
17 Tips to Maximise Your Samsung Galaxy Buds 4 Pro
So if you just picked up the Galaxy Buds 4 or 4 Pro, this is the video for you, because I'm about to show you 17 settings and hidden features that will instantly improve how the earbuds sound. I'll also show you how to improve the mic pick-up quality, and I'll even share some secret settings and hidden features with you, as well as a very unique.
THE FOUNDATIONS
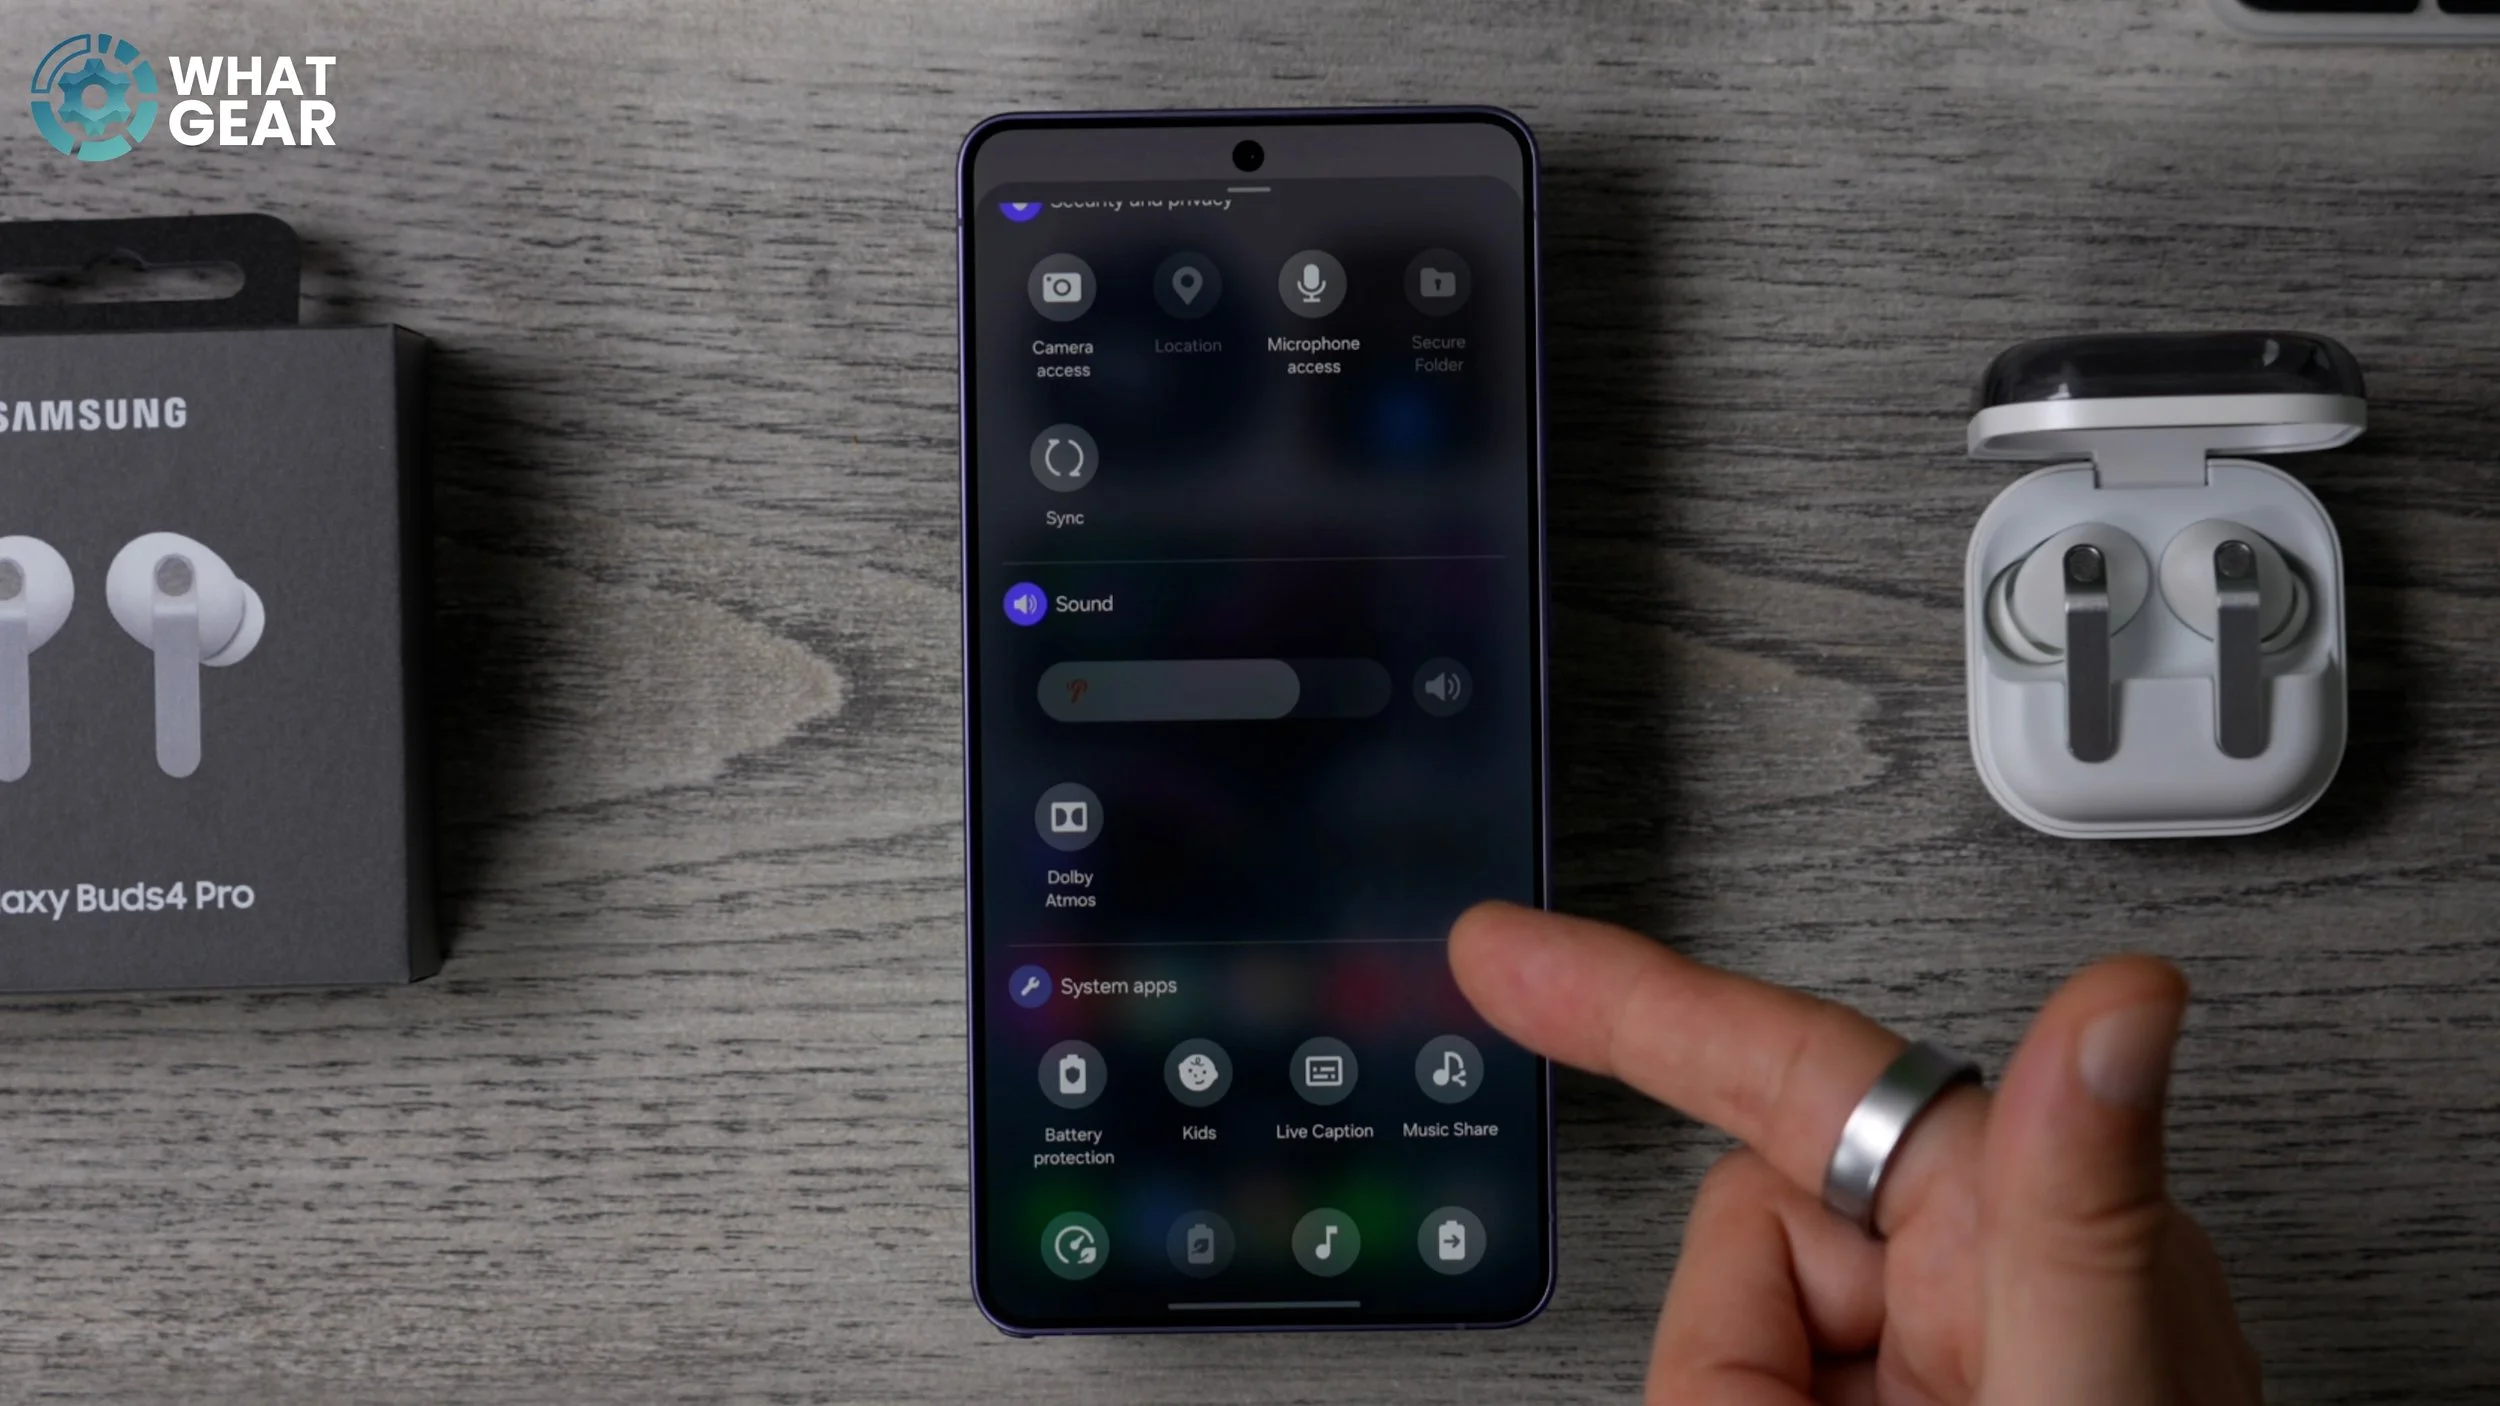
The very first thing to do when you connect up your earbuds for the first time is this: familiarise yourself with how to get to the settings for the earbuds. So jump into your Settings, and at the top you will notice there's a dedicated section for the earbuds settings, and we are going to be using this a lot throughout this video, so make sure you know where it is and how to get there. Now there is a little hack to get there a little bit quicker, which I'm also going to show you. Now, if you hold your finger down on your home screen and go to Widgets, you can go to the Galaxy Buds app right here, and then you can add one of these widgets to your home screen.
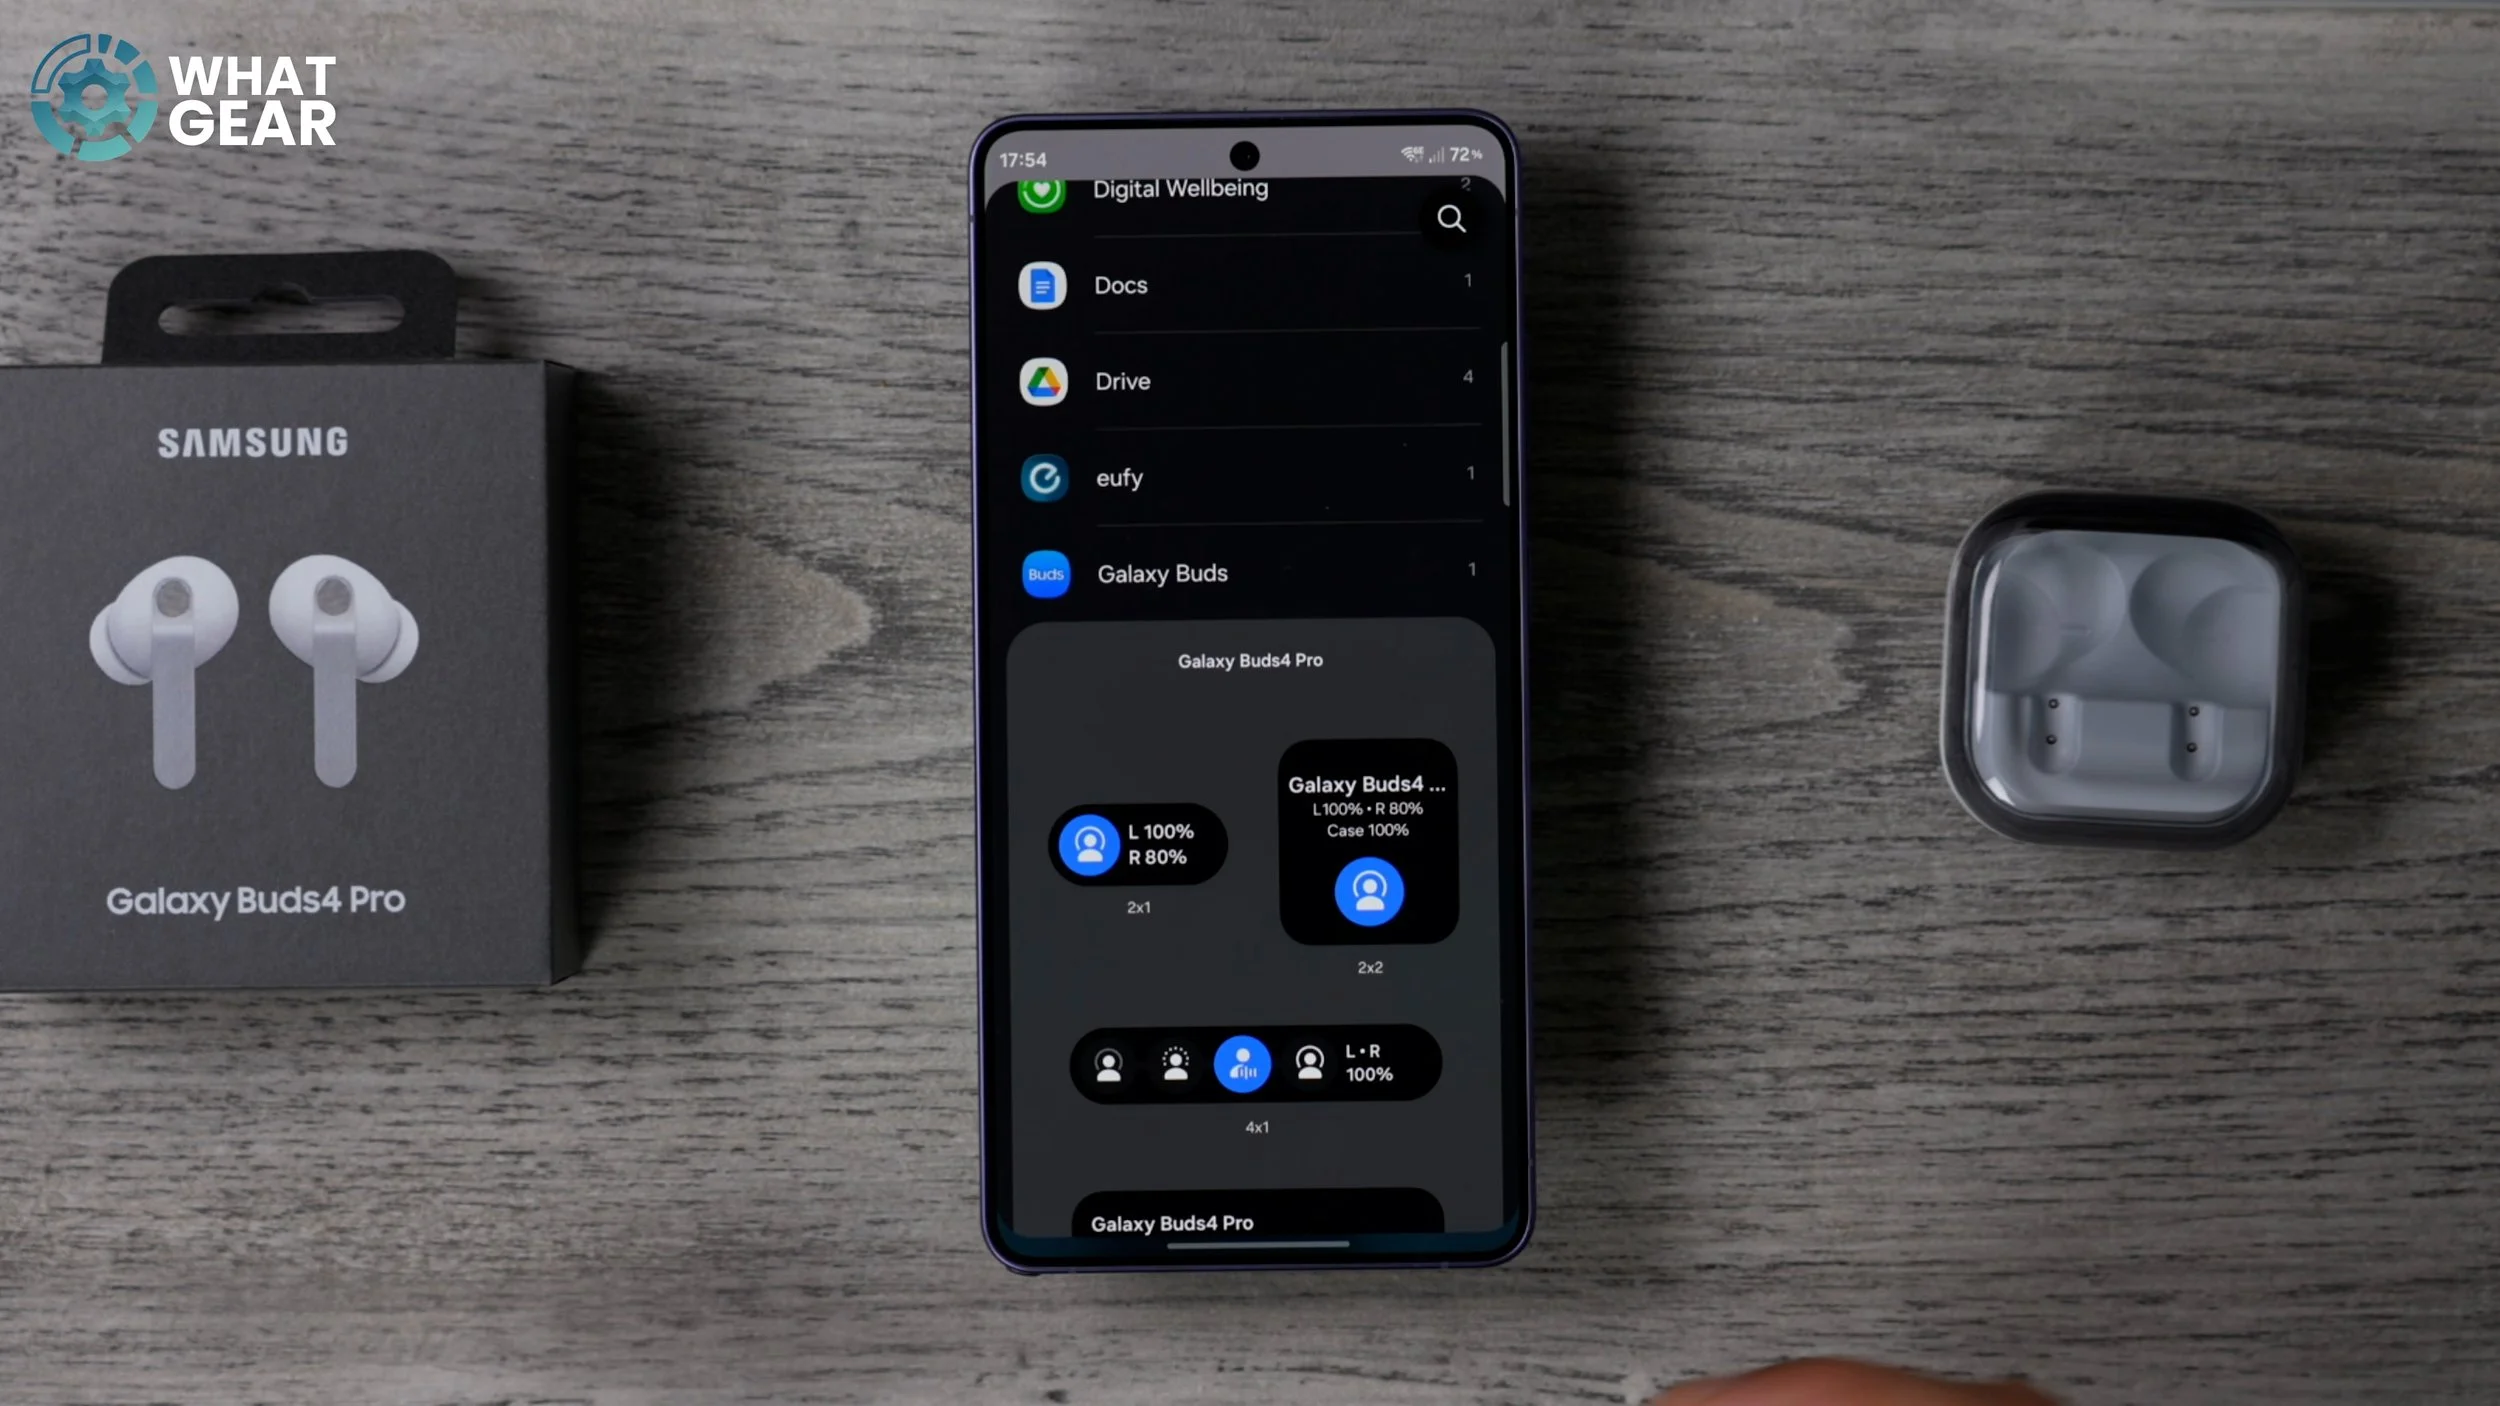
Just make sure that you have room for it. And if you don't, and your phone is already fully set up with widgets and things like that, you could add it to a stack. So if you hold your finger down on an existing widget, go to Create Stack or Edit Stack, swipe all the way to the end, and then hit the plus. And then you can add the Galaxy Buds widget here. So I'm going to go with this one because this is the right size for that particular stack. And there we go. So this little button here will allow you to switch between the ANC modes very quickly, but if you tap the top of this widget, it will jump straight into the settings. So it's a nice little shortcut.
PERFECT THE FIT
And now that that is done, let's move on to tip number two. You have to put the Buds in your ears for this one. Just place them in your ears the natural way that you would. Don't adjust them or twist them. Just place them in and check that they're comfortable. And now, if you jump into the Buds settings using the shortcut you've just created, you can scroll down and go to Sound Quality and Effects. And right here is where you're going to find the Earbuds fit test. If you go to this and hit Start, it will play a tone in your ears to check if the seal created by the ear tip is the perfect fit for your ear or not.
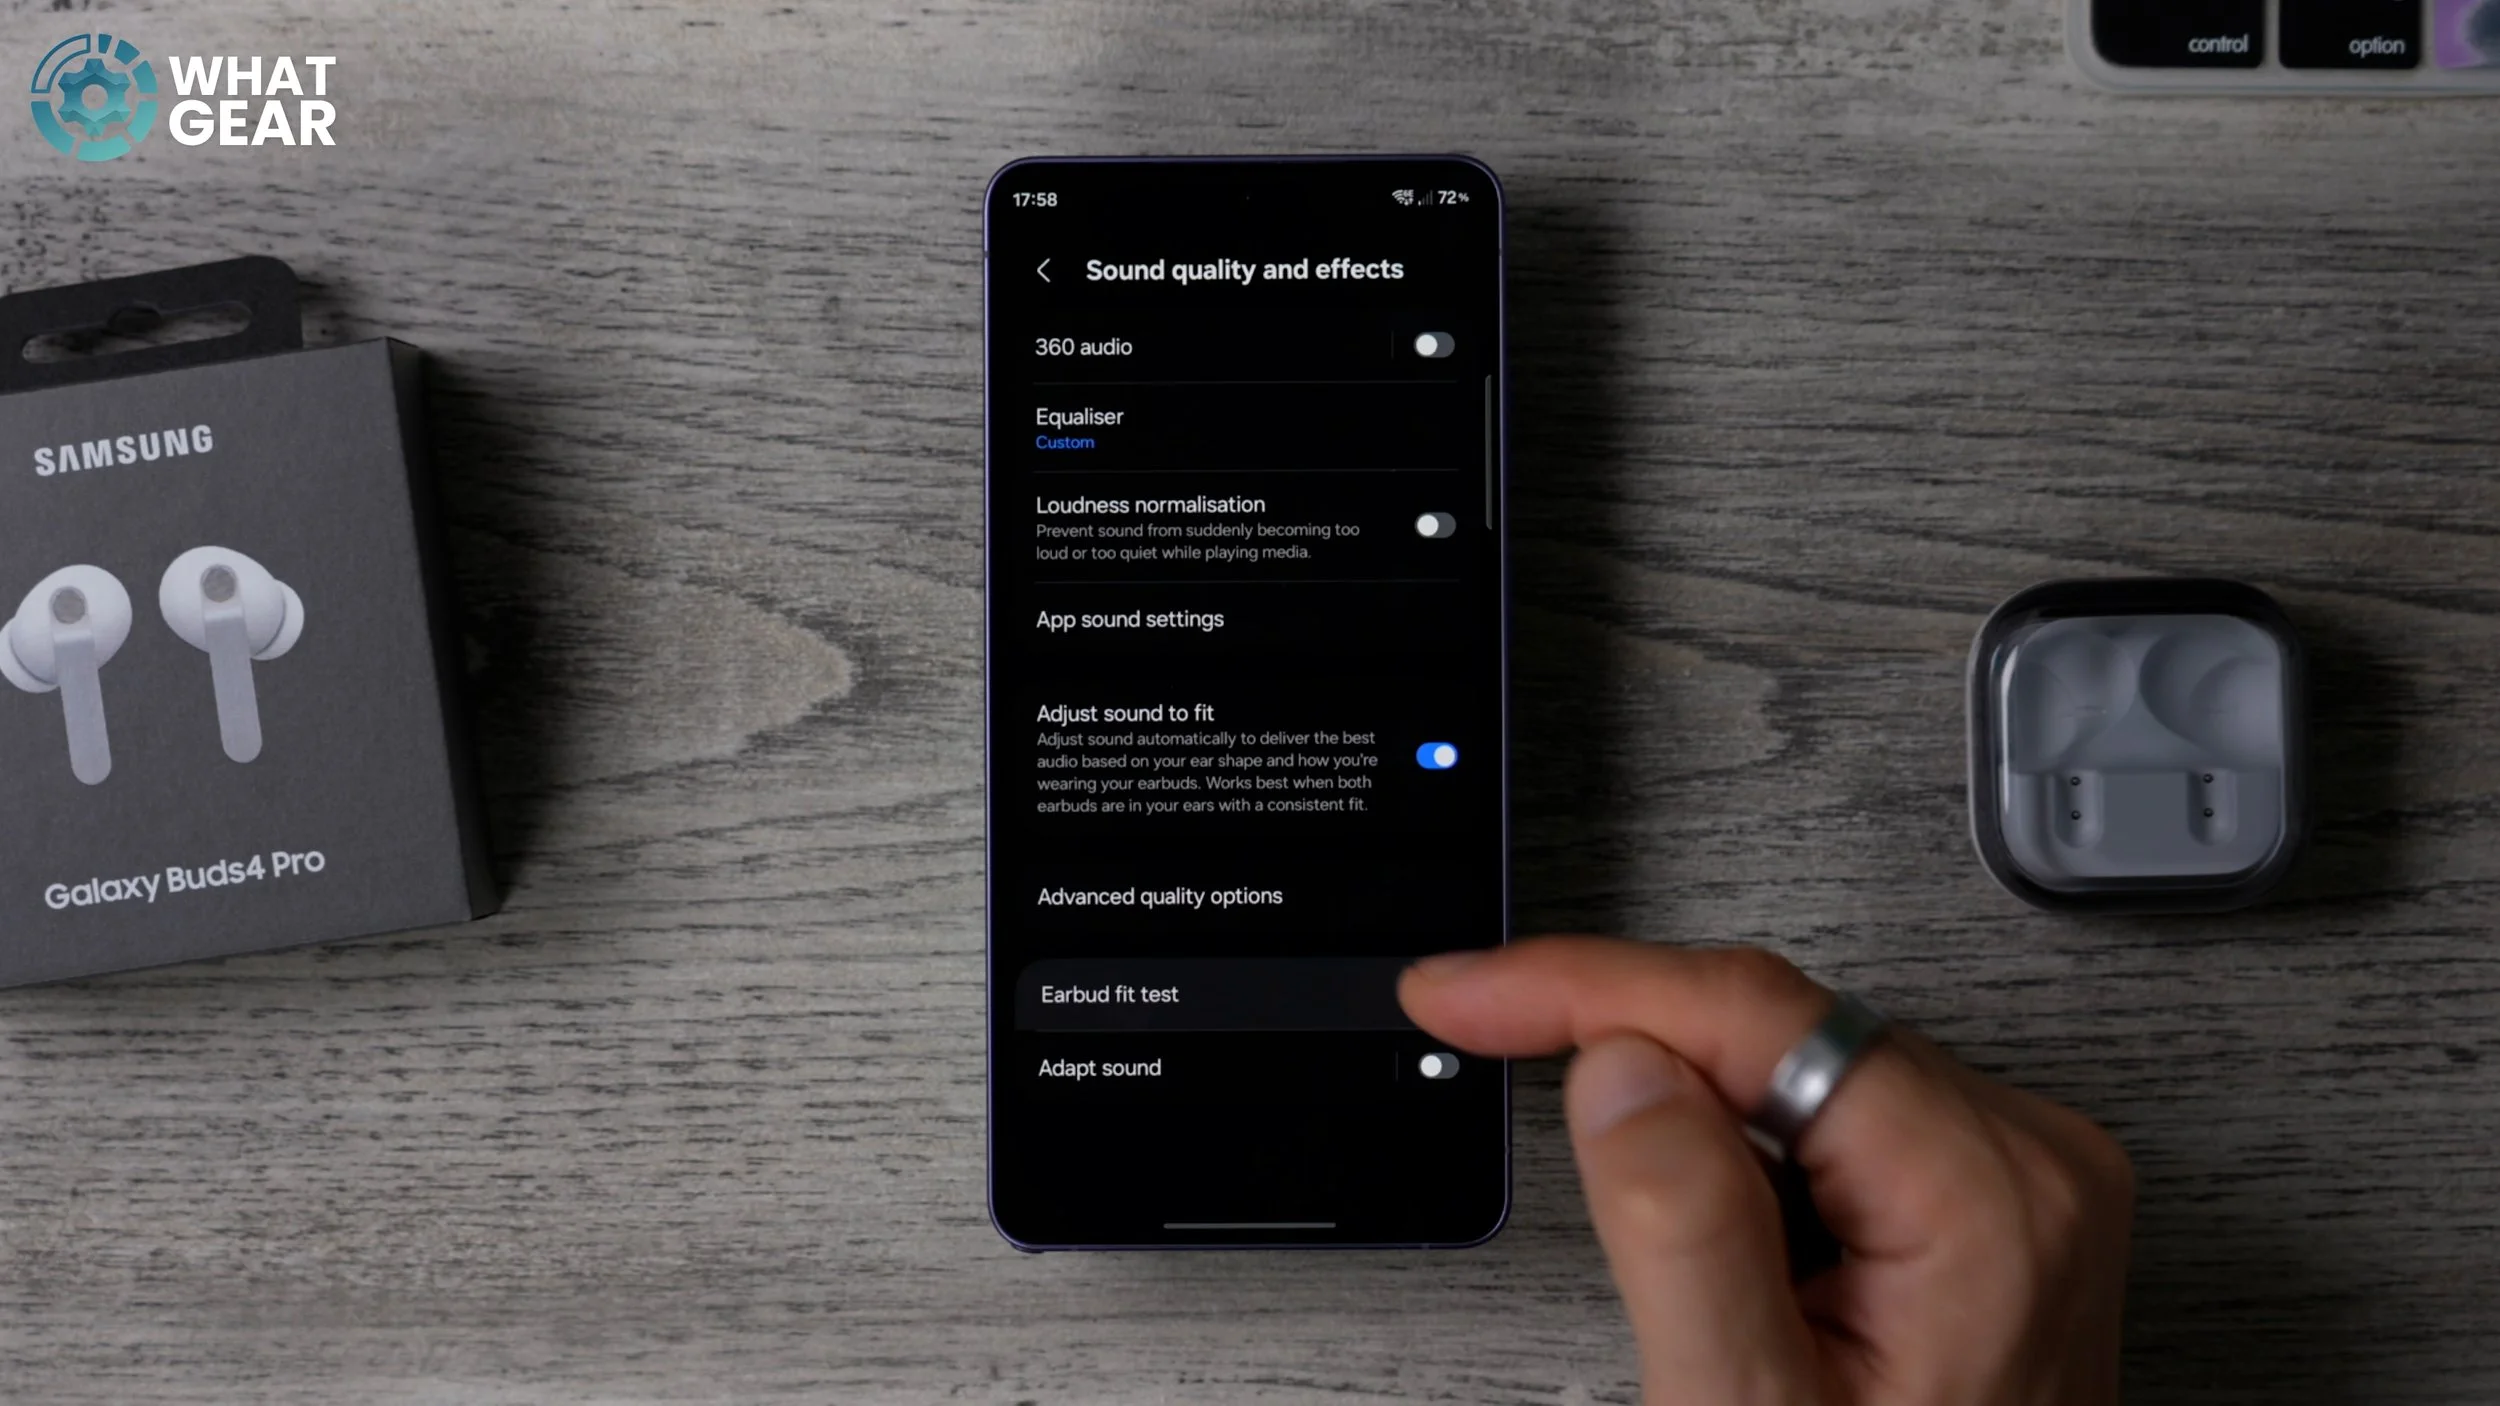
Now, if you see something pop up, you might be tempted to just adjust the earbud in your ear and repeat the test, and that actually can return the result you're looking for. However, what I recommend you do is actually talk a little bit, maybe even chew some gum or something, because then what will happen is the earbuds will fall into their natural position within your ear, and then run the test again. If you still get the same result, that's when you want to think about changing the ear tip.
THE VERY IMPORTANT TIP…TIP
And I know it sounds simple, but there is a bit of a trick to it. So let me show you that. So if you find yourself in a situation where you're going to have to change the silicone tip on the end of the earbud, here's how you do it successfully without completely destroying or ripping the existing ear tip. What you want to do first is turn it fully inside out so that it looks like this. Now, once you've done that, you want to grab this lower part of the silicone.

Grab it as far down the stem as you possibly can and pull it from here. Now the ear tips actually lock in beneath the surface of the earbuds this year, so it creates an even better seal, and that's why they're so difficult to take off. Just make sure you do it using that technique, and that way you can test the different tips to find the appropriate size without damaging them. So there we go. It turns out my right ear requires a smaller silicone tip than my left. Okay, so that's the very fundamental stuff out of the way.
SOME SOUND ADVICE
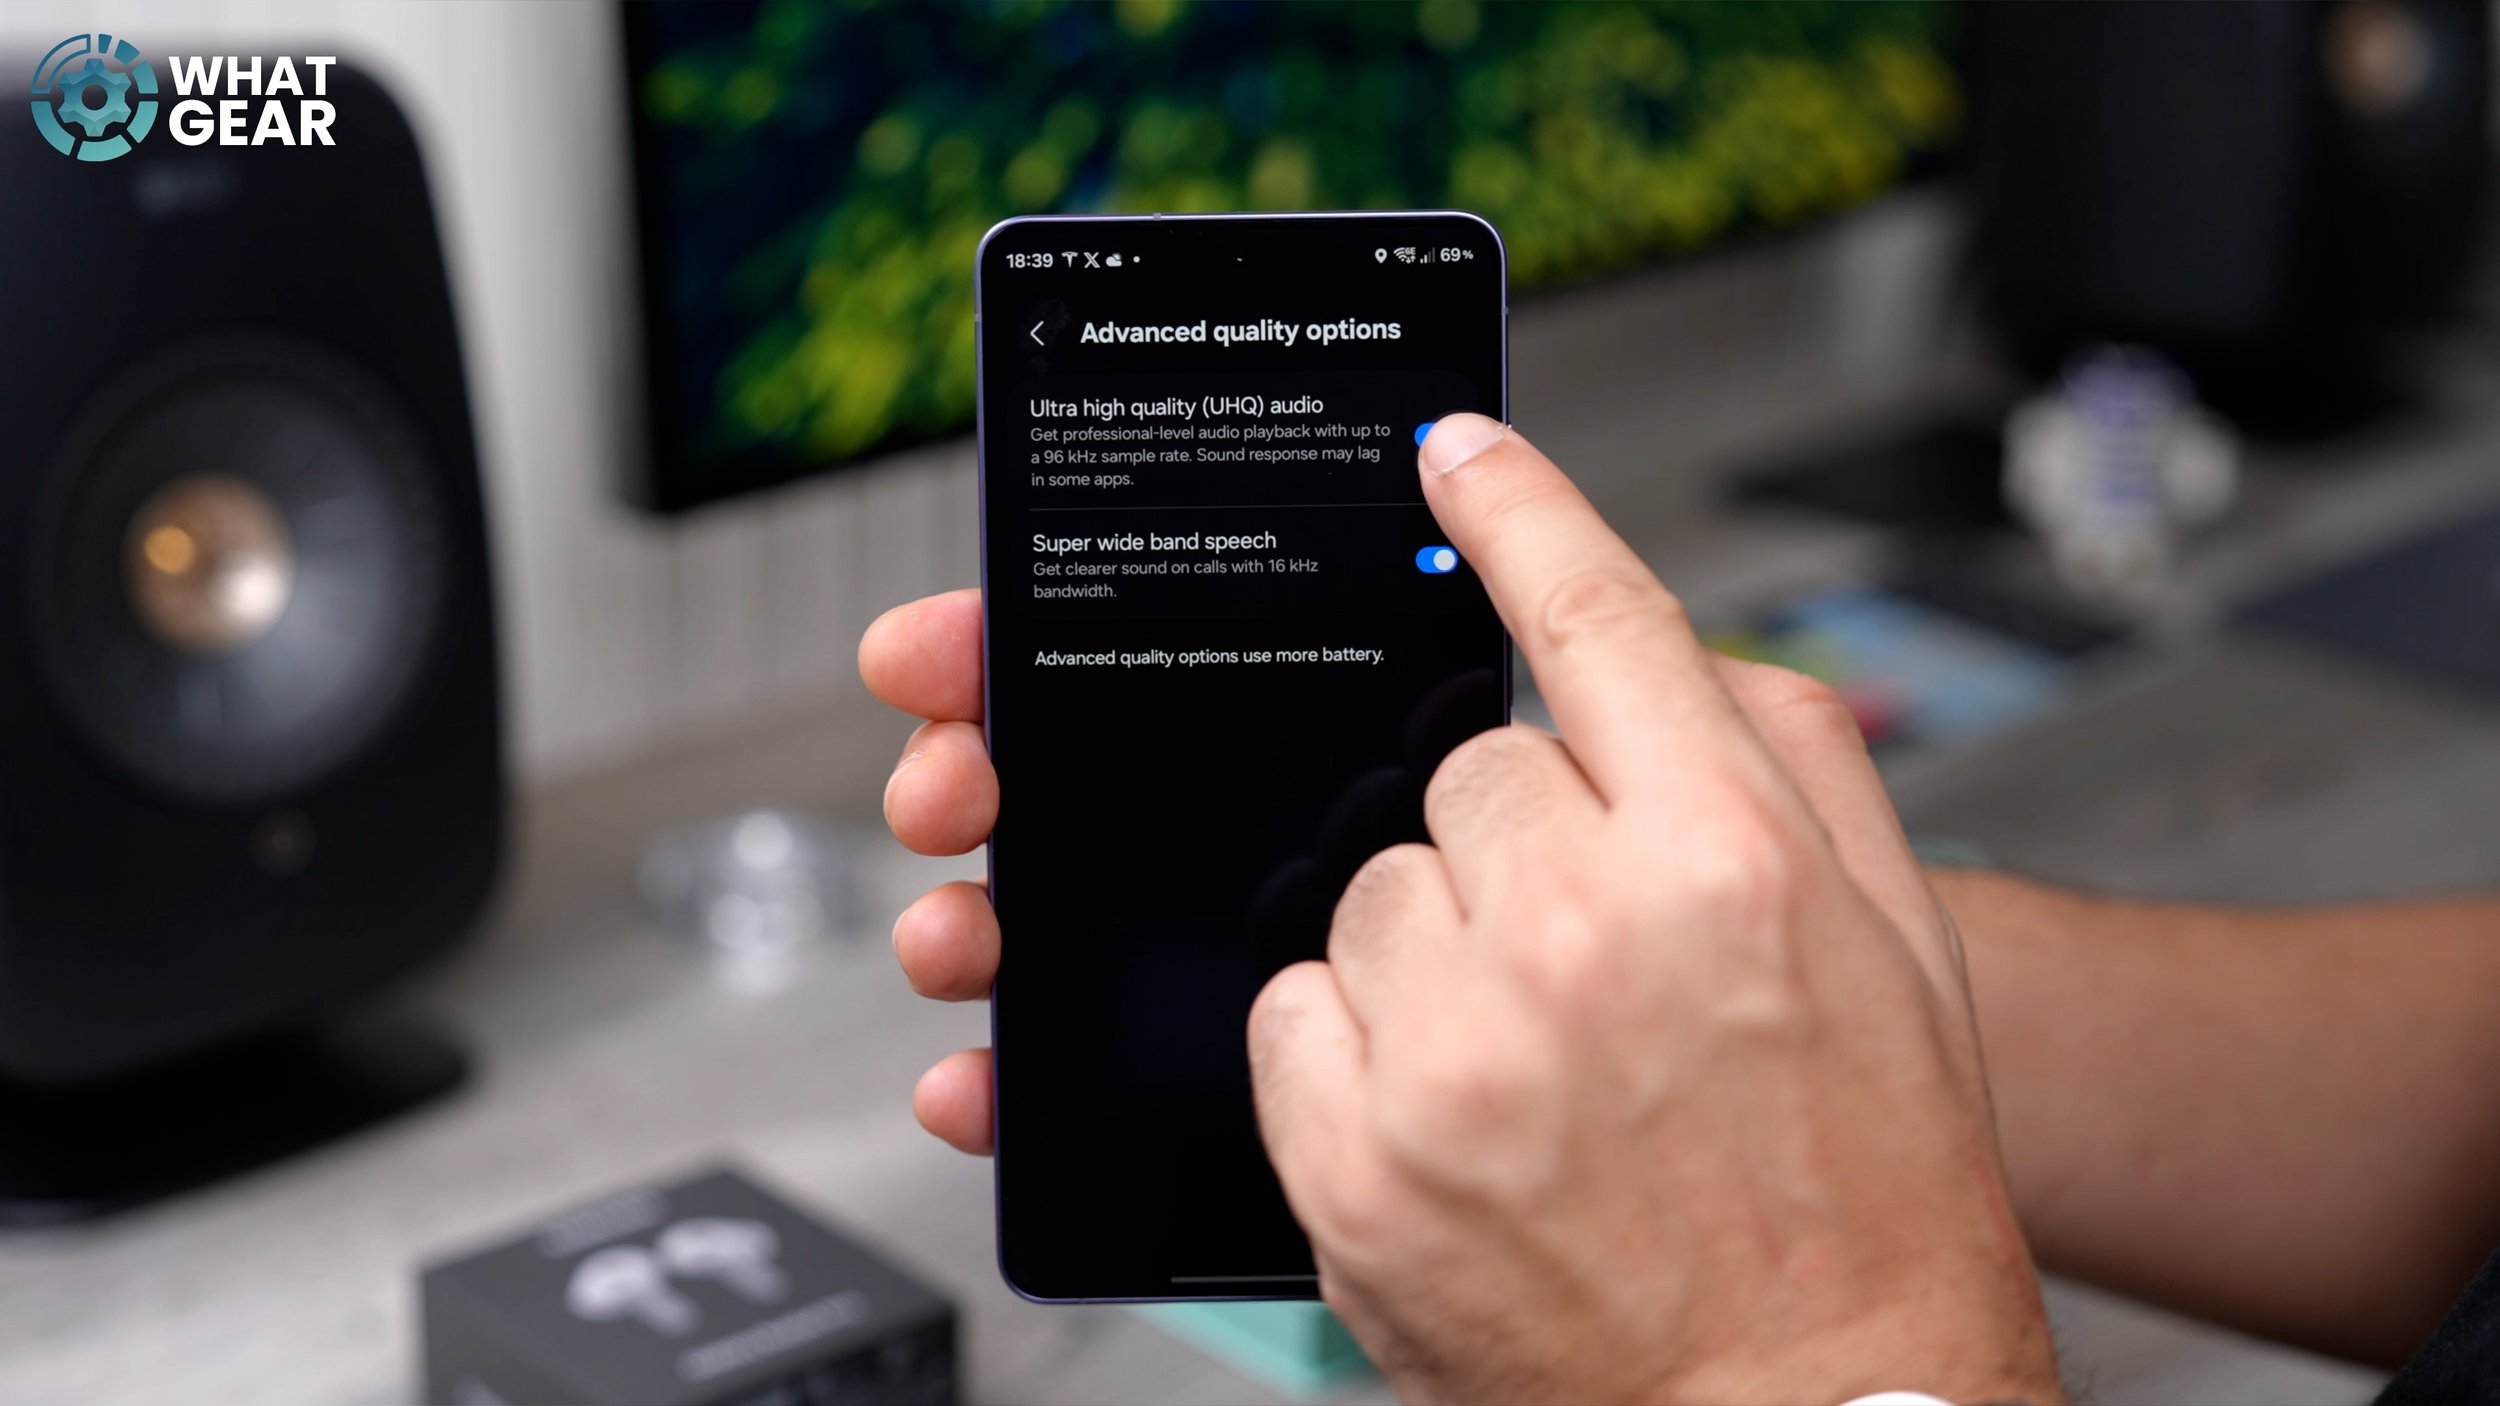
Now let me show you how to make your Galaxy Buds 4 or 4 Pro sound even better. Once again, we're going to jump into the settings for the Buds within the Settings menu. Again, we're going to scroll down to Sound Quality and Effects. And then here is where we go to the Advanced quality options. And at the top of this page is a setting you should absolutely, 100%, turn on on day one. It is the UHQ audio quality.
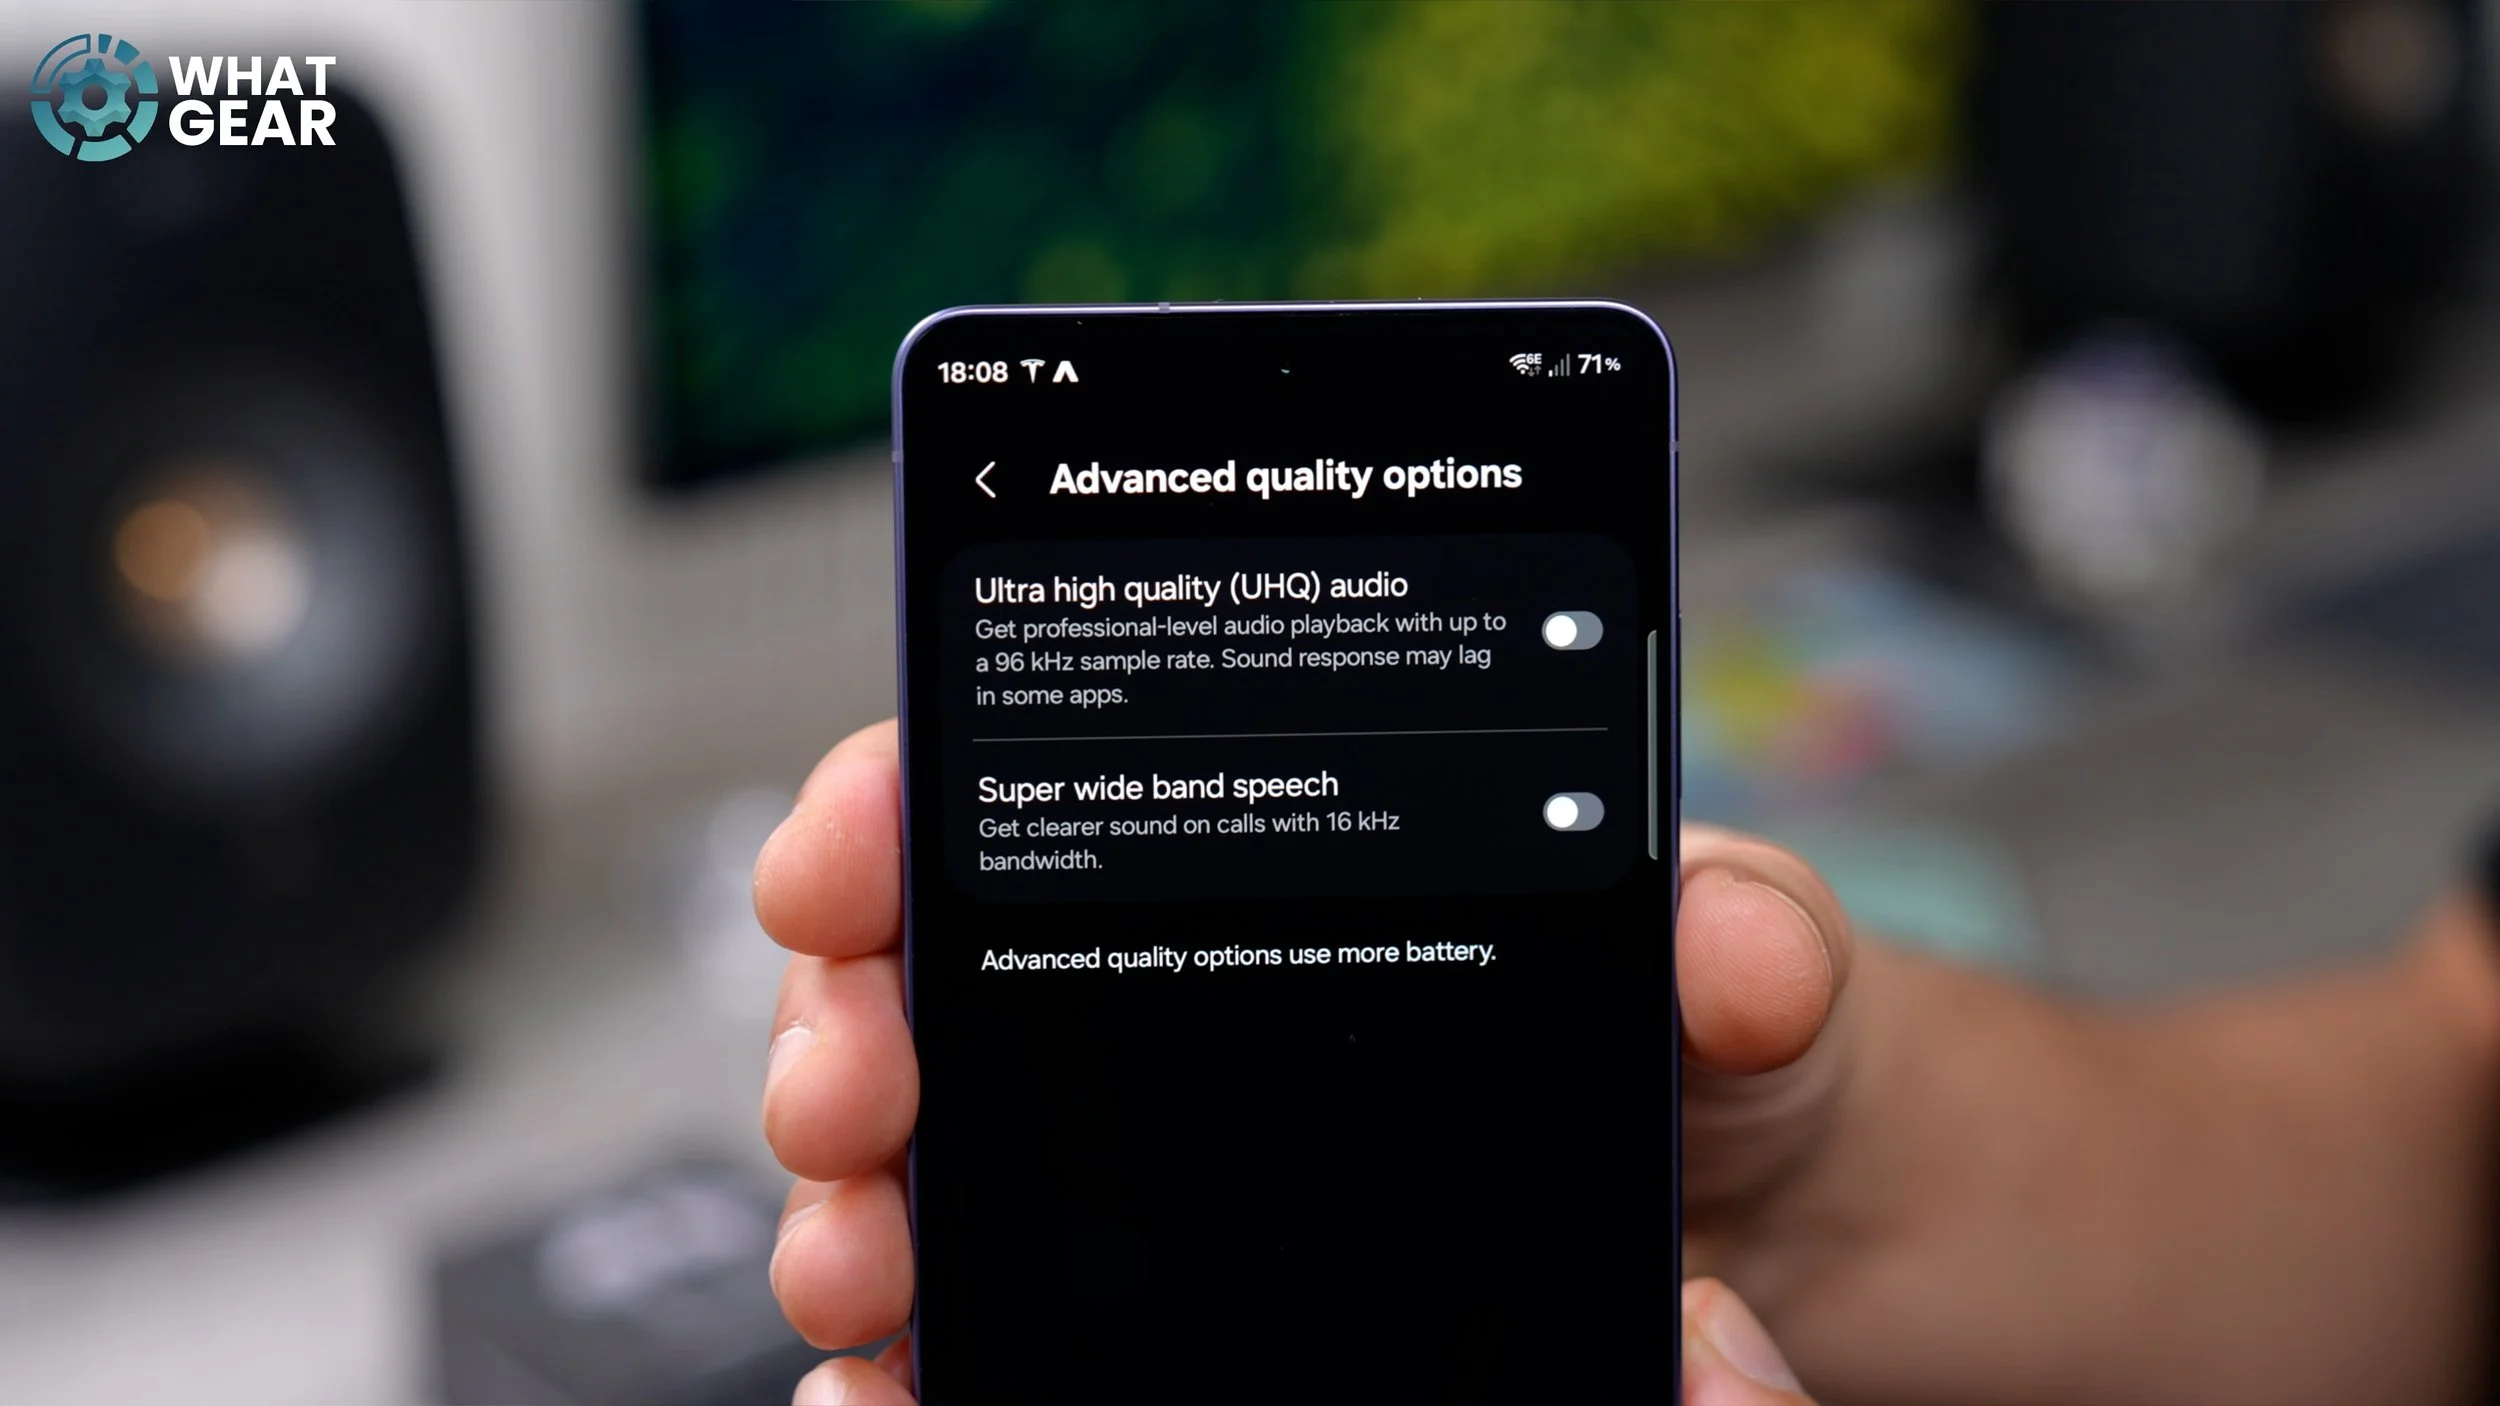
This essentially unlocks Samsung's own high-res audio codec designed specifically to work with Samsung audio devices like your brand-new earbuds. So if you're already happy with how the earbuds sounded before switching on UHQ, you will be even happier. And if you stick around, I'm going to share with you guys my custom EQ, which I believe makes them sound even better, especially if you're into more of the heavy bassline types of music.
VOICE PICK UP UPGRADE
And let's move on to the next one within the earbud settings. Once again, we're going to go back to Sound Quality and Effects. We're going to go to Advanced quality options. And underneath the UHQ audio setting, you will find Samsung's Super wideband speech feature, which will be switched off by default.
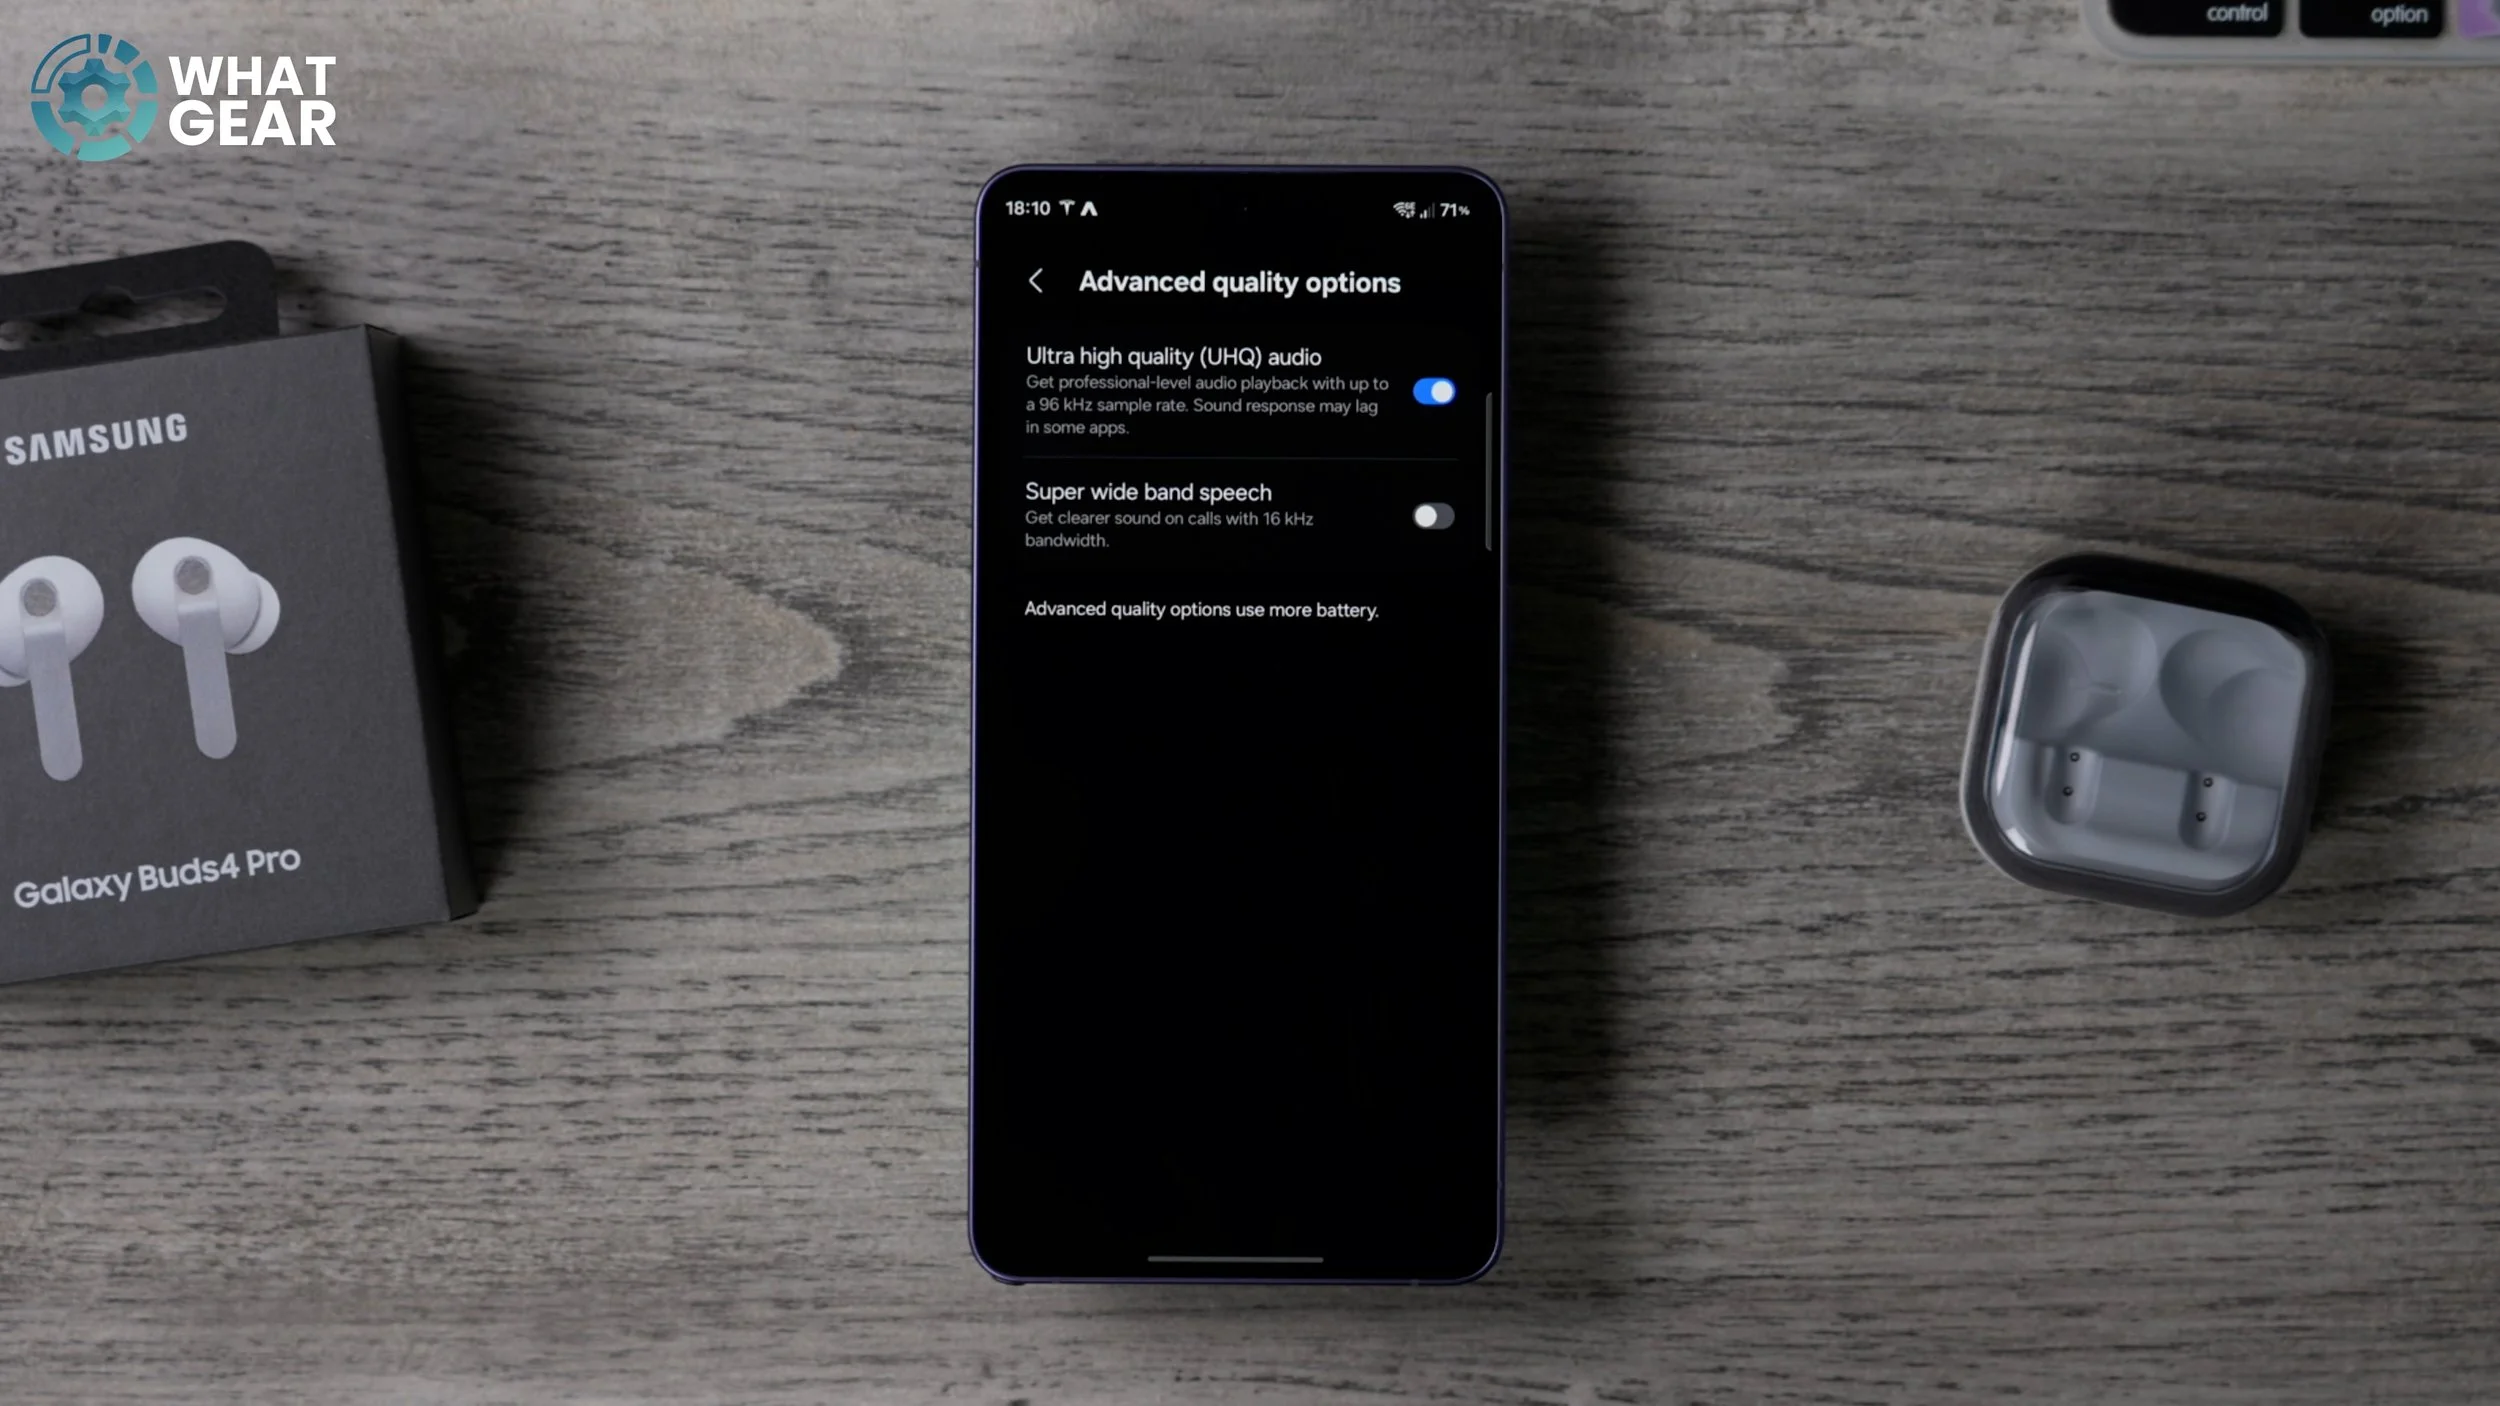
If you leave this off, the audio quality that people will hear from your earbuds when they phone you or when you're on a conference call will literally be halved. So this doubles the quality of your voice, and I don't see any reason why you wouldn't want to switch this on. So switch on Super wideband speech on day one.
UNDERSTAND THE AUTO-SWITCH
Let's jump back into the settings for the earbuds. And right here at the top, staring you right in the face, is a feature that you might actually overlook. And it is a pretty awesome feature, so let me explain what it does and how to set it up. Where you see Auto switch to ambient sound, if you tap on this, now here is where you'll find two options that could be very, very useful. So if you enable Voice detection, when you start to speak, the earbuds will auto switch into ambient mode so that you can have a conversation with the person you're speaking to and actually hear what they're saying. That could be very handy. However, if you do like to sing along to your music when you're on your own, you probably shouldn't switch this setting on. Now, one scenario where you absolutely should switch this on is when you're on a flight or something like that, because when they're bringing the drinks round and the snacks, you can just start speaking, and it will auto toggle into ambient mode so you can actually hear what they're saying to you.
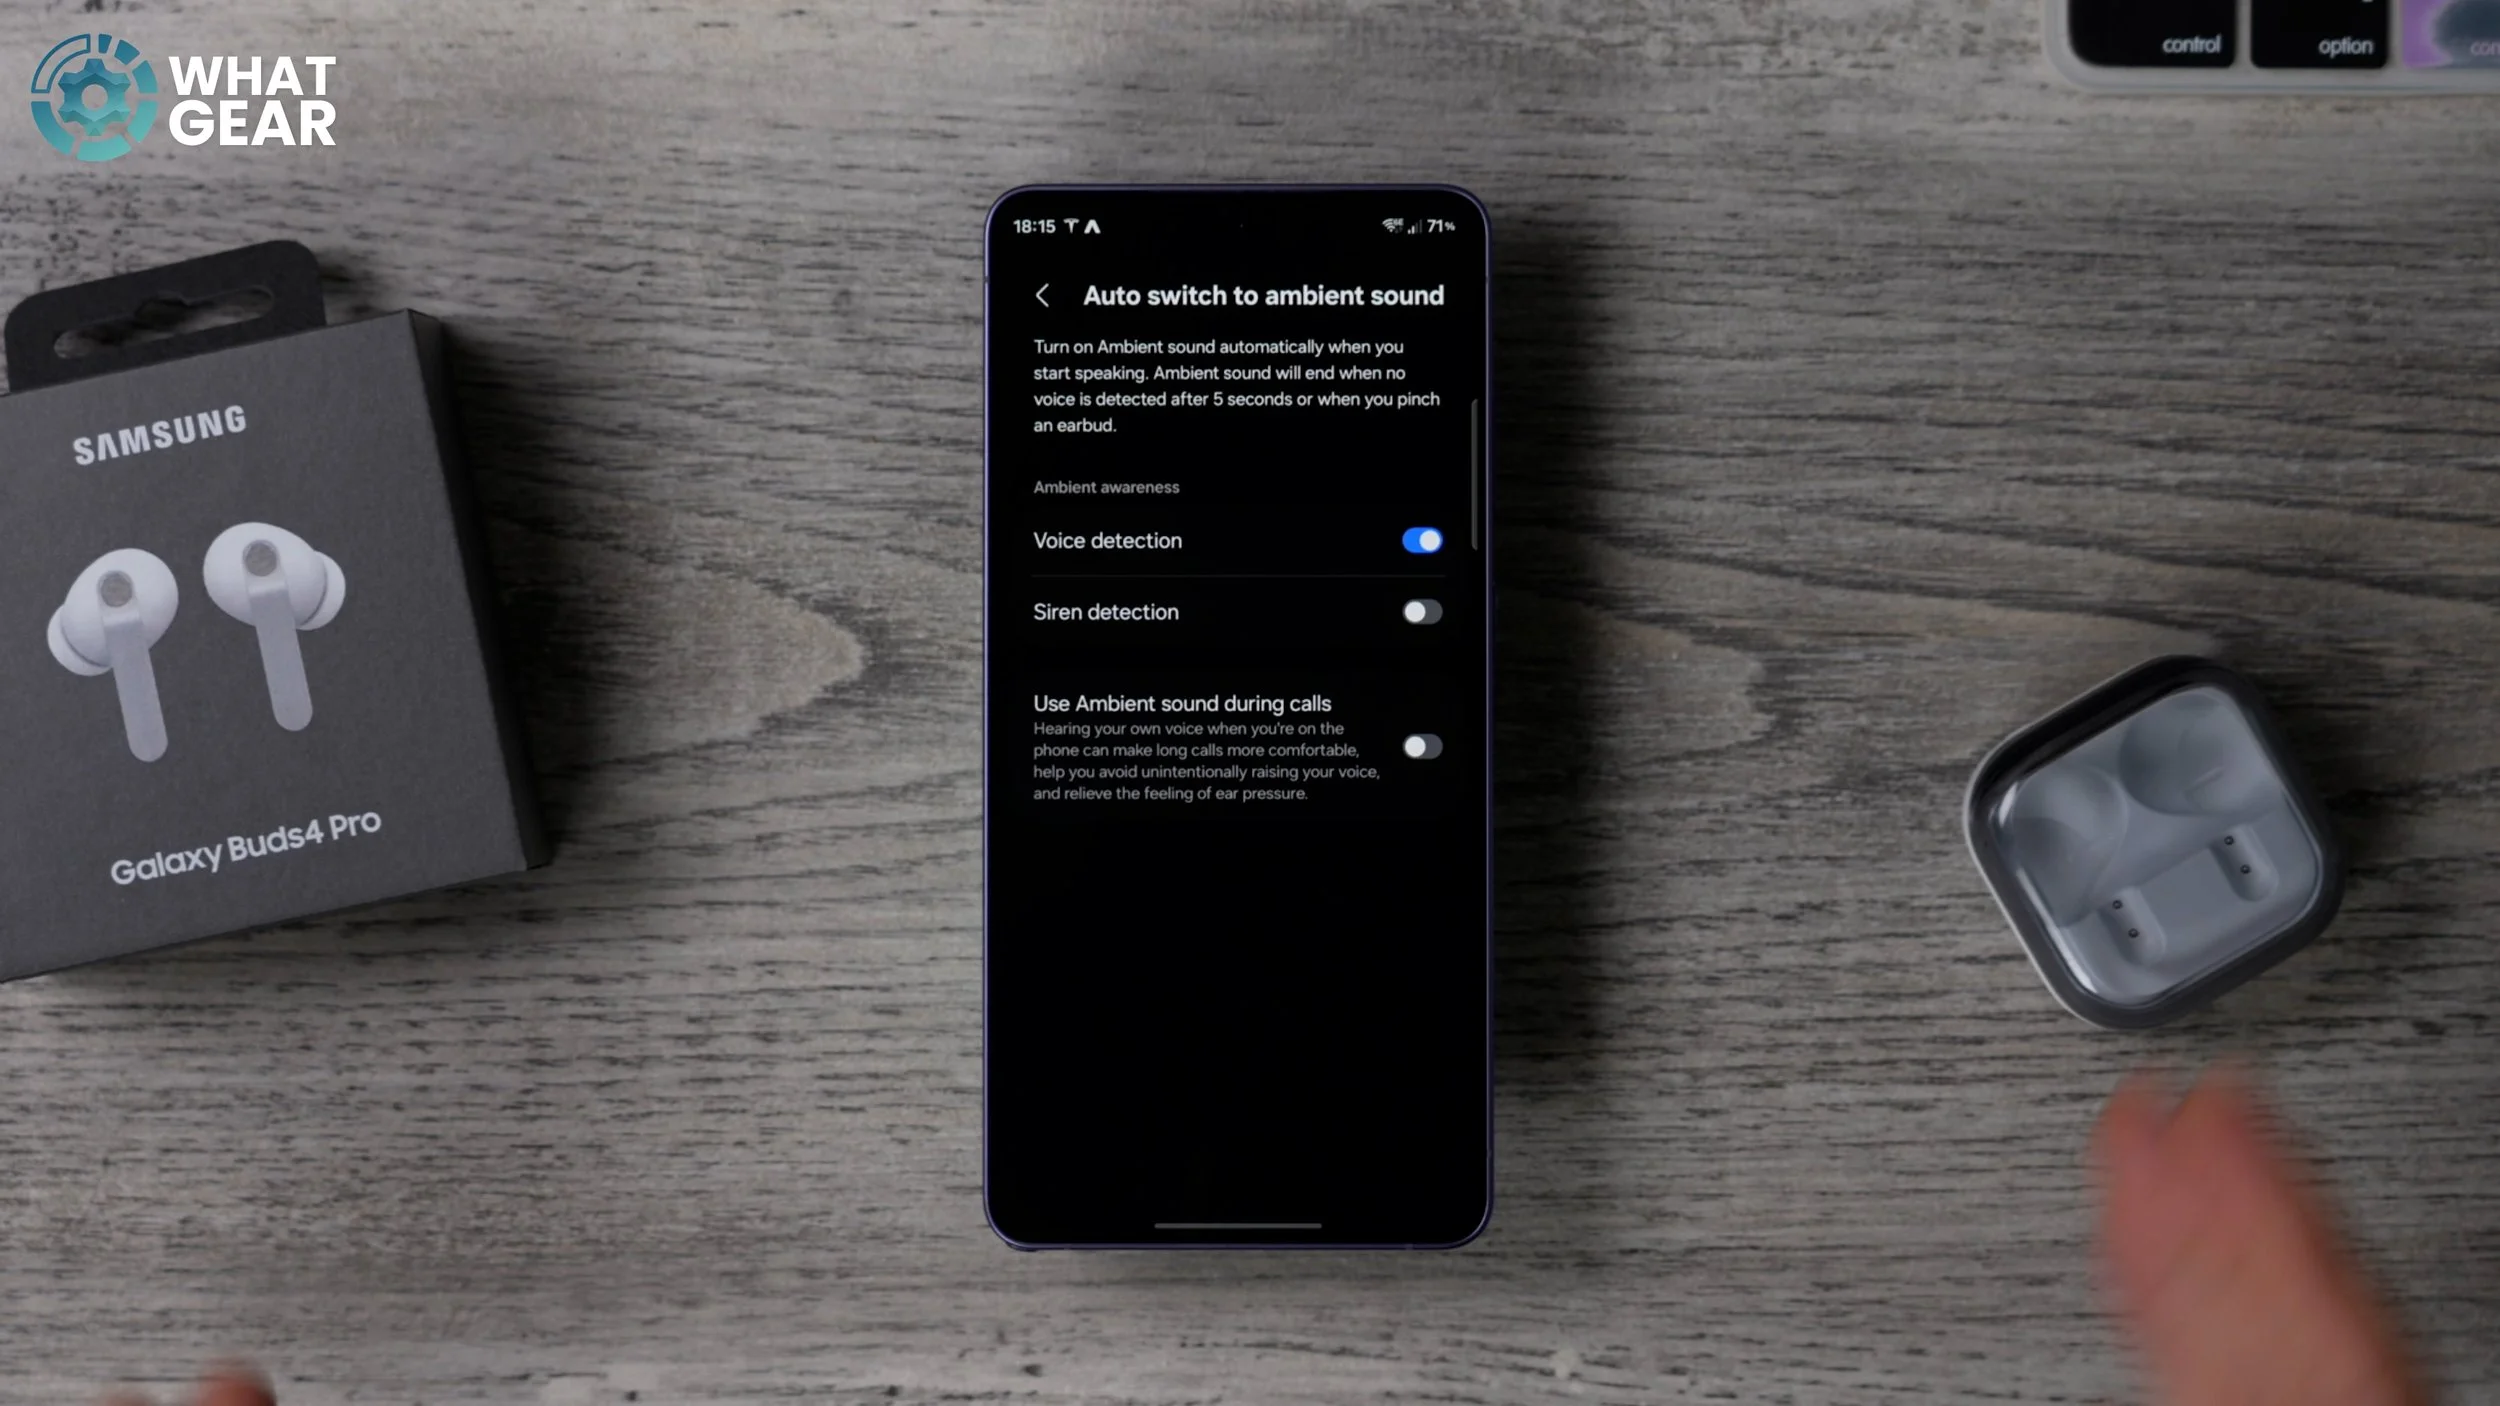
Now, the next one, which I highly recommend you switch on straight away, especially if you're the type of person who likes to go jogging or cycling with your earbuds, is this one: Siren detection. So with this on, your earbuds will be listening for sirens—for example, police cars, ambulances, fire alarms, those kinds of things—and it will allow those particular types of sounds to switch your Buds into ambient mode. And there is another little hidden setting here, just beneath the two, which is very useful as well when you are on phone calls: Switch to ambient mode. This is good because you'll be able to hear the sound of your own voice. It kind of reduces that sort of boomy effect that you get inside your ears when you're talking on a phone call. I do think it improves the voice call experience. So yeah, you might want to test it out and see if you prefer it too.
UNLOCK MORE MODES
Staying within the Buds settings, there is something I need to make you aware of. When you toggle between modes using the Buds stems, it will actually switch between noise-cancelling and Ambient mode, and that's it. So that one right there in the middle—the Adaptive mode that adjusts on the fly to the surrounding noise in your environment—isn't accessible unless you open the app and switch to it here. You can also do it from your widget on your home screen. You just have to remember what the icon looks like. It's this one with the person with the little lines. So this actually is a pretty cool feature that you need to be aware of. And let me show you now how to access it even easier than having to go into the app or use a widget, and you'll only need to do this once.
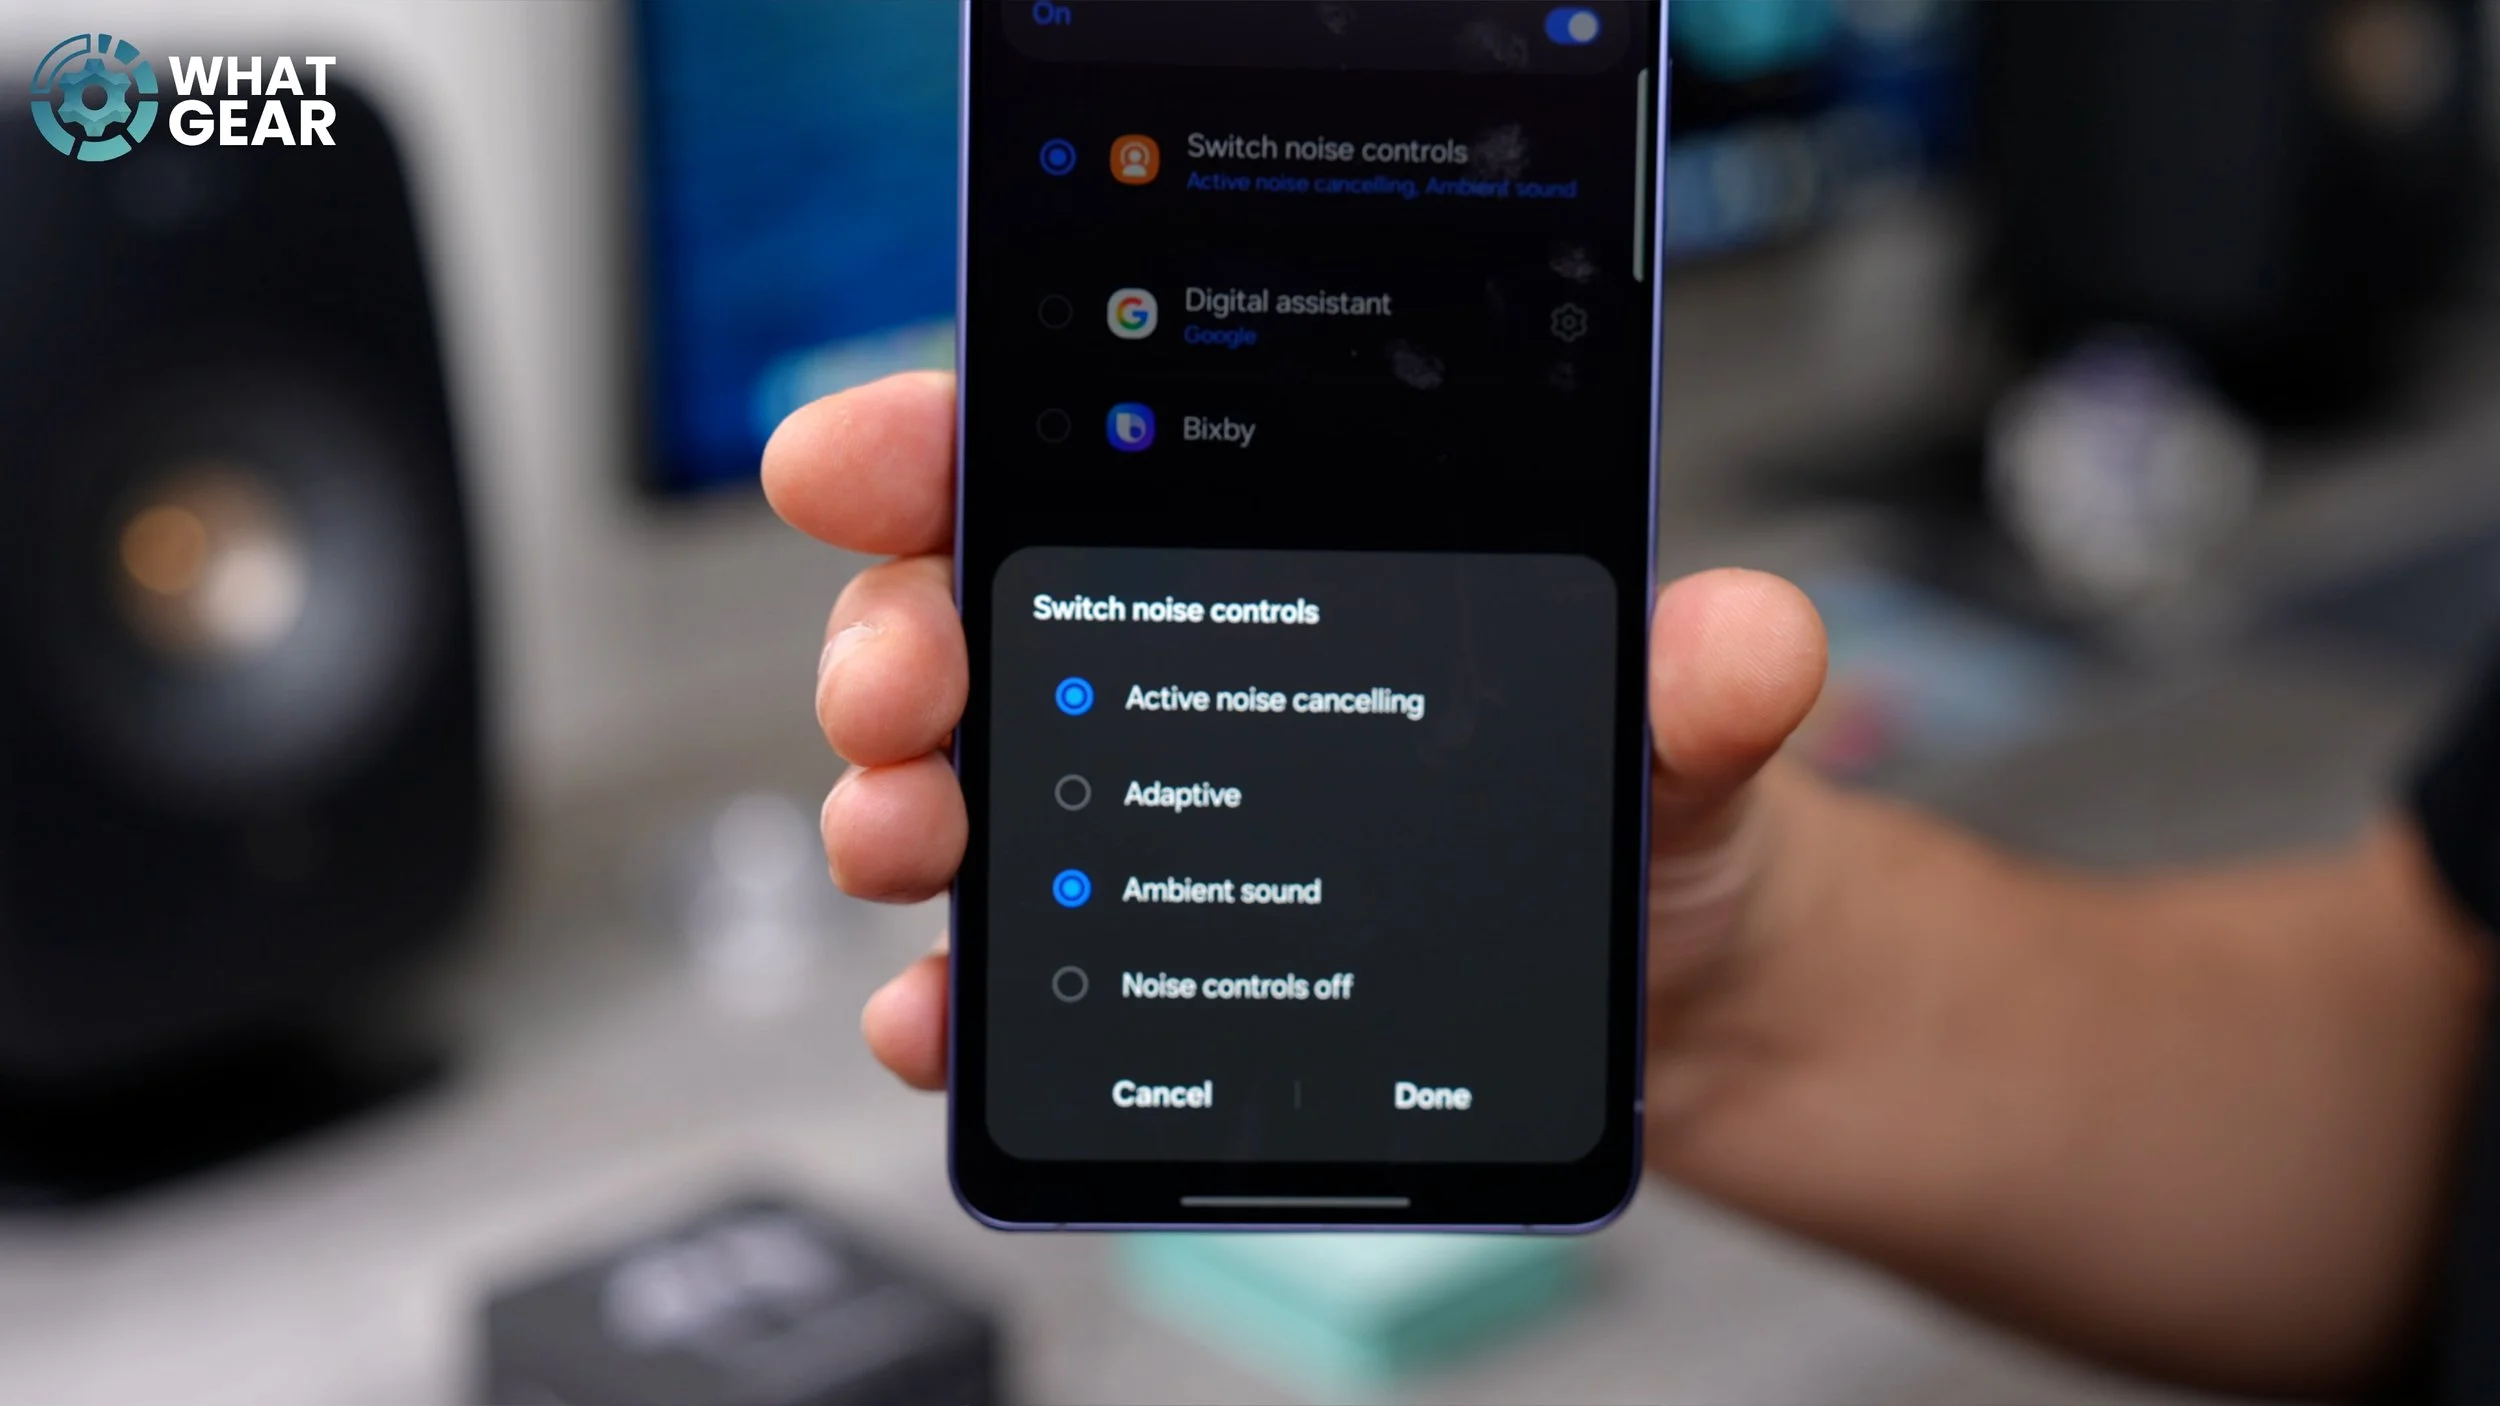
So, back within the app, if we go to Earbud controls at the top, this is the page where you can take control of your controls. And the default controls are very basic, and most people might never need to change these. But let me show you this on the right earbud, just for example, because I am right-handed. If you tap where it says Switch noise controls, go to the noise controls, and tap on this. Right here is where you can add the Adaptive mode to be part of the pinch and hold gestures to enable it. As you would expect, you just highlight the box and hit Done. And if you want to, you can turn noise controls off completely, which, if you're power-conscious, is a mode you might want to use from time to time. So now that that's been set up properly, when I pinch and hold the earbud, it will switch between all four of the available noise-cancelling modes instead of just the two that most people will have access to.
A LITTLE ASSISTANCE
Here's another tip for improving how you use the earbuds. If we go back into Earbud controls again, let's go to the left controls. You'll notice they're set to the same as the right controls. And if you are right-handed, I'd recommend you keep your noise controls on the right side—and vice versa if you're left-handed, which means we can free up the left-hand side to do something completely different. So if you go to the left controls, you can choose whether you want to map this to a digital assistant like Google Gemini, the brand new Bixby with Perplexity, or if you want to, you can even use one of the Samsung apps. Now, I've found that this mindfulness app from Samsung is brilliant for trying to get to sleep or just relaxing. And if you want to customise this, you can hit the little settings to the side and change it to another Samsung app, which you might find useful.
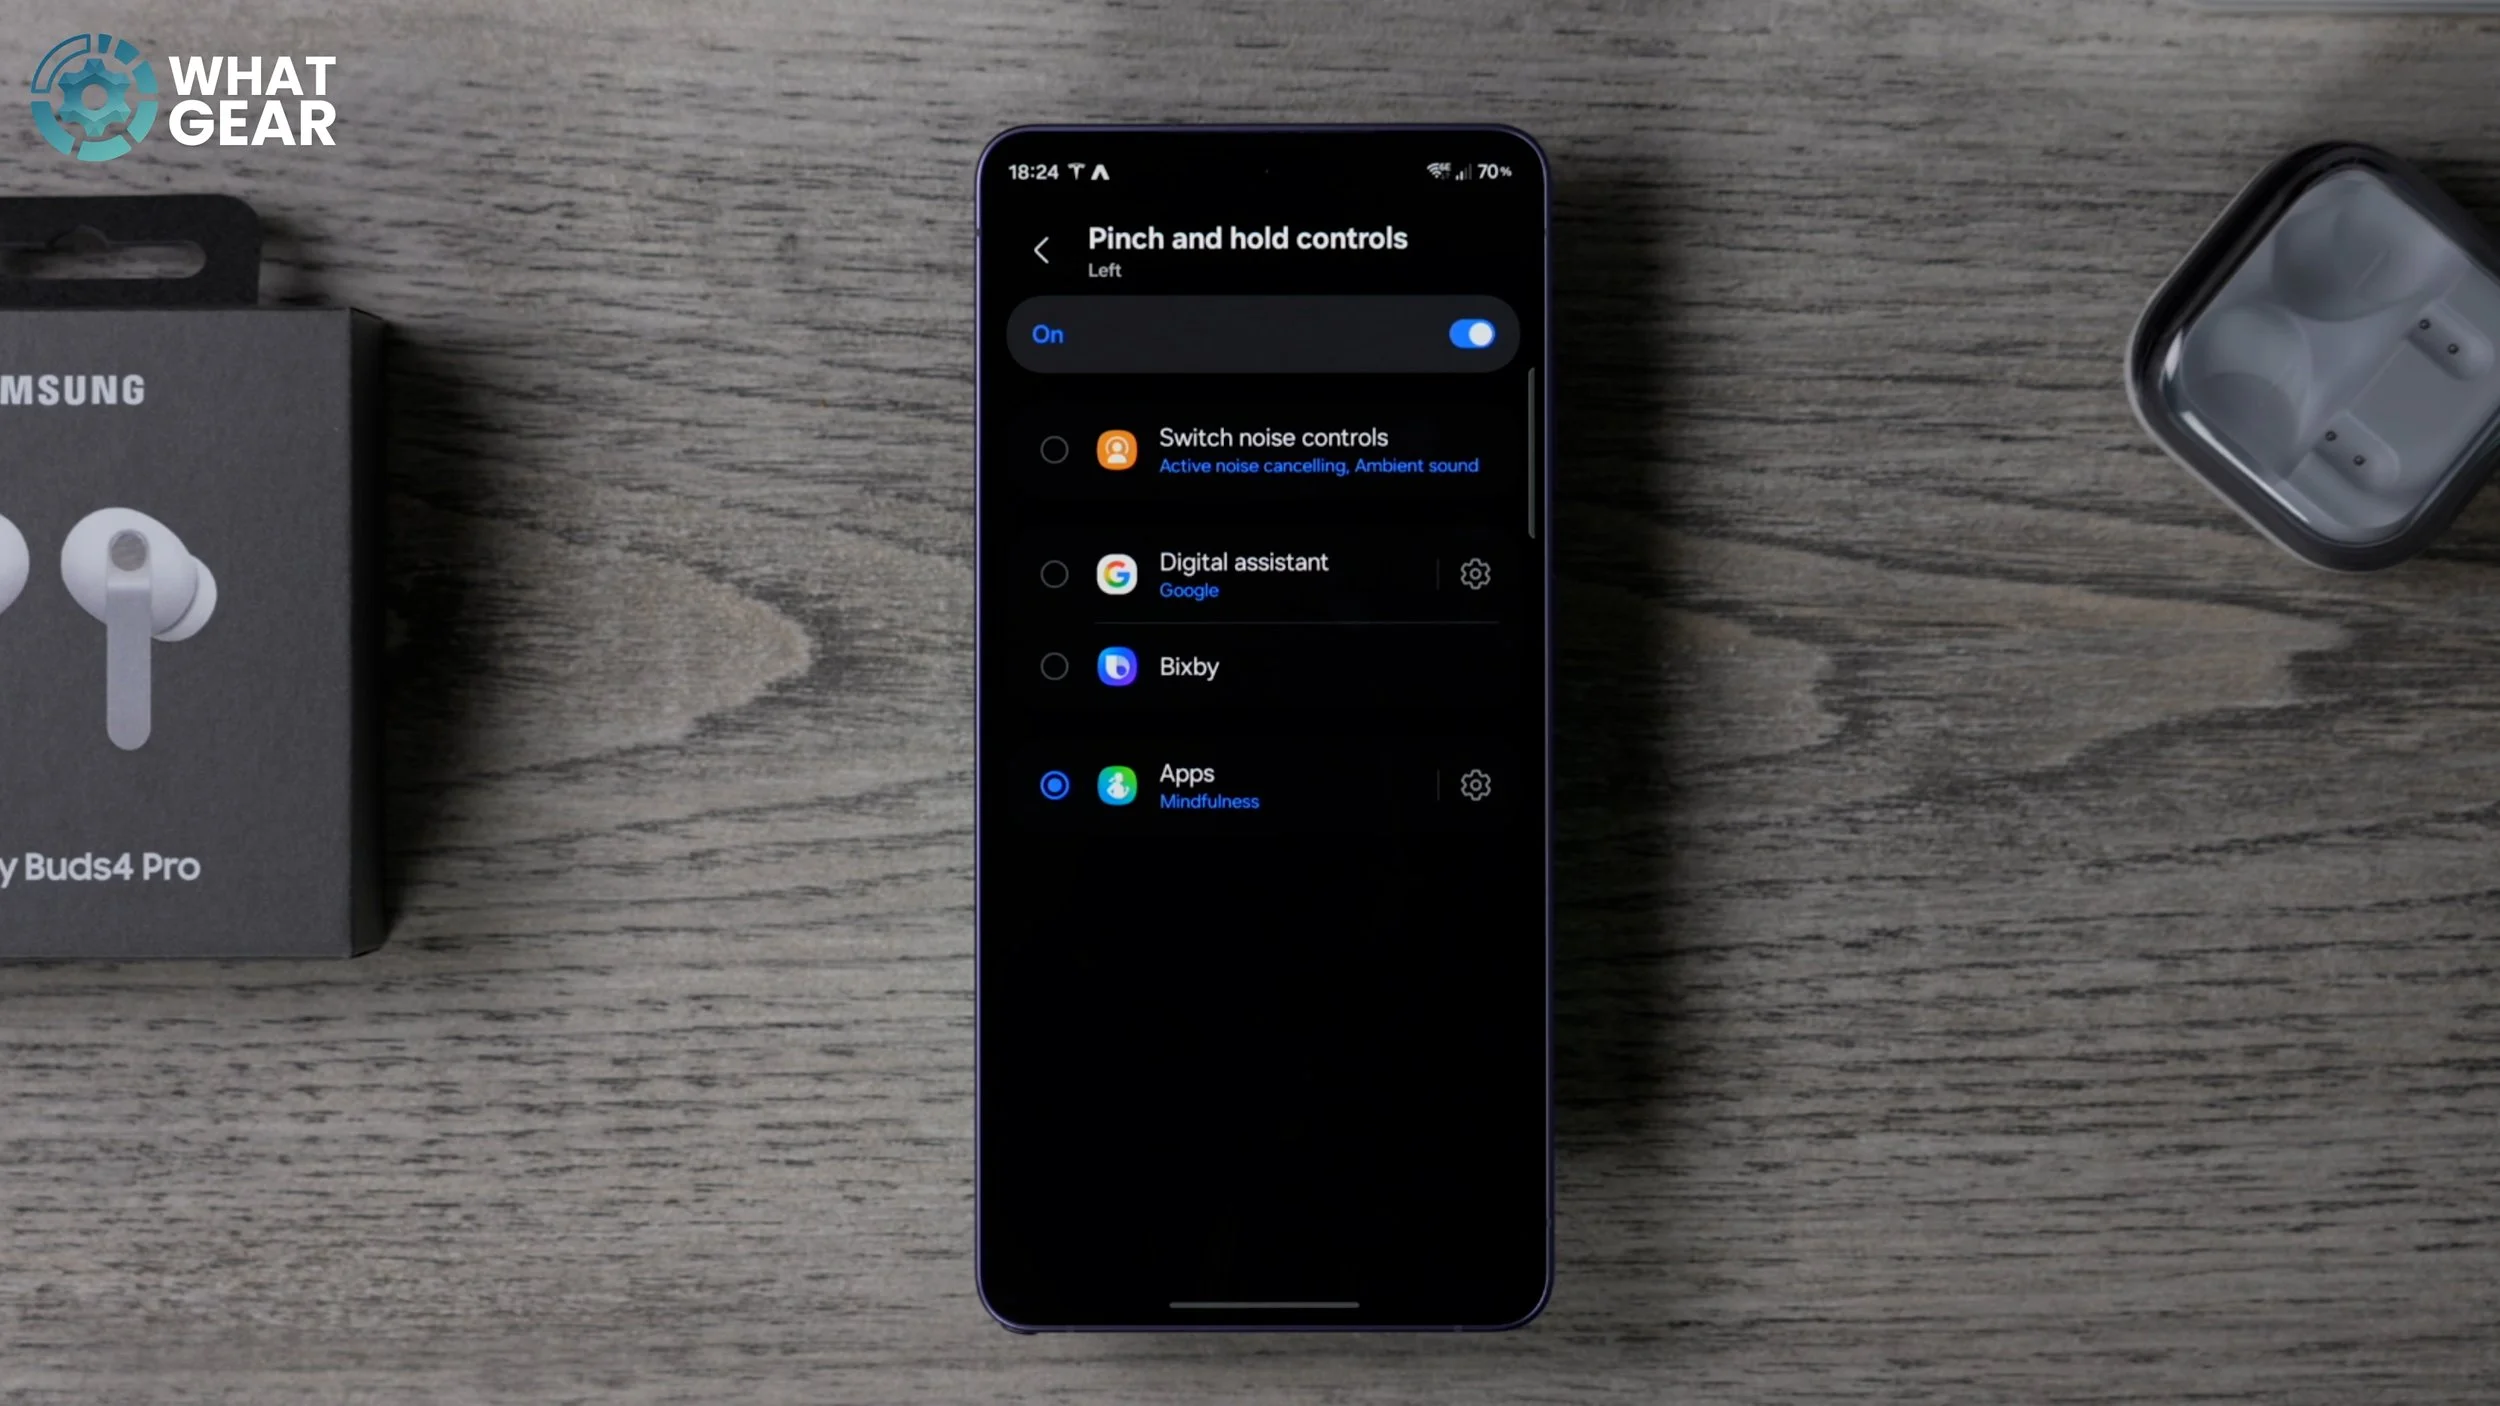
So if you are on holiday, you could use the Interpreter, or the Voice recorder if you want to record meetings. And if Spotify is your streaming service of choice, you can choose that here. Just be aware of the fact that Spotify doesn't offer high-res audio, which is a bit disappointing, really. I think it's because so many people don't realise that they're getting lower streaming quality, and because of that, probably Spotify won't ever change, and so we would have people complain about it. Anyway, moving on: if we go back one step and go to the digital assistant (I set it as Google), there will be some permissions that pop up, and with this set up, you could actually just start a Gemini conversation using the pinch gesture on the left earbud.
PLAN AHEAD
Here is another little setting that you might not want to switch on, but you might find some scenarios where it could be useful: Head gestures. So if you go to this, with this enabled, you can answer calls by nodding, and you can cancel calls by shaking your head. The problem with this is you might end up accepting a call that you didn't want to accept, or you might reject a call that you didn't want to reject.
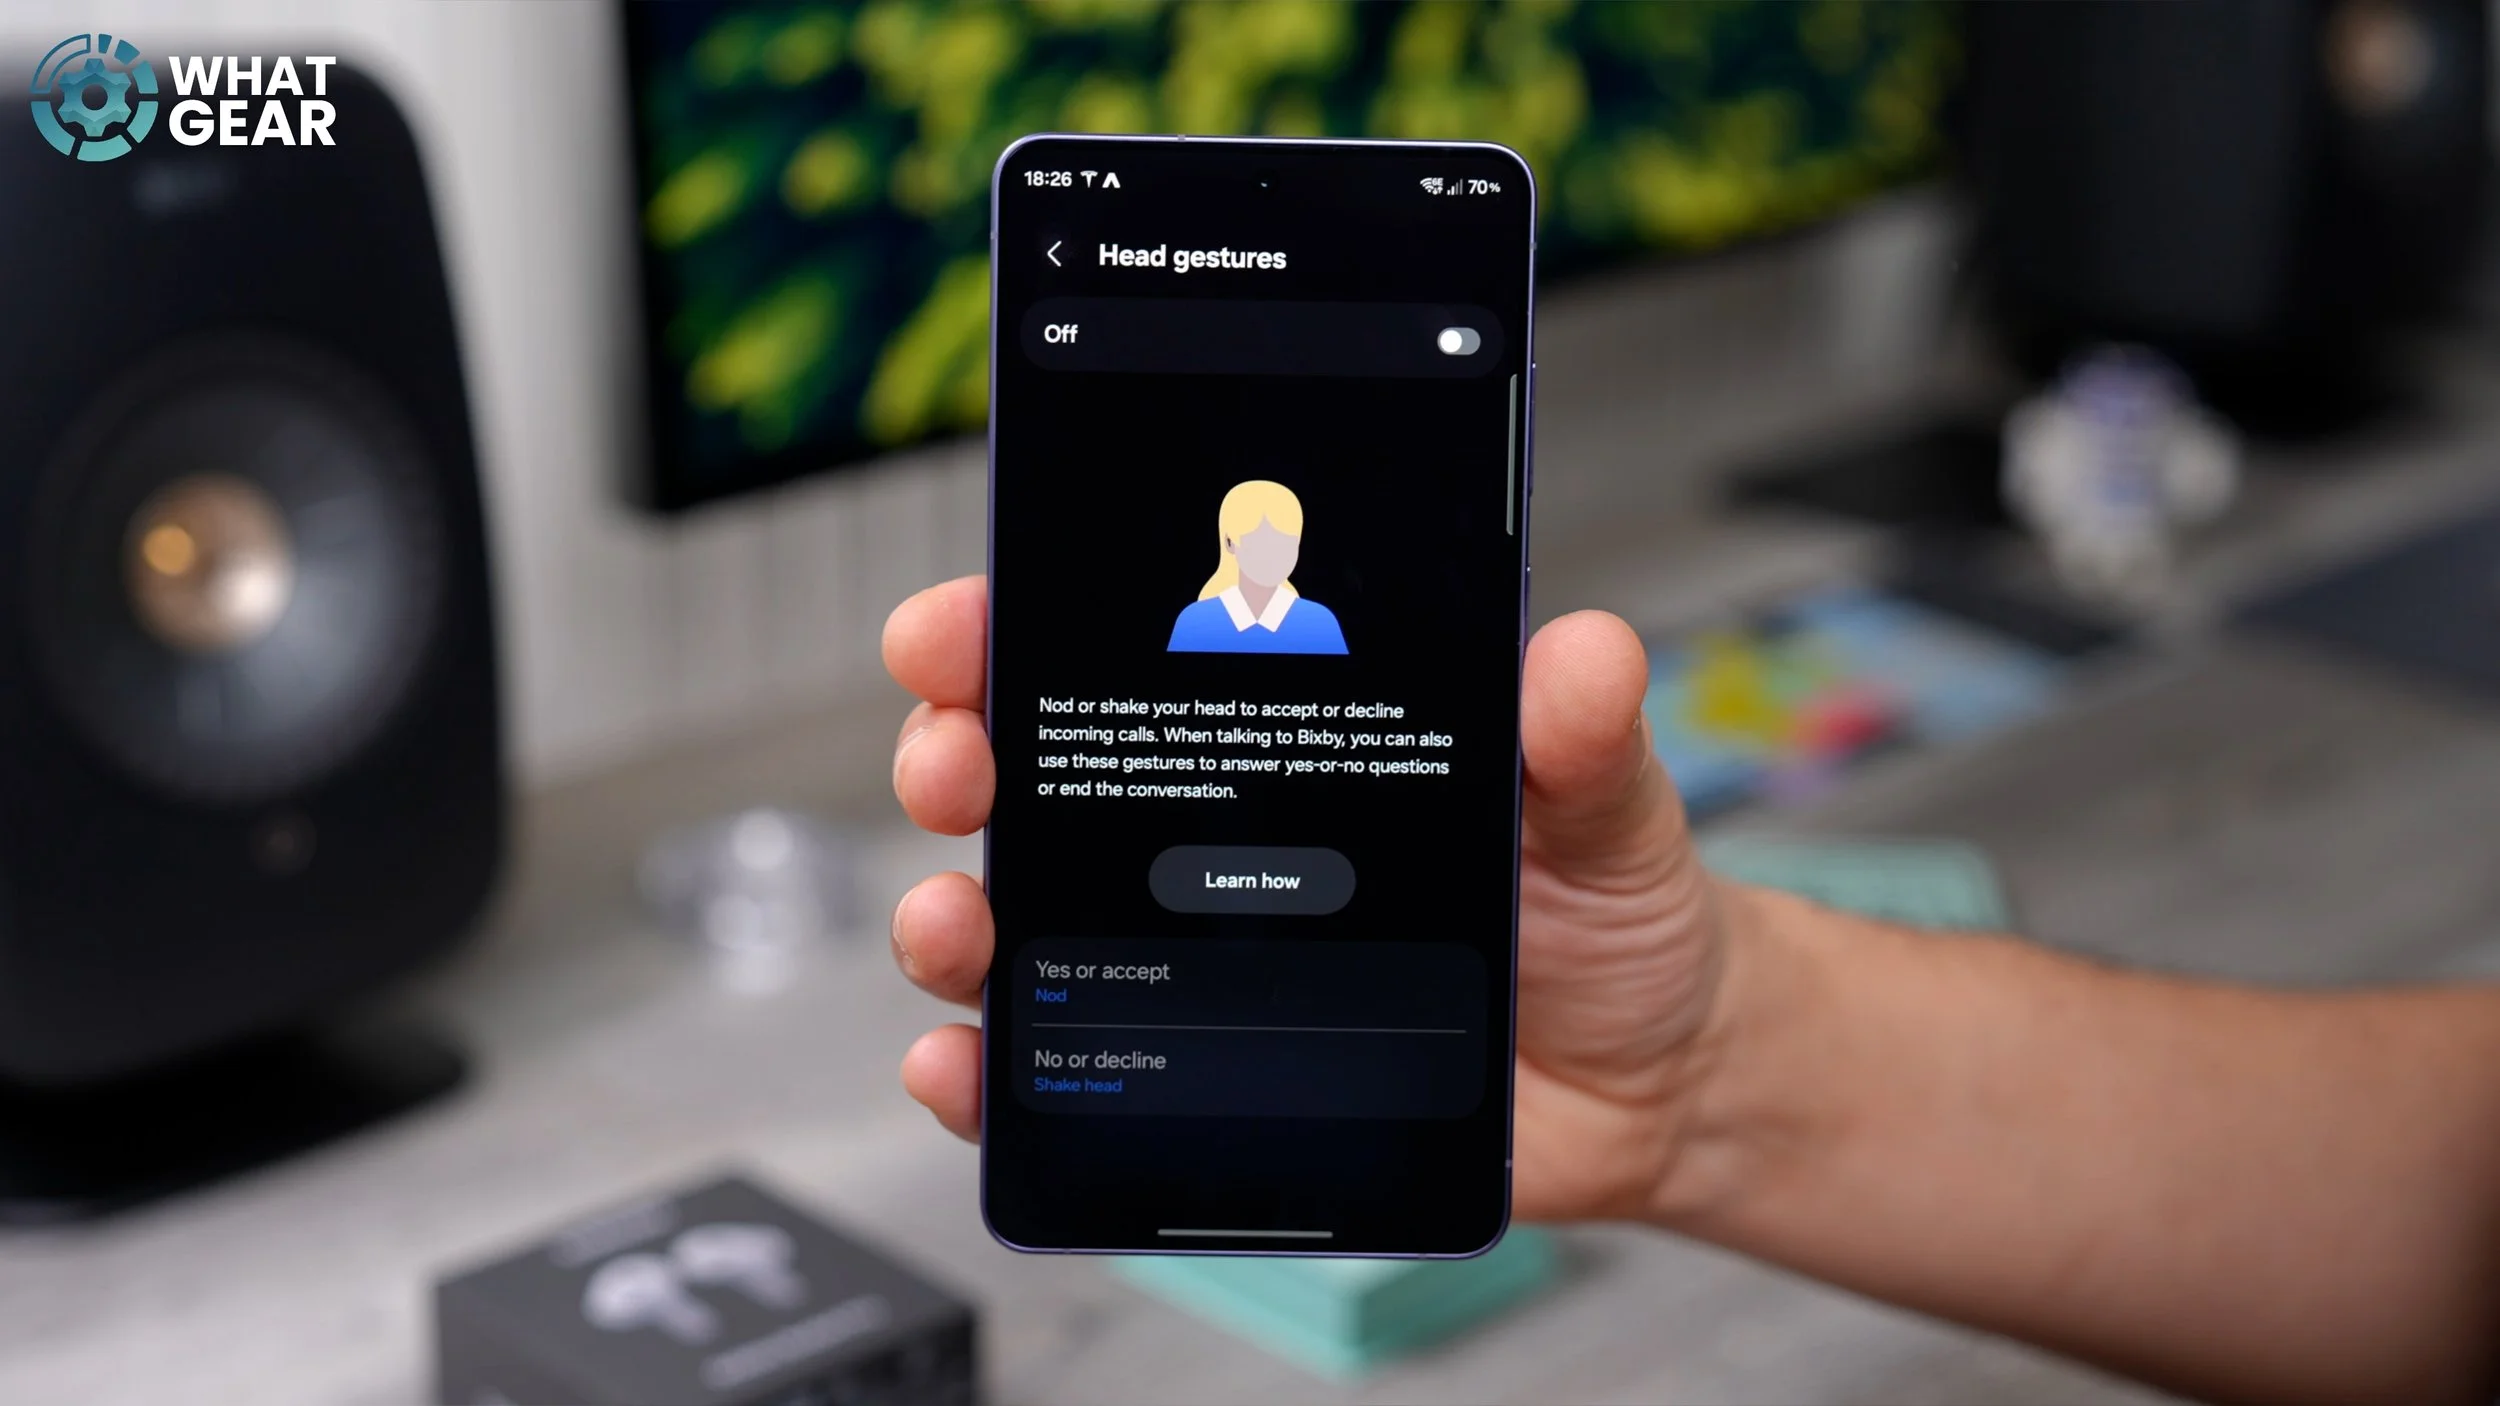
So I would suggest only switching it on when you know that you can't use the gestures, but you are expecting a call, and that way you can kind of be ready. For example, if you're in the gym lifting weights, or your hands are dirty while you're cooking, or your hands are busy, and things like that. I'm sure you can think of some more scenarios, but yeah, just be aware of this. You don't necessarily have to use it.
TALK TO ME
Let's get into some of those more well-hidden features within the settings. If you scroll down, you will see a section called Advanced features. Tap on this. Right here is where you can enable Read notifications aloud, which can be extremely useful, can also save time, and can also be extremely annoying from time to time. And that is exactly why you need to do this. At the top, you can choose whether you want the notifications to be brief or detailed, so you can select that there. But more importantly, underneath you'll see the option to customise for individual apps. Tap on this. This is an absolute must if you're going to use this feature. Go through all of the apps that you do not want read out in your ears and switch them all off. For example, I get so many emails—if I left Gmail on, I would be interrupted continuously whilst listening to music, so there's no point in that being on in my opinion.
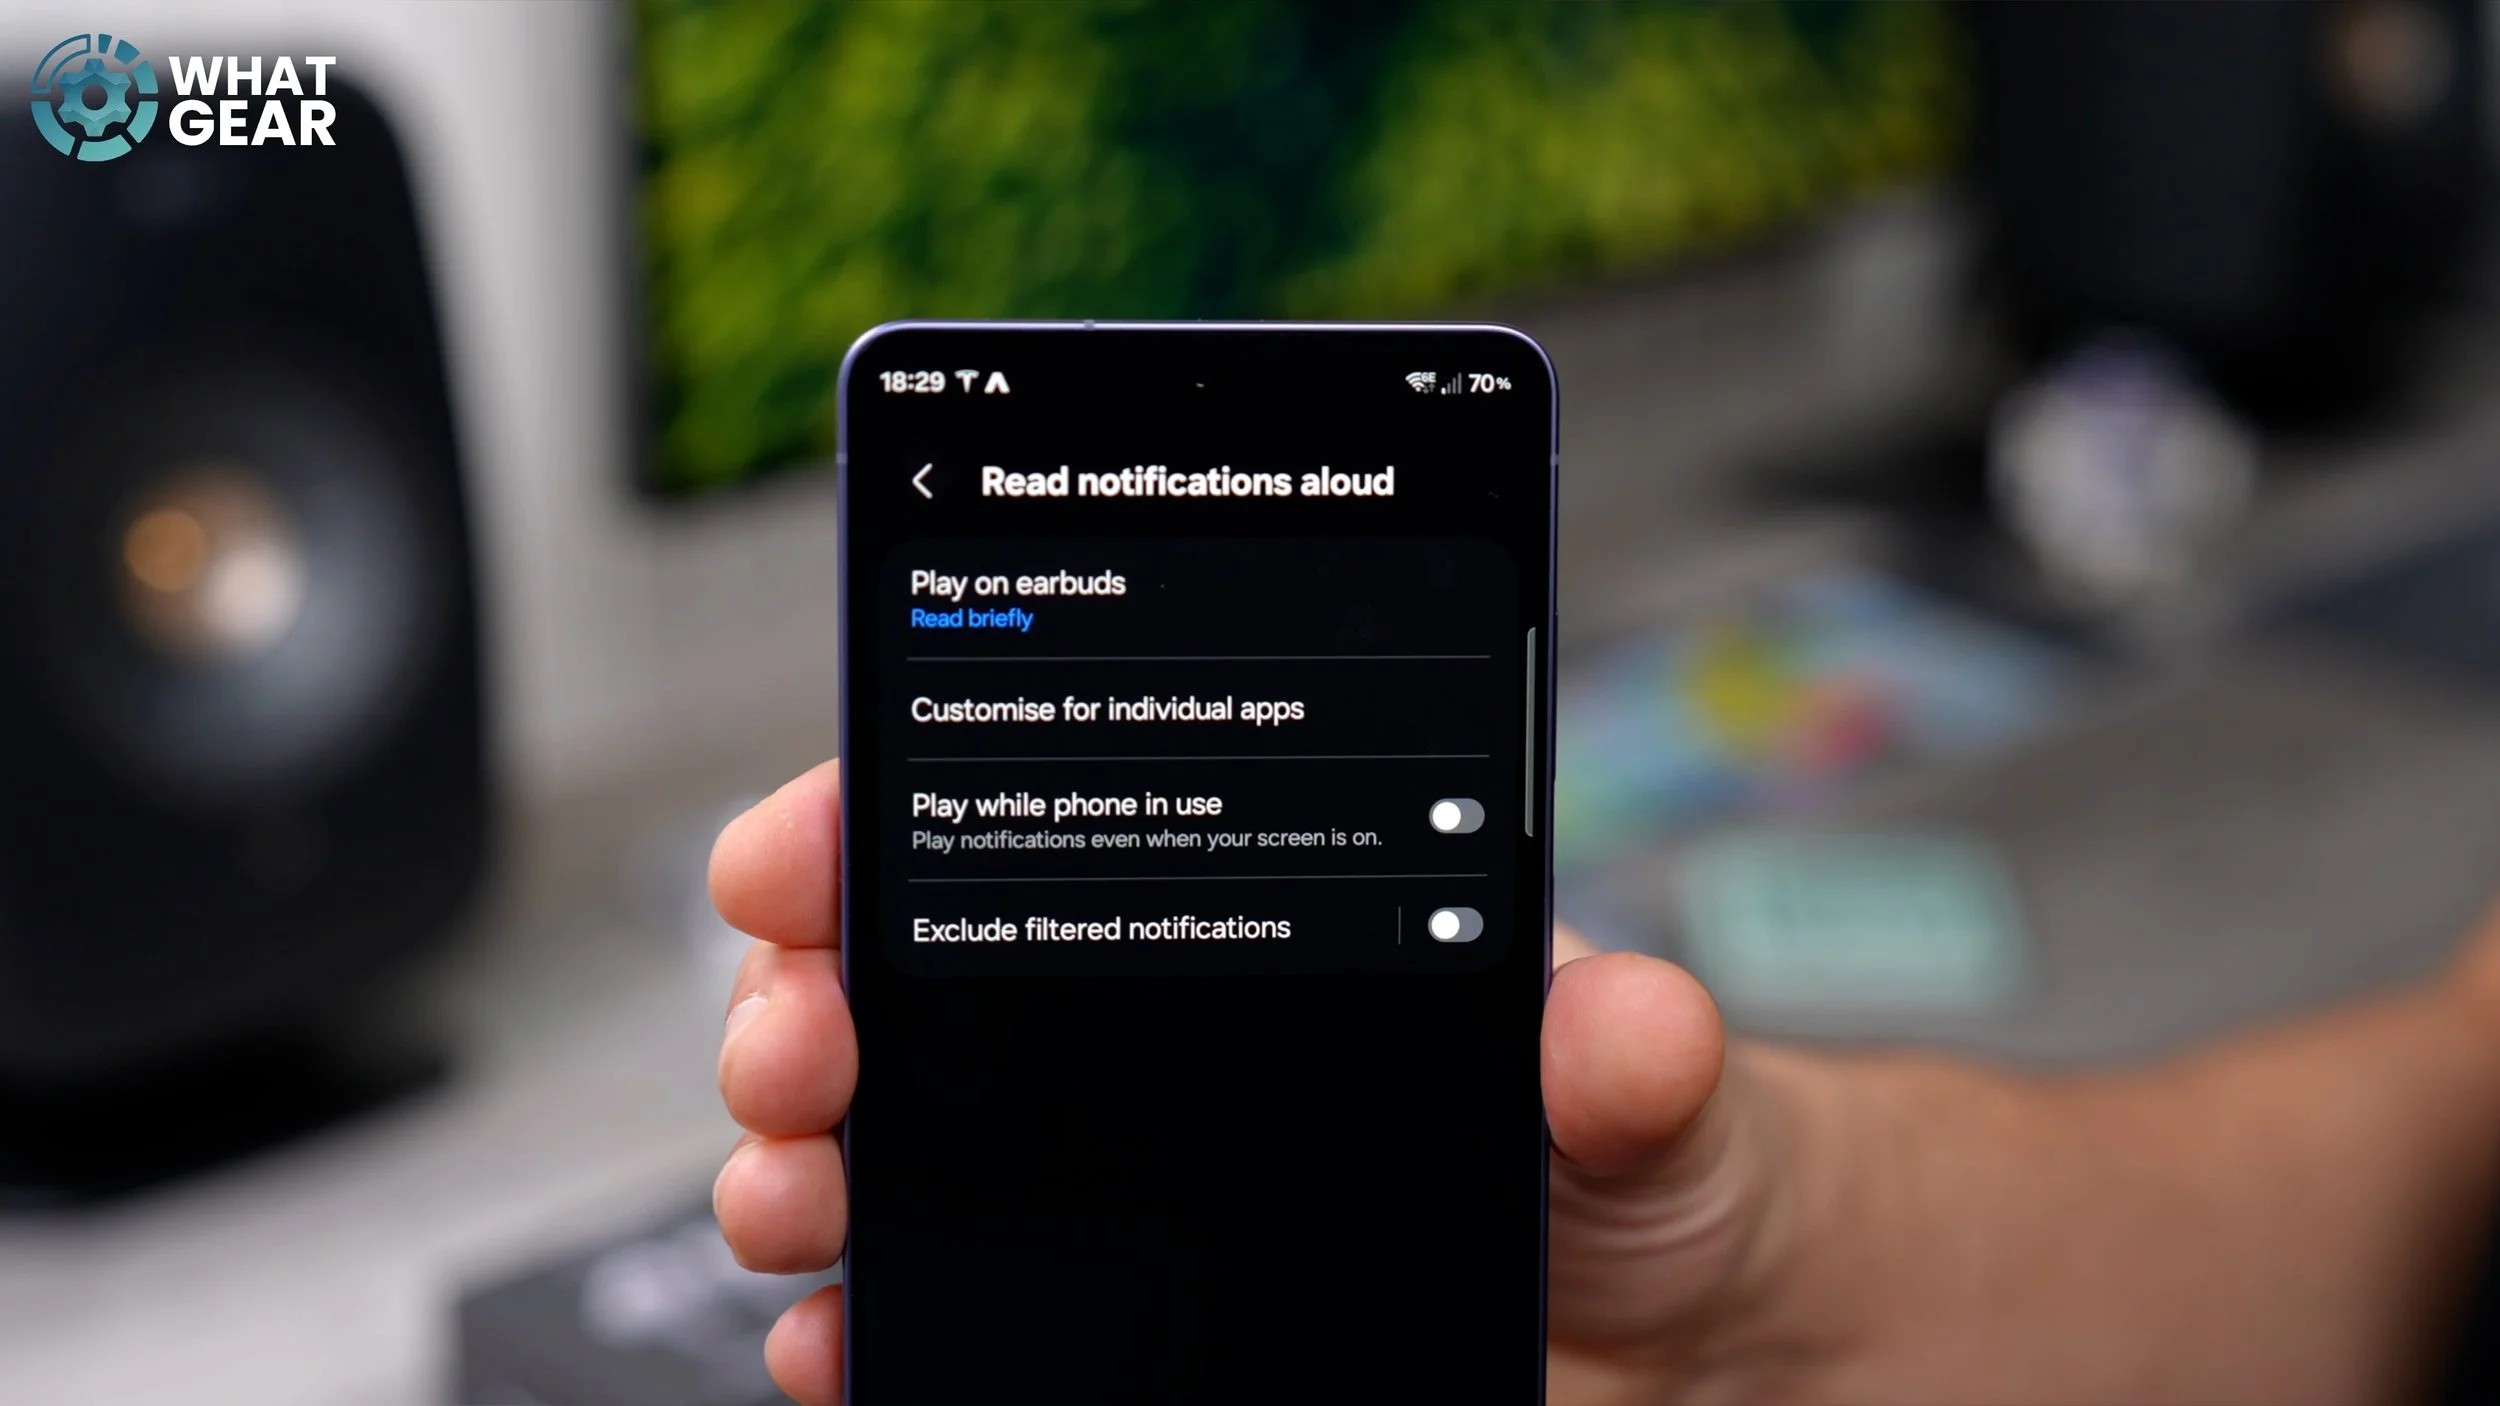
Messages I don't mind, and WhatsApps I don't mind either. Maybe my security alarm is a good one to leave on. If something kicks off whilst I'm listening to music and I'm away from the house, I might want to know about that. And maybe I'll set this to detailed so I know exactly what's happening. So you get the idea: go through your apps, switch off everything that you don't want read out, and choose whether you want it to be brief or detailed. And there we go. You've done it once. You don't have to do it again unless you install a new app. This is going to be important to you.
I’M LISTENING
Here is another advanced feature to look at on day one. If you scroll down the settings menu for your earbuds and go to Advanced features again, surprisingly, this feature is actually switched off. It is In-ear detection. And essentially, it gives you control of the wear-detect sensors in the earbuds. So by default, when you take the Buds out, and you're on a phone call, it will switch to the phone's earpiece and microphones, which is cool. But while playing, the media is actually switched off. So if you are the type of person who listens to podcasts or audiobooks, I think this feature is one you want to switch on, because as soon as you take one of the earbuds out, it will auto-pause the media until you put it back in again.
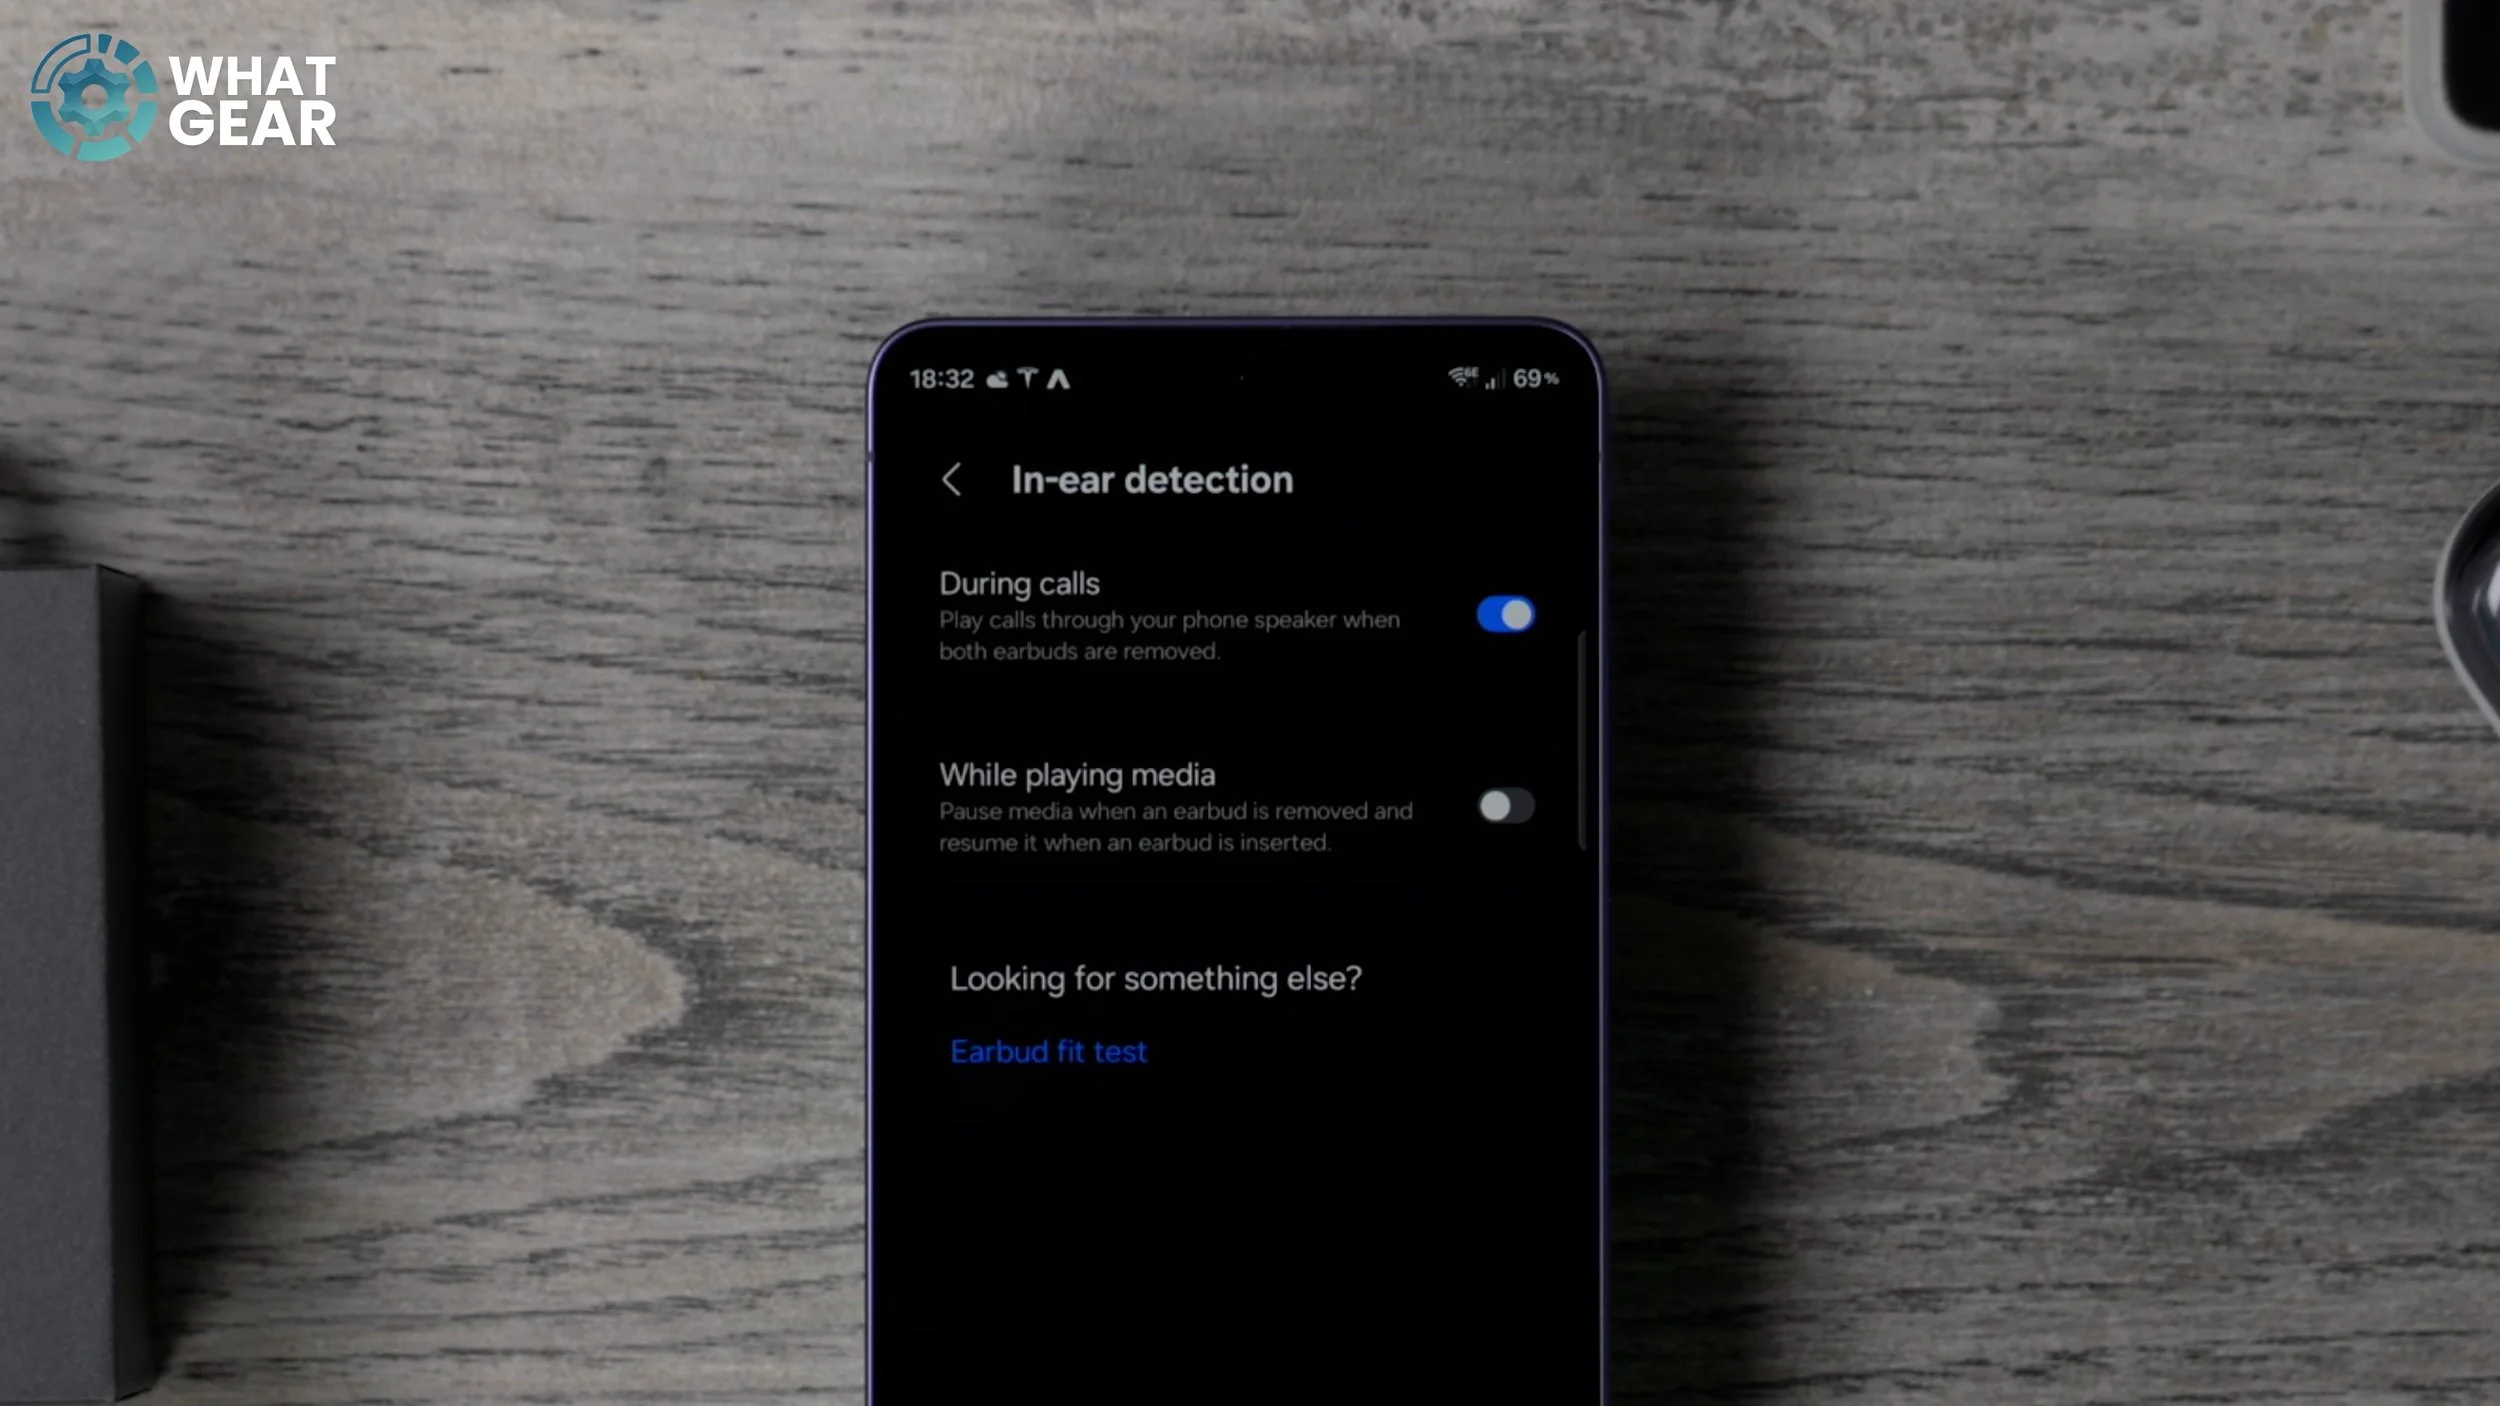
And here's my opinion on this: if someone's talking to you or about you, you might want to take out an earbud. For example, if you're at the gym and someone's being annoying or something like that, you might want to take out an earbud to hear what they're saying, and you don't want to miss a key part of your podcast or the audiobook that you're listening to. Yeah, I don't know where I'm going with this, but you get the idea. If this sounds like something that might happen to you—or has happened to you—yeah, switch this on. So when you take one out, they'll know that you're paying attention.
DON’T BREAK YA NECK
let's do another quick advanced feature within the settings page. Scroll back down to Advanced features, and then here you will see the Neck stretch reminders. If you're the type of person who spends a lot of time staring at their phone—which is a lot of people, if we're being very honest—if you enable this, this will start the calibration process, and then it will give you reminders from time to time when you should be stretching your neck a little bit. Once you've set that up, whenever the phone feels like you've been staring at it for too long, it will tell you to stretch your neck a little bit.
SYNC UP
Let's stay in Advanced features for this other little bonus feature. If you go into the Labs section, you will see that there's the option for Gaming mode, and it's greyed out. Now, you might be wondering why this is greyed out, and it is because the UHQ codec is enabled right now. So if you are a gamer and minimal latency in your audio is more important to you than the sound quality itself, you need to go back to Sound quality and effects. And then in the Advanced quality options, switch off UHQ. Now you have to go all the way back again to Advanced features, and in Labs, and in here you can enable Gaming mode. This brings down the quality of the audio, but also brings down the lag on the audio significantly. So your gunshots and things like that, when you pull the trigger, will be perfectly in time with the animation.
360 / SPATIAL / ATMOS SOUND
Here is another setting that you need to be familiar with from time to time, and it is this. If you go into the settings, once again, go to Sound quality and effects at the top of this page. You probably spotted it earlier: the 360 audio feature. Now, the only time you'd really want to use this is when you are listening to 360 audio via one of the streaming services. The only problem with finding these kinds of tracks is the fact that all of the different companies call them something else. So we've got Dolby Atmos, we've got spatial audio, we've got immersive audio, you've got 360 Reality Audio. So, for example, in Tidal, if you type in Dolby Atmos, you'll find entire albums and playlists with Dolby Atmos support. The 360 format will work perfectly there. And you might feel tempted to use this for watching movies, but there is, in fact, a better way to get a similar—actually, maybe a better—effect when watching movies. And that's what I'm about to show you next.

MORE IMMERSIVE MOVIE SOUND
So on your home screen, if you swipe down from the top right corner, you get your quick settings. These are the default ones. I've played with the layout a little bit here. What you want to do is hit the pen at the top and then tap Add control at the bottom of the screen. Here, if you scroll down, you will find, eventually, the sound menu, and you'll notice the Dolby Atmos feature is not added to your quick settings yet. So if you tap on this, that adds it to your quick settings.
You can resize it if you want to, so it's easier to find. And whenever you're watching movies now, you can simply swipe down from the top right corner and enable Dolby Atmos. And this is definitely more well-suited to Atmos formats. The 360 audio will work on pretty much anything, but this particular calibration was designed with Dolby, so this one might be more accurate—and is fantastic for movies too.
CUSTOM LEVELS
So this next tip is going to be extremely useful for you, especially if your ears have taken a bit of a hit over the years. Maybe you party too hard. But even if you haven't, you still might want to take a look at this. So if you scroll down, go to Accessibility. There is a feature here called Adapt sound. If you enable this and then tap where it says Adapt sound: if you want to do this the quick way, you can just choose your age group. And then if you want to test it, just go to the settings, and then you will hear the difference that it makes just by using these two buttons down here.
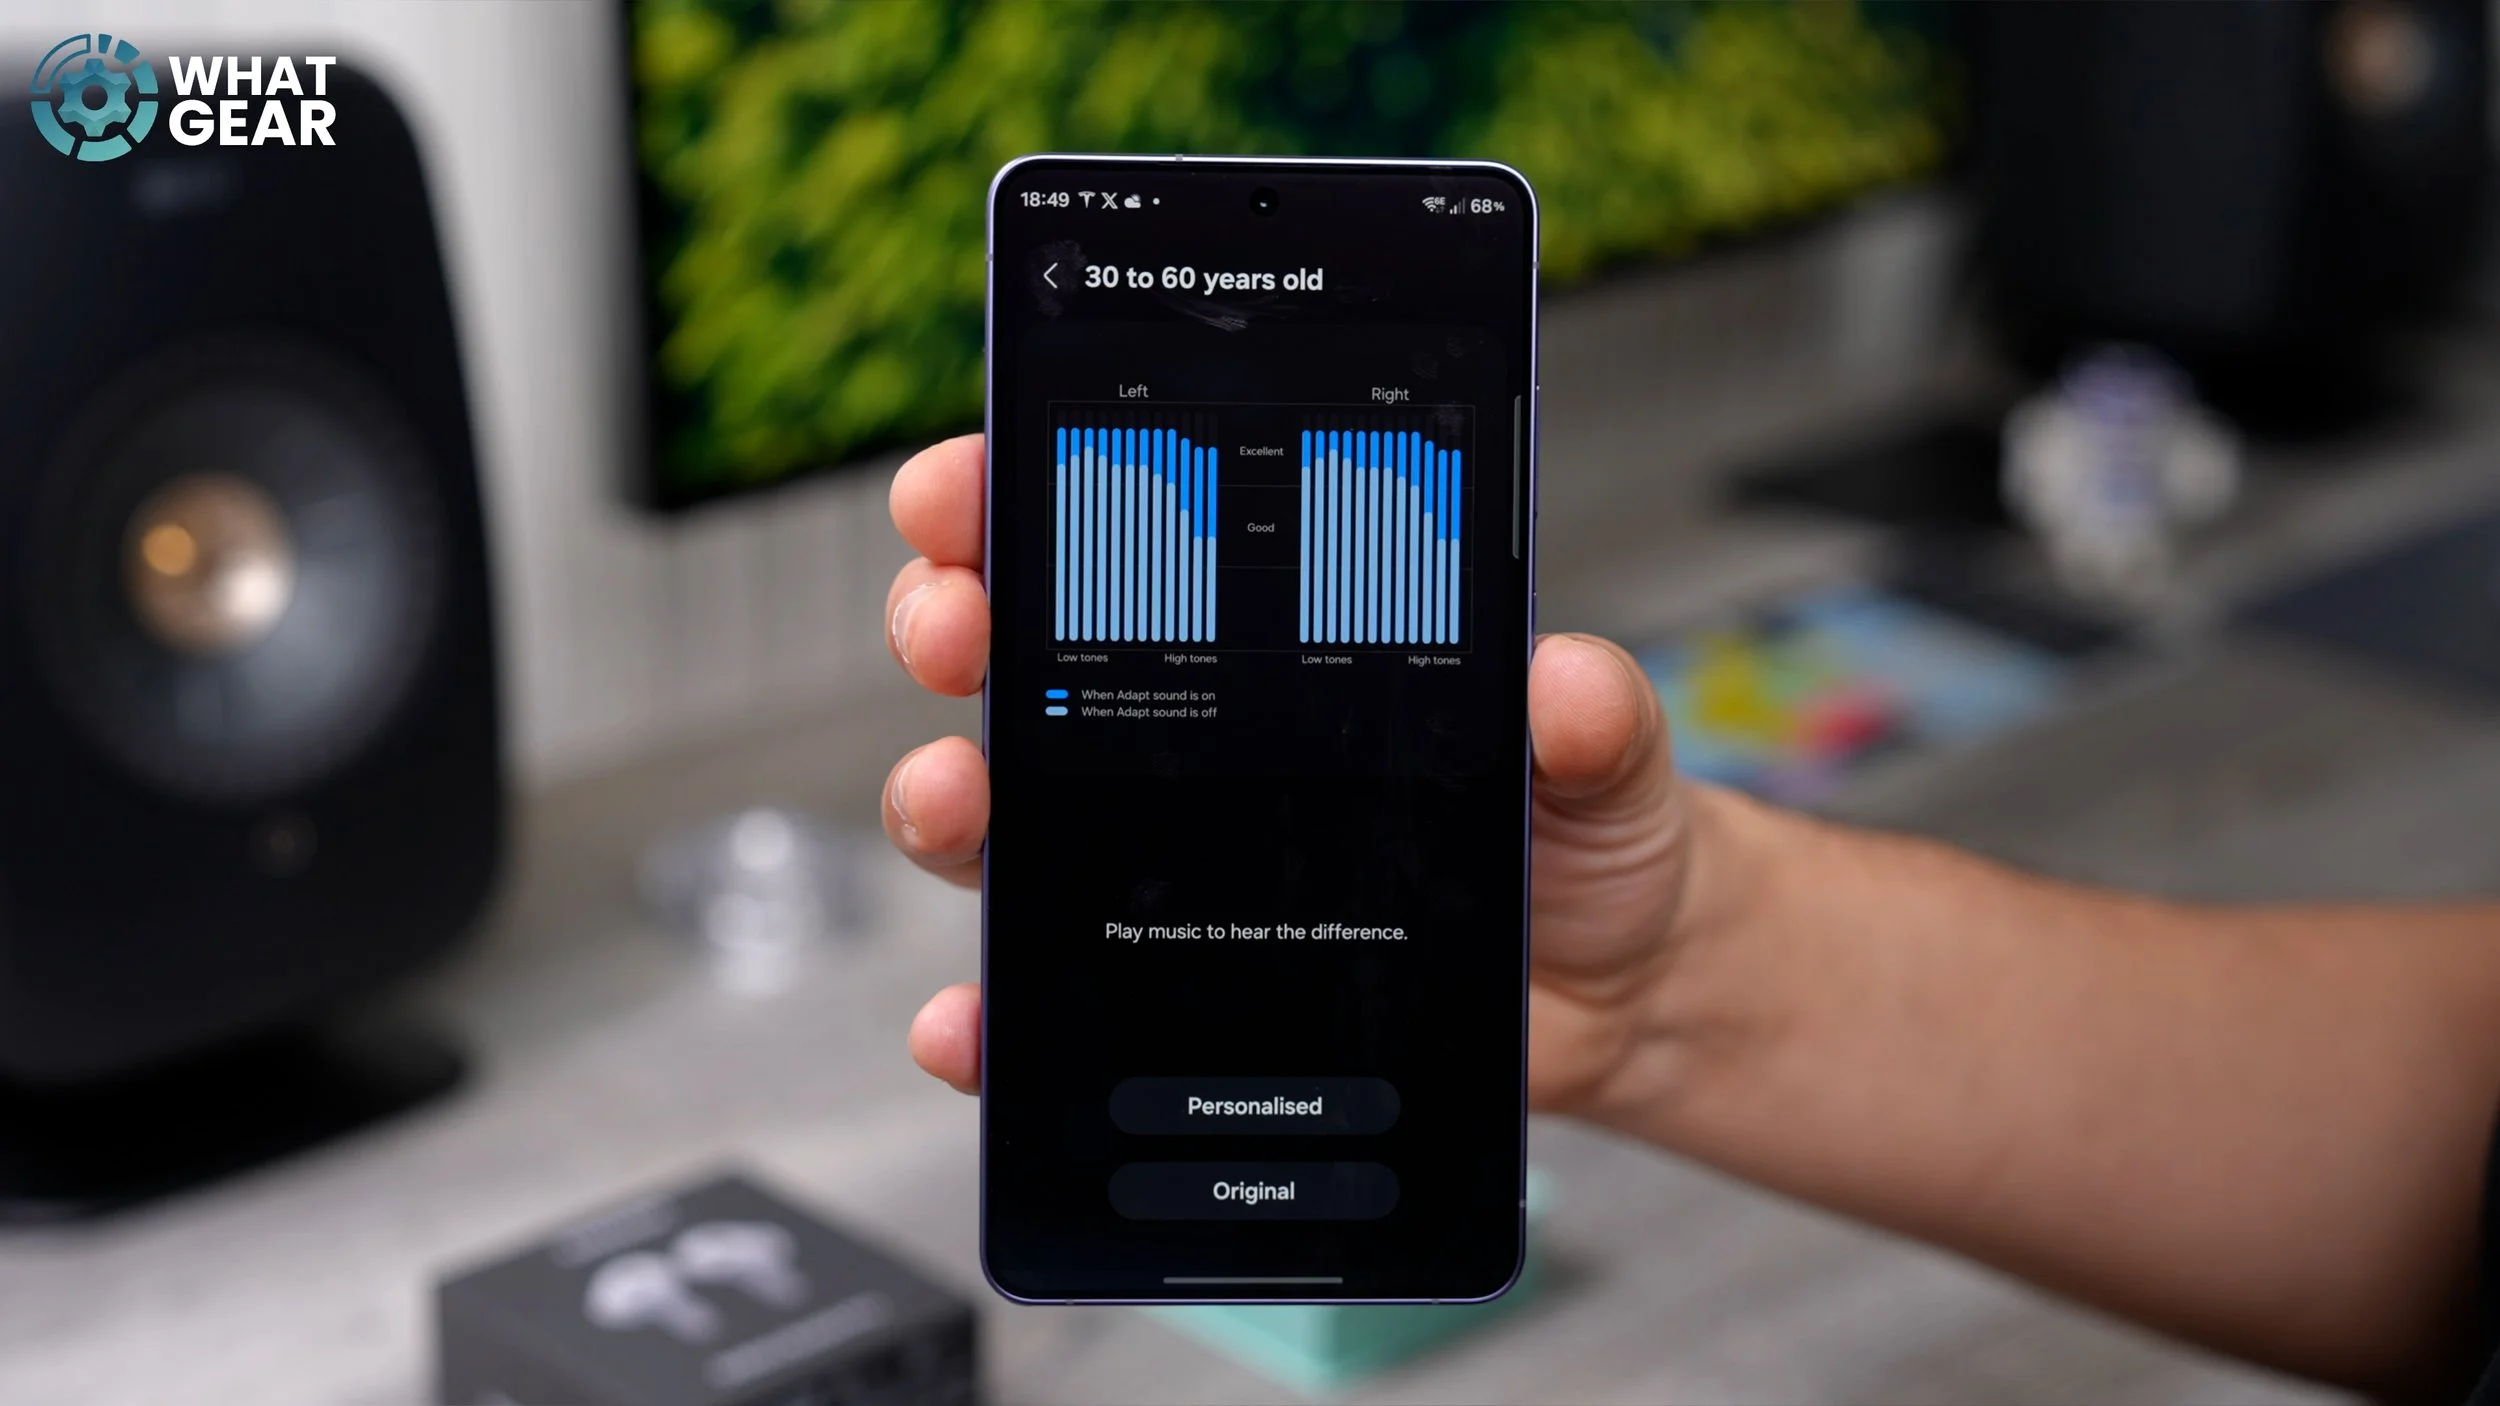
However, I don't recommend you do this. The better option is to do the Add personalised sound profile. This essentially is a very thorough hearing test, so make sure you set some time aside to do this. And once you complete the hearing test, this bit of software will detect any deficiencies in your hearing abilities and create an EQ to balance that all out so that you can hear the music properly with your own custom EQ. I'm not going to do it right now because it does take quite a while.
AURACAST AUDIO SHARING
This is something that's kind of a rare use case, but it's worth knowing because you do have it in your Buds settings. If you scroll down, you'll see the option to Listen to Auracast here. You can actually broadcast your own audio as well. So if you share at the bottom, whatever you're listening to on your phone can be shared with another pair of Galaxy Buds or another pair of earbuds. This supports Auracast. And if you want to broadcast your voice via Auracast, you can do that too. Just by toggling across to Voice, they will need the password in order to tap into your Auracast broadcast.
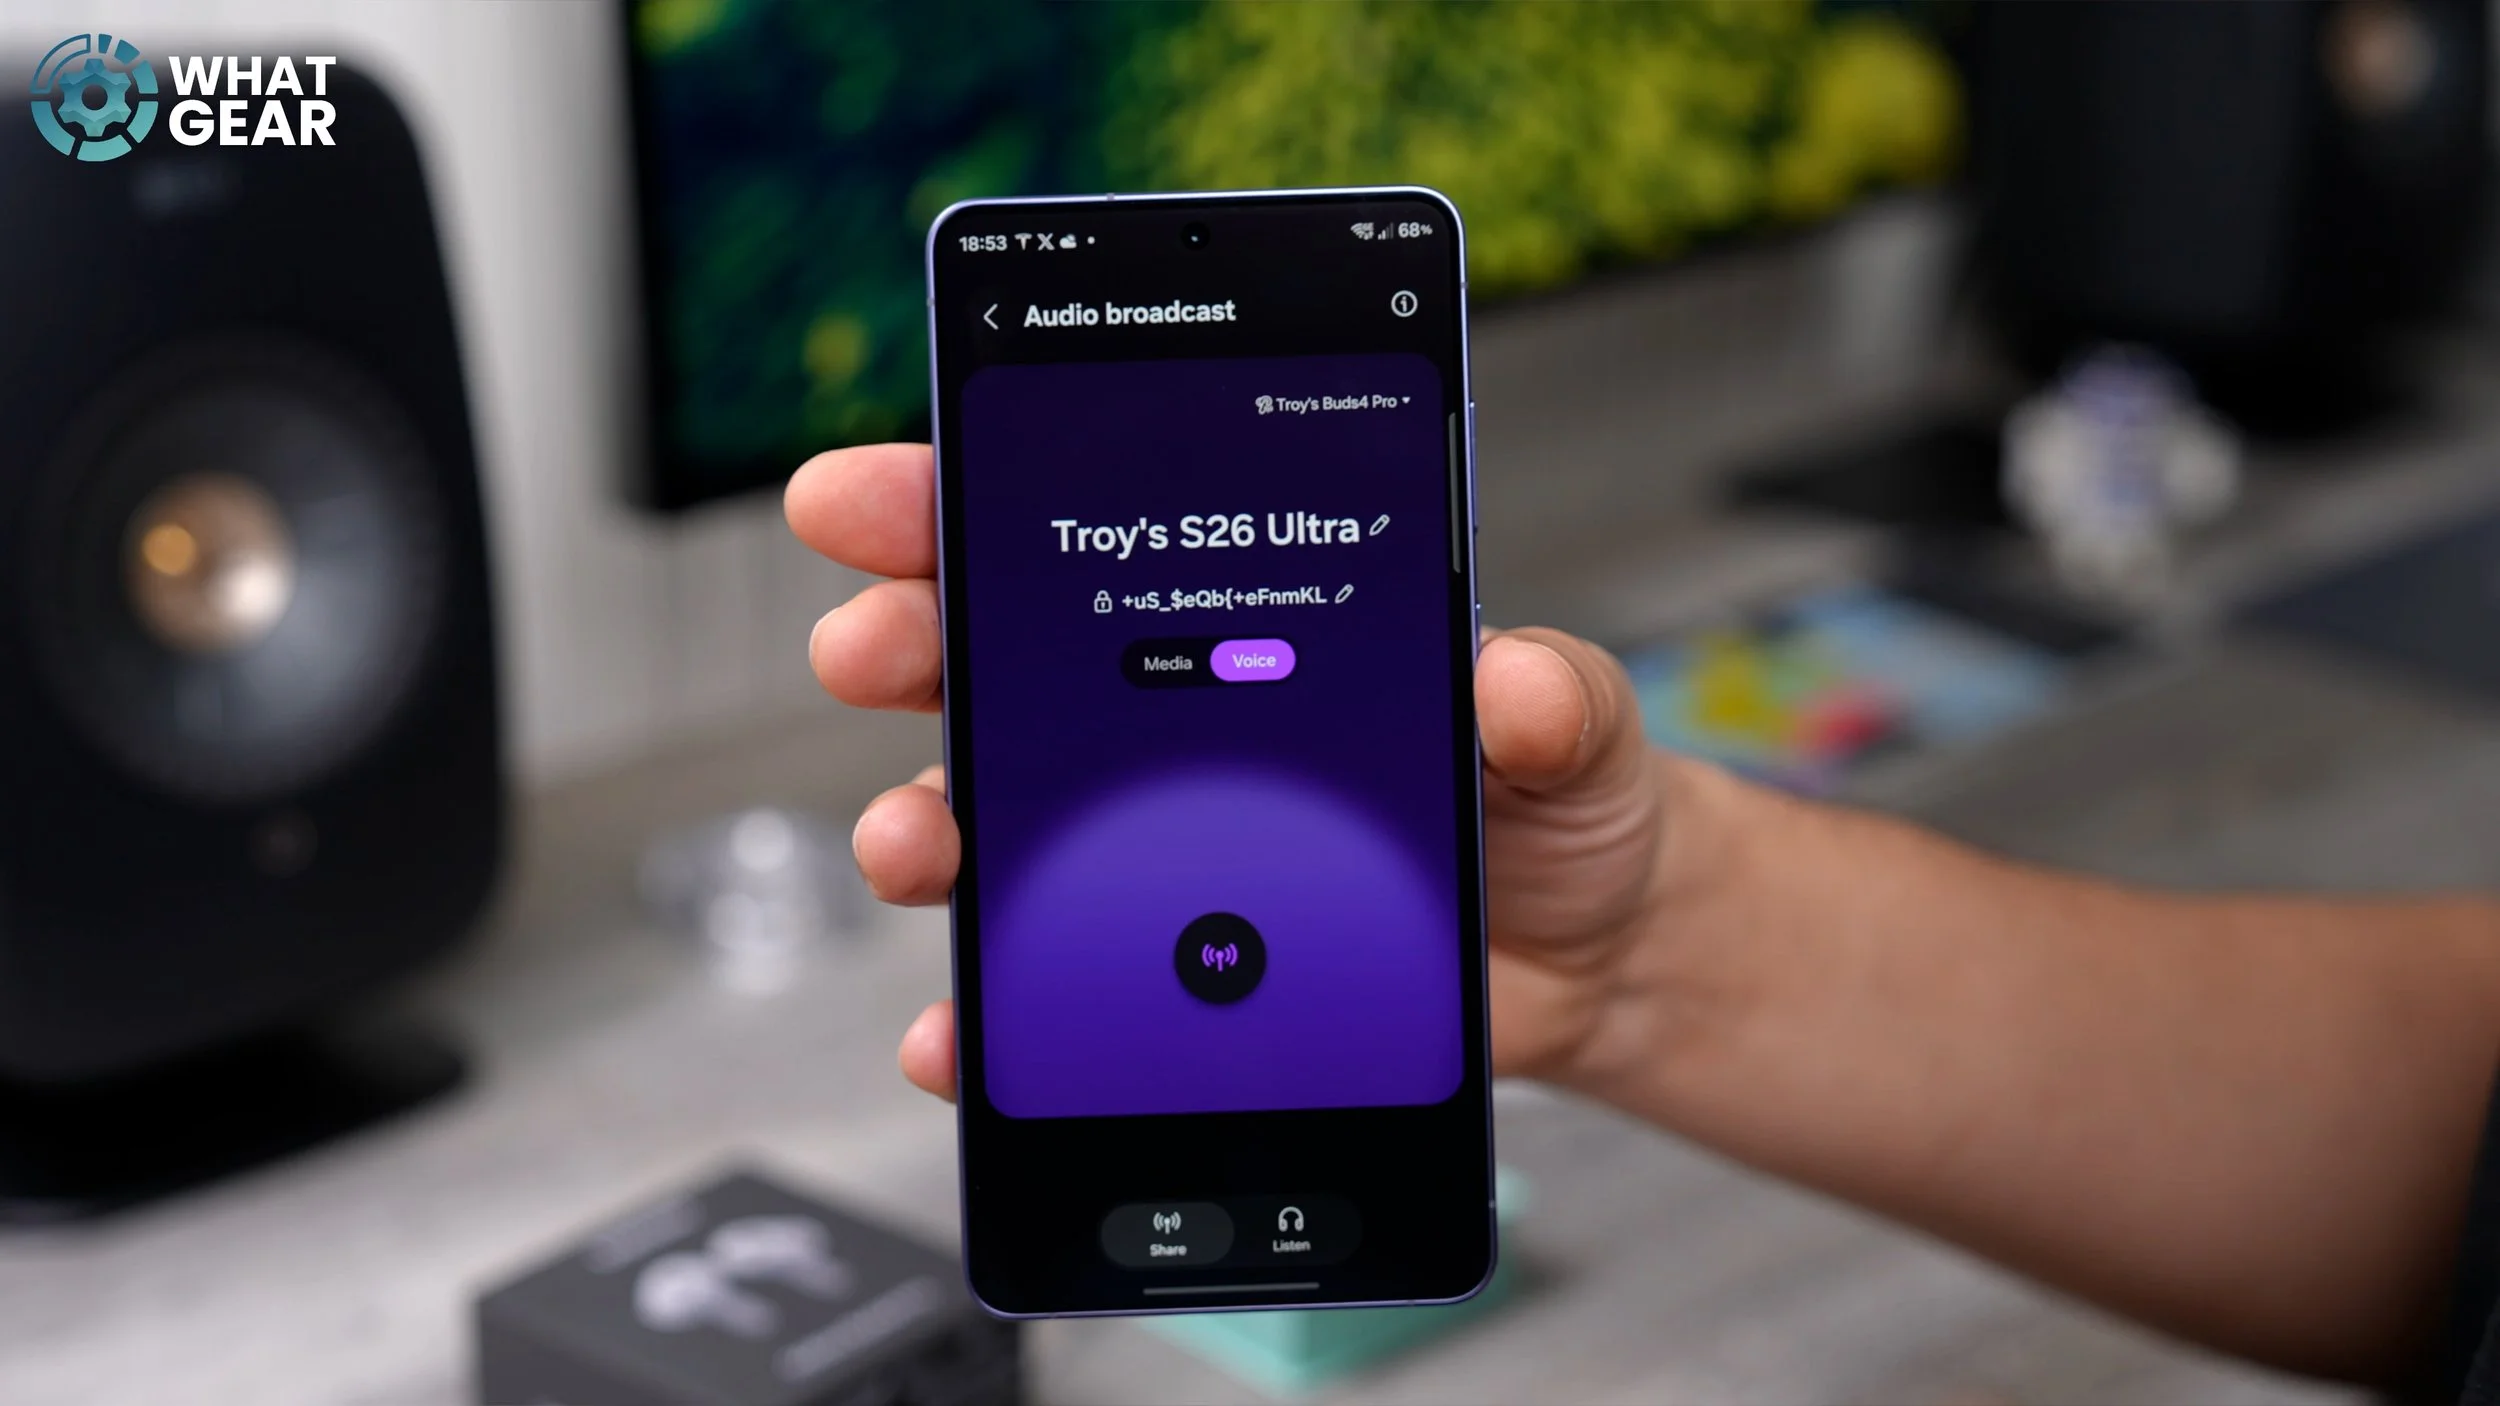
But let's say, for example, you've got a group of friends with you, and you're in another country, and you're the tour guide. You can actually speak to all of them using Auracast, but the only limitation is that their earbuds must support Auracast. Anyway, you might find you never use it, but at least you know you have it, and now you know what it does. Remember, you can also log in to someone else's Auracast broadcast using the Listen feature right here.
THE EQUALIZER
I did promise you guys my own custom EQ, and also I want to show you how to use the EQ. If you go into the Buds settings, go to Sound quality and effects at the top. Here you see Equaliser, and right now it is set to Custom. This right here is my own custom EQ. I have spent a number of days fine-tuning this to perfection for the types of music that I listen to. If you do like kind of bass-heavy stuff, I recommend you give this a go.
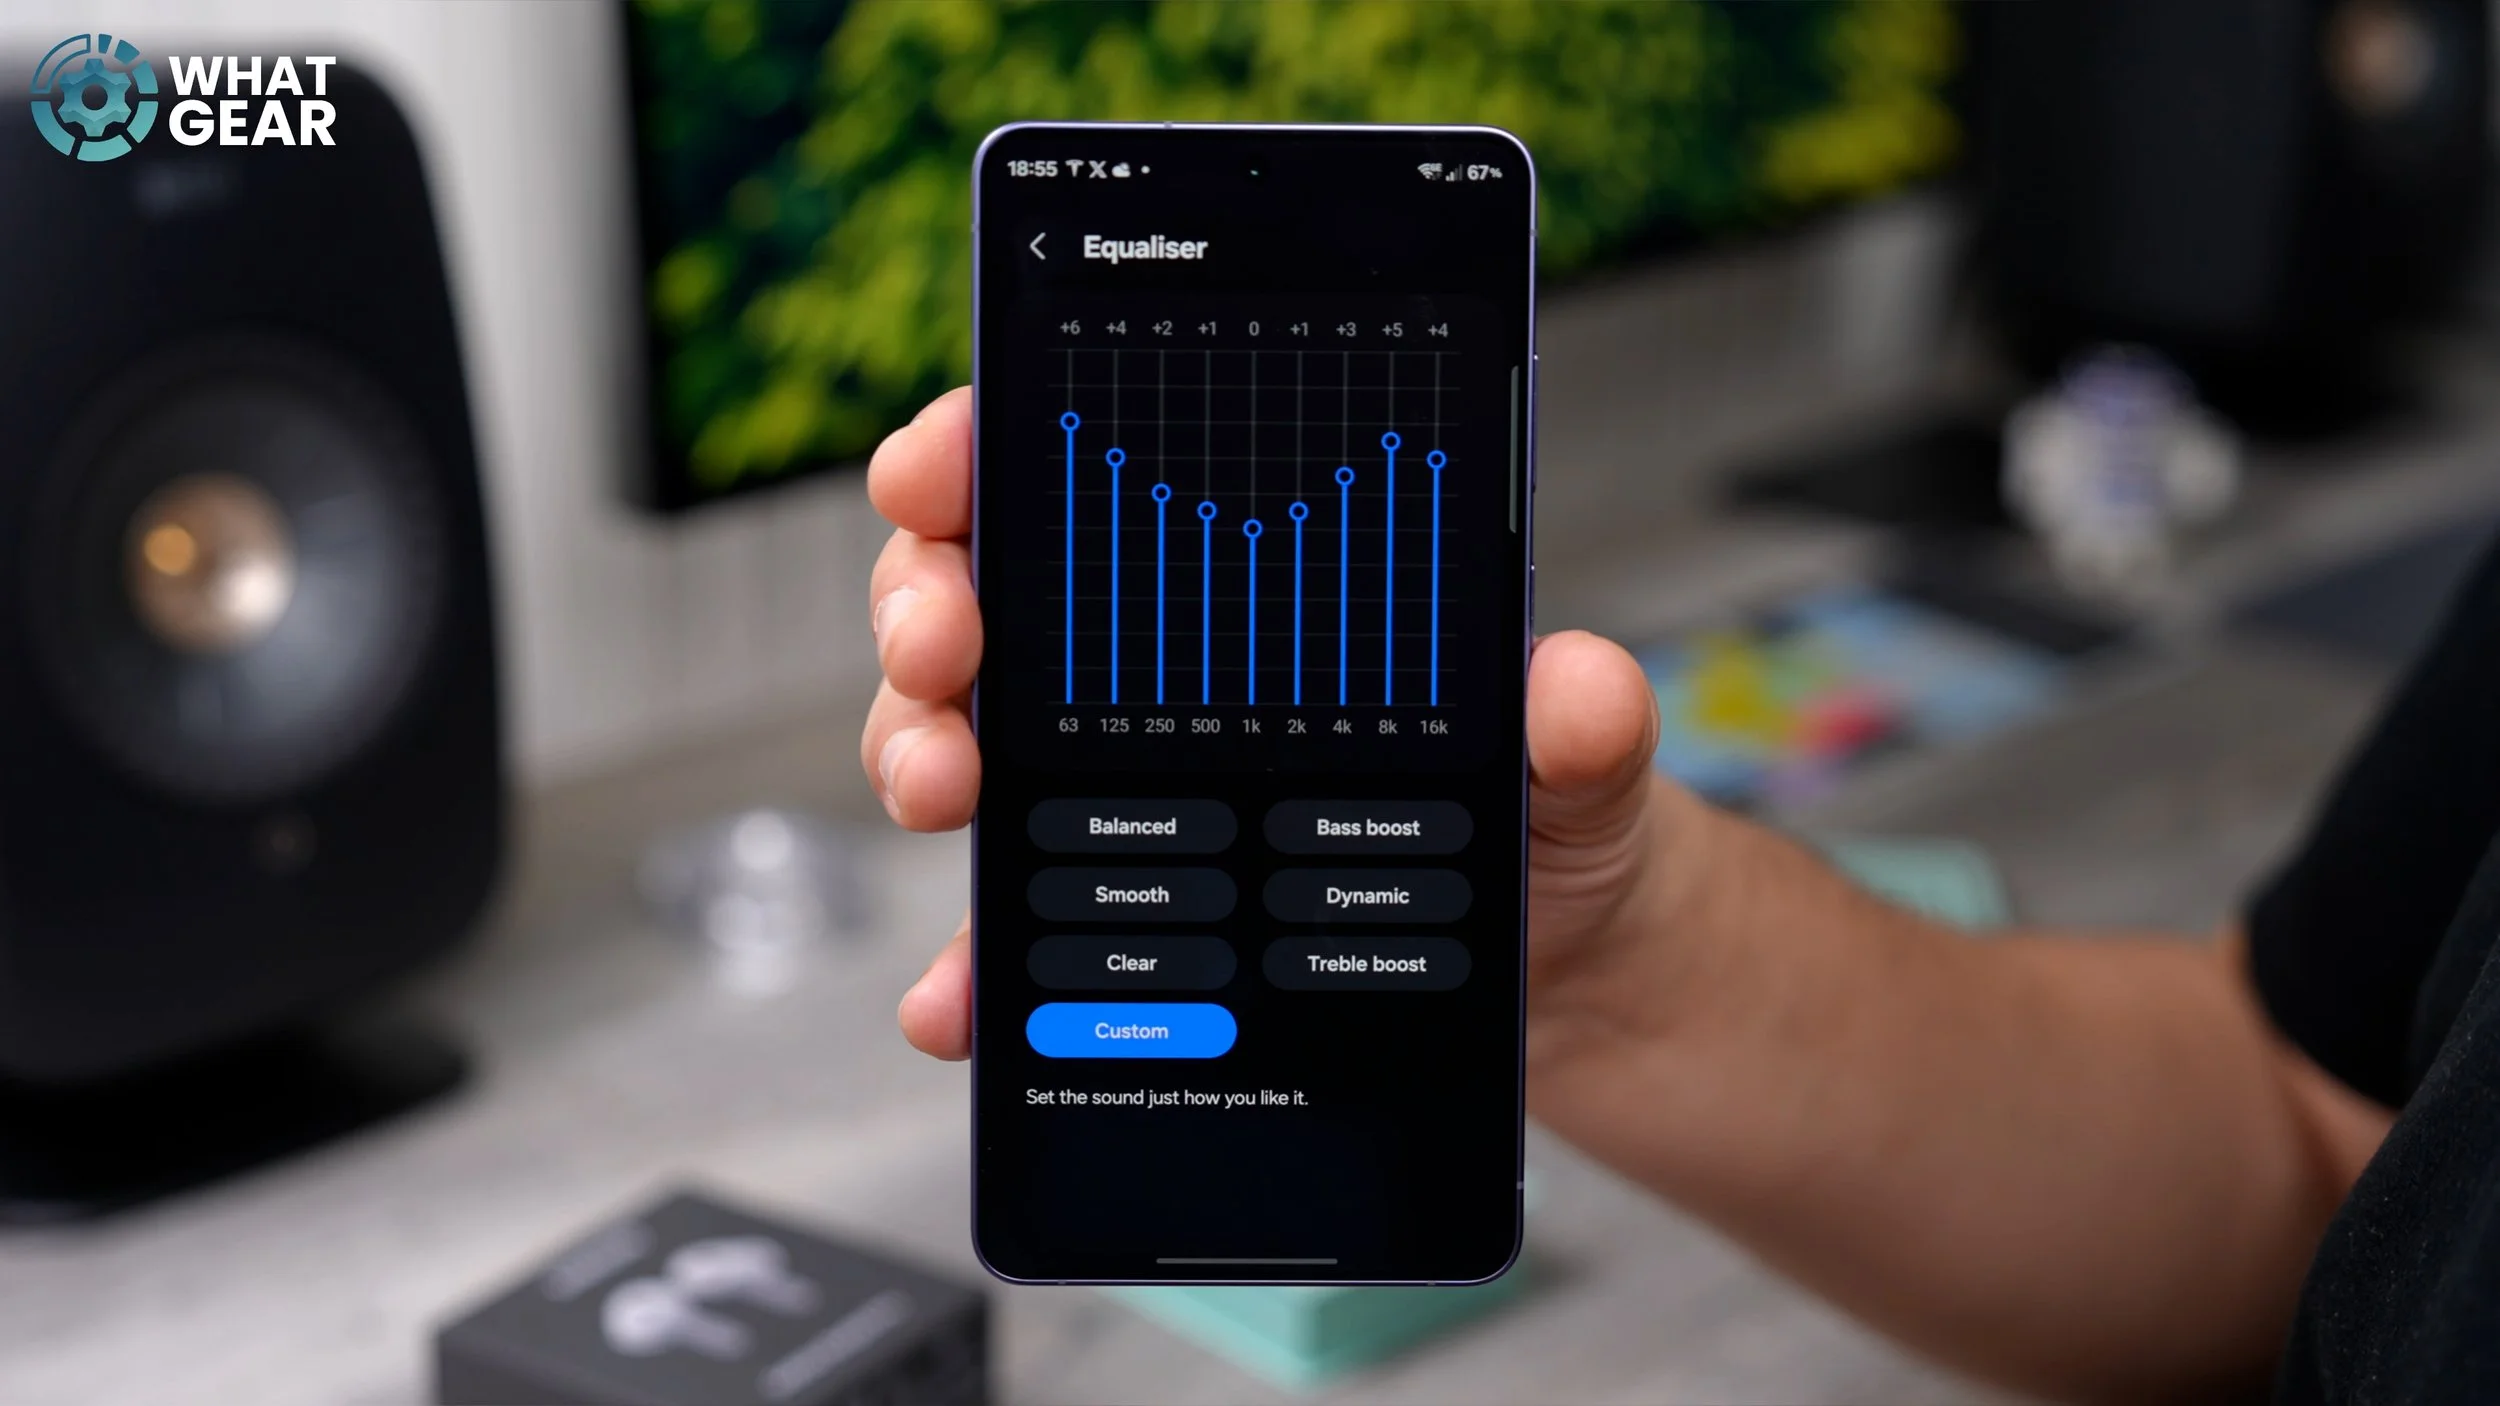
If you just want a simple EQ that sounds really, really good, Dynamic is definitely one of the best. But for those of you who know what they're doing when it comes to EQ audio, nothing is stopping you from creating your own one. I do wish they would allow you to save your custom presets, but at this point, you only get one.