
Galaxy Tab S11 - Tips, Tricks & Hidden Features Guide!
In this video, I'll show you guys how to truly master the Galaxy Tab S11 Ultra. Most of these tips will apply to the regular Galaxy Tab S11, as well. And I know there's going to be a bunch of people out there who get this tablet and install their social media and streaming apps, and sure, they'll be happy with it just like that, but I bet if you ask them the question, Can you tell me what the Galaxy Tab can do to an iPad can’t? They haven't seen a video, which breaks down how to unlock the full potential of the Galaxy Tab and step by step, walks you through how to set it up the correct way on day one. So that's what I'm about to do.
STAY UP TO DATE
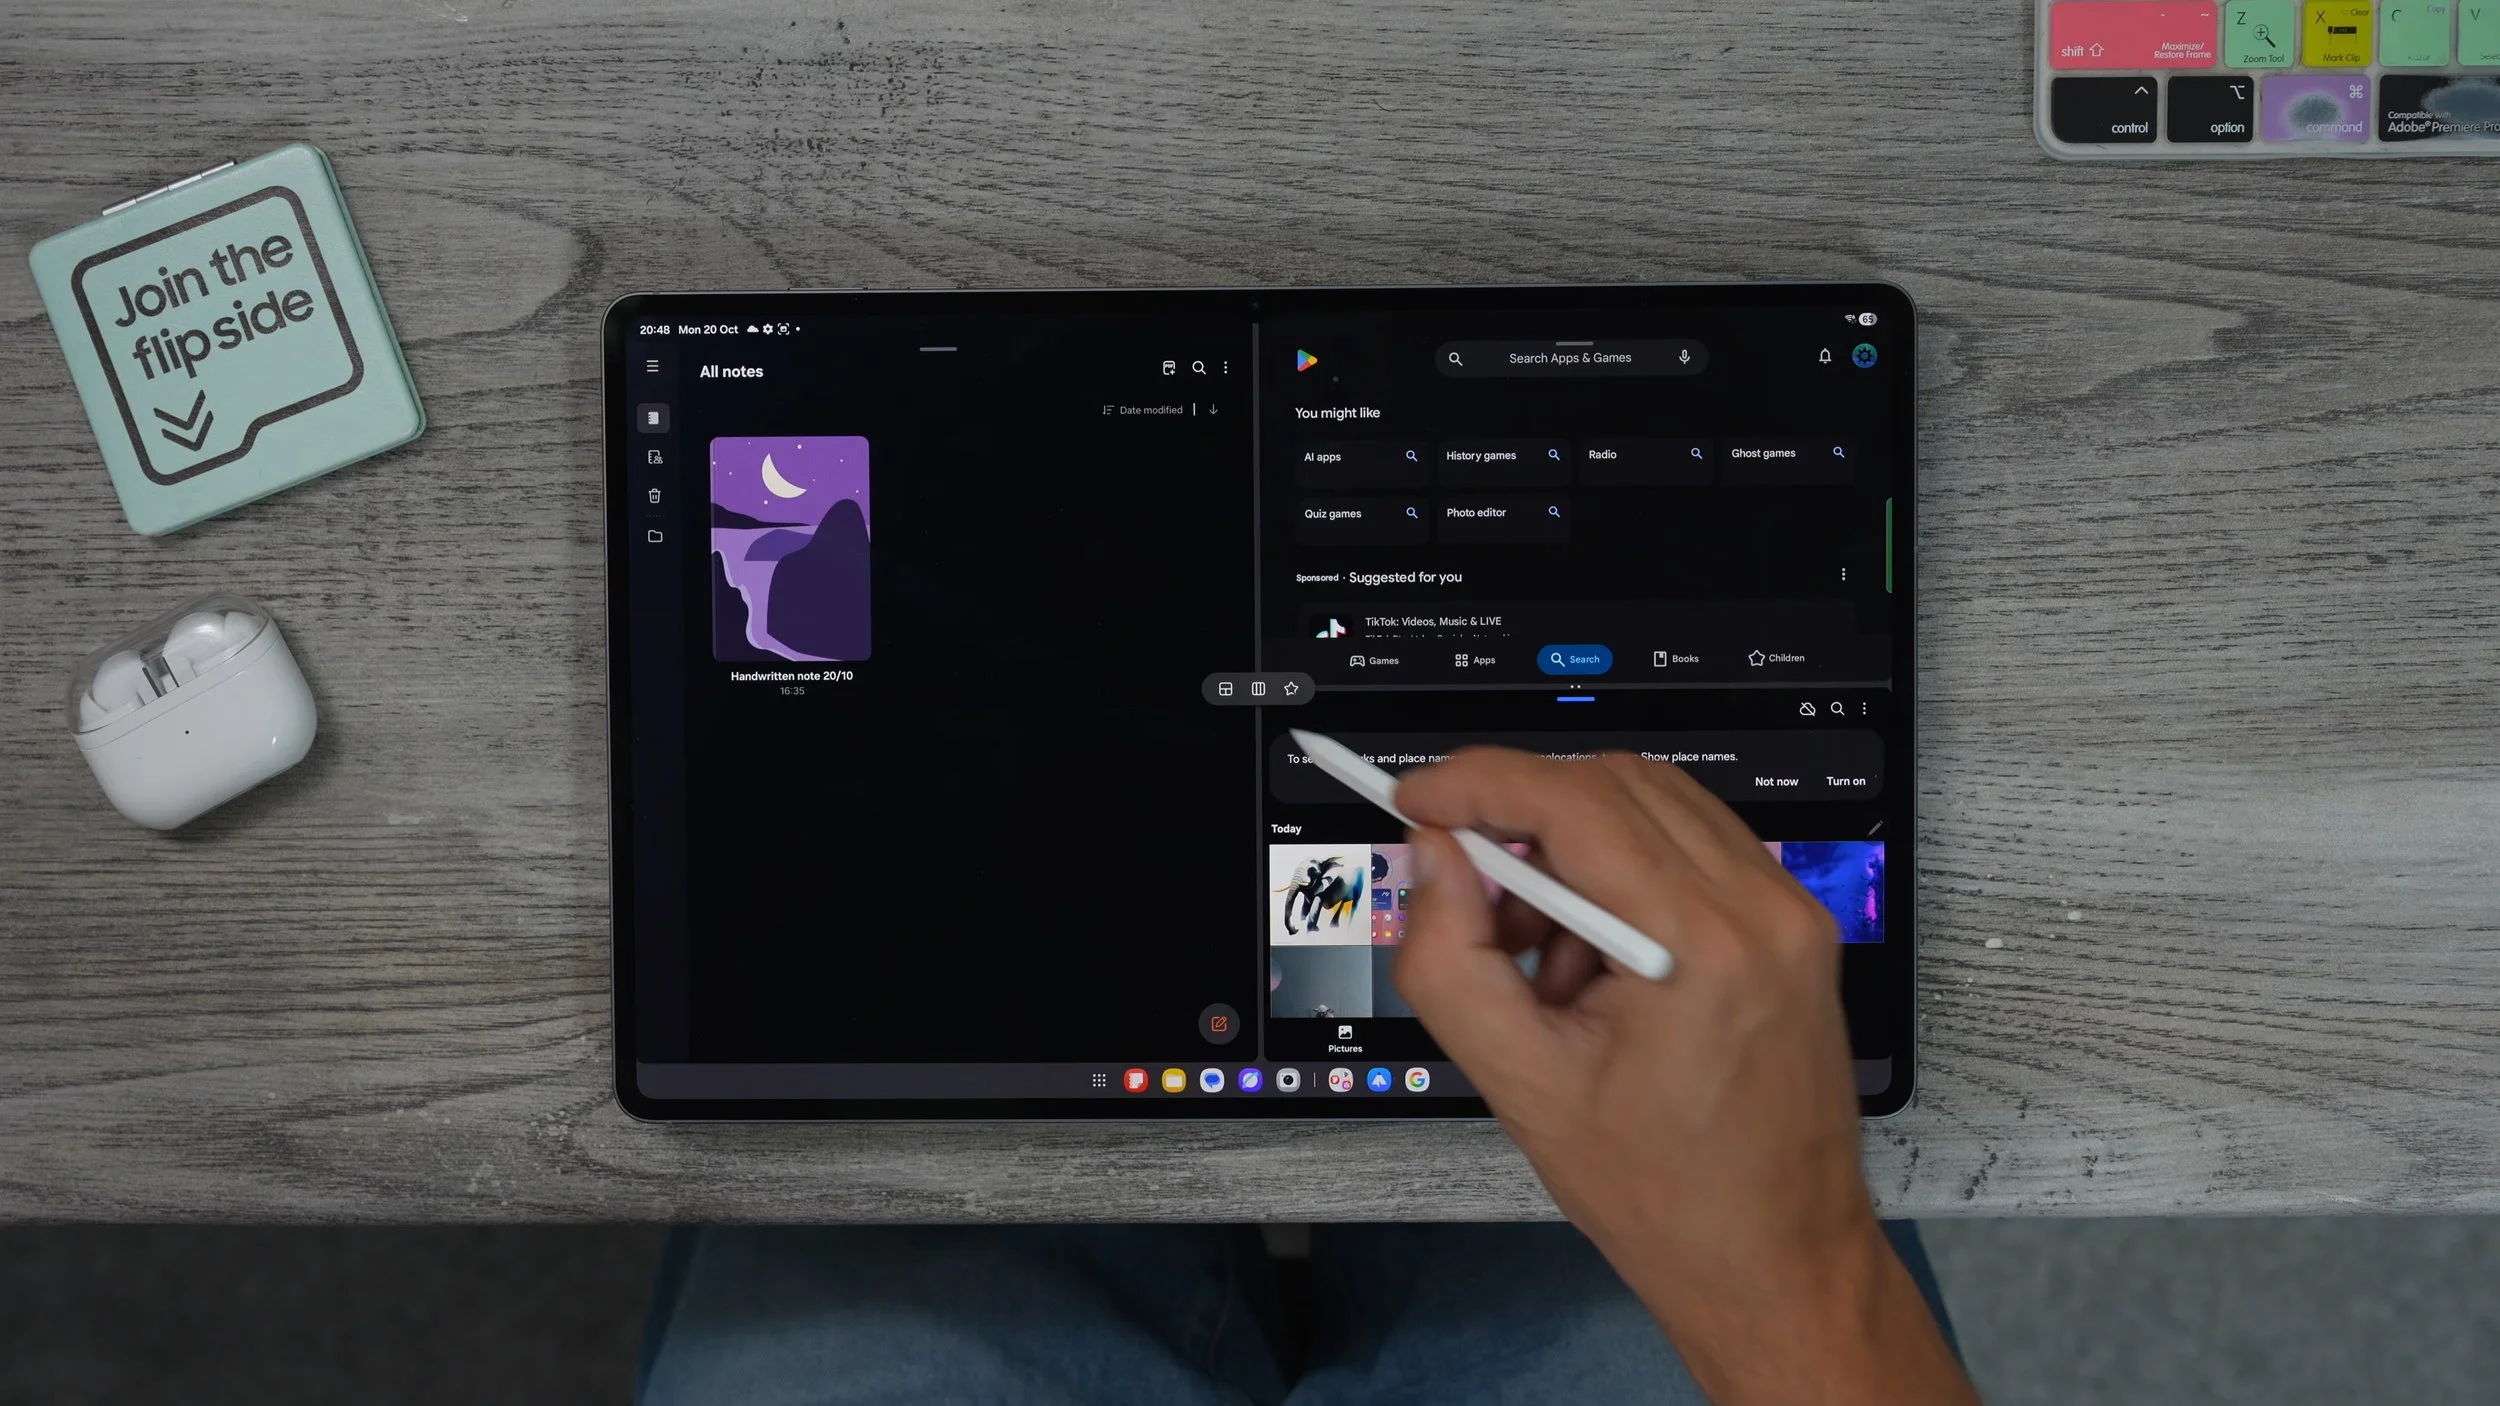
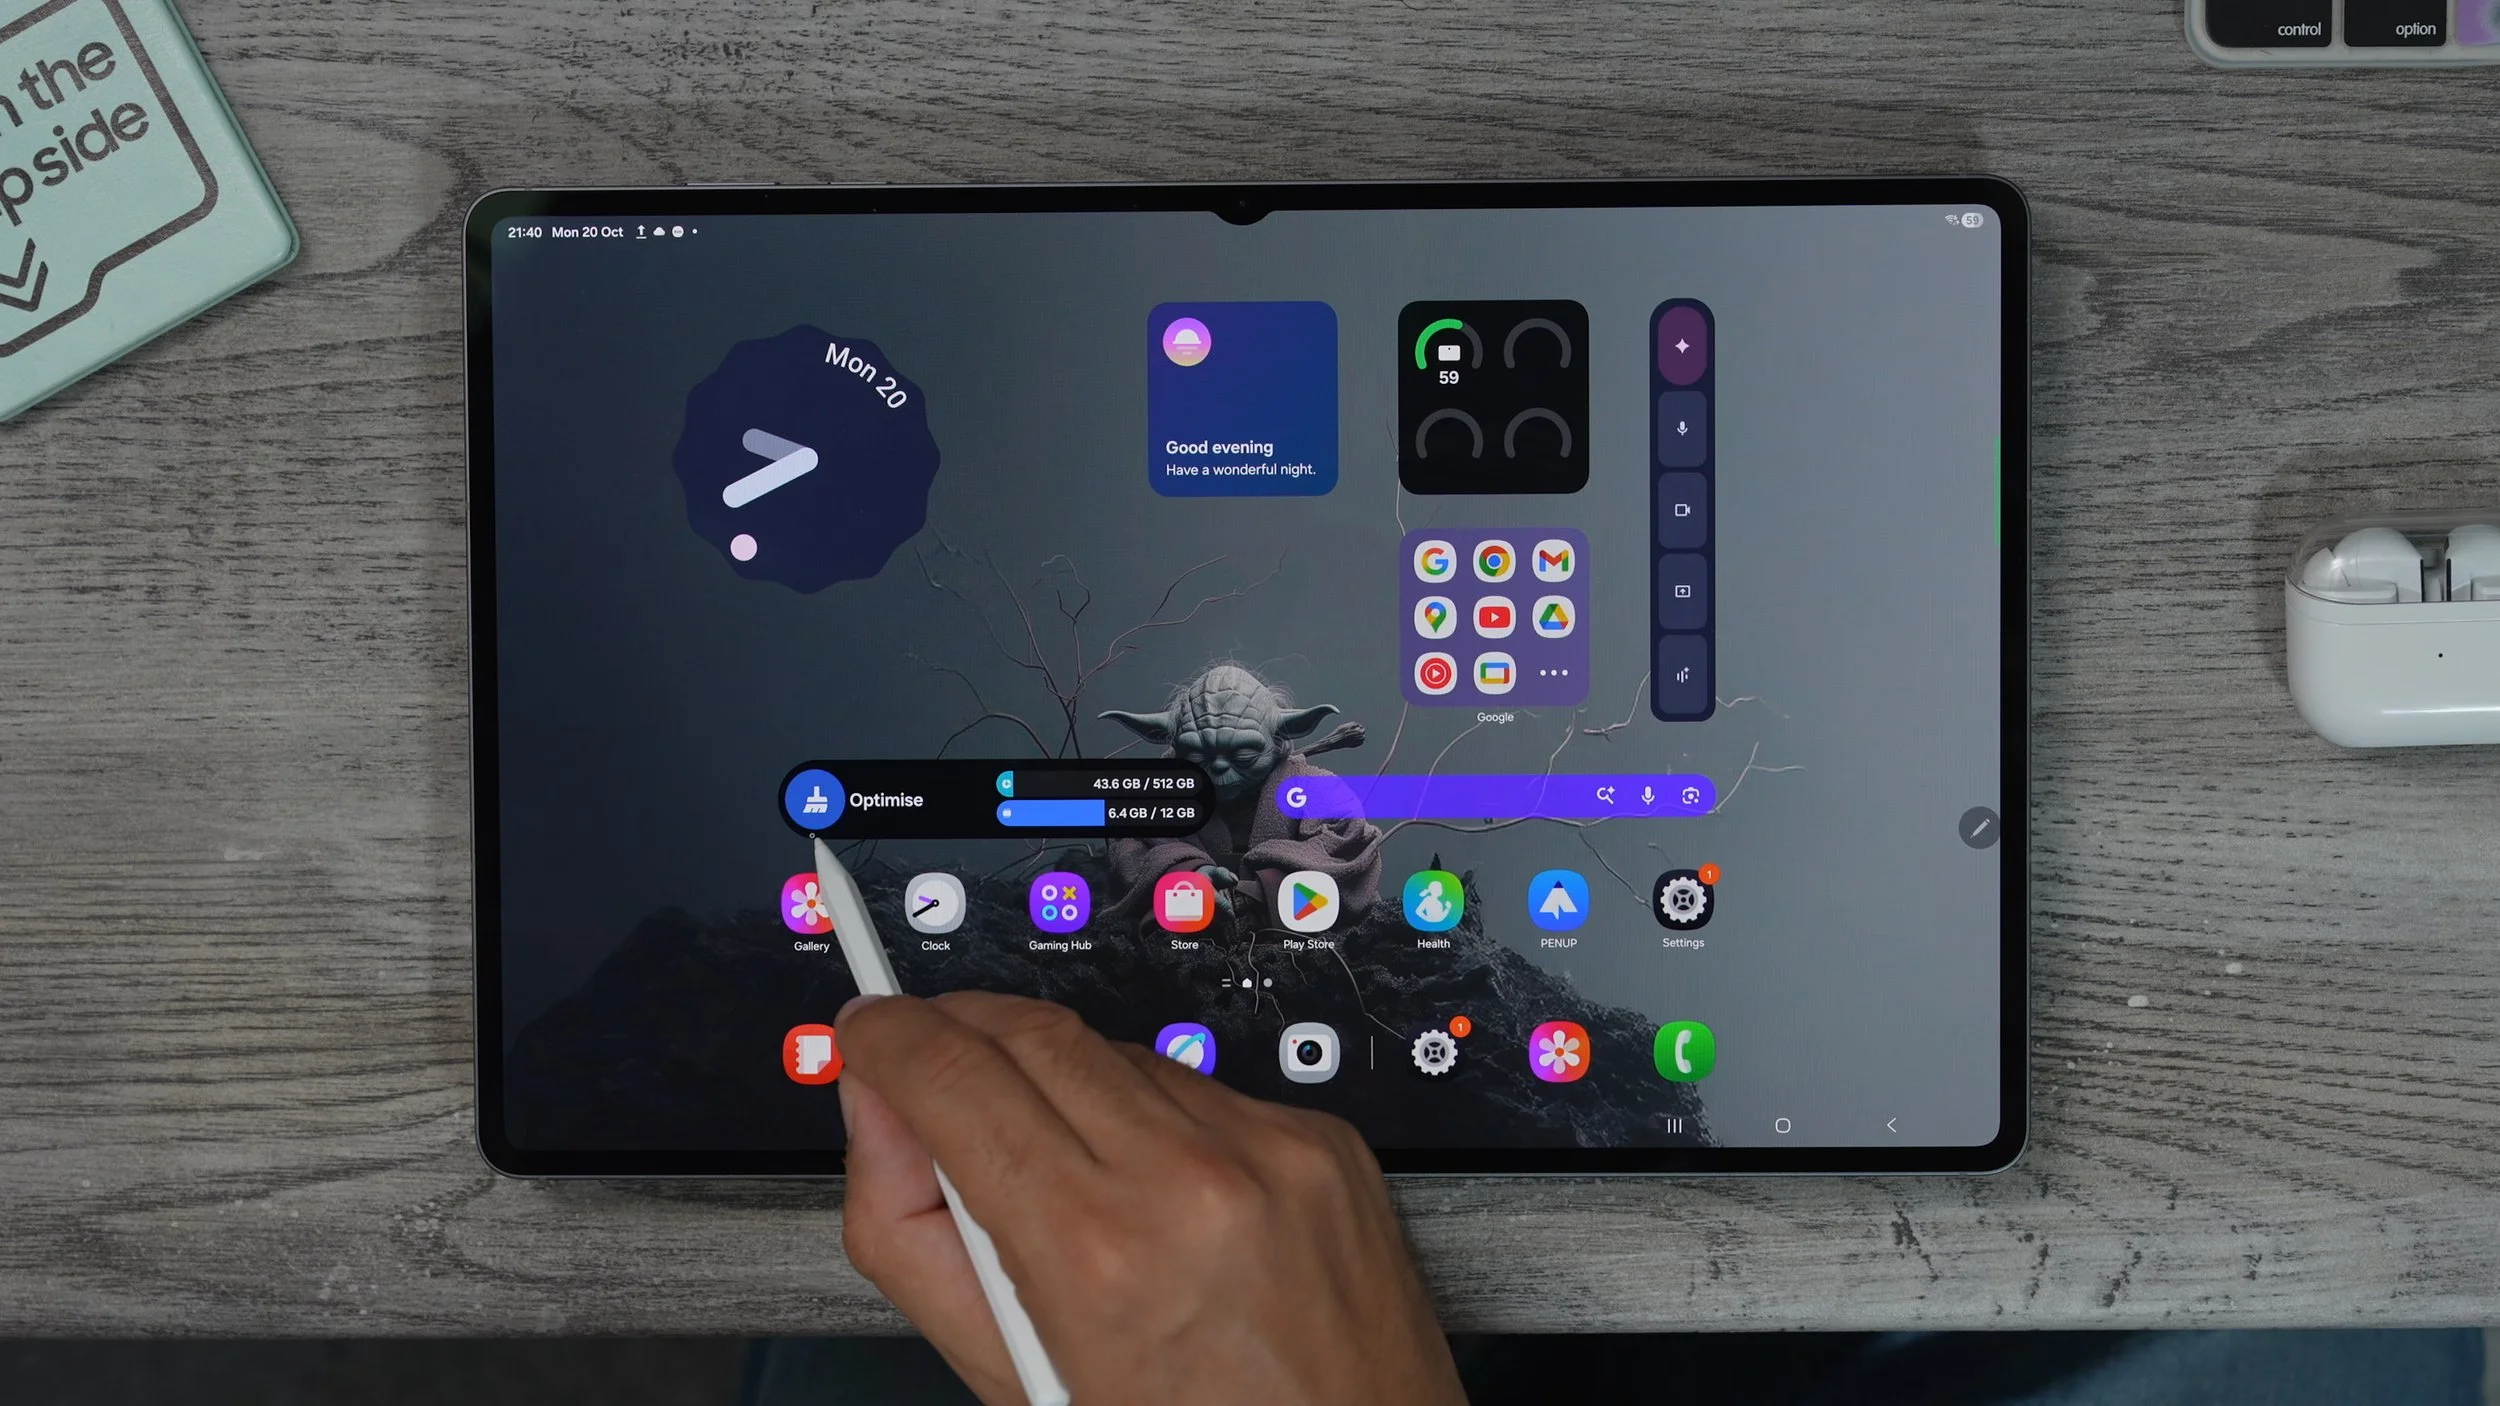
So this has been factory reset. This should be pretty much how your tablet will look straight out of the box. There are two really important steps that you must do straightaway in order for all of the features to work properly on day one. There are two apps that you need to look at first of all: the Google Play Store. If you open this up, go to your little icon in the top right corner and go to Manage Apps and Devices. You will see the update section, I have 14 Google updates. These are all official Google apps. Some of them are actually pre-installed apps as well. Just make sure all of these are up to date.
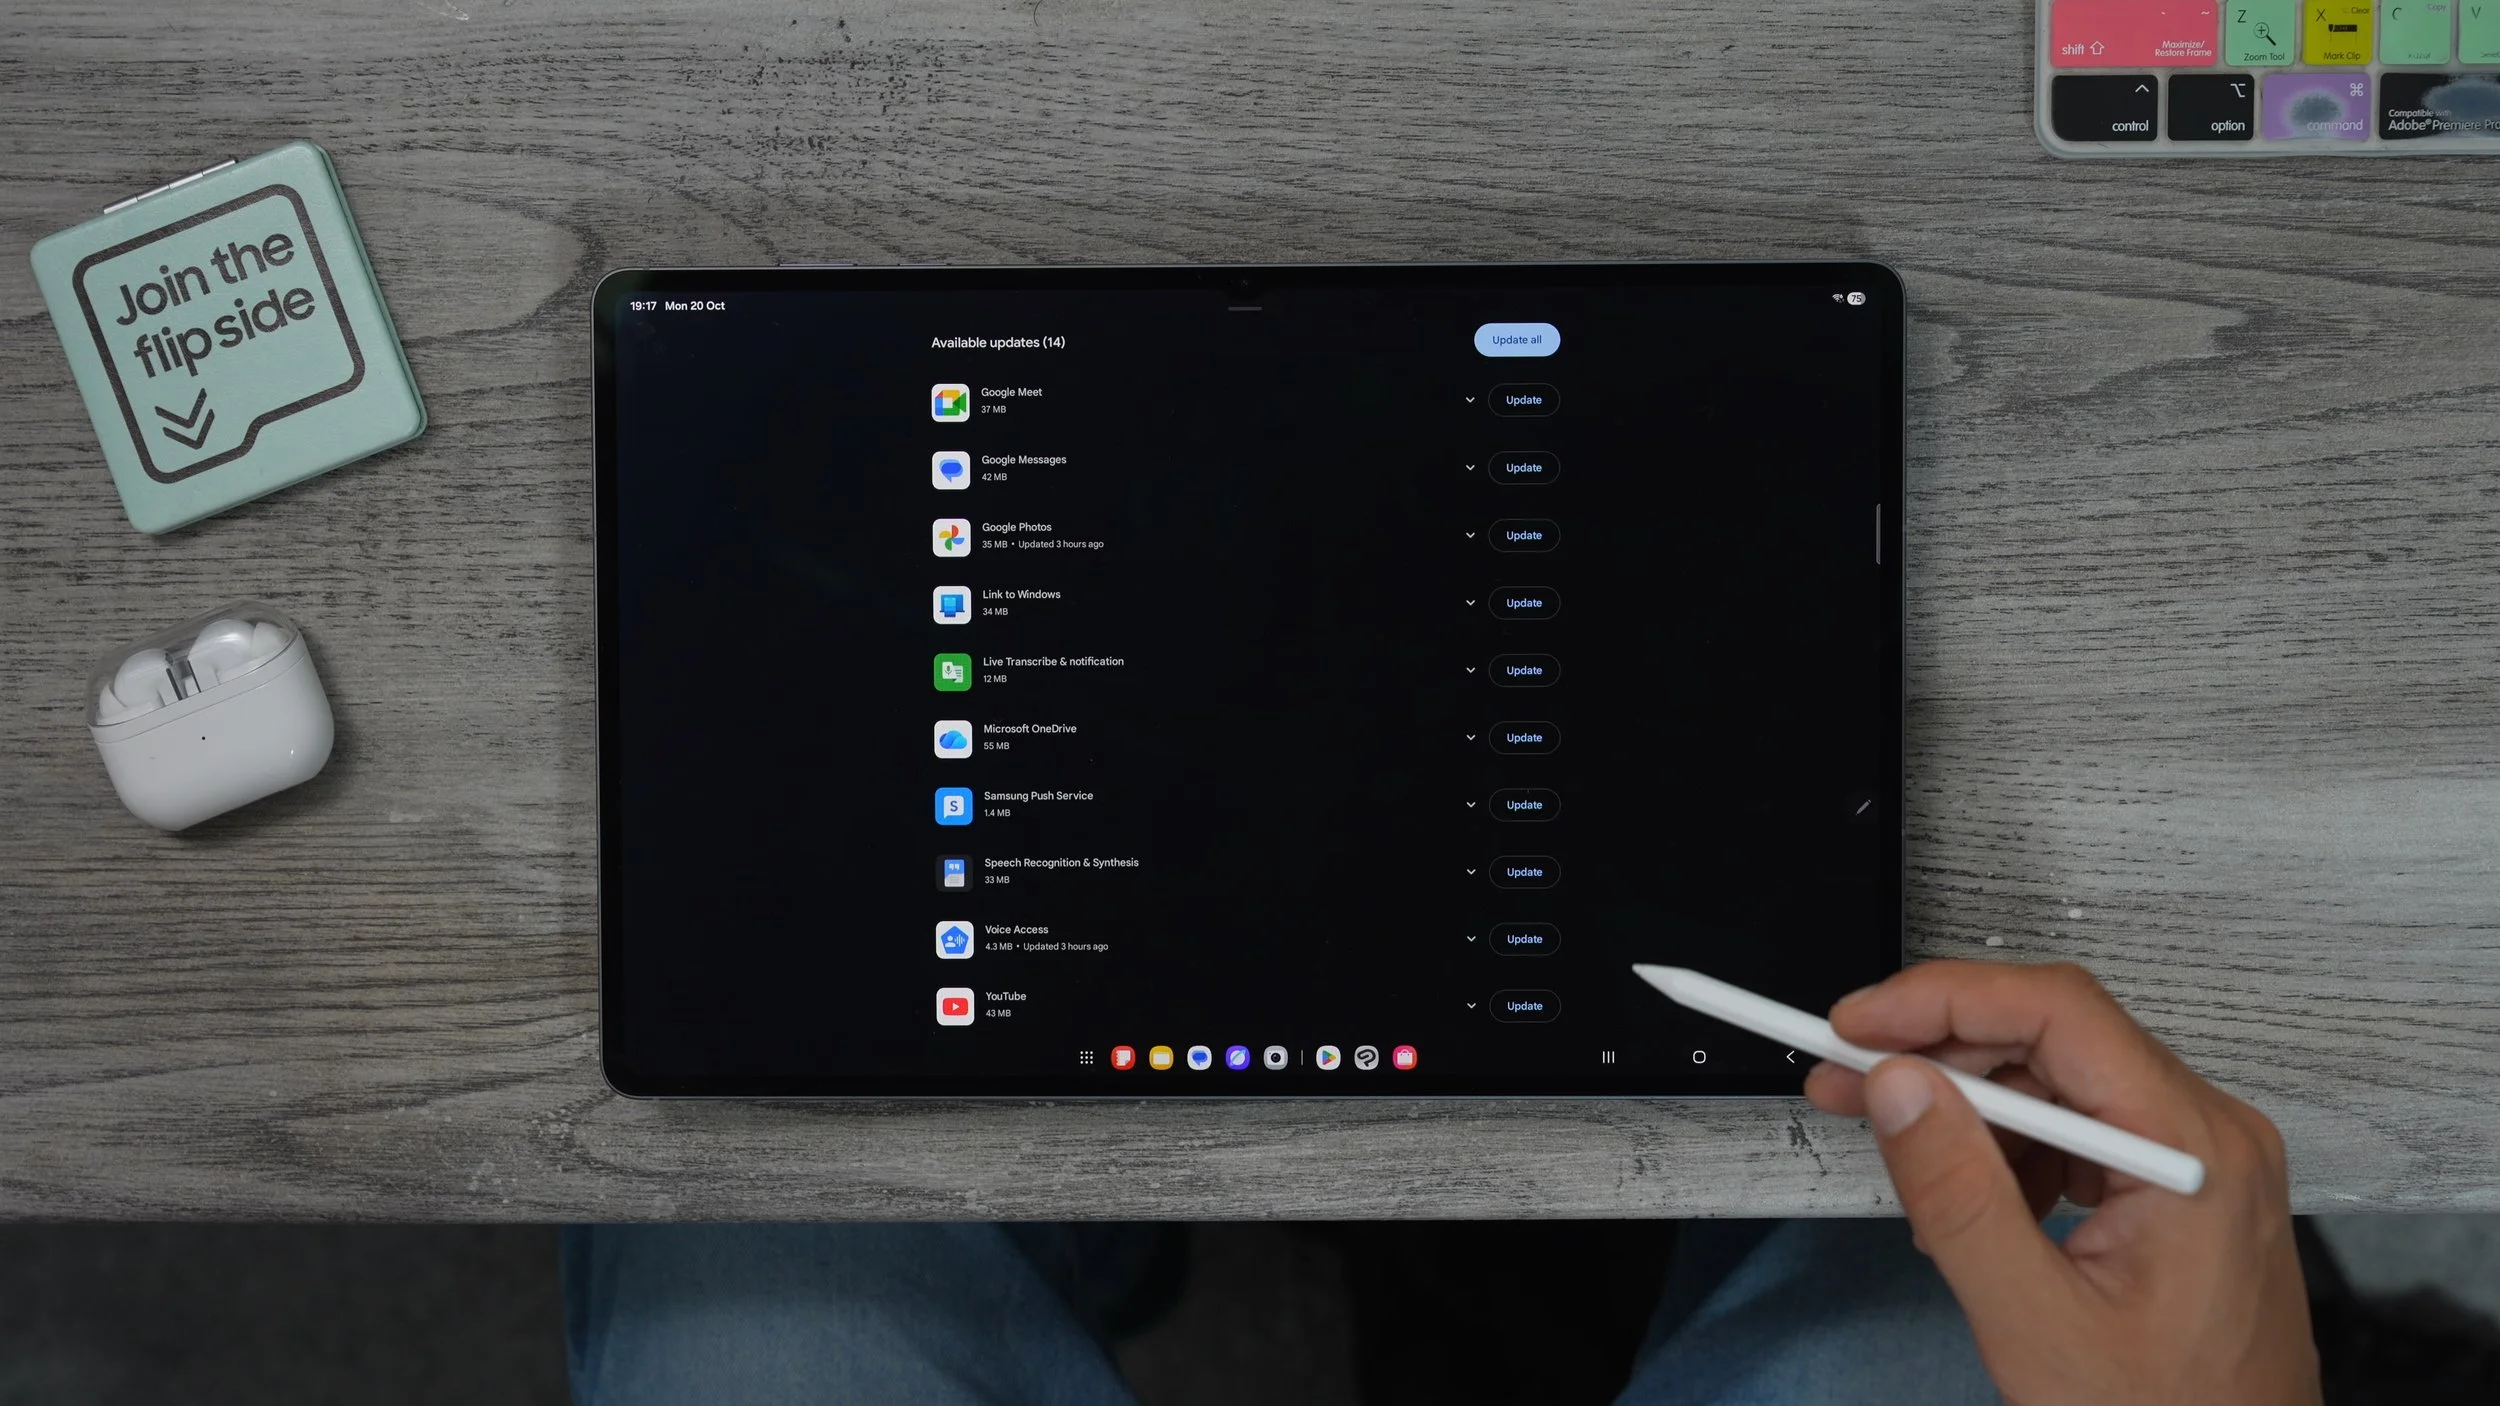
Next, we're going to go to the Samsung Galaxy Store. And in the top left corner, you should see a red dot. Tap on that. And then on the left side, you will see the update. Tap on that and just make sure all of your Galaxy apps are up to date. These are really important; if you don't do this, a lot of the features won't work fully on the tablet, and it could take a while before this happens automatically, so just take the initiative and set this off manually.
TWO SETUPS
You can use the tablet in landscape mode like this, and you can also use it in portrait mode like this. But did you know? Each layout, for each orientation, can be customised separately. For example, if I take the now breathe and just move it up here, and then I switch back to portrait mode, it goes back to the original set-up for the portrait mode. So the now brief is still down here. If I take the weather widget and move it up, when I go back to landscape, it remains where it was when I was last in landscape. So this means you will have to spend a bit of time customising your home screen, for both orientations, landscape and portrait.
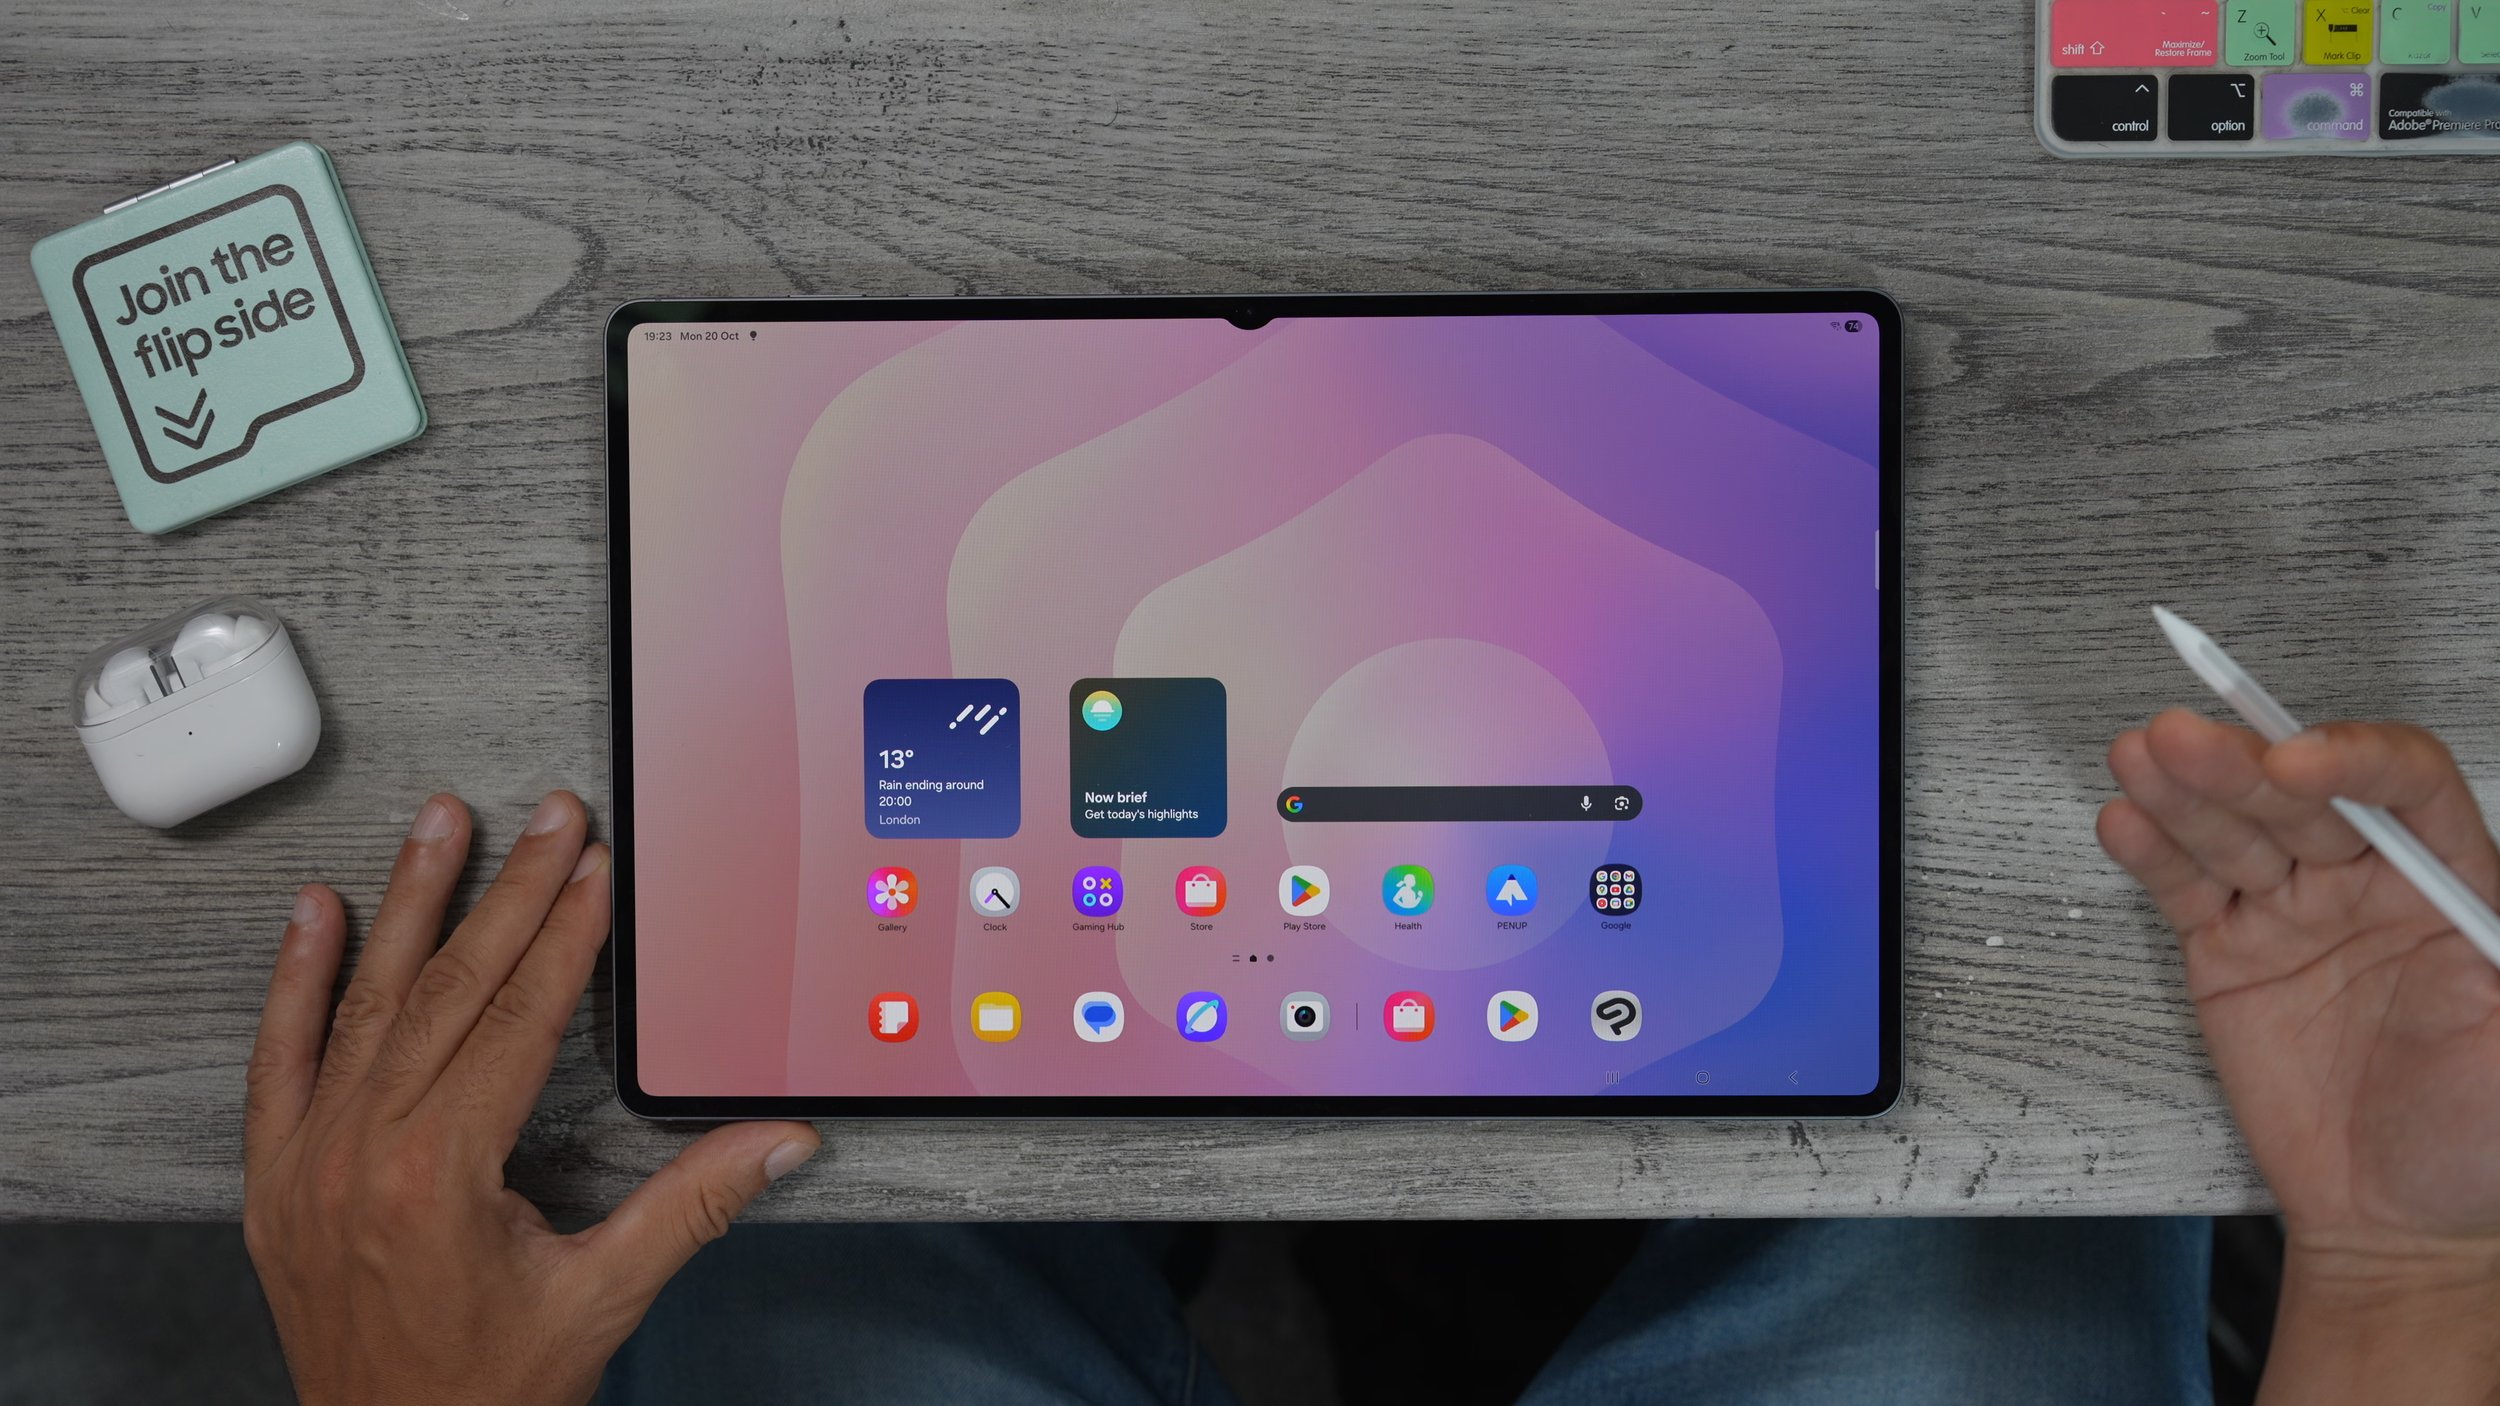
With that in mind, though, there are a couple of things that will not change. For example, if you customise the taskbar, when you flip to portrait, that will remain the same and the actual apps that appear and the widgets that appear will remain the same. However, you can change the size of widgets. For example, if I shrink this down to the smaller now brief when I switch to portrait, the now brief is still the full-size widget. So just keep that in mind. You can customise the size of widgets. You can't customise what apps, and you can't customise the taskbar independently. And there's a ton more customisation tweaks and hidden secrets and features when it comes to customisation, which we're going to get to a little later on, including where I got this clock from. But for now, let's move on to the next one.
FIND THINGS QUICKER
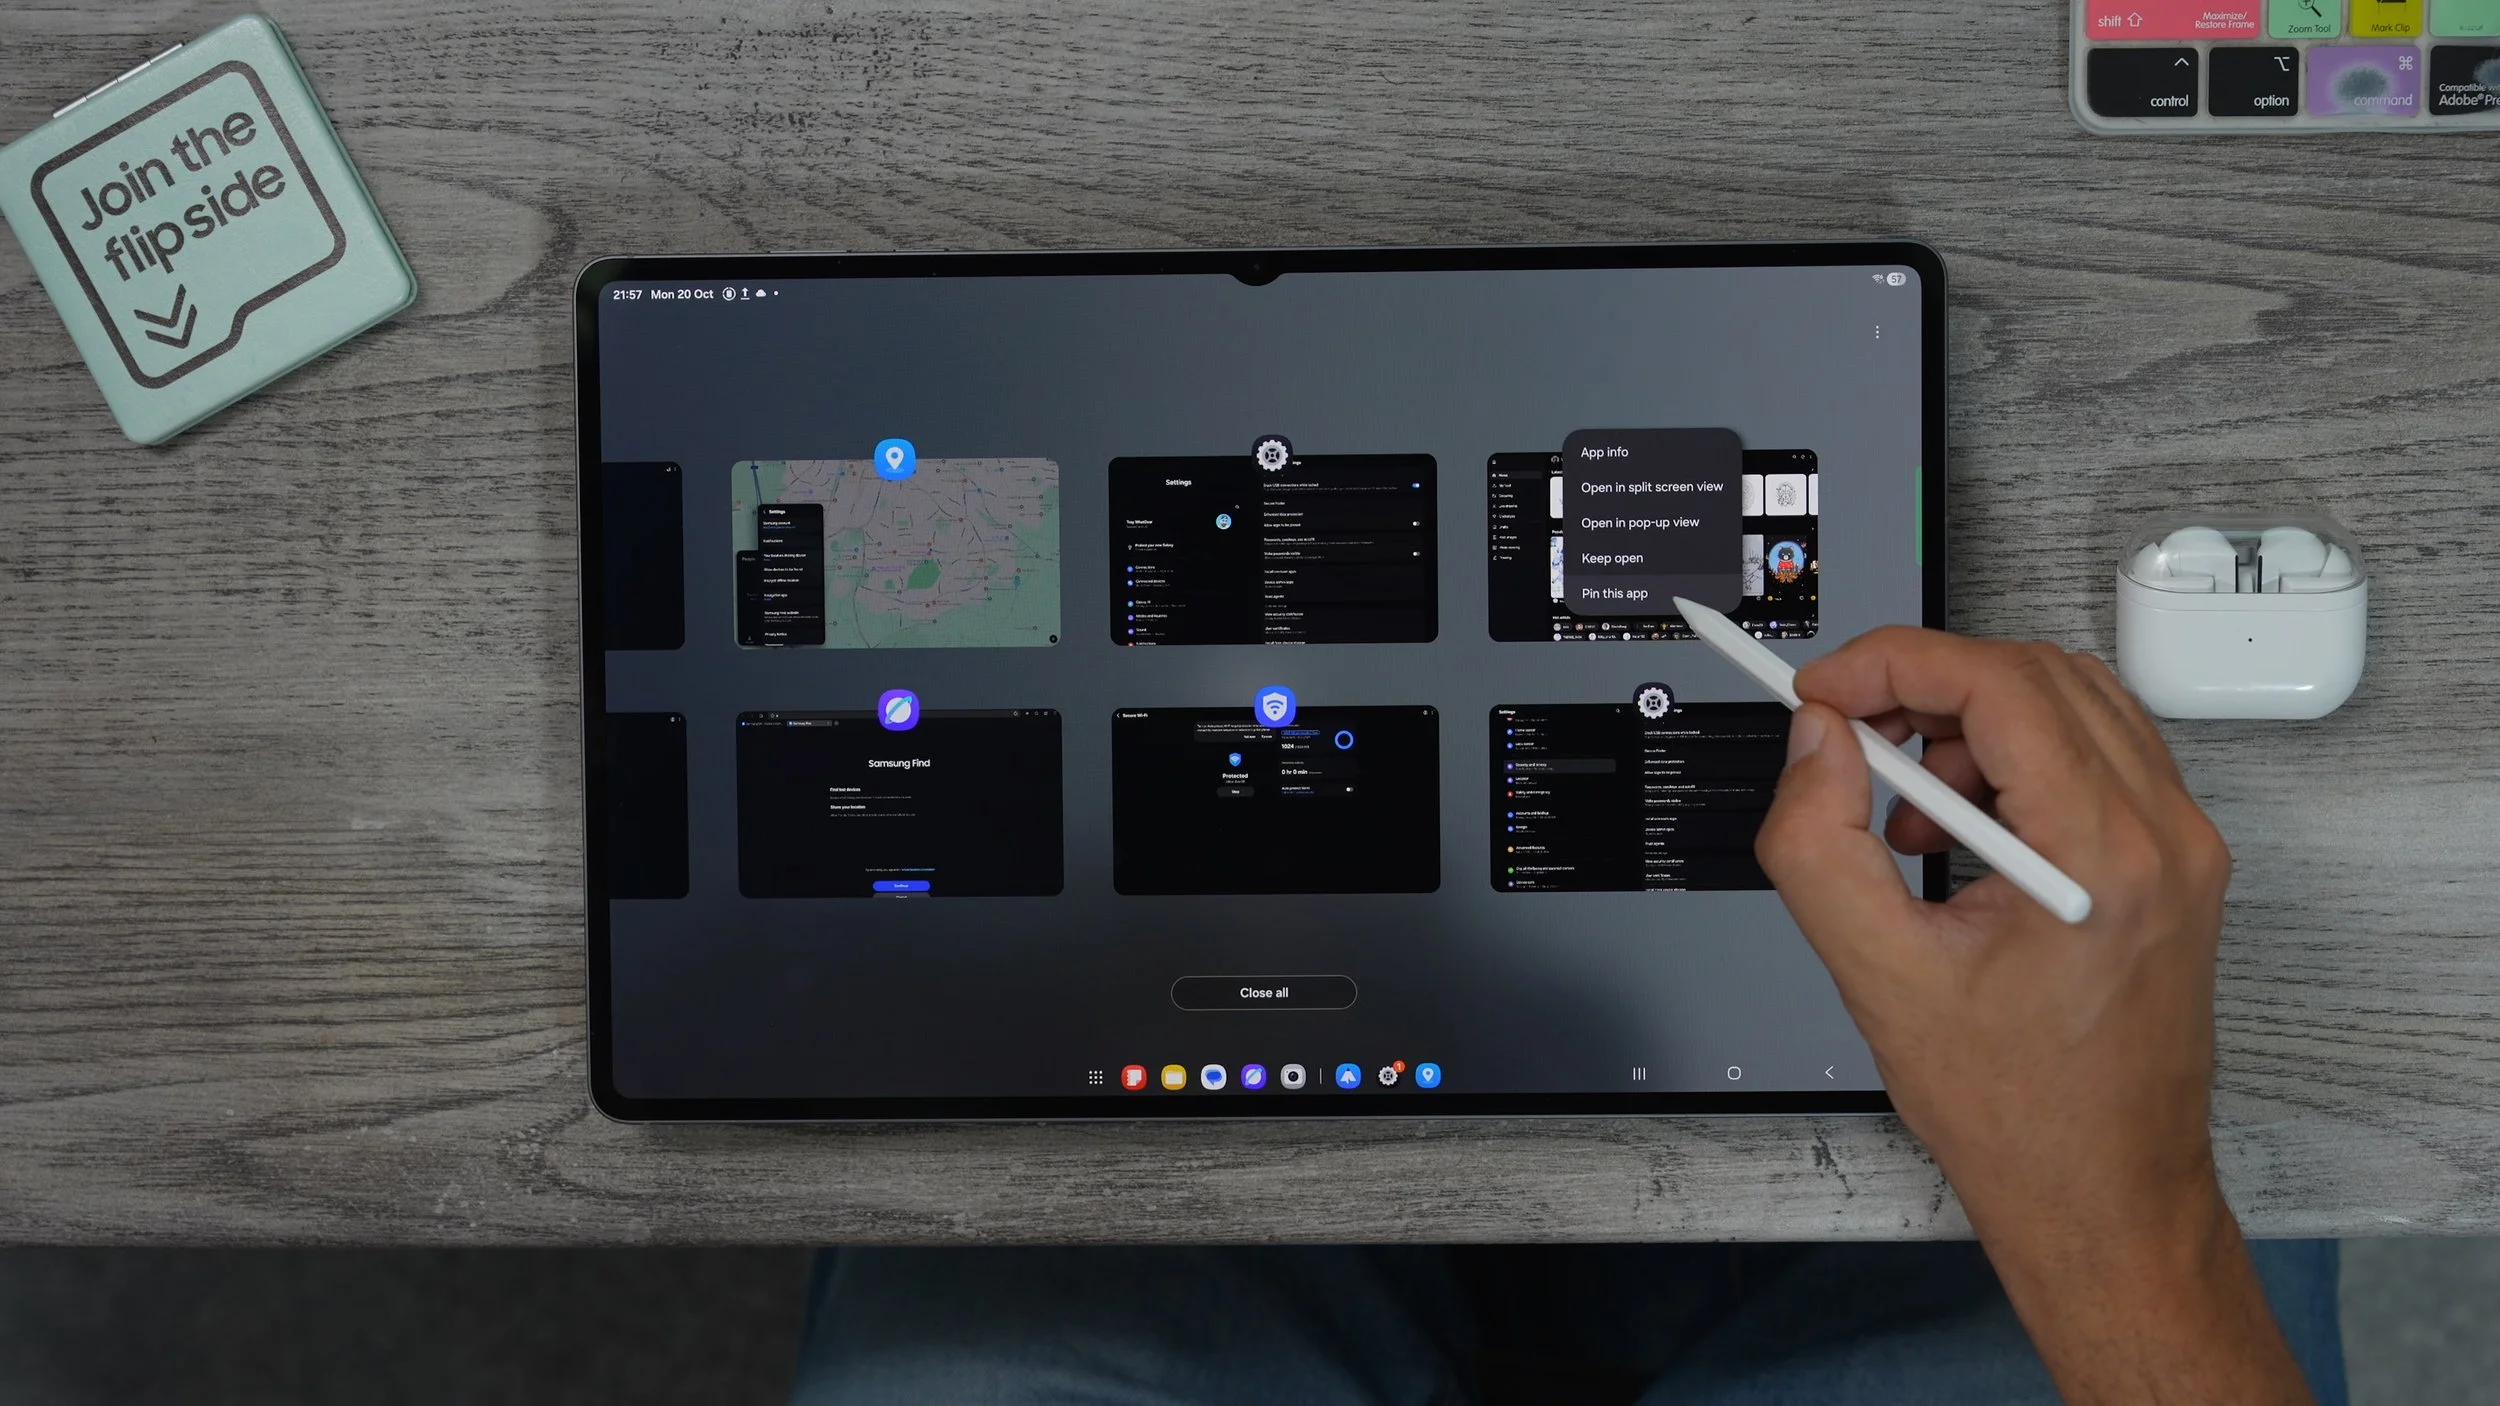
something you're going to find really frustrating down the line. When you start installing loads of apps and things like that, it's when you open up the app drawer by swiping up, they will be all over the place and not organised in a way that they're easy to find. Unless you just type in what it is you're looking for. Here is something I highly recommend you do on day one, because it's going to save you time.
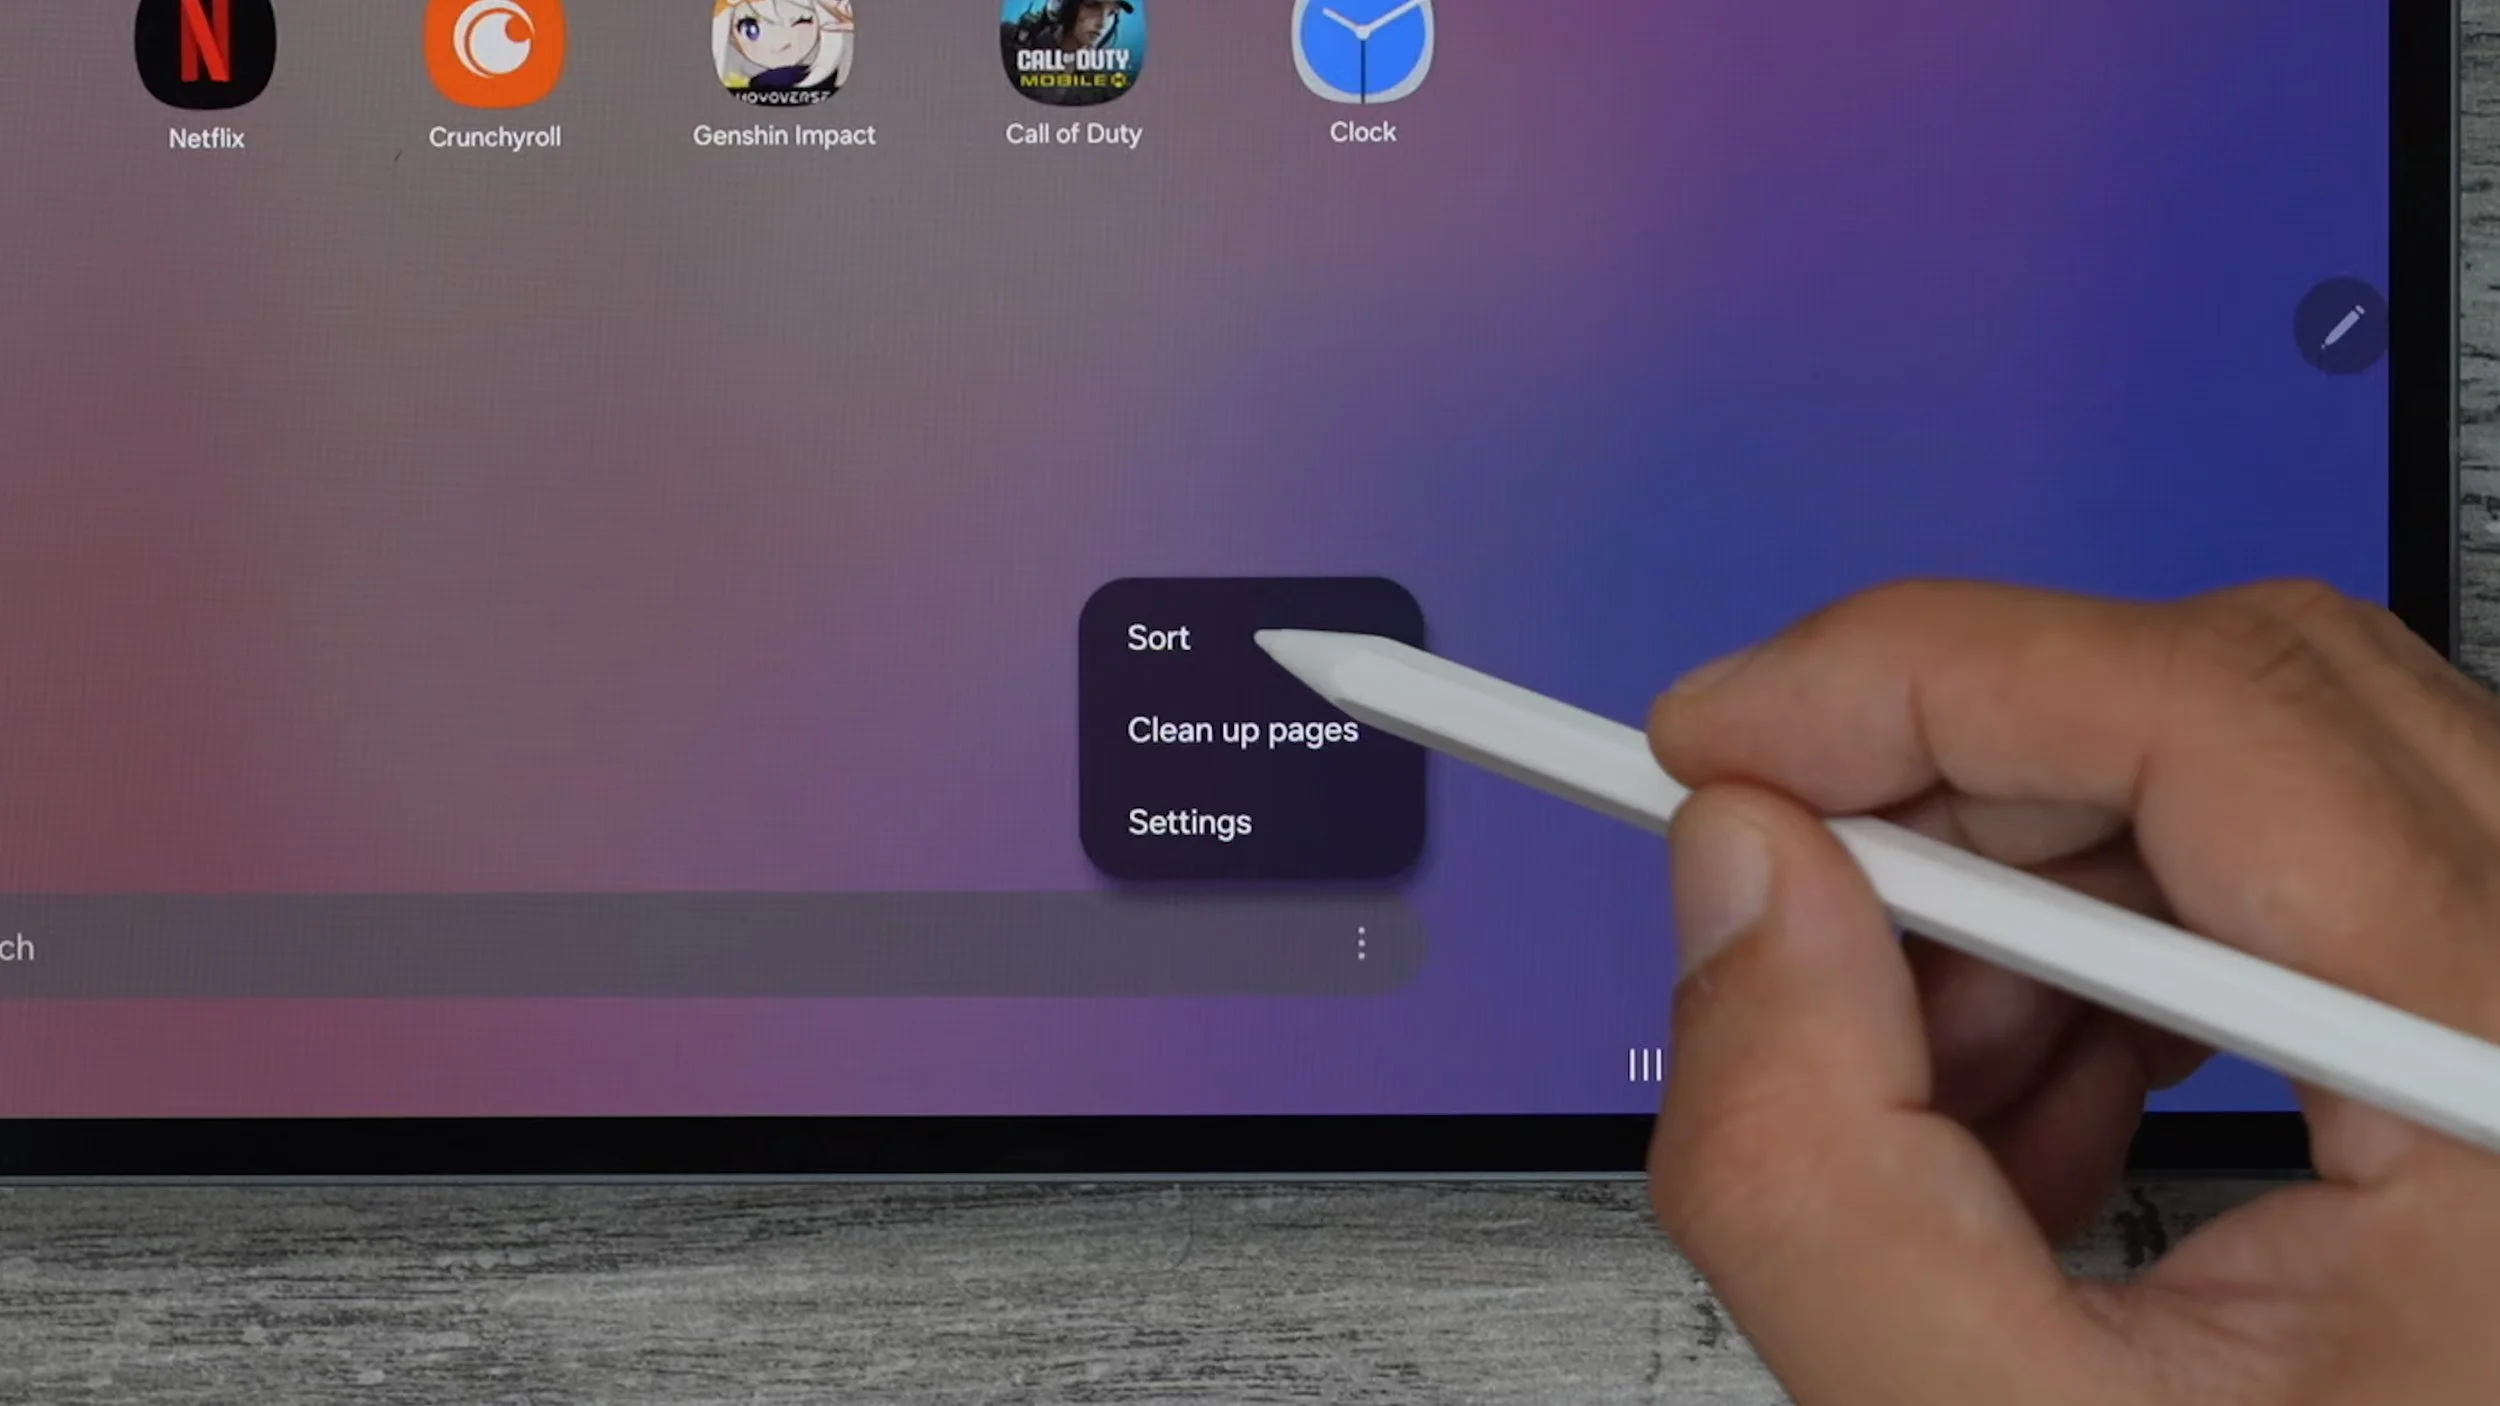
So when you swipe up, this is what's known as your app drawer. Here in the search bar at the bottom, you'll see the three dots. You tap on that, and then tap on sort. Here you can organise your app drawer alphabetically. Now it's just going to be much easier to find what you're looking for without having to type in and search, having to scan through all of the apps to find the icon or the app name that you're looking for.
PASSWORD AUTOFILL
This is a very important fundamental step, and I think a lot of people would never even look at this. We're going to go into the settings. There are a couple of ways to do this. You can either go to your apps and then go to settings. What I'm going to do is just bring this onto the home screen. Another way to access the settings is to swipe down from the top right corner, and you'll see the settings here as well. On the left side, we want to scroll all the way down to security and privacy. On the right side, we're going to go to more security settings. And in here we're going to go to passwords Pass passkeys, and autofill. Right here, it says preferred service. If you go to the little settings, you can actually choose which service is going to take care of autofill for your passwords. If you use the Google Chrome browser or you use another Google phone, just not a Samsung phone, then all your passwords are going to be backed up by Google.
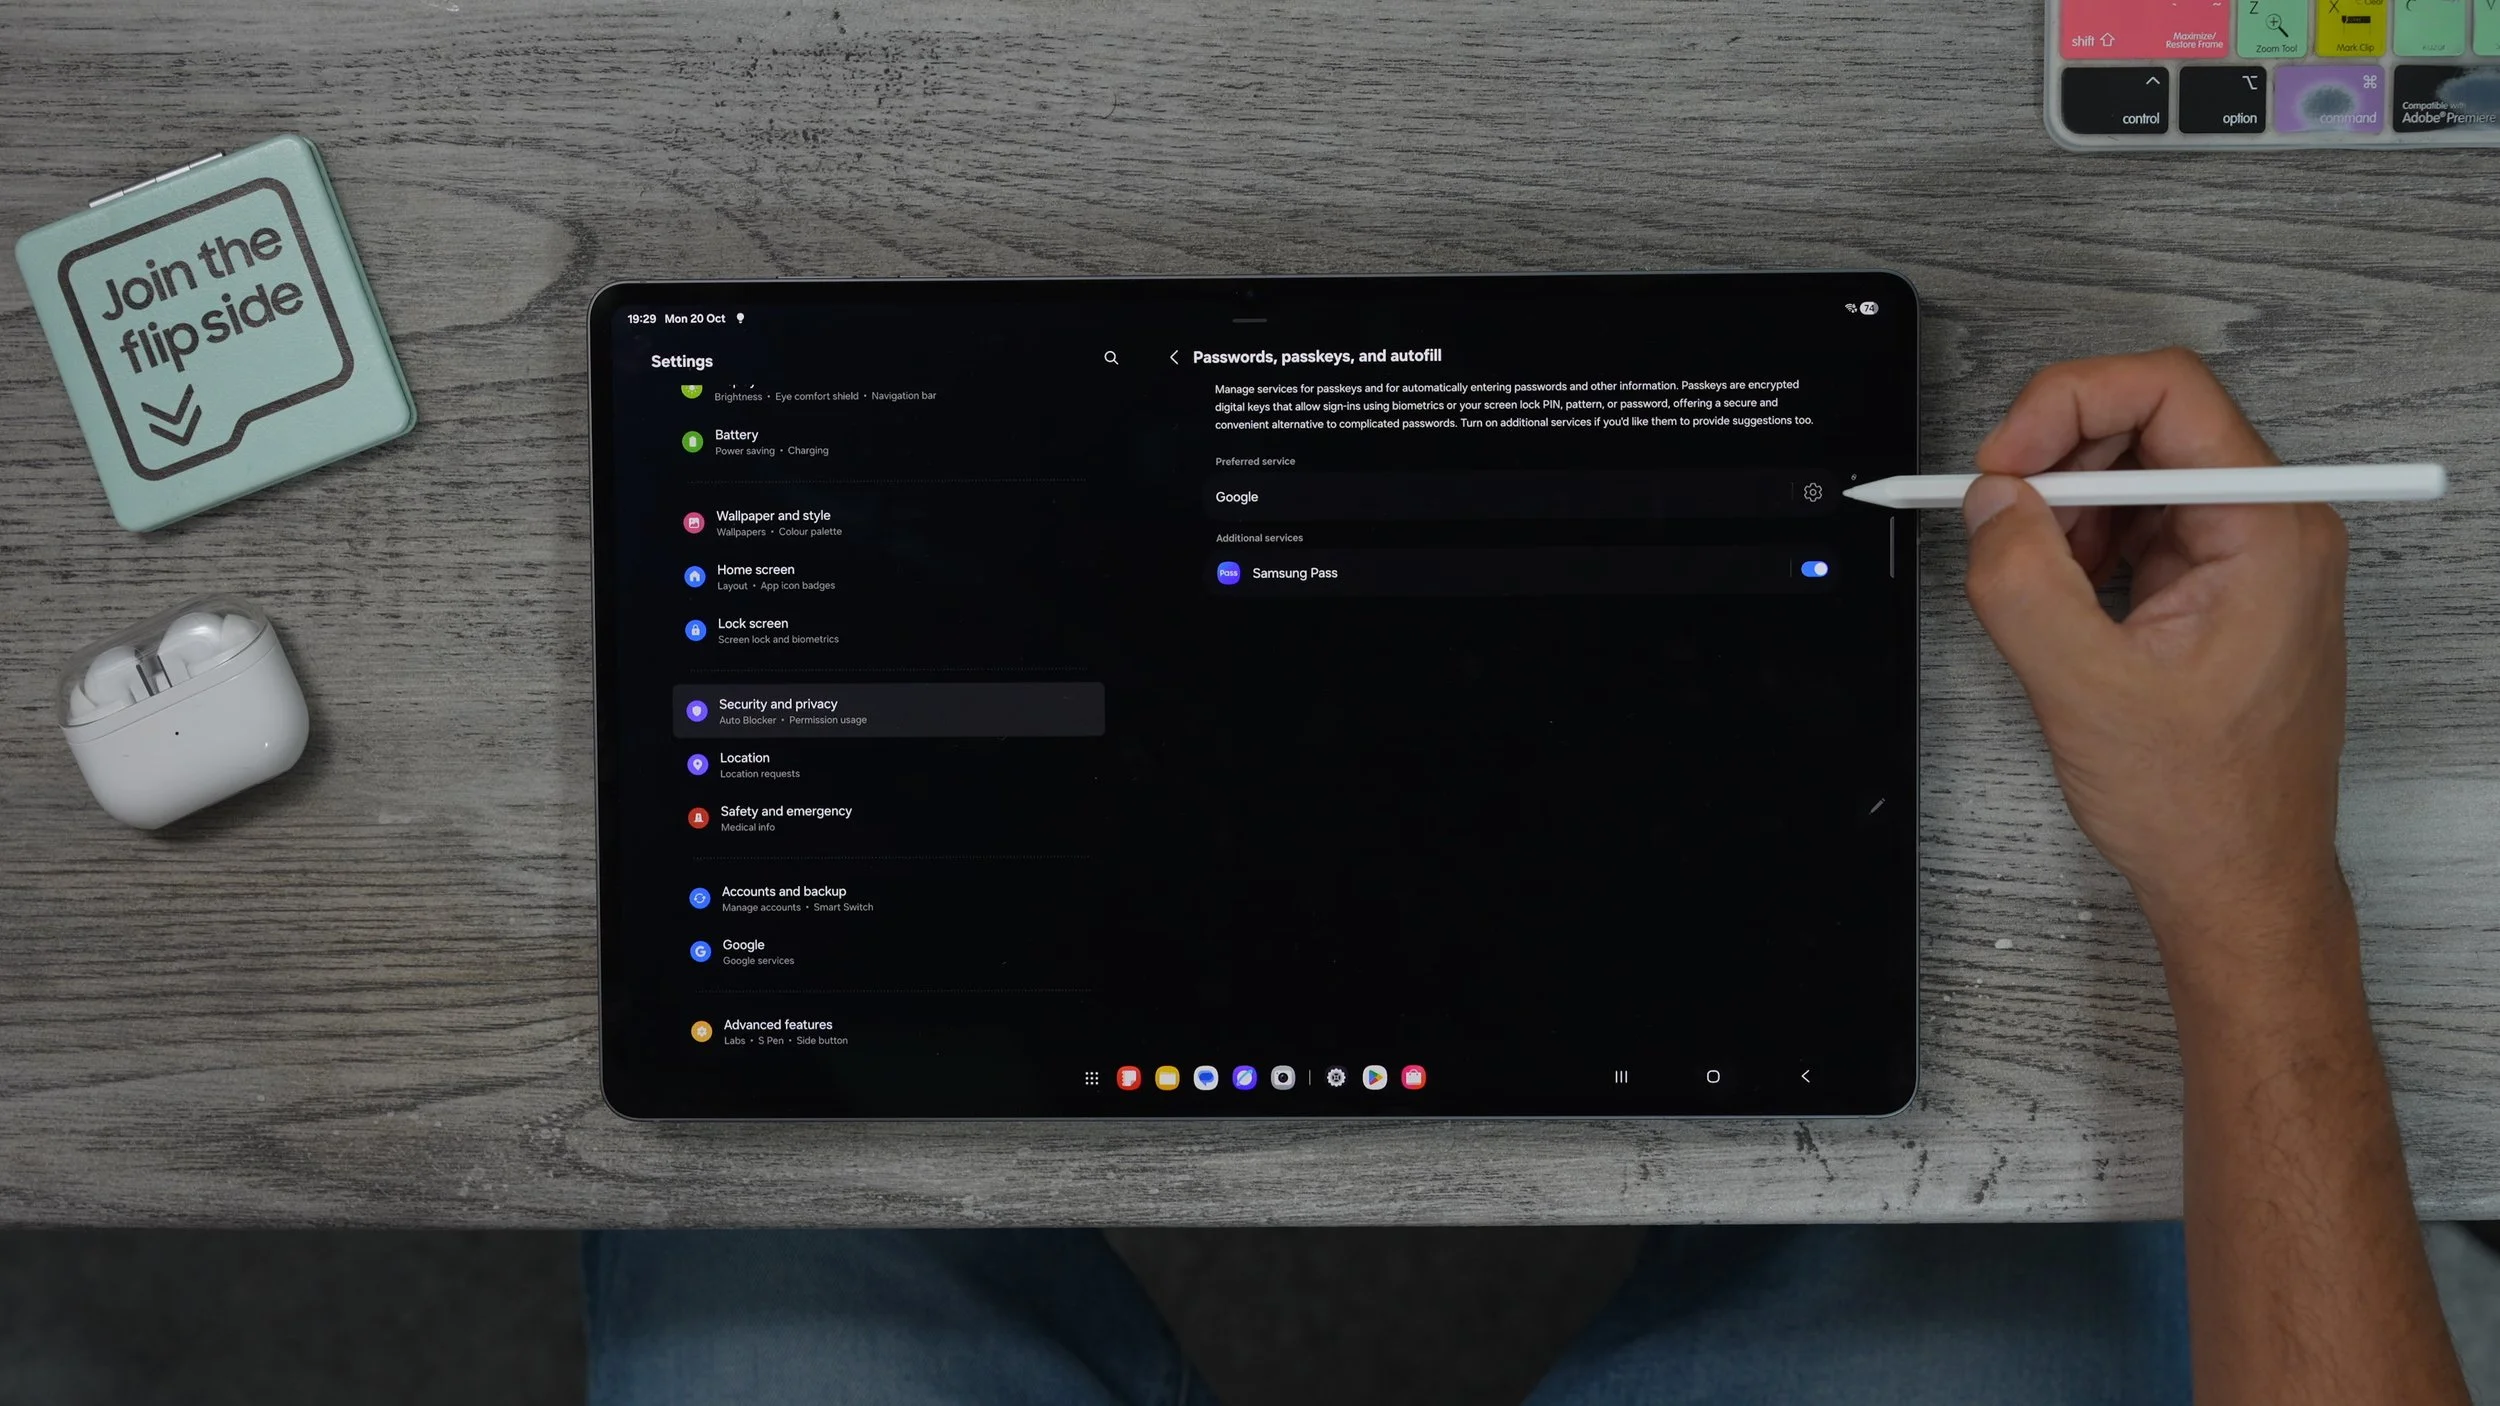
If that is the case, you want to leave this on Google. If you do use the Samsung Pass app for all of your passwords, switch it to Samsung Pass. If you've got another third-party app for your passwords, you can add that service here. I personally use Chrome on all my devices, so all my passwords linked to Chrome are carried over and will autofill everywhere on this tablet. So definitely consider doing that. And suppose you're the type of person who really struggles with remembering passwords and you want an easy and free way to access them very quickly, whenever you forget them. In that case, There is a Google feature on this tablet which keeps everything locked away using your biometric fingerprint is very, very secure but is so well hidden that a lot of people will never find it. I'm going to show you guys how to find it and how to make it very easy to get to whenever you forget a password, so stick around for that. But now let's move on to some of the fun tips and tricks.
SKETCH & TRACE
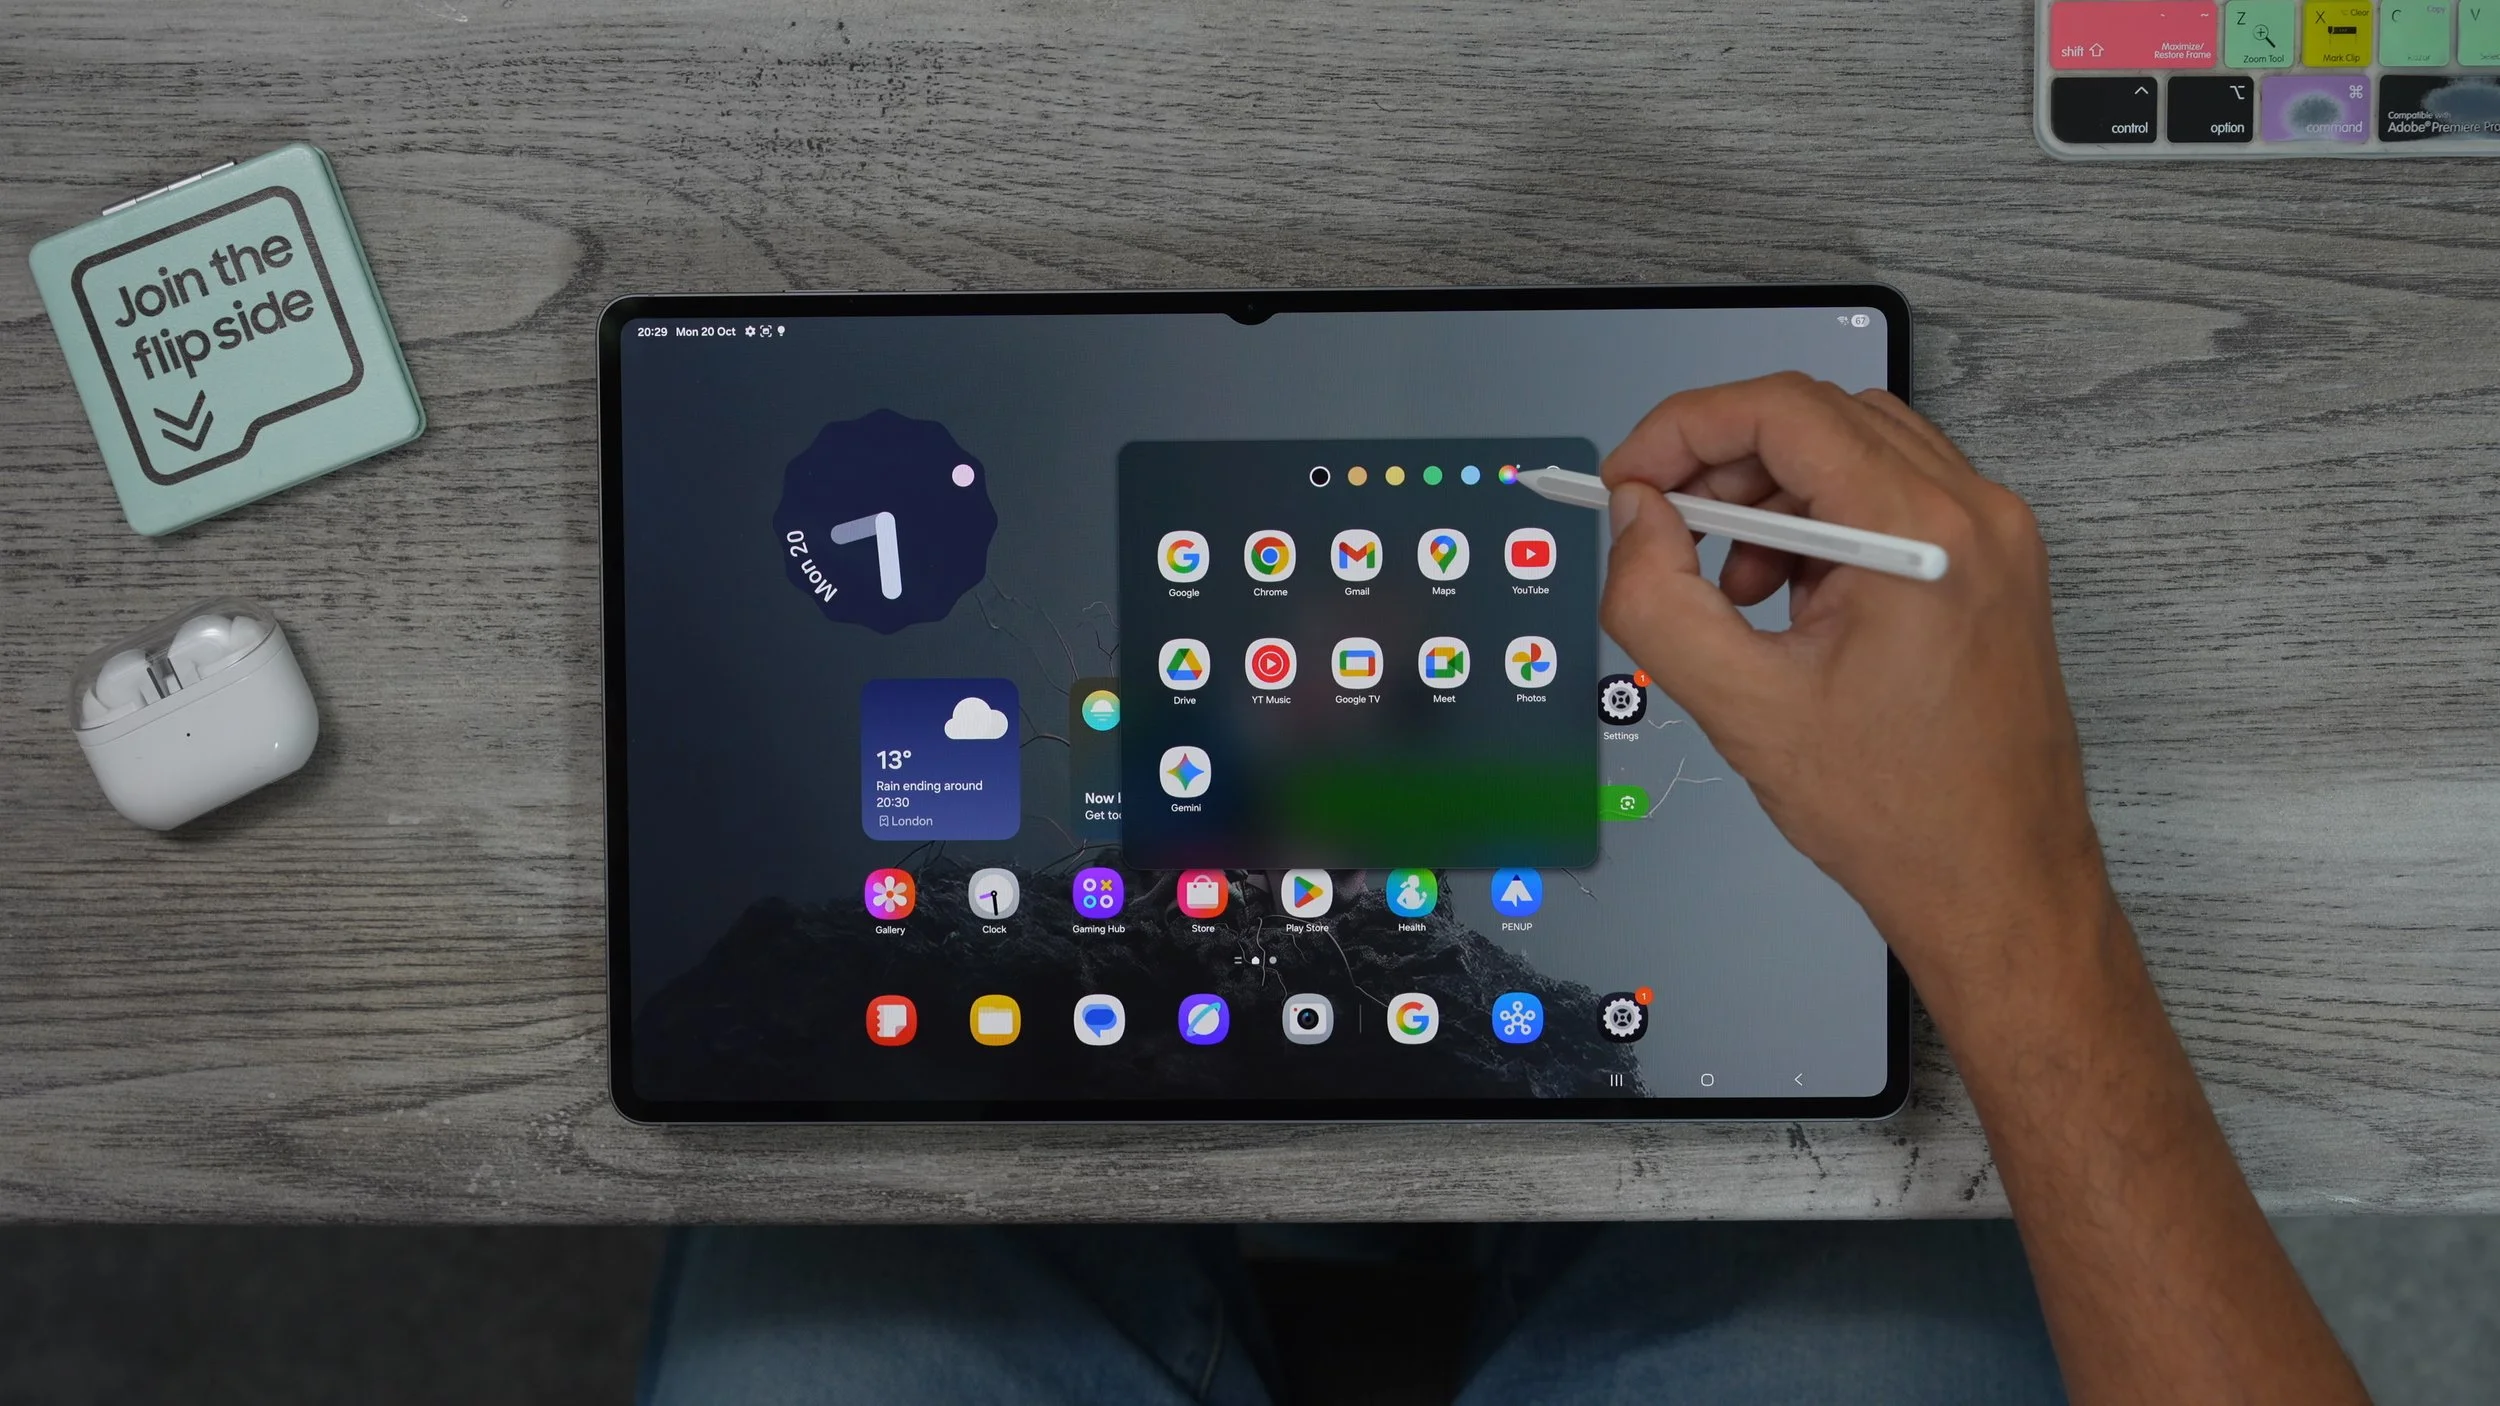
Samsung is kind enough to actually give you the S-Pen with the Galaxy Tab S11, and there are some cool things you can do with it. Let me show you how to unlock some of those features. Whenever you hold the S-Pen near the screen, you get the pen icon. If you hover over it, you'll see its name of which is called Air Command. If you activate this, it's got three apps set up for you. But if you hit the little plus at the bottom of the window, you can add all of the spin apps. For example, translate magnify pin up, which is one of my favourites, and write on calendar. Now, when we go back, all of the apps are available whenever we open up the Air Command. My absolute favourite S-Pen app is Pen up. You can use this in various ways. On the left side, if you go to colouring, you can choose whatever you want and start colouring straight away. And you can even see what other people have done with it and share your own designs online as well.
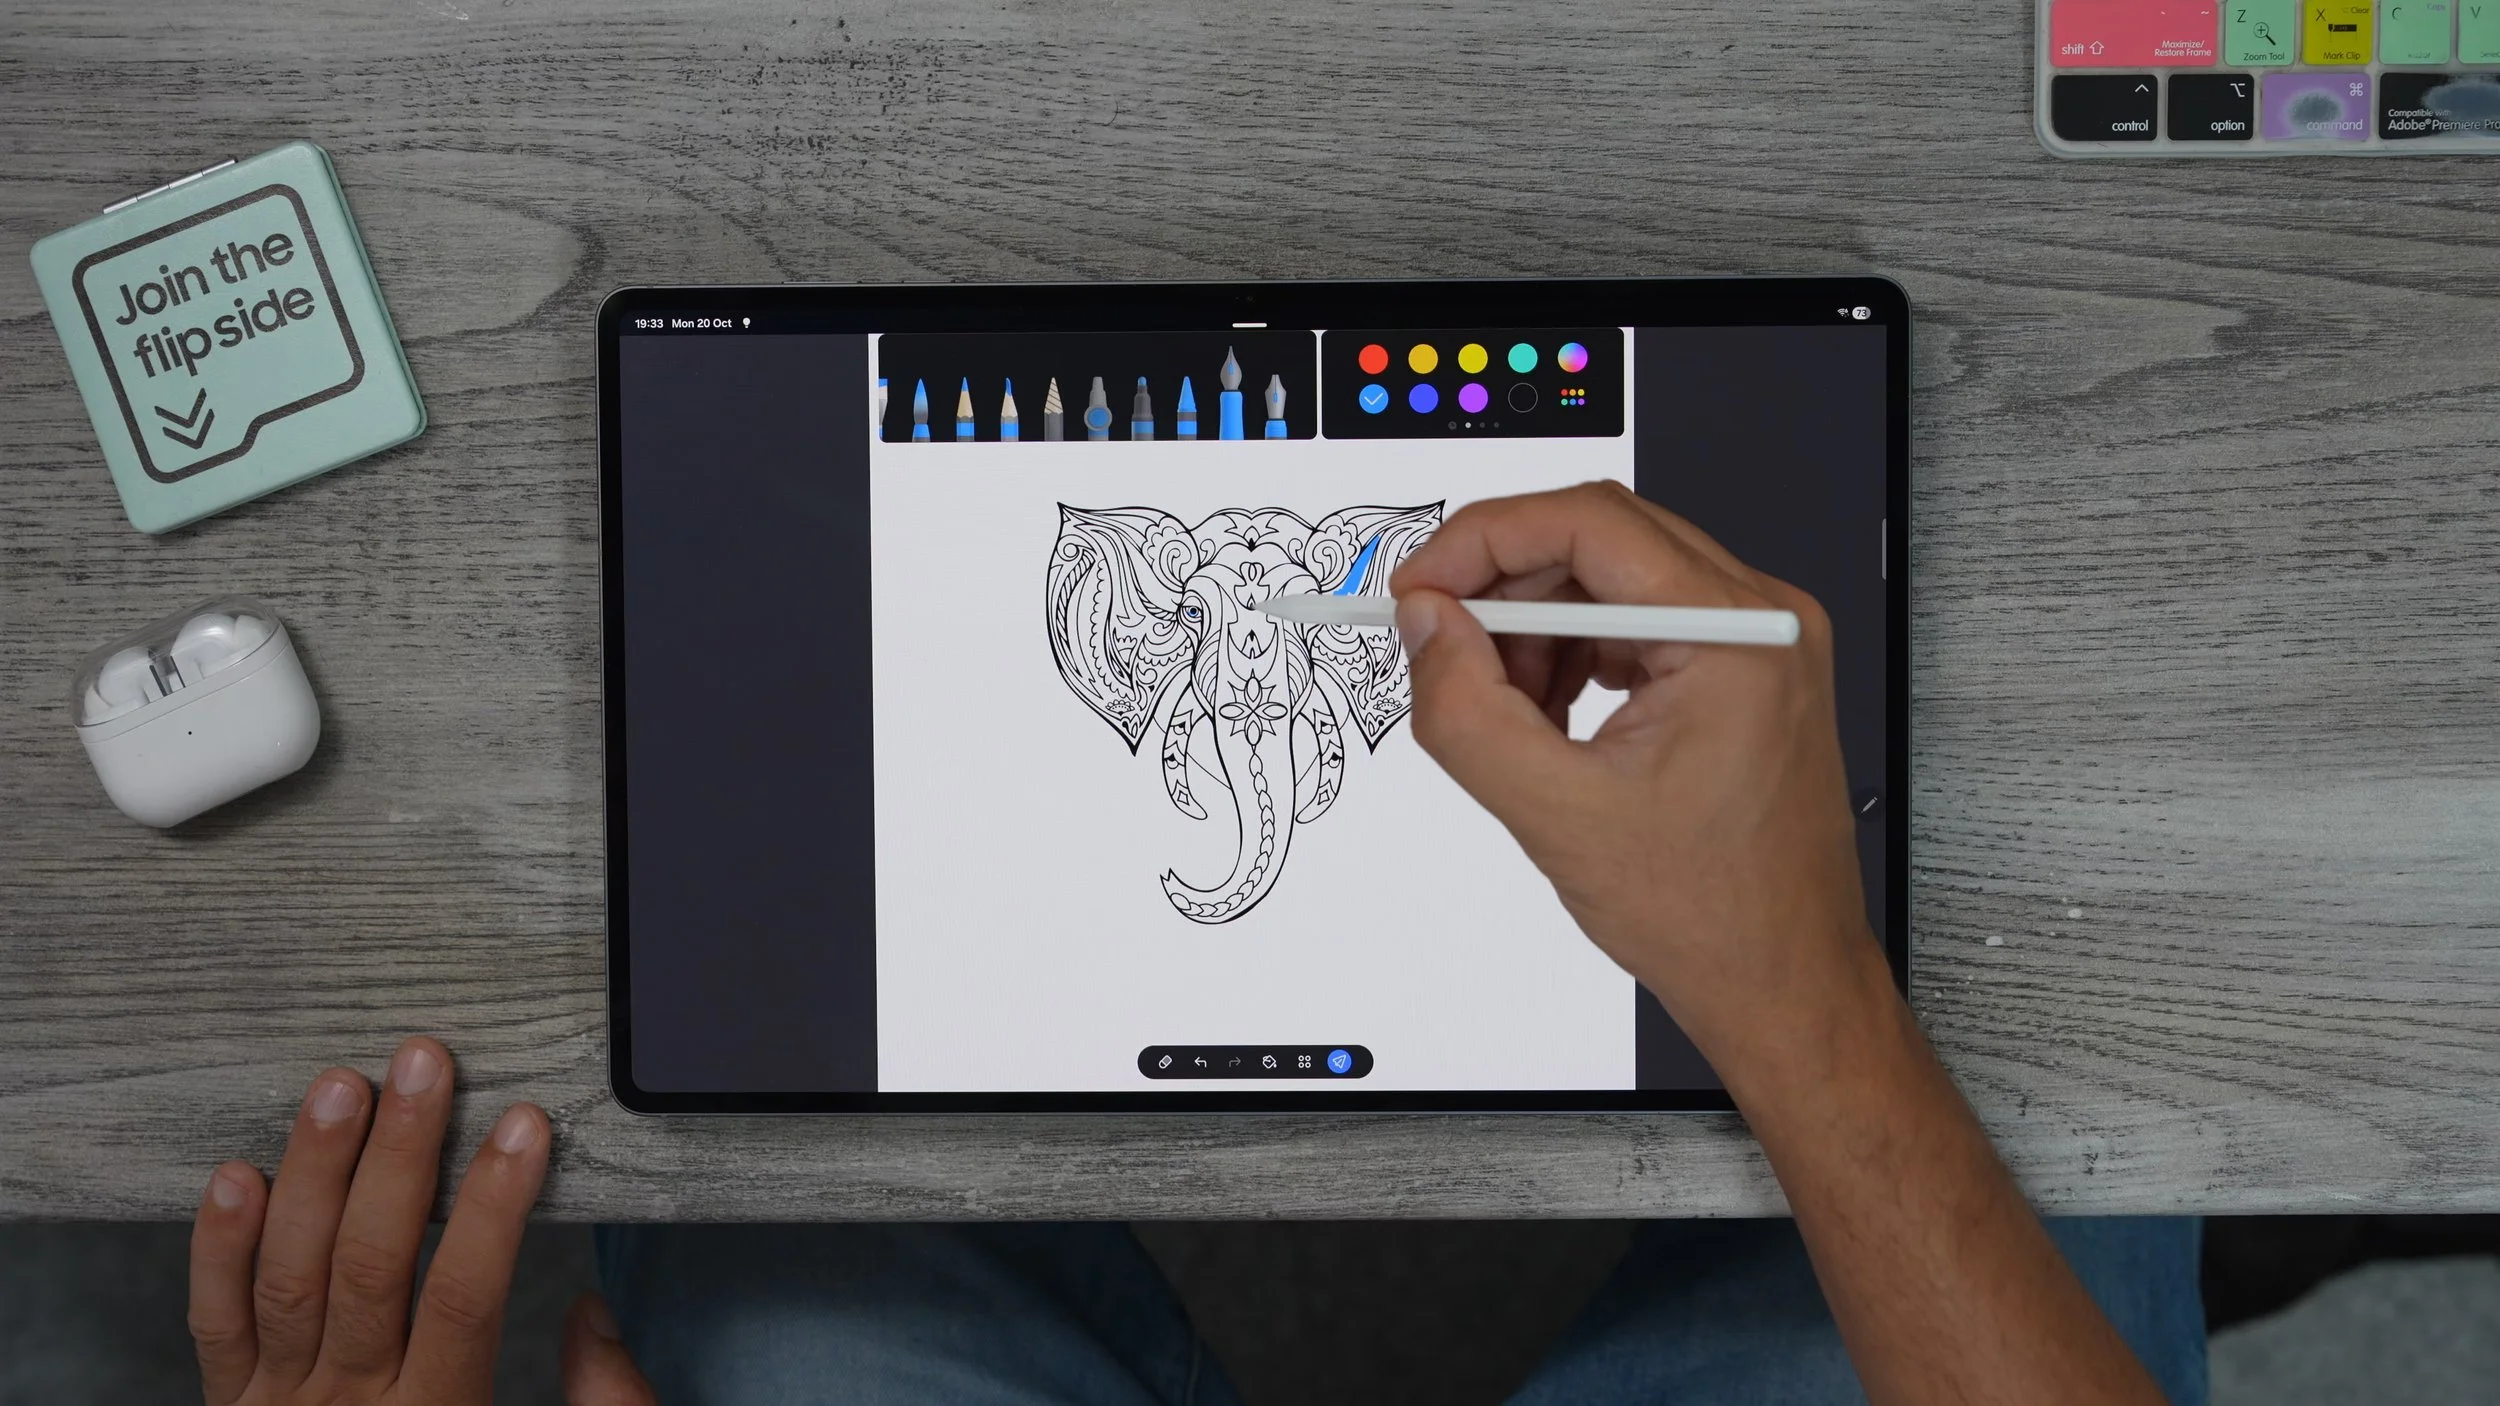
This could keep you busy for a long time or keep someone else busy if they keep pestering you. On the left side, you'll see some other options. Go to Photo drawing. You can now snap a photo using the camera on the tablet itself, or choose one from your gallery. I'm going to choose R2D2. Now, what we can do is choose how transparent we want that image to be, because essentially, what we're going to do now is trace over the image. I'm just going to drop it in much, much smaller. Now we've got this image in the background, and we can simply trace around the lines of the image. And of course, you can mess around with all the different pens and different styles of pens, all of the colours as well. You can grab colours from the layer underneath. So you can match them perfectly just by hitting the little layer tool.
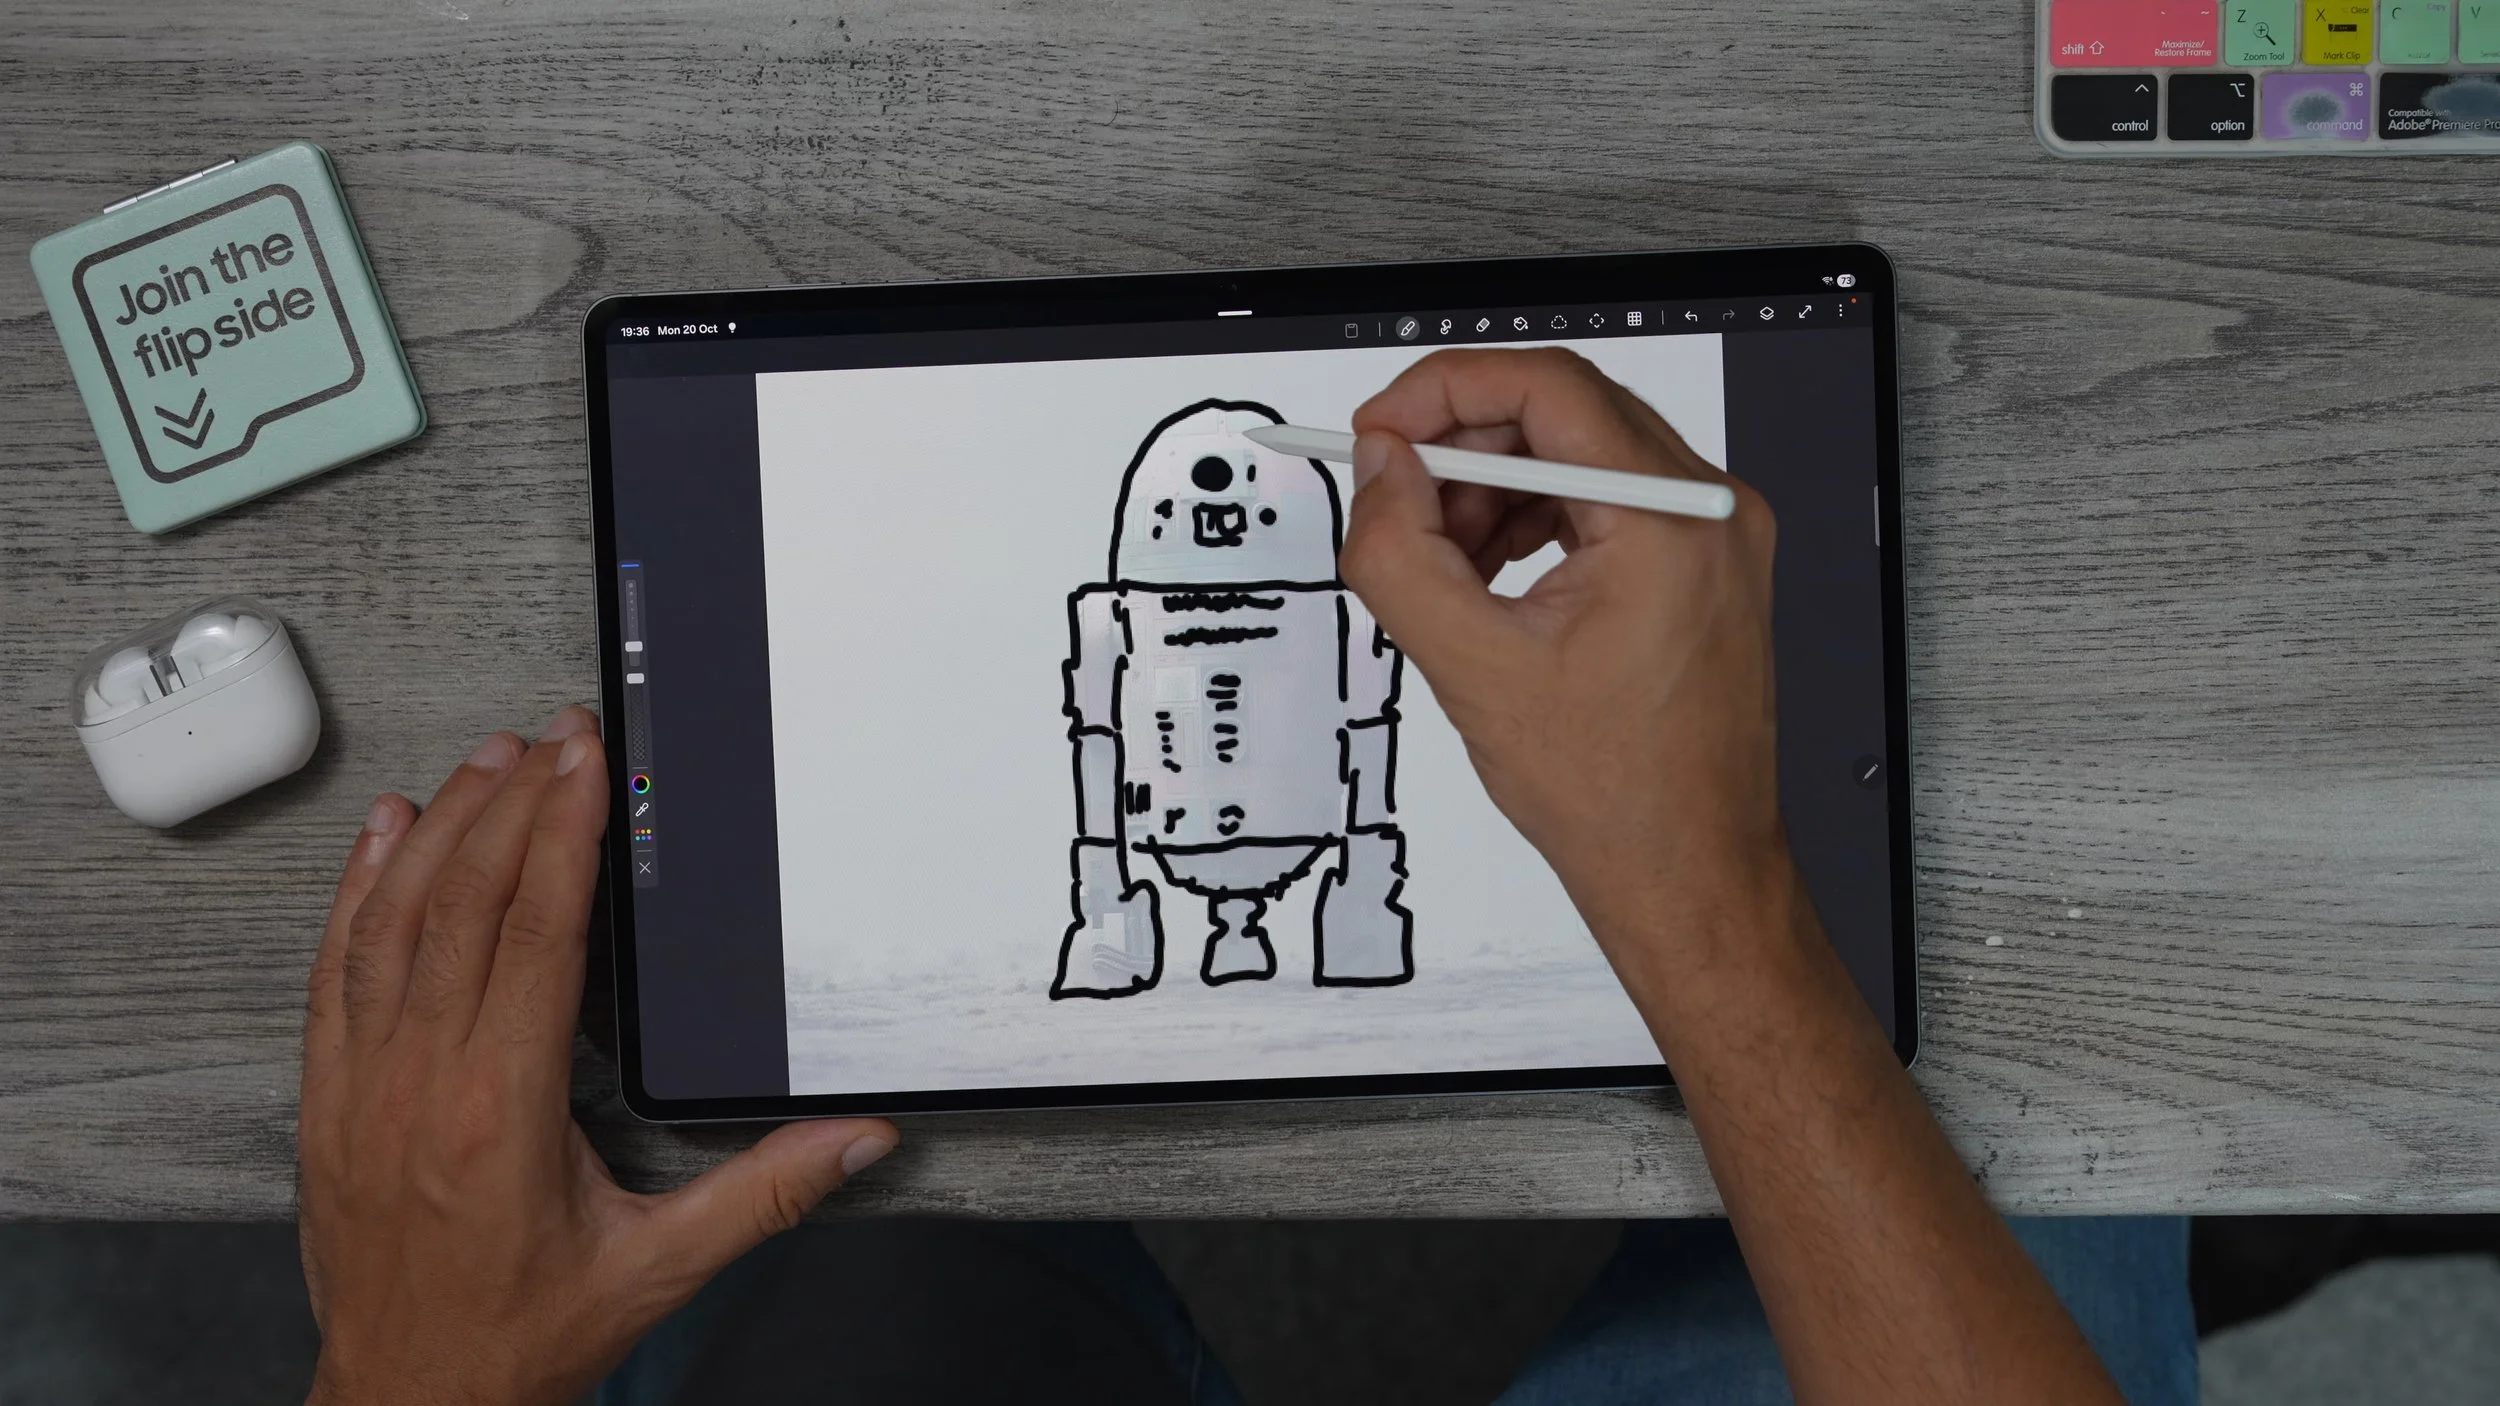
Once you finish, you can make that layer disappear. And essentially, you've got your image that you've traced, see, you can add photos of people and sketch them out in much better detail than what I've done here with this particular first attempt. But just to give you an example, this is what I've come up with so far. You can also create additional layers, of course. So if you create another layer underneath the outline layer, you can then go in and add some colours without affecting the lines again. This is a great way to kill some time. And if you're a real creative, you can create some real masterpieces for sure.
MORE S-PEN TOOLS
Let me show you a couple more pen tools that could be very useful for you. So, hit the Air Command and go to magnify up in the top right corner, you can change the magnification amount. And then what you can essentially do is hover the pen around on the screen without actually touching the screen to magnify small writing and things like that. That could be very handy. If you want to screenshot anything and kind of mock it up, you can do that very, very easily. And actually save that to your photo gallery.

The write on the calendar does exactly what you think it does. It allows you to write on the Samsung calendar, and translation can also be very useful. You can leave it on auto so it actually recognises the text file. You open up the Samsung Korean website, for example. Now, when I'm on this page, wherever there's Korean text, I can literally just hold the pen over it, and that will automatically translate the text. I do need to download the Korean pack before this will work. Now, when I hover over the text, you get the Korean, and underneath it, you can see what it says. So I'm sure you can see how this could be handy when browsing websites that aren't fully in English,
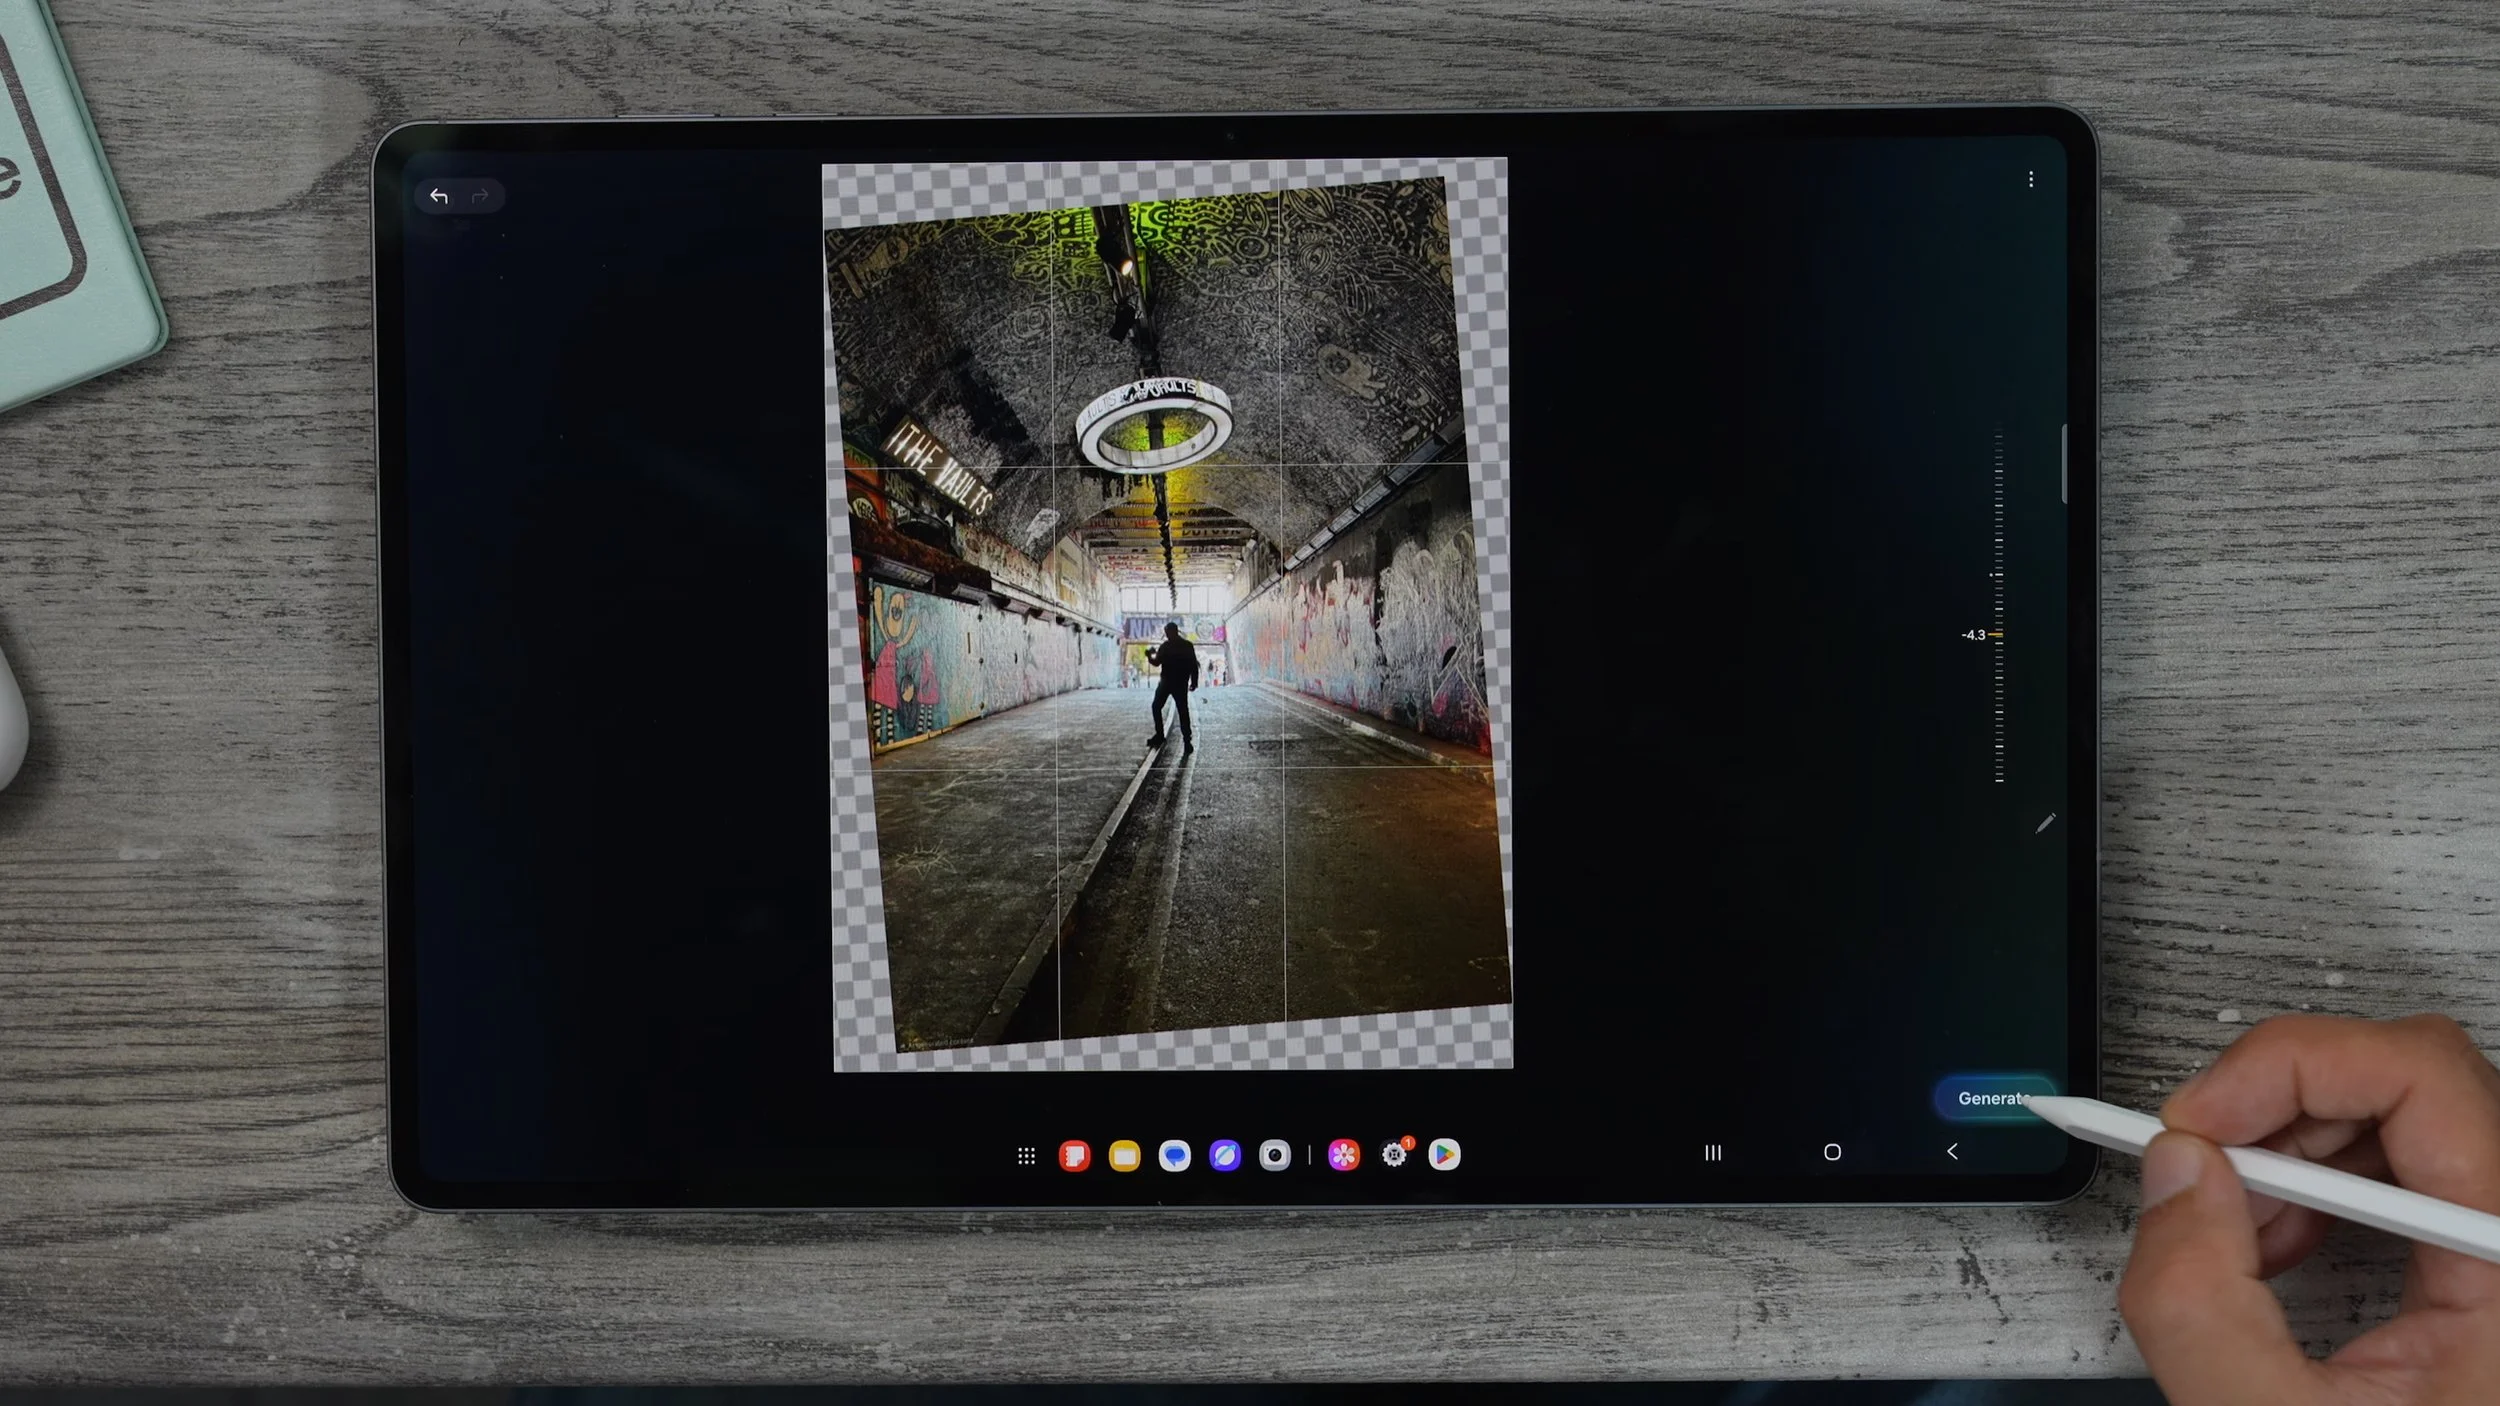
DRAWING ASSIST
Here's another fun way to use the Galaxy S-Pen with the tablet. If you open up Air Command again, this time we're going to go to Drawing Assist. This exists on Samsung phones as well. But it works way better with the S-Pen. So essentially, what you can do over here is draw anything you want, and it will take that image and turn it into a more refined version. Not the best, but it doesn't matter because this is where the sketch the image comes in. If you hit generate, it takes my rough sketch and turns it into a proper piece of art.
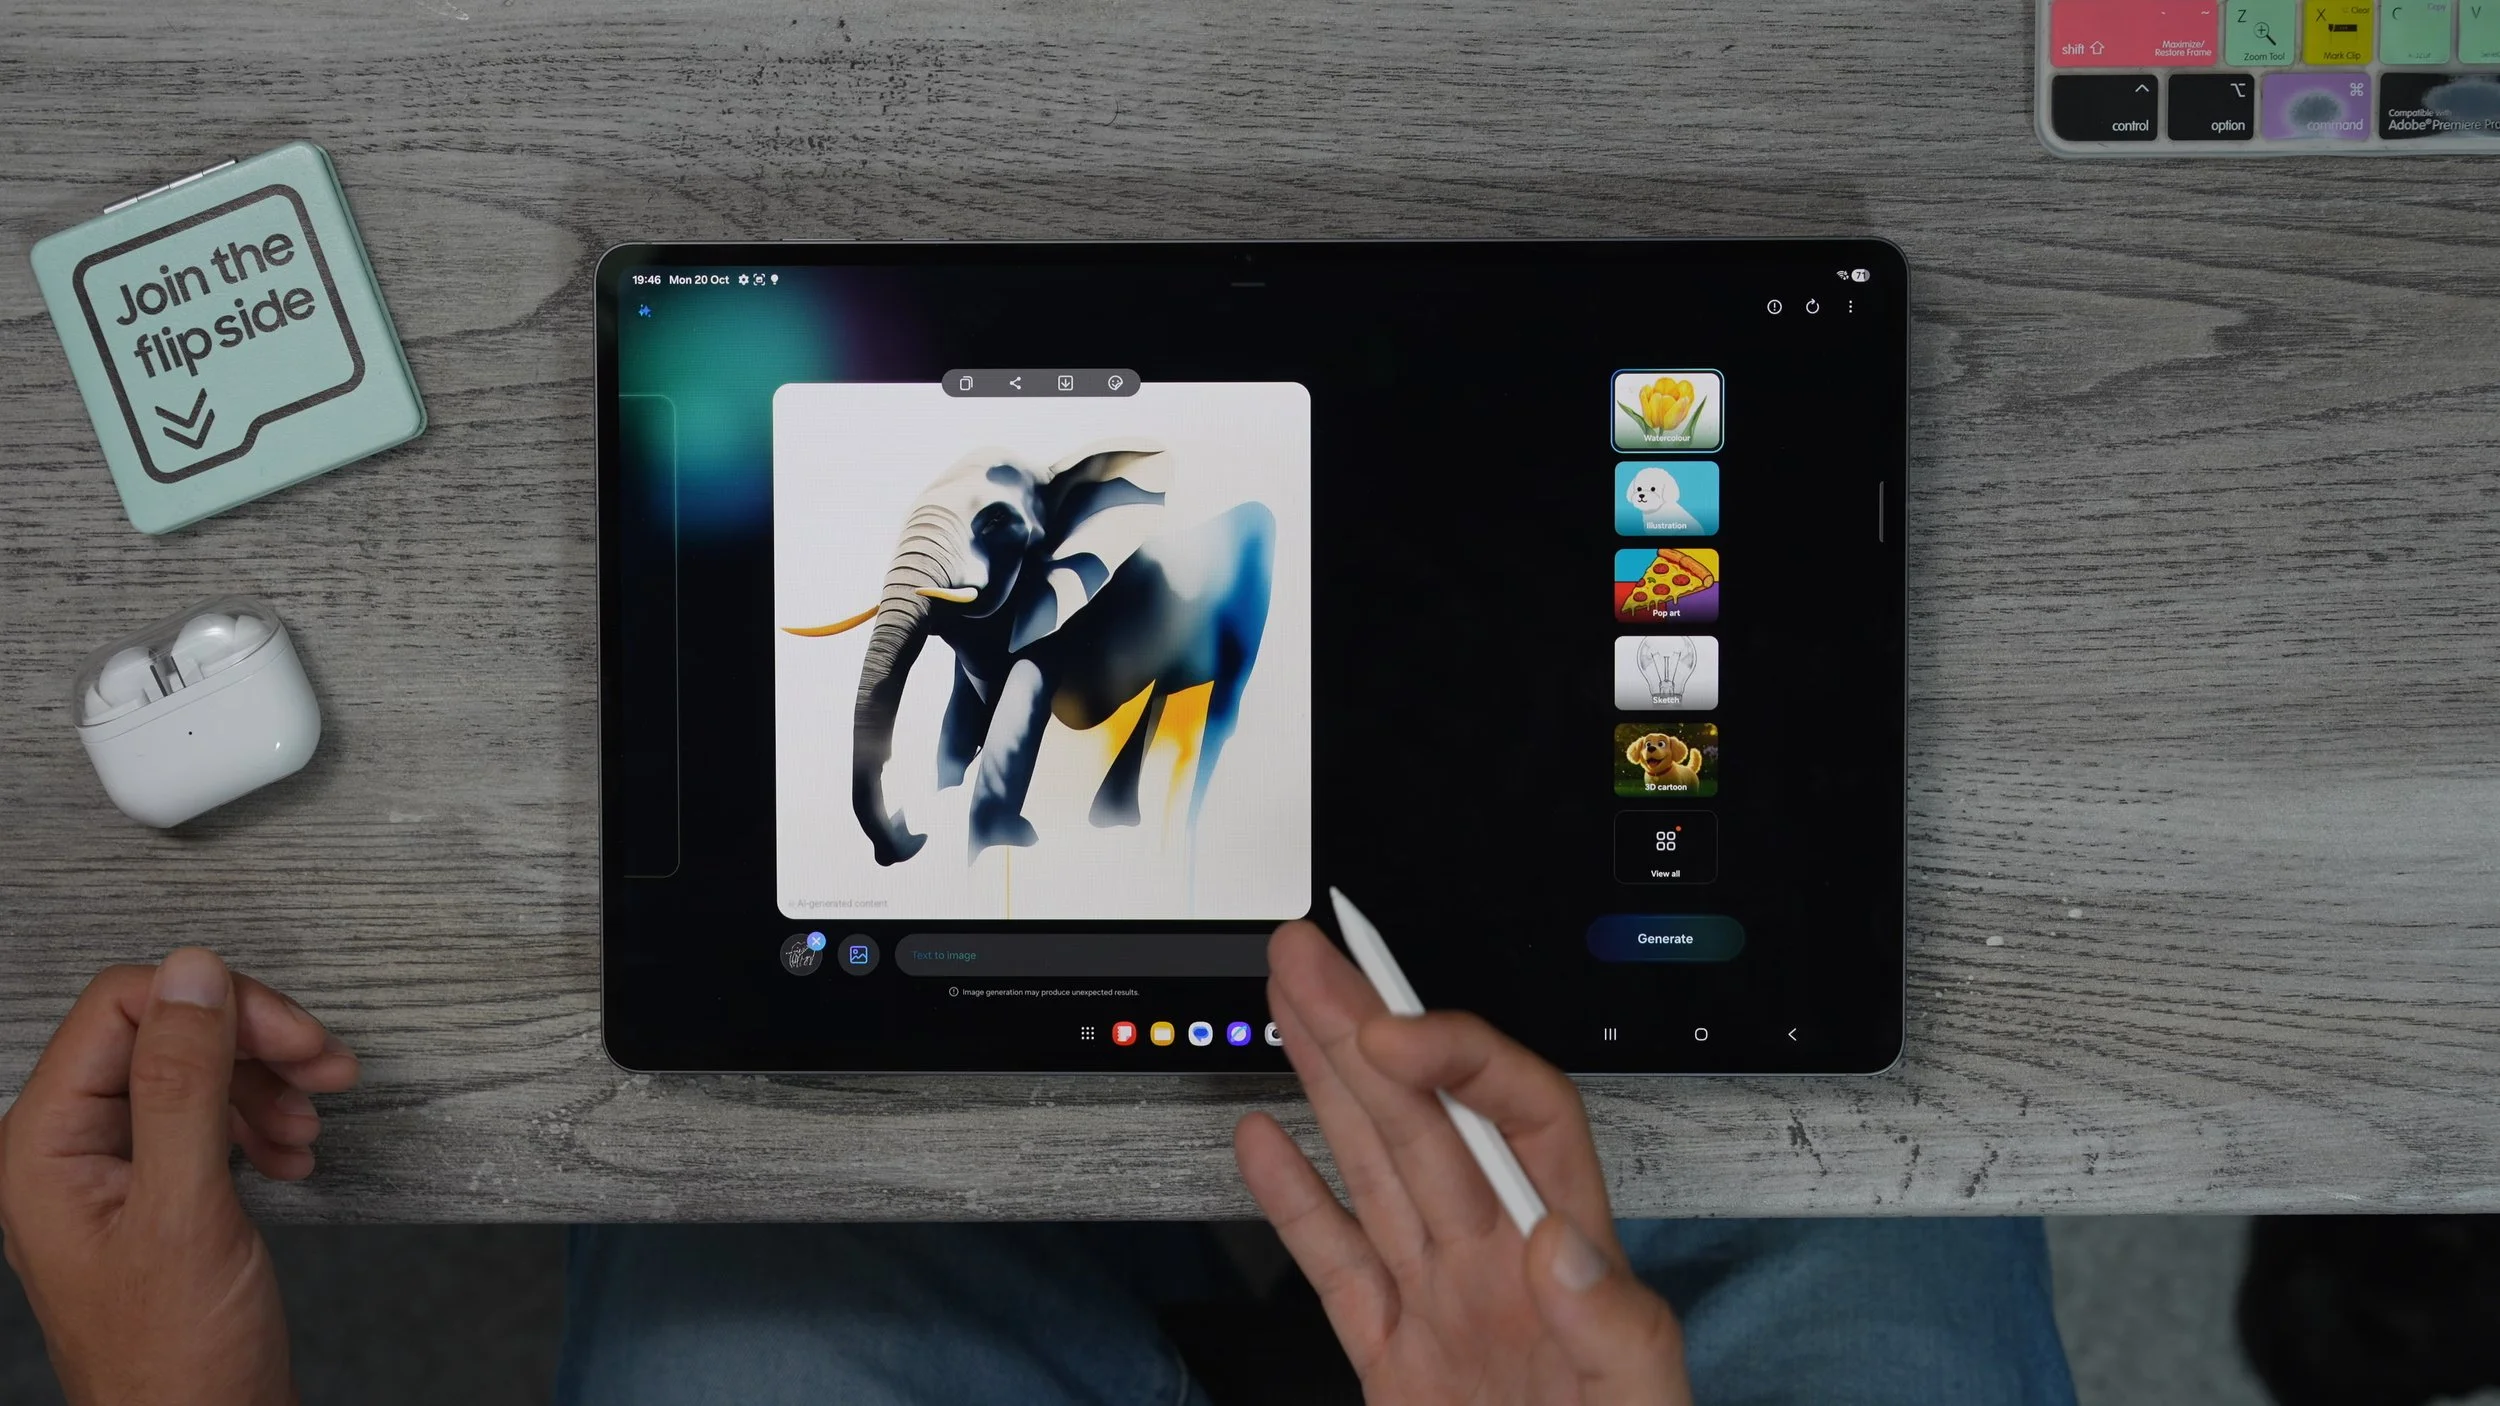
You've got all of these different styles on the right-hand side. And if you go to view, you can even get more new styles as well. Once you're happy with your design, if you hit download, you can save it to your gallery, you can share it, you can add stickers to it, and you can copy and paste it into other apps, which I'm going to show you more of a little later on. Really fun to do here is actually to take an image that exists in your photo library, and then recreate that with one of these styles on the right-hand side. That could be quite fun to do as well. And if you wanted to, you could then take that generated image and open it in the pen up app and then sketch your own version of it on top of that. You can kind of take this AI and use it as a template to create your own work of art. That's if you could be bothered to put in the work.
COPY & PASTA
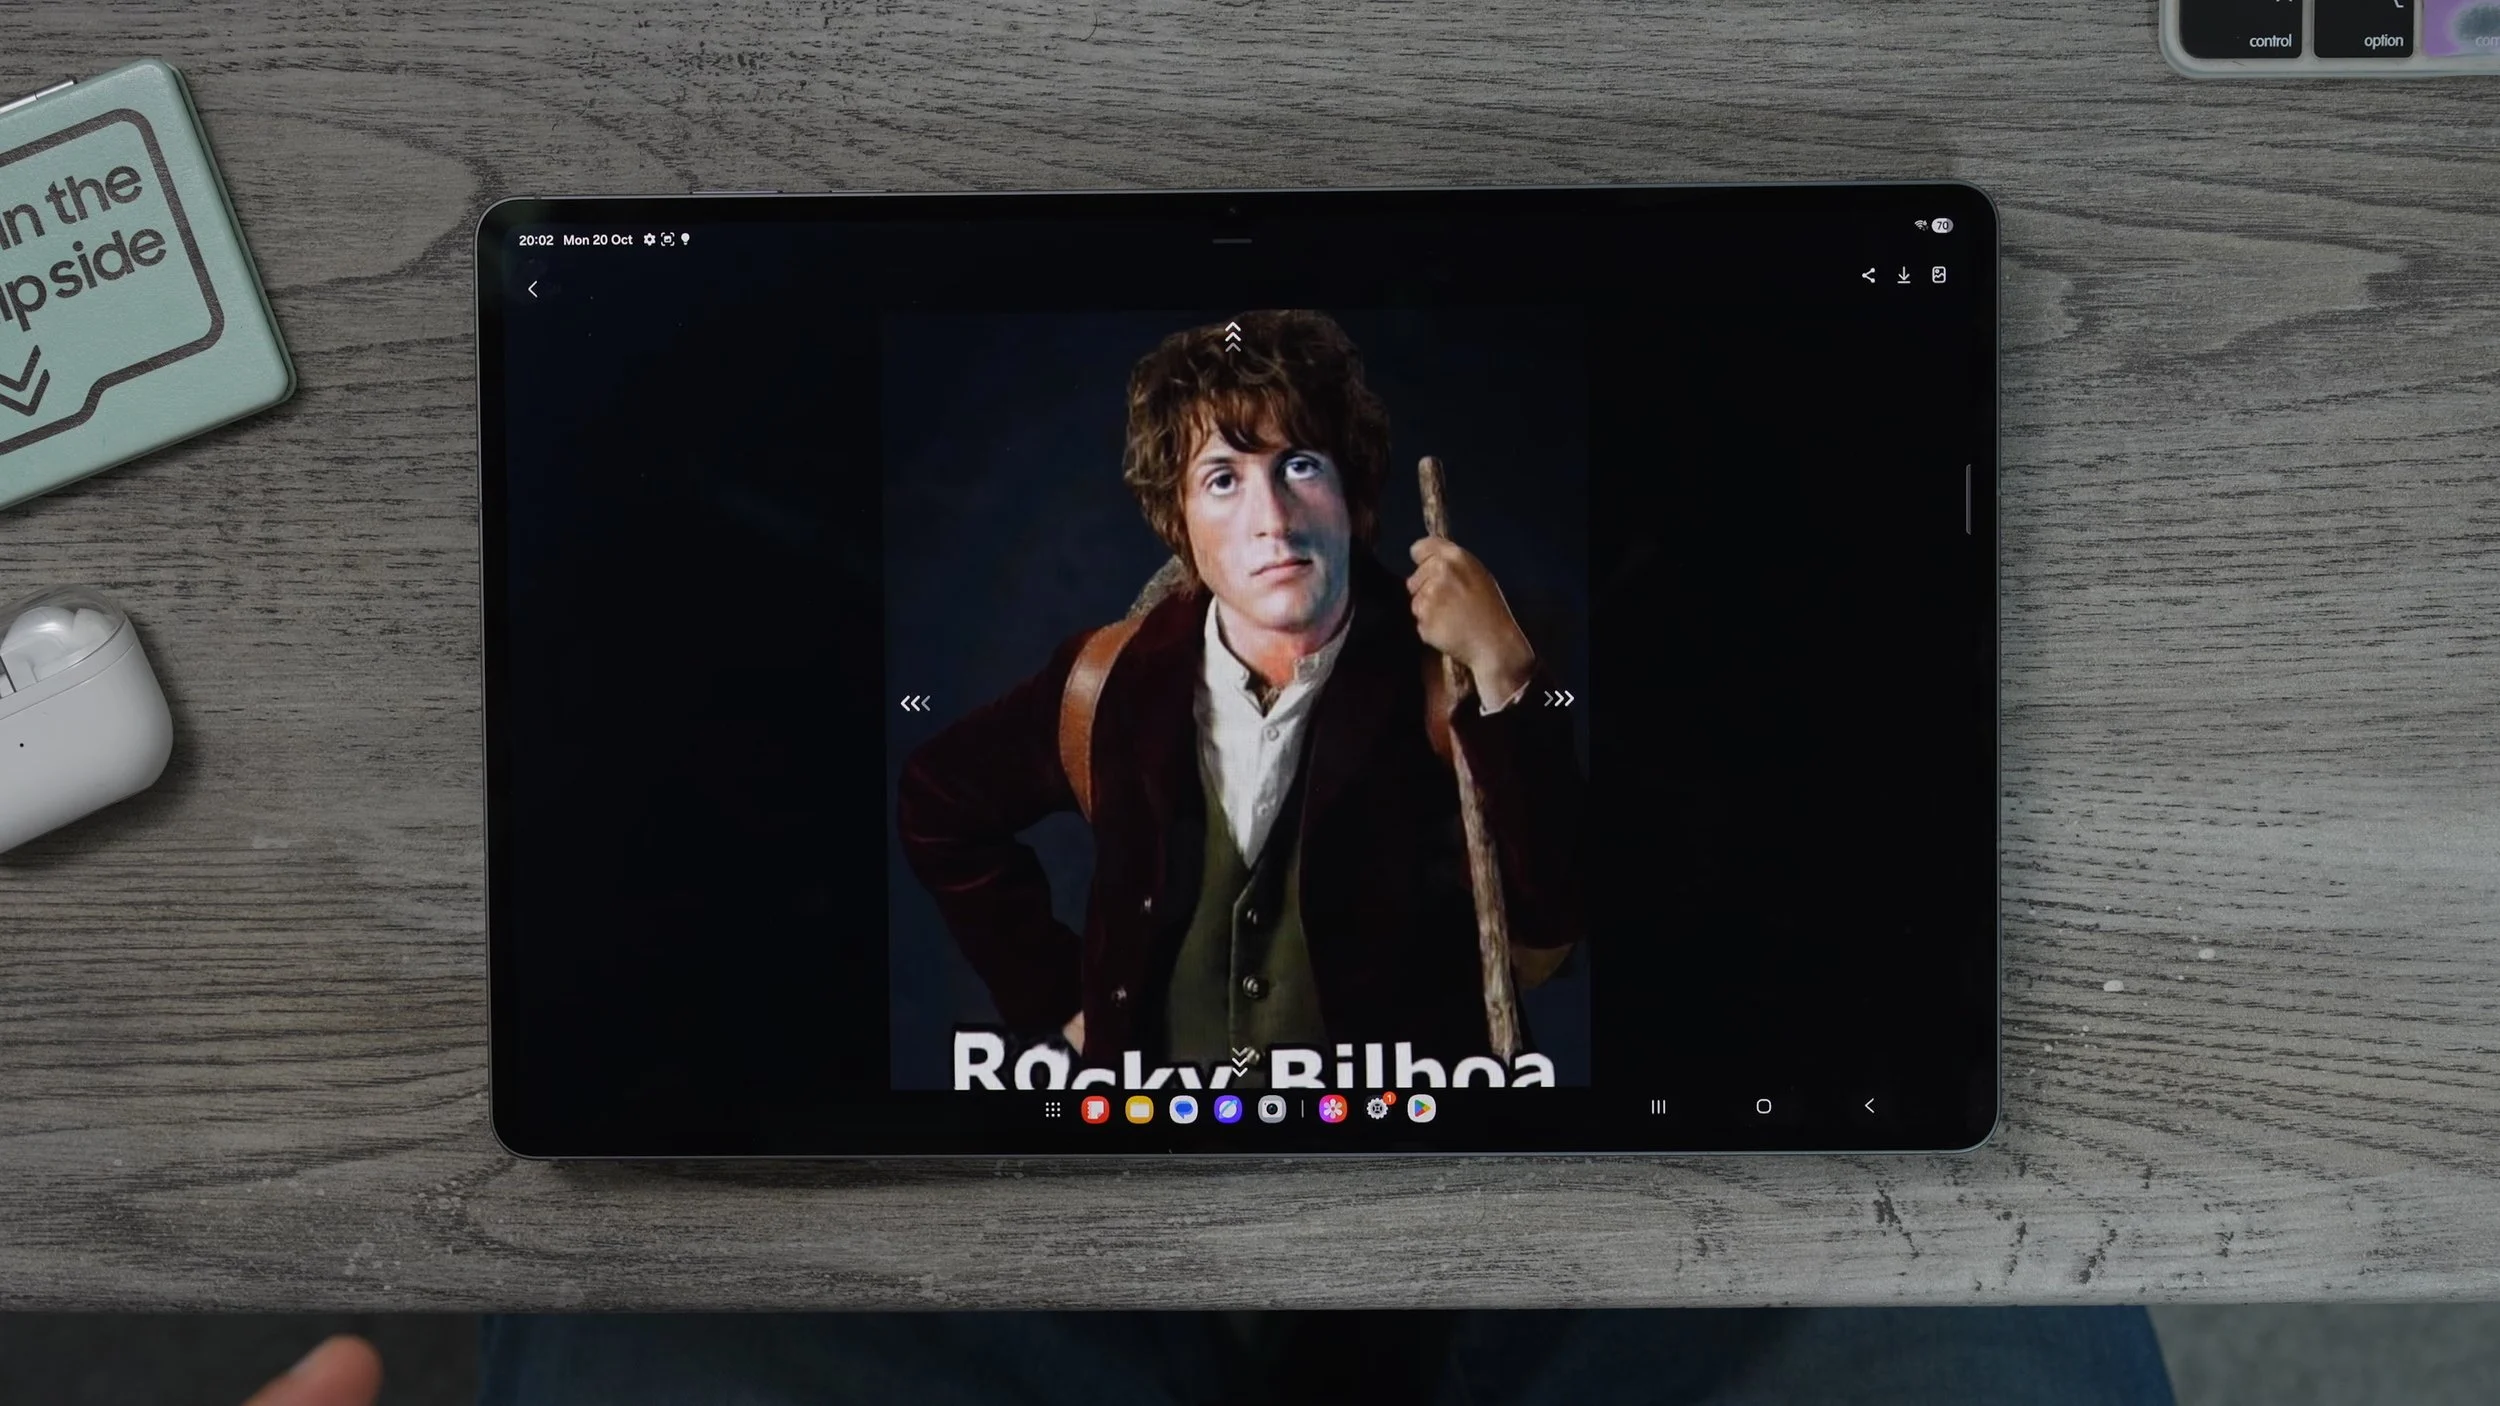
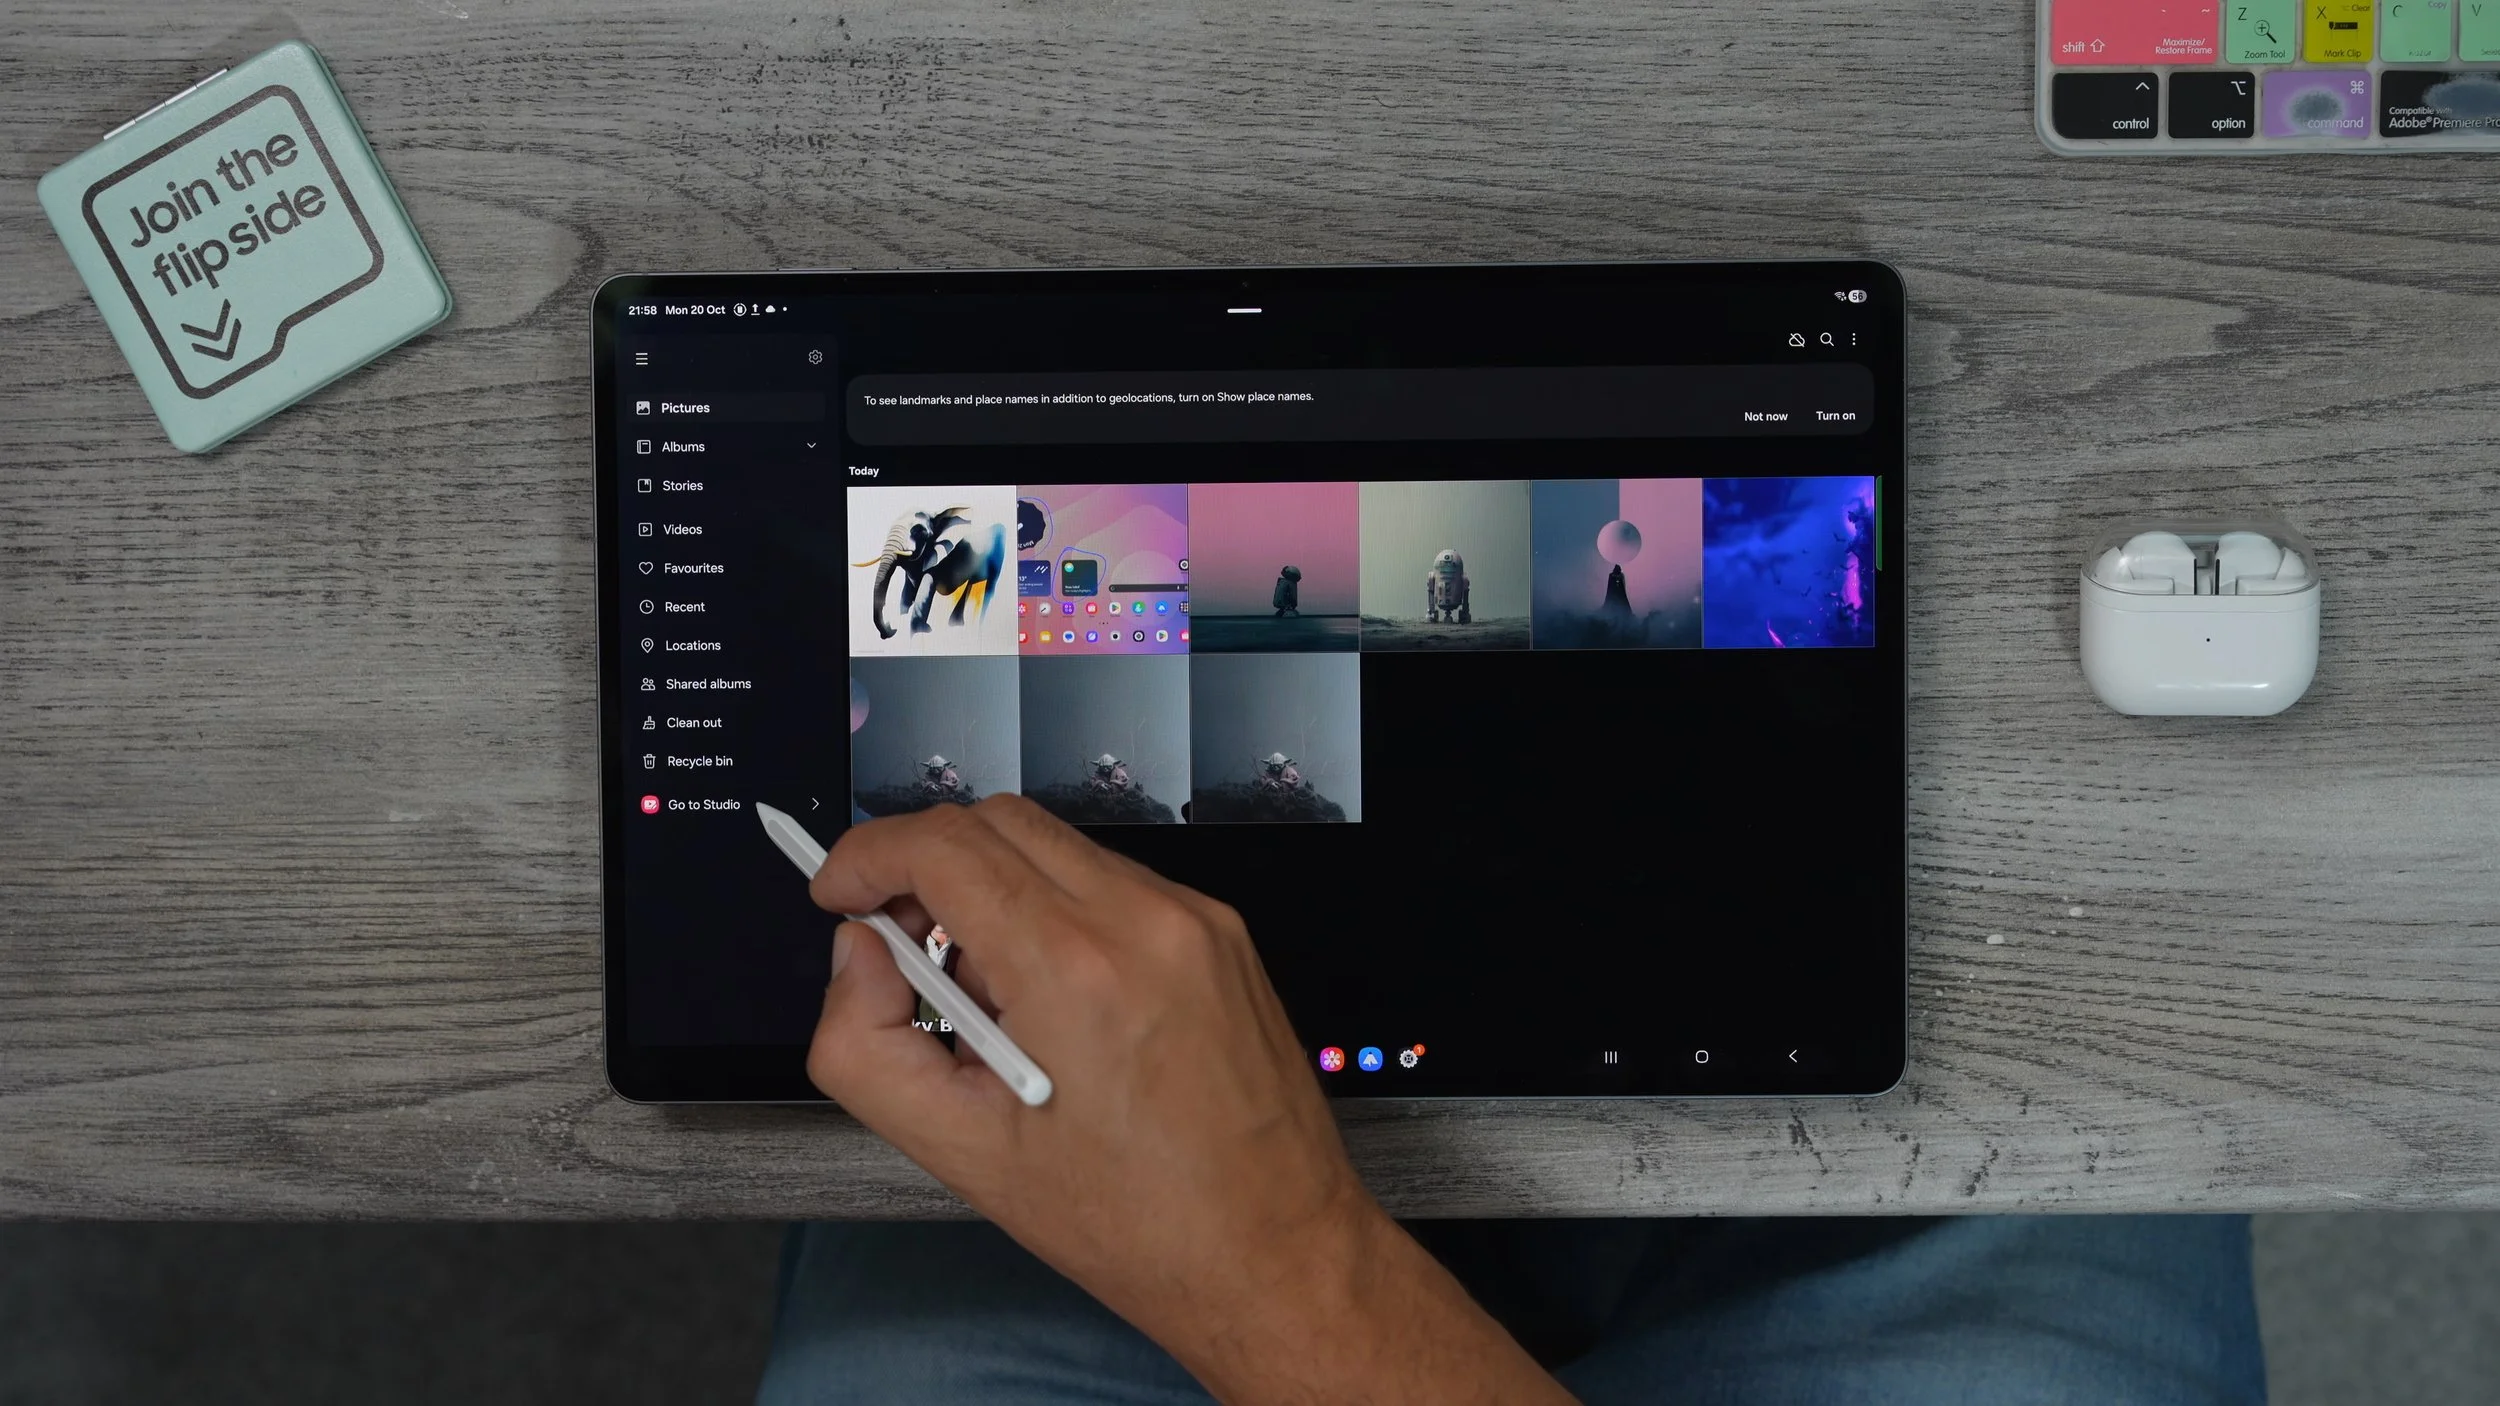
Let me show you something else that's really cool. I'm going to copy this by hitting the little copy icon up here on the top. I'm going to go to the gallery app on the tablet, open this up. Here I have my Master Yoda wallpaper. And let's say I want to add the elephant into this wallpaper. I could do it by simply holding my finger down on the image itself and tapping paste. We've now added the sticker onto the wallpaper, but that really doesn't work that well. Here's what I'm going to do. I'm going to go back to a different image, for example, Rocky Balboa. I've now cut him out of the image, and now if I go back to the Master Yoda wallpaper, I can drop Rocky onto this image and position him down here. And just to make sure I keep the visual as it is, I would hit the three dots and go save a copy.
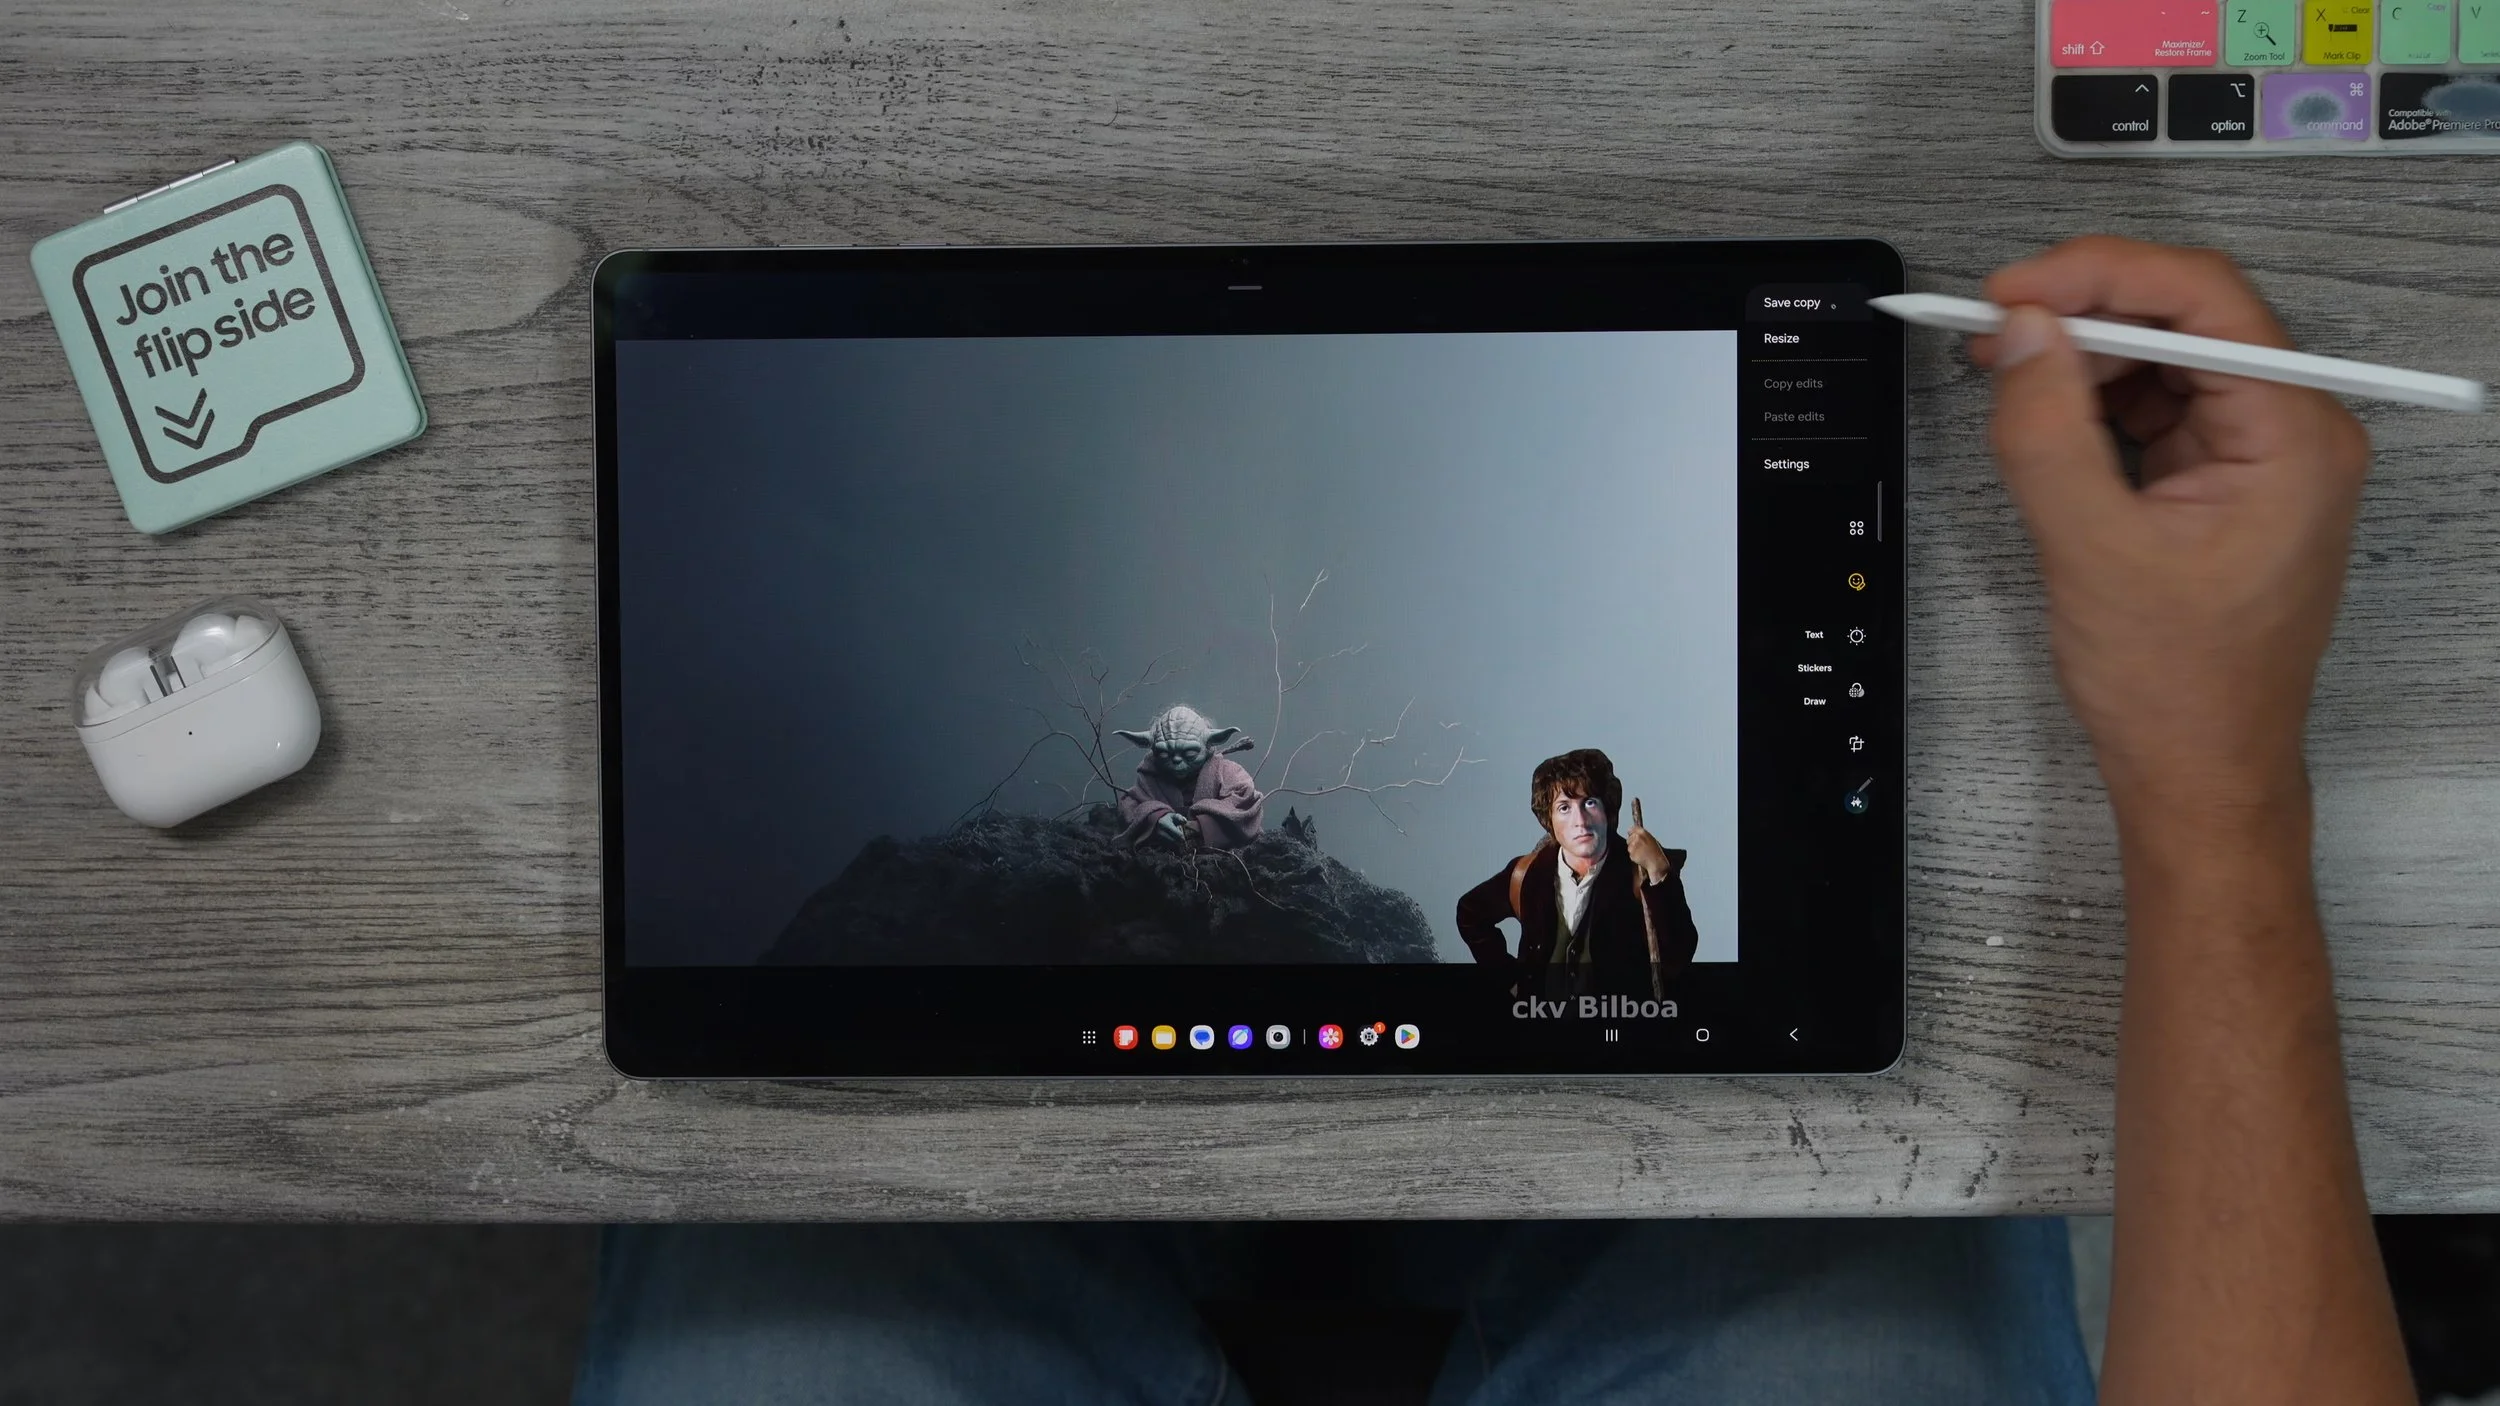
So now I've added one sticker. I can do it again. So let's go to another image, Vader. This image and the moon, and drop him onto the Yoda image. Hit the three dots, Save a copy. There we go. You can grab stickers from pretty much anywhere. You can grab images and photos of people and drop people into the image however you want, and create a fully customised, and modified wallpaper. And you could even make a full collage of photos as your background if you really wanted to. You just have to spend a bit of time copying and pasting these stickers from one photo to another.
MAGIC ERASE
Now let me show you another little photo trick. Let's go back to the gallery, open up a photo, for example, this one where these two kind ladies have photobombed the image. What we can do here is actually use AI to correct this image in more than one way. So the top right corner, you'll see the little sparkles. This is the AI icon. Whenever you see the sparkles, that means there are AI tools available in here.

What we can do is we can zoom in and draw around these two ladies by this is now selected them. Now we can hit the little eraser tool and get rid of them by hitting generate. So it's going to use generative fill to fill in the details of the gaps where they are being removed from. It's done a really, really good job with that. There is no sign of them. Not even the shadow is there. So that's very, very impressive.
INTRICATE STICKER
Now, let's say you want to create a sticker from an image. You can do it as I showed you before. You bring it down and drag it somewhere else. Or even just copy or share it. But let's say the shape is actually a bit trickier. What you can do is hold your finger down on the part of the image you want to turn into a sticker, hit the three dots, and go to edit. This brings up an editor tool that allows you to more carefully refine the sticker. For example, if I wanted to remove this little white light, the shining between the camera that I'm holding and the background.

What I can do is go to deselect and just do around that area, which I want to get rid of. If I want to add more details can hit the little plus icon. We can also use the snap to shape or shape tool if you prefer. Once you've done that, hit next. You can now actually colourise the image or tool on top of it. Then you can just hit save and save it as an image or as a sticker.
LEVEL UP
Here is another little image editing tool which is really, really useful. It also harnesses the power of AI. Let's say, for example, in this photo, you can see the horizon. The line down here is not quite level. What we can do is go to the sparkly stars at the top. And then we're going to use this tool here on the right-hand side, just to adjust the angle so that the horizon line at the back is actually level.
All this area around the outside here is all going to be filled in. The only problem now is that the light at the top is kind of wonky, but I think that's how it actually is in real life.
LIVEN UP YOUR PHOTOS
We're going to move on to some customisation, which you're definitely going to want to do. Let's go to the Rocky Balboa photo. When you swipe up on an image within the photo gallery, you're going to see tools pop up, like remaster, background blur, and then this one live Effect. This is really, really cool. If you go to a photo with a bit more depth than this one, what it does is it turns it into a kind of spatial photo. So when you move the tablet around, it always looks 3D. This isn't the best example of this, but you get the idea.
It's almost like a living photo. If you do have lower-res old photos that you want to improve, you could just go to remaster. This takes the image data and uses AI to kind of increase the resolution of the photo. You can see it's actually brought up so much more detail, and all the colours just look a bit nicer. So definitely make use of these tools.
DECORATION OPTIONS
Let's start with some wallpaper customisation. Just hold your finger down on an empty part of the screen. You'll see wallpaper and style at the bottom. Tap on that. Here you can go to Change Wallpaper, and you'll see all of the presets. Something to keep in mind is that the Samsung presets do have different colour options available. If you choose this one and go to variations at the bottom, you'll see there's this one here, which is kind of pink and purple. If this isn't your style, just go back to wallpapers. Scroll down and you'll see some of the other default ones. I particularly like this one: dynamic. So it kind of shifts colours throughout the day. Again, at the bottom, you'll see the option to change the style. So in the evening it will be darker, and in the daytime it will be brighter and more vibrant. There is another wallpaper that I really like. So if you go to change wallpaper again, scroll down, go to the colour section and go all the way to the end. You can actually go to the colours at the bottom. This one, you can be a bit more specific with the colour that it is, and it keeps that same pattern, which is nice. And you can even change the saturation of the colour, but my absolute favourite wallpaper set up is this.
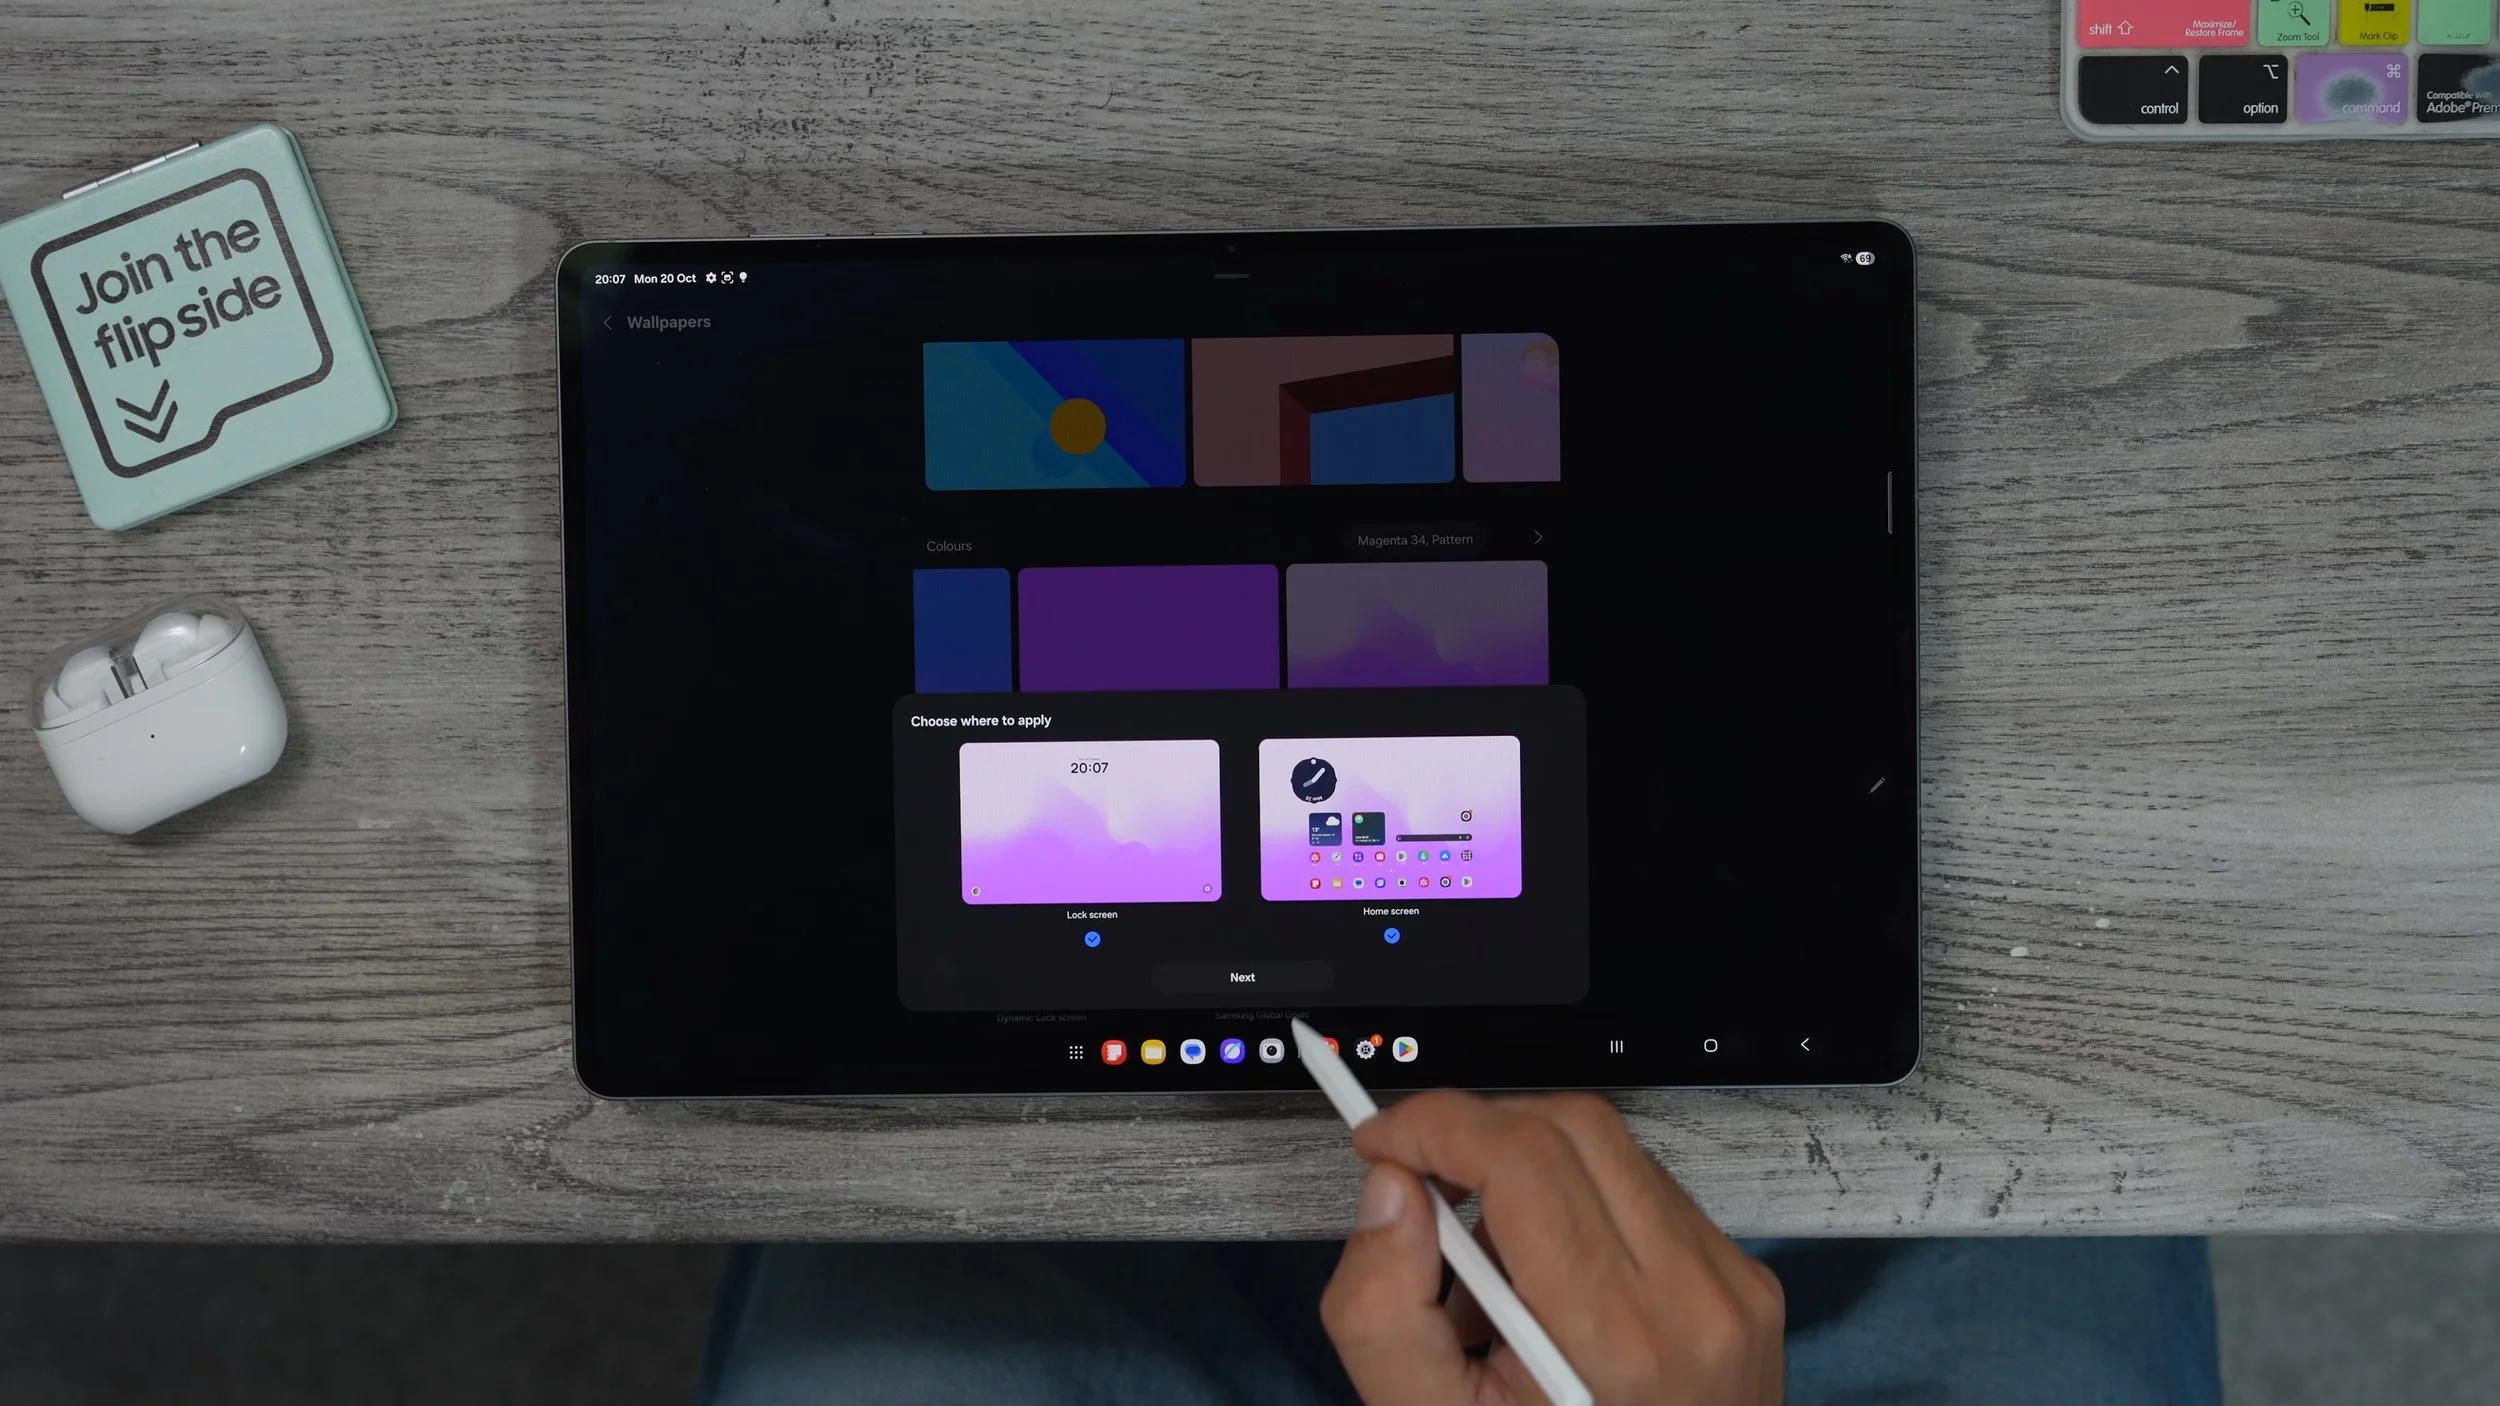
So once again, I'm going to hold my finger down on the screen, go to Wallpaper and Style change wallpaper. This time, I'm going to choose one of my own by going to the gallery section. I'm going to go with the Master Yoda wallpaper. Not one of the ones that I created, but the original one. We can make it even more useful. When I go to change wallpaper, once again, this time in the creative AI section, I'm going to go to Photo Ambient and try it now. You have to give it permissions for the local weather for this to work. Essentially, what this will do is add weather conditions around the wallpaper. So if it's snowing outside, it's going to show you snowing on your lockscreen, if it's raining or if it's sunny, it's going to show that, and it just works really well with this Yoda wallpaper. Sometimes you get these nice beams of light, and when it is raining, it looks like rain is landing around him and things. So it's a really nice effect, but it's also very useful because you know what the weather's like outside before you even step out the door.
LOCKSCREEN SETUP
Here's the next customisation step. This time, we're just going to tap on the lock screen. And here is where we can modify what we have on the lock screen. And there's a new way of doing things when it comes to the widgets. For example, if you tap on the widget bar, you can now have it displayed on the left side of the screen. So if we just tap, everything shifts over, and you'll notice we have a lot of space to add shortcuts as well. So if you tap on this area at the bottom here, you will see all of the widgets that you can add. And there is one specific widget which I highly recommend you add is the voice recorder. The reason I recommend you add this is that you can actually record summaries and even transcribe recordings using AI, and you can activate the recordings from the lock screen.
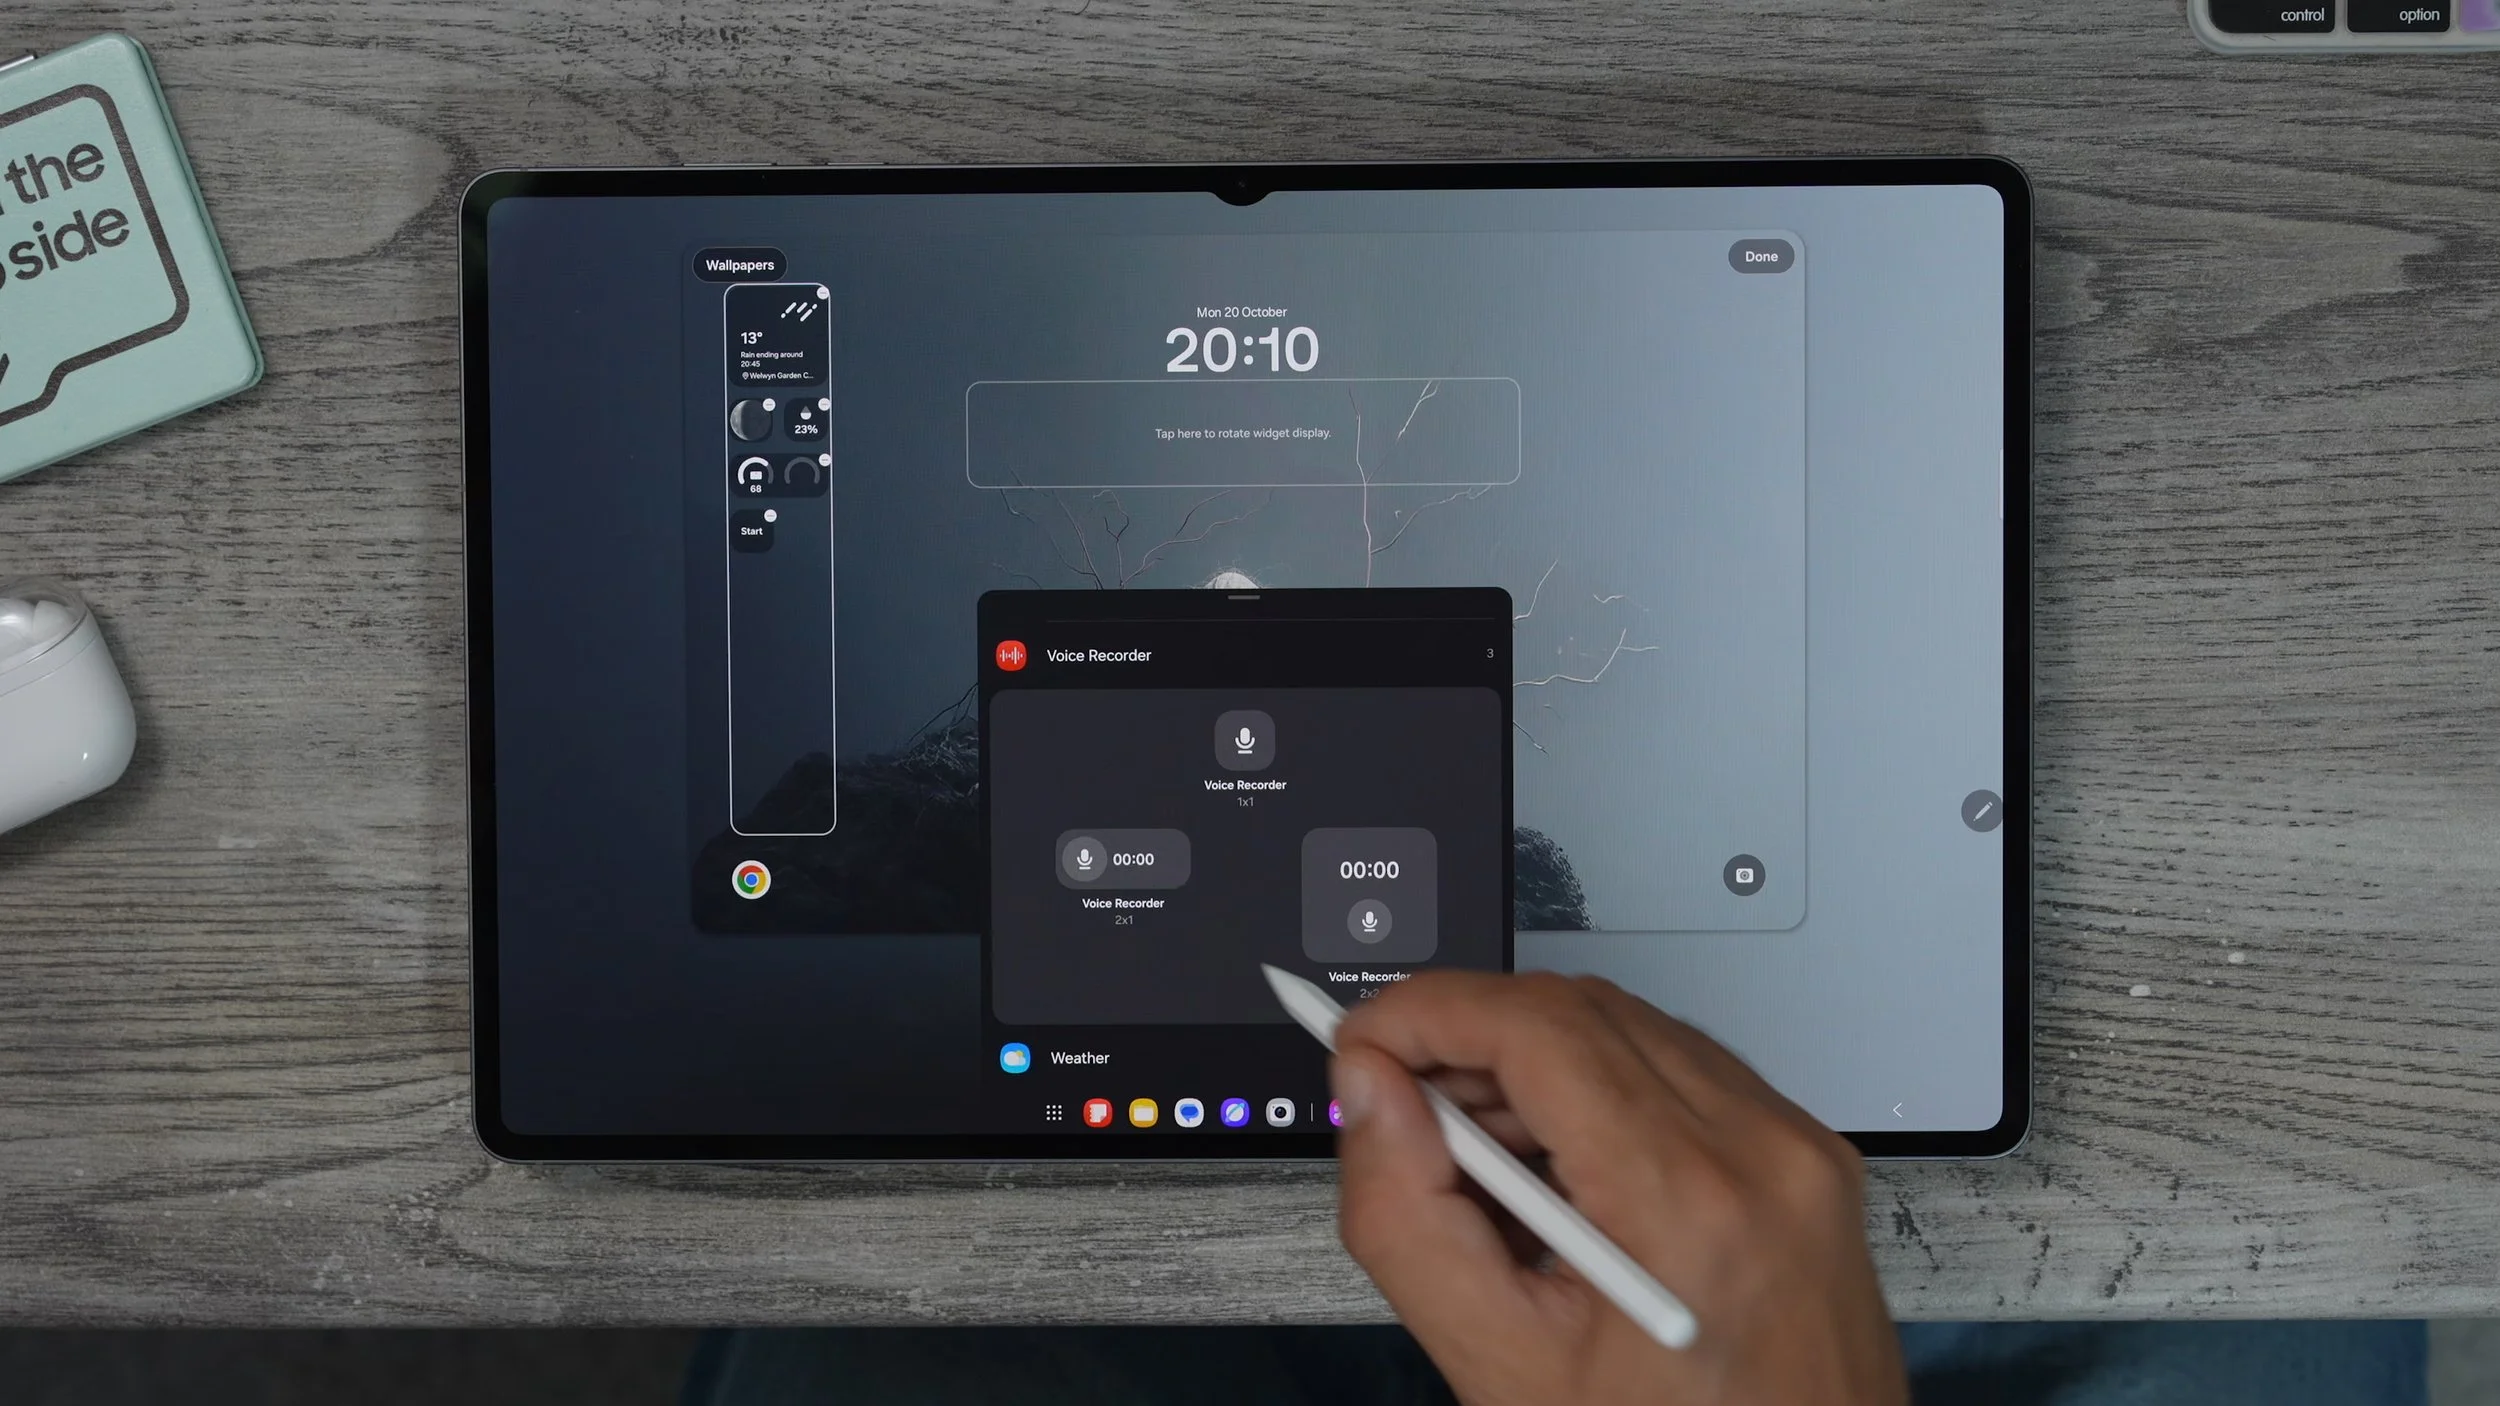
So if you are in a meeting or a lesson or a lecture or whatever, you could just hit that on the lock screen that will record. Next time you open up the tablet, you can then summarise it. This will allow me to clear any background up on the tablet without actually even having to open it, so that's pretty useful. Also the battery widget. I've got quite a few Samsung devices I can keep tabs on. All of them right here. So I spent a bit of time setting up the widgets and choosing whether you want them vertical or horizontal. The next thing you might want to do is customise the clock on the lock screen.

My favourite by far is a dynamic lock that actually adjusts to the wallpaper and the shapes on your wallpaper. If there's a clear subject in the middle of the image is quite big and actually shapes around that subject. This can be placed anywhere, and it can be massive if you want it to be. Keep in mind, you can customise the colours to work better with your background. And actually, the colour affects all of the widgets as well.
COLOUR PALETTES
Now there is one more wallpaper style trick that I need to show you. Go into the wallpaper style again just by touching and holding on the home screen. And just below, change wallpapers, you'll see the colour palette. So this affects all of your system settings. And if you enable it, it actually grabs the colours from your wallpaper. So that everything kind of matches. And then you have a few different colour palette options, and you'll see how they look. You've also got the basic colours, so if you want a solid colour running throughout the entire system, you could do that.
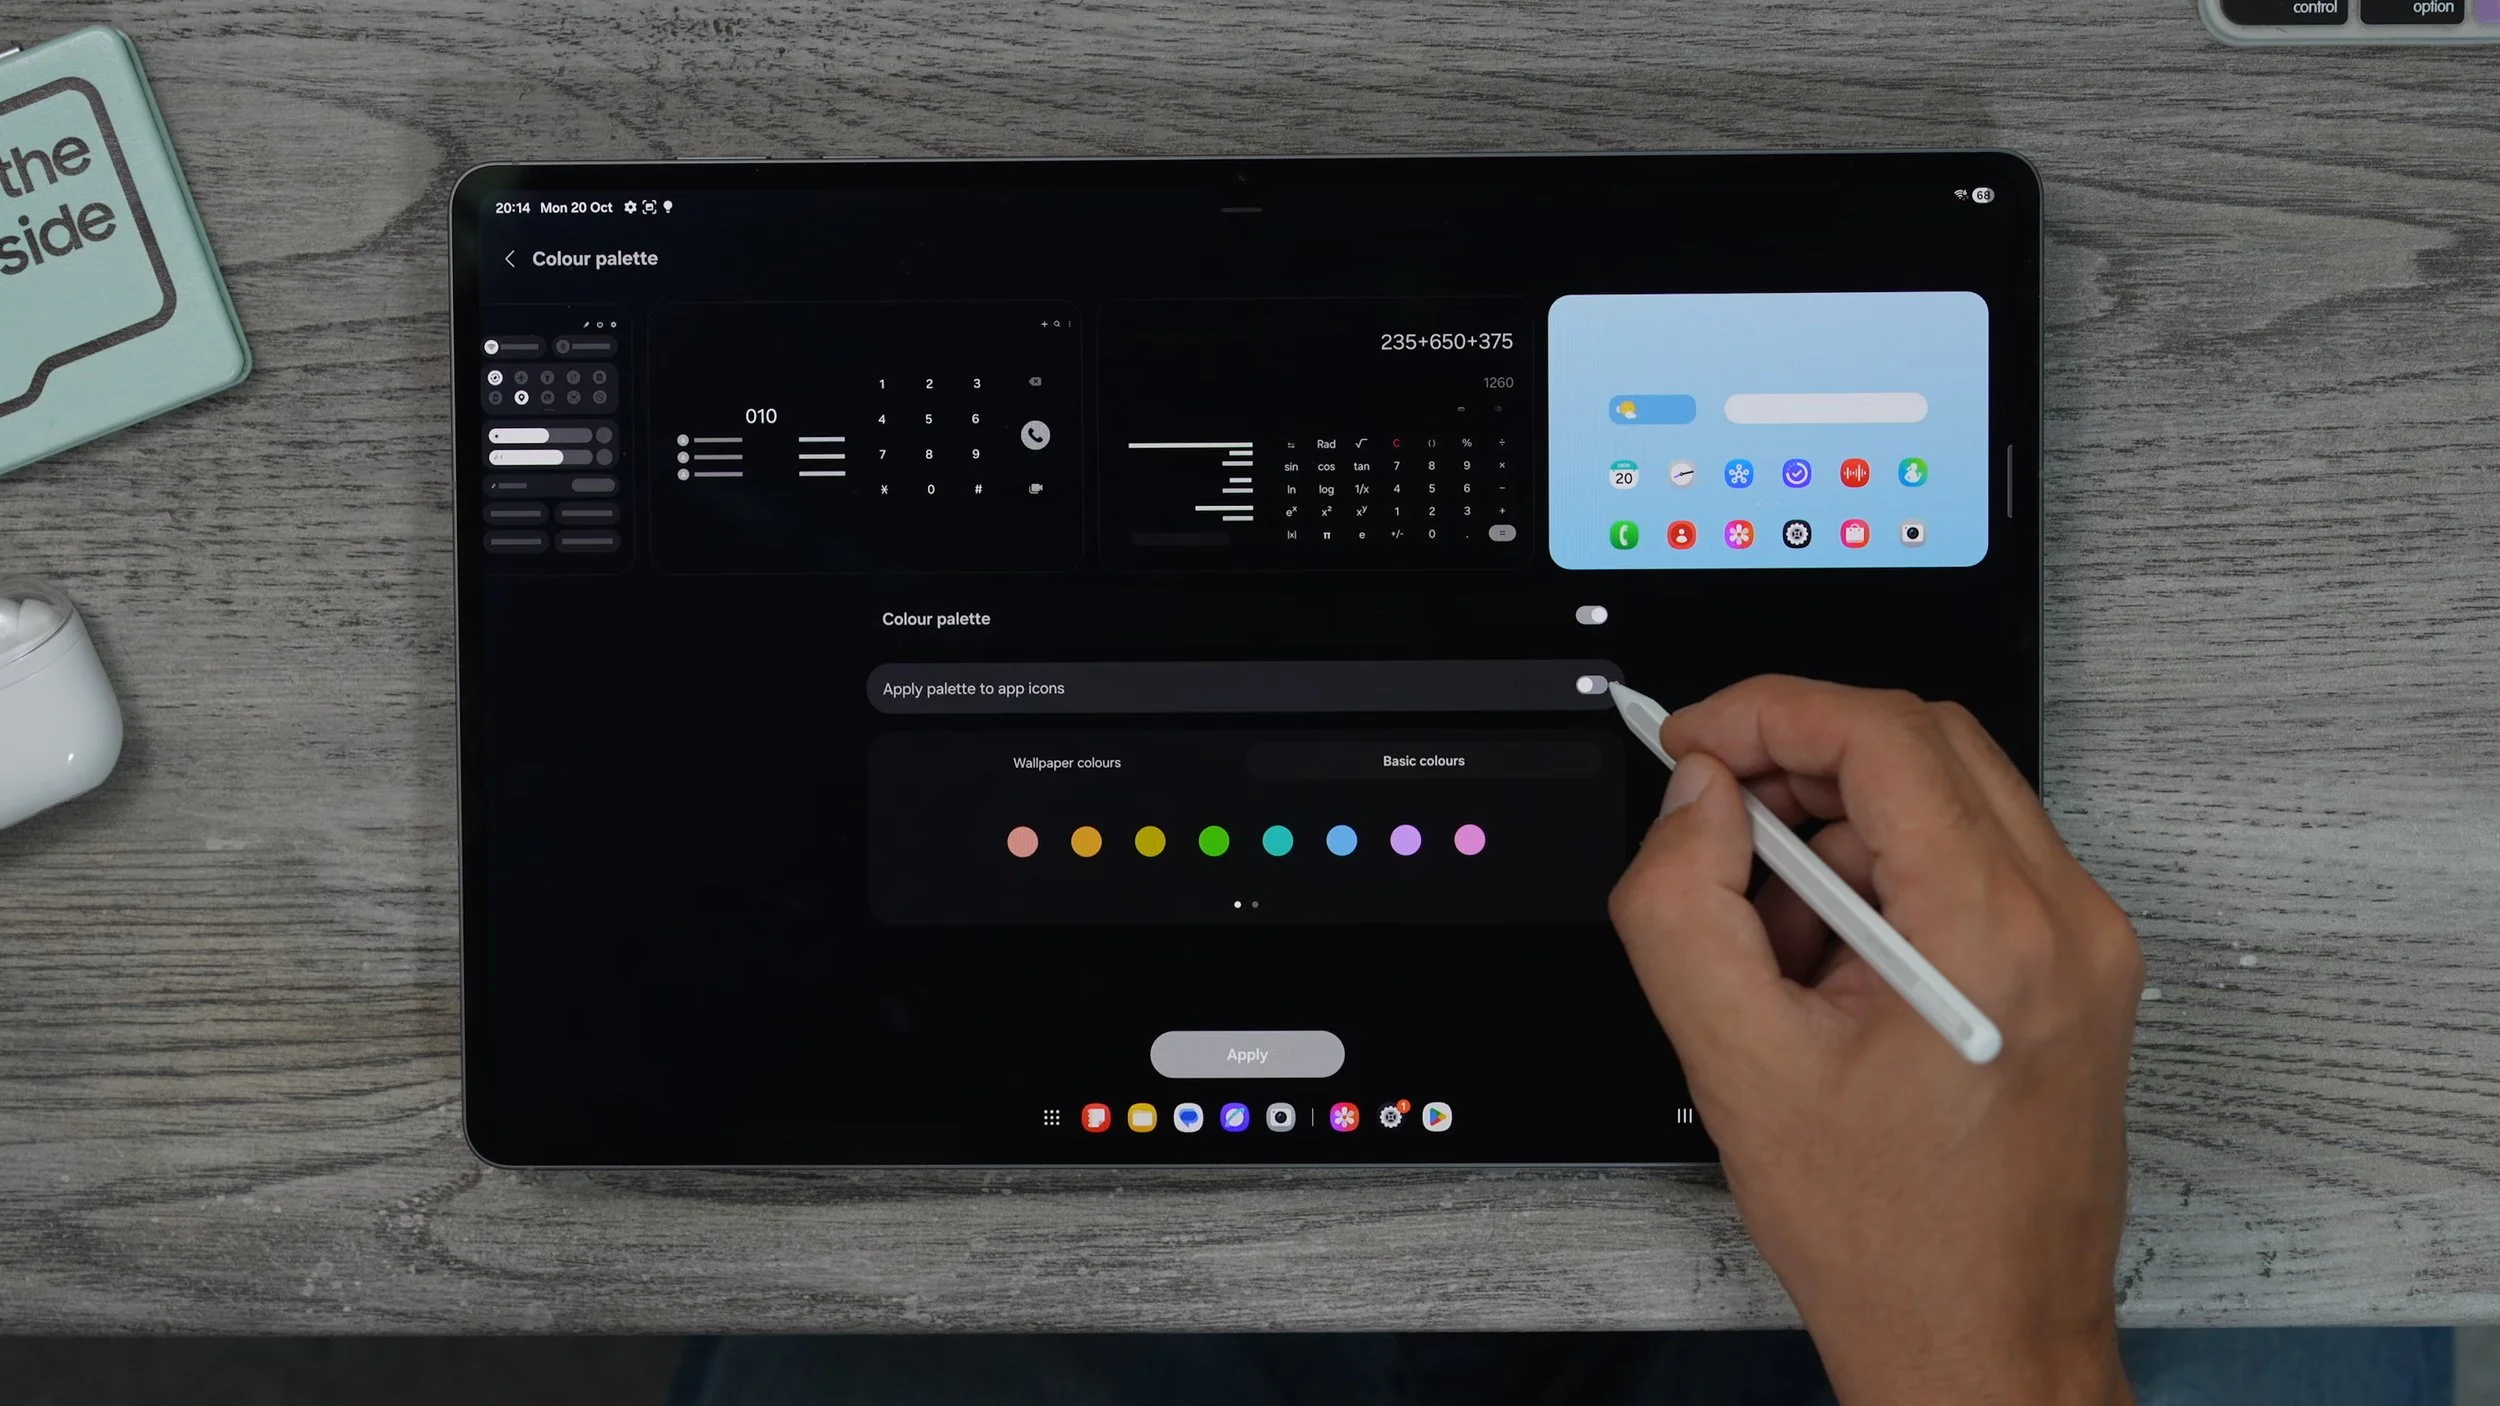
My favourite is actually the two-time ones. Have a little look at these and choose whatever works best for you. And if you want all of your app icons to have just one uniform colour, you can actually do that just by tapping Apply palette to app icons. You'll see that all of the icons have now turned this grey colour. Maybe you find it less distracting, so you can focus on the things you want to do, or it might slow you down, making it harder for you to find the apps you're looking for. So definitely play around with it and customise it in a way that works best for you.
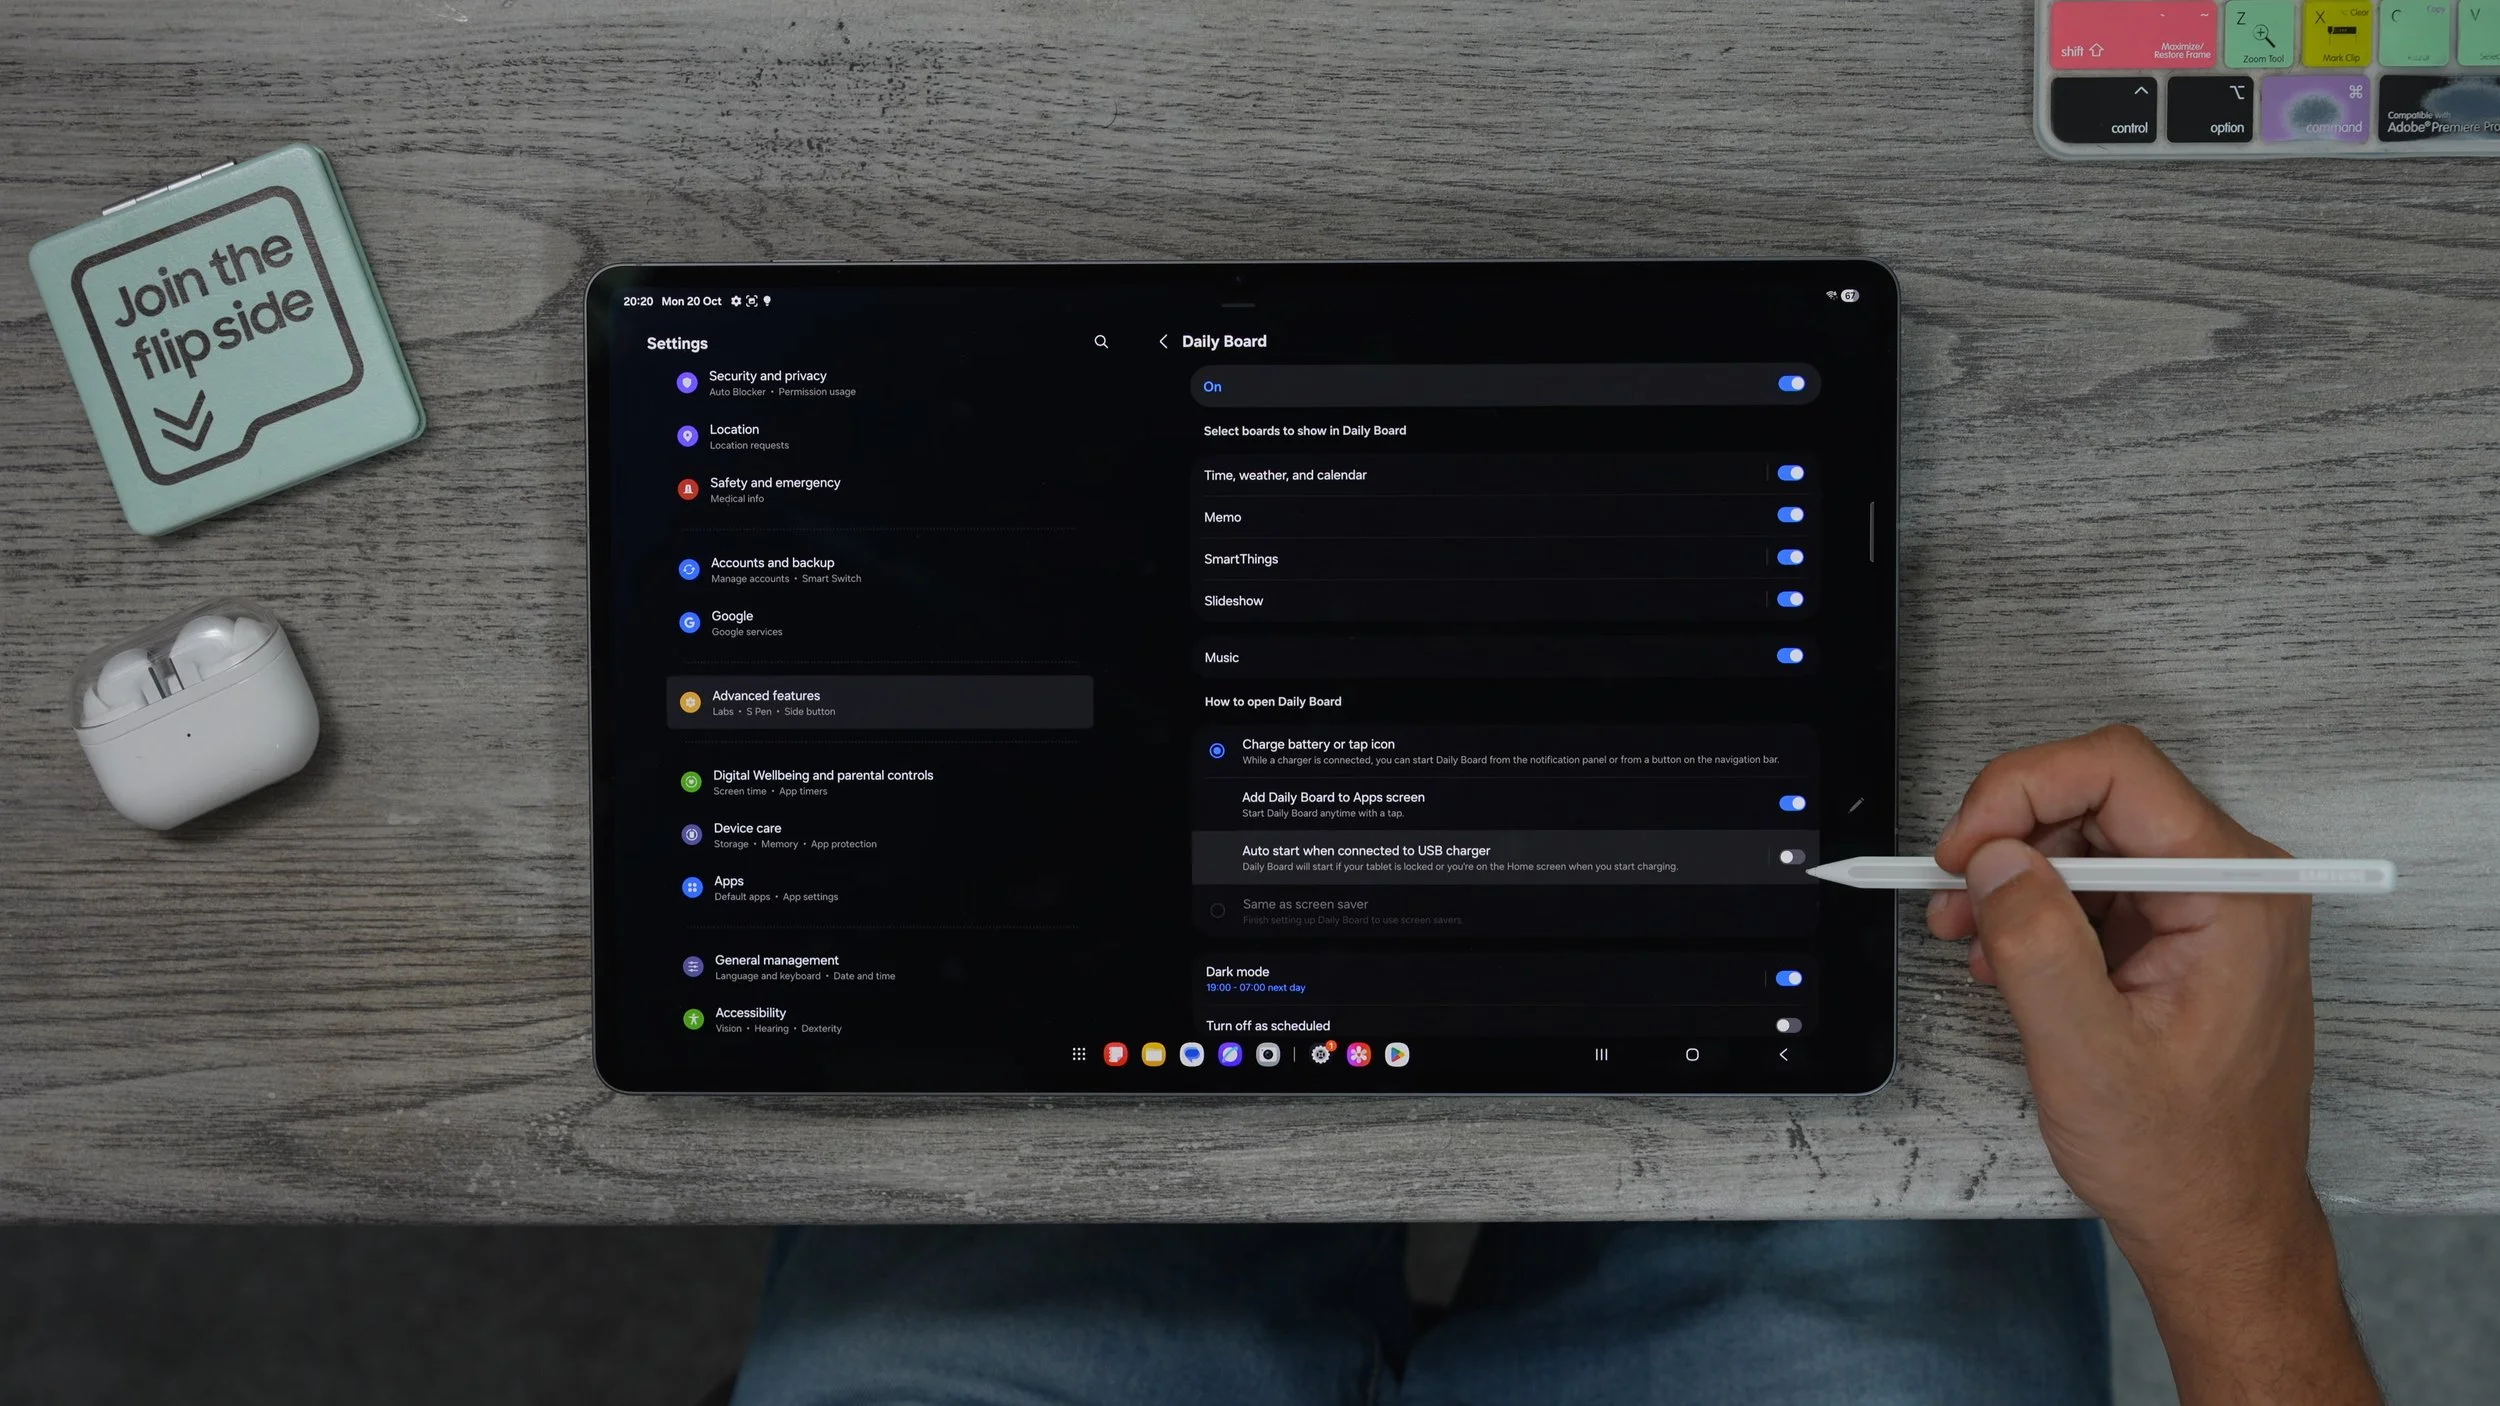
THE DAILY BOARD
Here is a brand new feature on the Galaxy Tab S11. And it's pretty cool, especially when you're not using your tablet. So if you go into your settings on the left side, if you scroll down, go to the advanced features on the right side, you'll see this daily board. It should be switched on already, but if you tap on this, you can actually choose what you want the daily board to show. You might be wondering what the hell the daily board is? By default, it is set to only appear when you're charging the tablet, and you'll have to tap the icon when charging to activate it. But what you might want to do is actually add the daily board to the app screen so you have access to it that way, and if you really like it, you can actually set it to auto-start whenever you plug in a charger.
I'm just going to show you how it works from the app screen. So if we swipe up from the bottom, we now have a new app, and it is called the Daily Board. It will give you a default set-up at first, which you can customise later on. So essentially, when you leave your tablet lying around or just charging, is kind of like a standby clock, but with more information. almost like what the Alexa show does, for example. It just kind of sits there showing information. If you tap on this and customise the style of the clock to something different. It just kind of moves around like a screensaver.
And it will adjust between day and night mode as well, depending on the time of day. If you swipe across, you can leave memos for people in your house, or little reminders, just by scribbling on the screen. So if you need to leave a little reminder of someone, you could do that, and it's kind of animated too, which is nice. If you have lots of Samsung smart things, for example, the TVs, the fridges, the washing machines, all that kind of stuff, the cameras, you can use this as a hub to control everything. Again, not too dissimilar from the Alexa show, where you can access all your Alexa devices in one place. And if we saw because again, we have a kind of animated wallpaper with the time. You can also have the weather there as well. You can actually even have music playing in the background from one of your streaming services. You do need to log in and set up first, before you can apply it to this kind of wallpaper screensaver type thing. You can change the style of the wallpaper as well. And then you have the option to adjust the brightness and things like that.
So yeah, if you want your tablet to show useful information or just be there in the background, ready to go. So this could be useful to set up if you have lots of smart home stuff. And for when you're not using the tablet, you can still be useful in this mode. And if you want to see how it looks when you are charging the device. So I've got it plugged in now, I'm just gonna swipe up and not actually unlock it. Down here, you'll see the shortcut to activate the feature. And it does work in portrait mode as well. That's pretty cool. So that's how you set up and use the daily board.
CUSTOM GOOGLE BAR
Now let me show you another really cool customisation trick that a lot of people don't know. And it is this, the Google search bar. It's not that we're going to be in light mode or dark mode. But did you know you can actually make it whatever colour you want it to be, and actually even add more functionality to it? Here's how you do that. So if you hit the little G on the Google search bar. Go to your icon up here and then go to settings on the left side. Here we're going to customise the search widget. And here is where we can change the colour of the search bar.
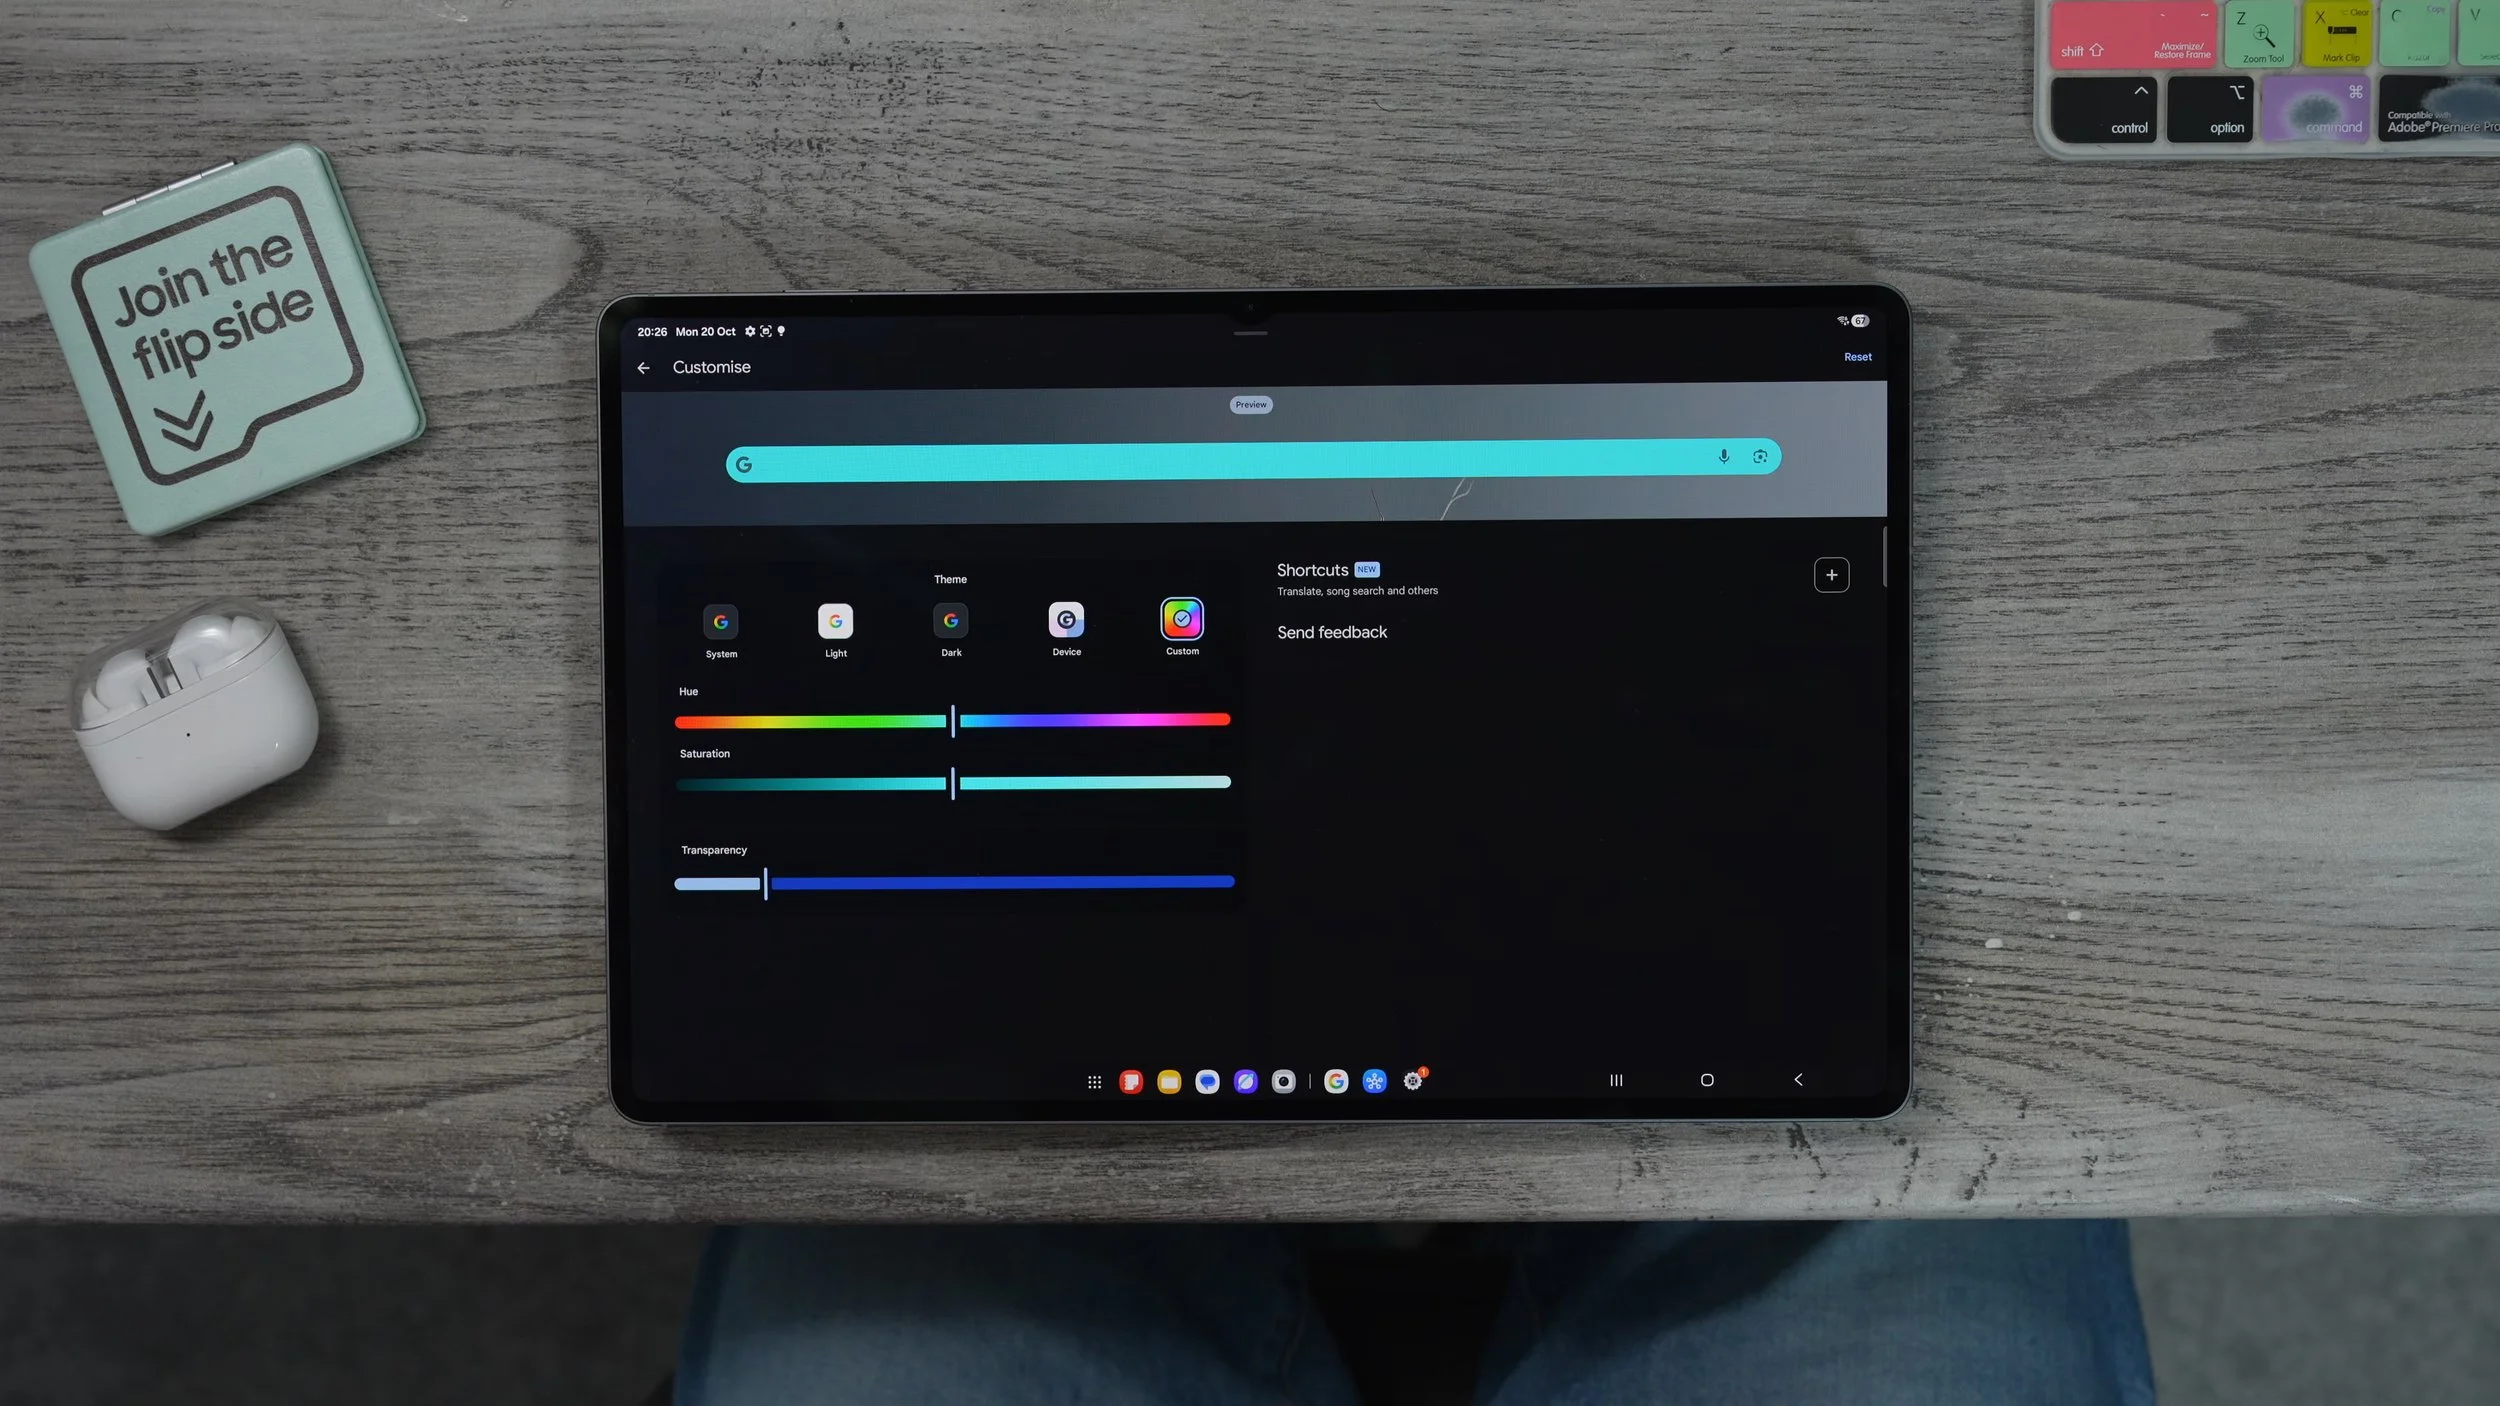
You got the device colour mode. So this will match the theme that we set up earlier, the palette. And then there's the custom, which is by far the best one in my opinion. Here we can change the saturation and the hue. I want to go with a dark purple, and I'm going to make it quite dark, with a transparent effect. So this is a bit behind the search bar. And then up here we've got the shortcuts, and you'll see there's a little new next to it. And that's because you've got the AI mode now here, which can be added to the search bar. You know, I've changed my mind. I'm going to make the search bar green to match Master Yoda. There we go. know what? You're happy with your set-up. Just go back. Back to the home screen. Custom search bar with a custom colour. With the new AI mode right there and ready to go. You know what? Now I'm thinking the purple might have been better, but anyway, moving on to the next one.
COLOUR CODED FOLDERS
Something that I really like about One UI is the customisation options. For example, you can colour-code your folders. Let's take the Google folder right here, for example. I'm going to tap enlarge. Now we've got a bigger Google folder. If you tap on the folder itself, expand it in the top right corner. You see this little red dot. If you tap on this, you can now colour-code the folder. So, for example, let's make this a dark purple similar to the weather icon.
You can change the saturation of that. Just make it quite dark. The Google folder is now purple. If you want to make it more transparent, all you need to do is go back to the colour, go back to the swatches and reduce the transparency right down. So it's just faint in the background as opposed to solid. And that kind of blends in a bit more nicely with this particular set-up.
NOW BAR OPTIONS
Here's another really nice exclusive Samsung feature. Go into your settings. On the left side, go to the lock screen. On the right side, go to the now bar. And wait, you see view More. Just tap on that. Here is where you can select what will appear on the now bar. Now, what are the best use cases for this, in my opinion, is for sports results. So if you want to customise what sports results are shown on your now bar. These will also appear on the lock screen as the events are happening. Go to the sports from Google right here. Make sure they're switched on, and then go to sports on Google Settings right there. This will take you to the website, which is linked to your Google account, and here you can search for whatever sports teams you follow. Just choose them from the list.
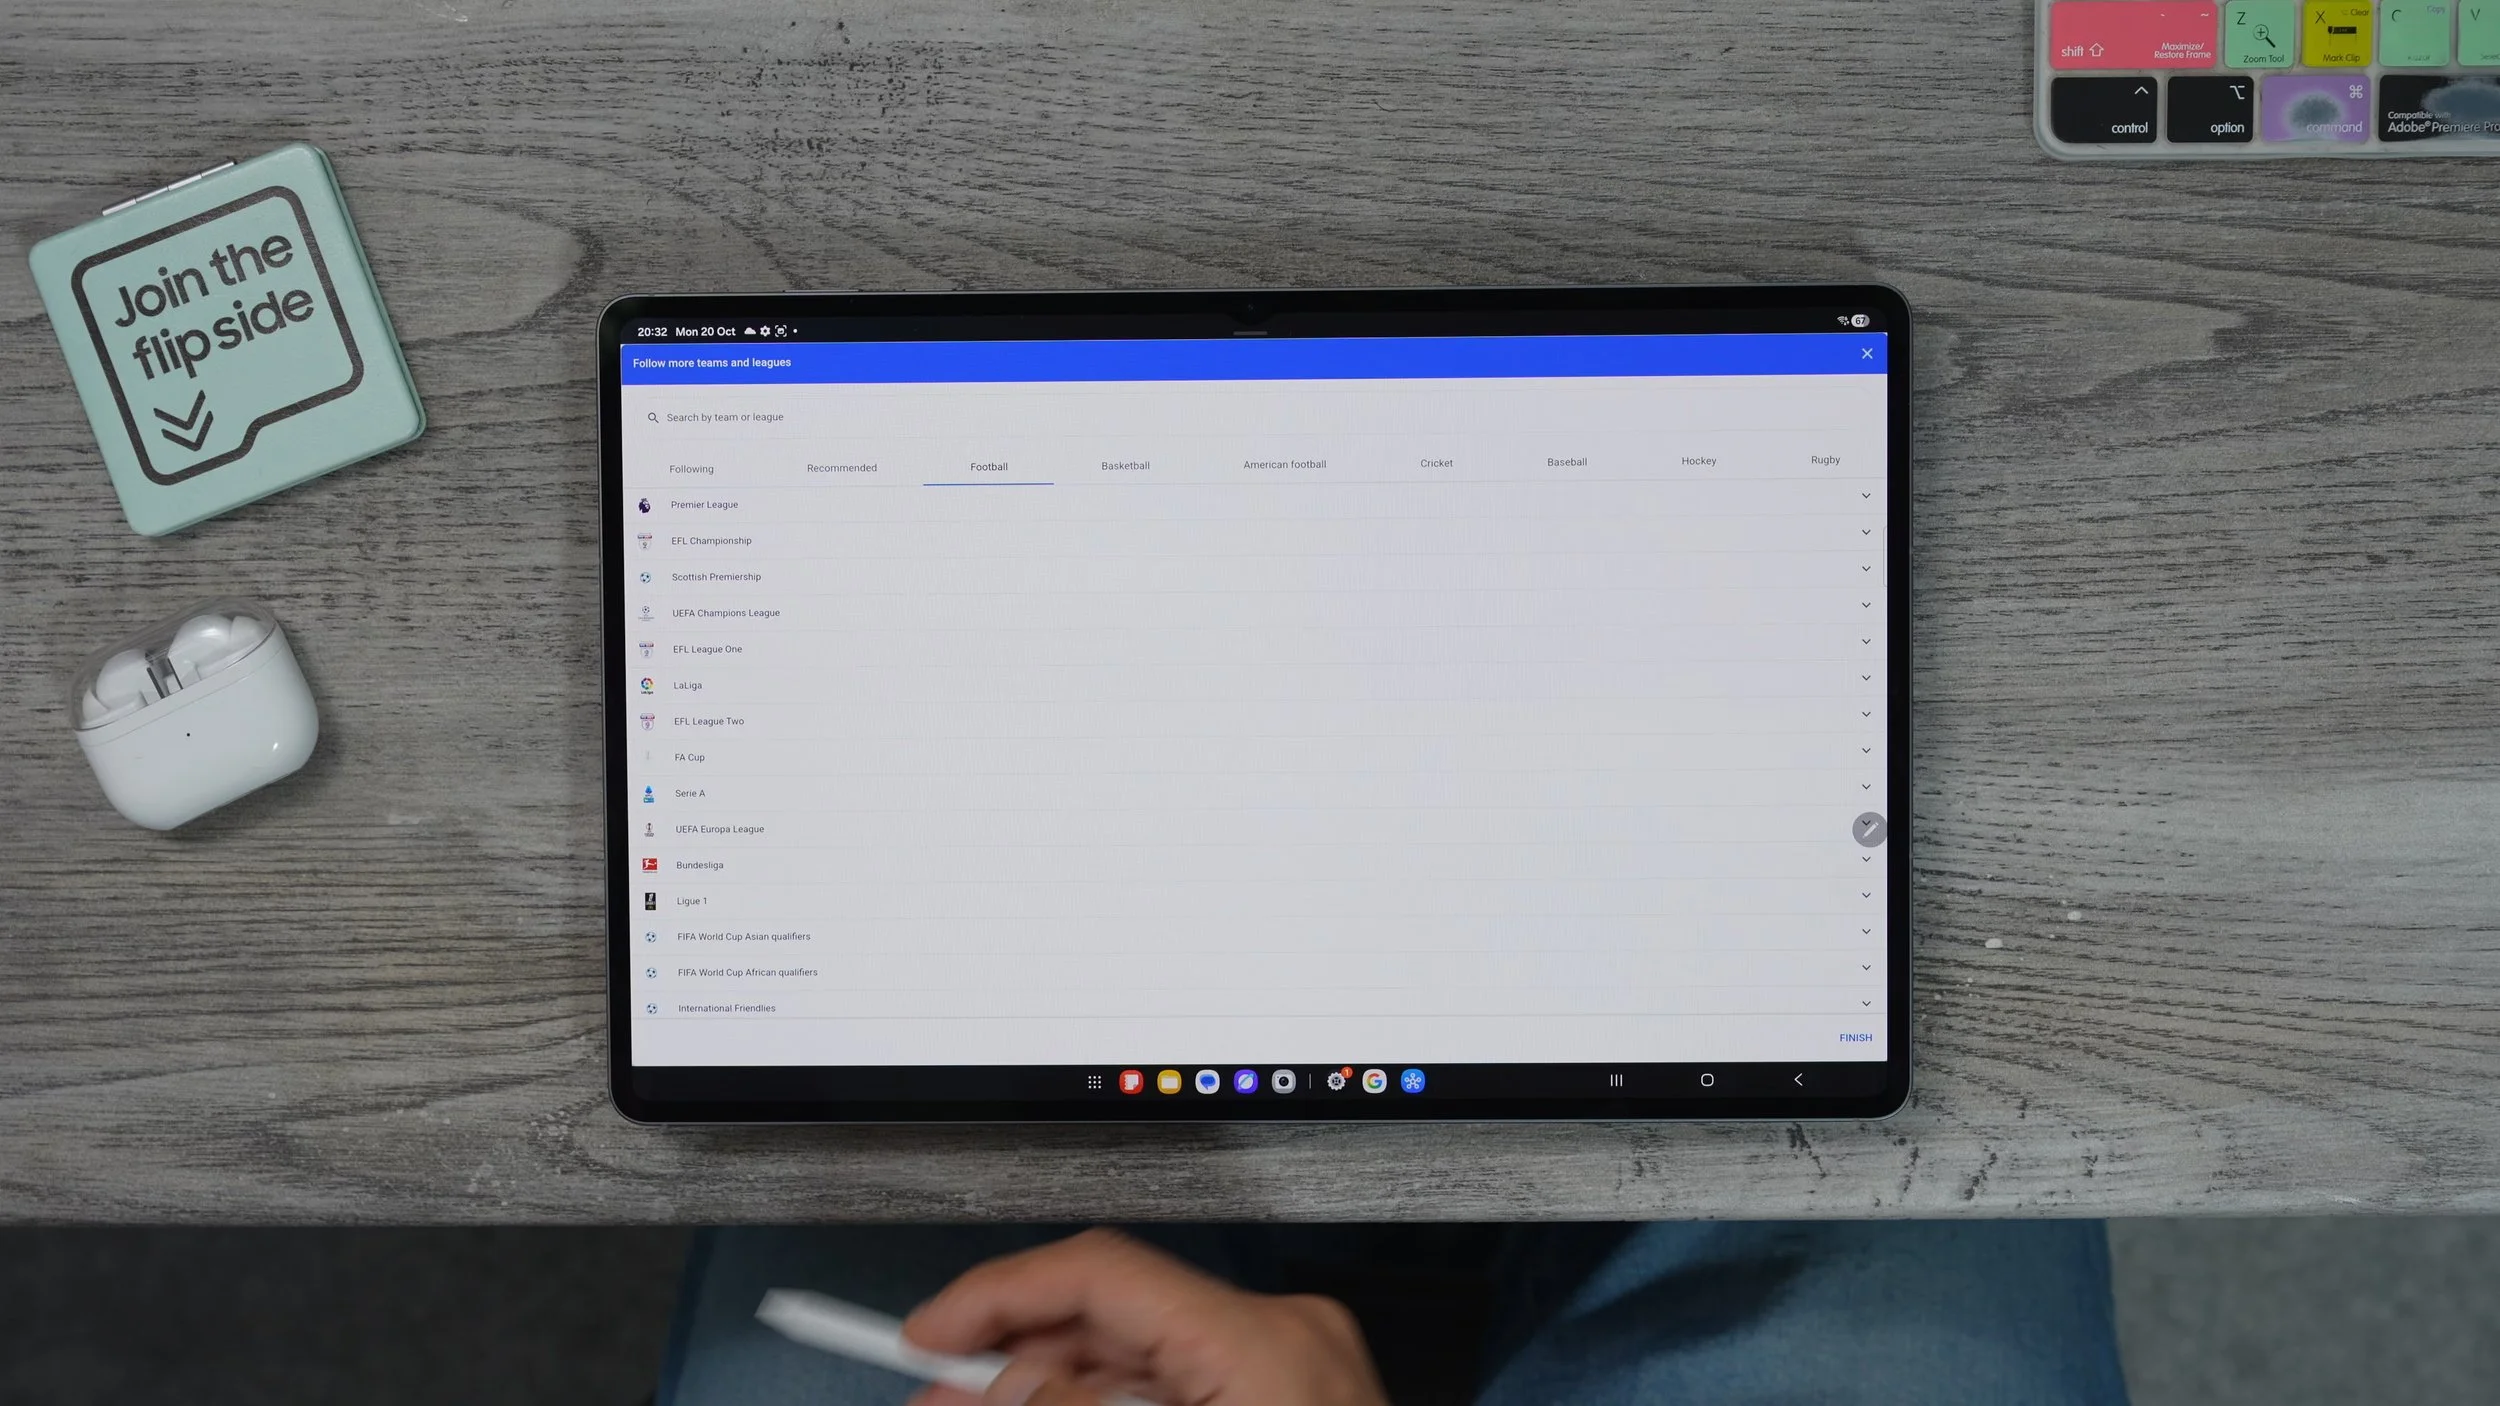
Those will then be added to the now bar. So when your favourite teams are playing, you will get live results. Broadcast straight to your tablet without you having to open up the browser or search or anything like that. And just to show you where this will appear, you'll actually see it within your now brief. That's one way that you will see it. Let's give you an idea of how this will look. I've activated the voice recorder. The now bar will pop up here. And you'll have your sports results right here. And if you tap it, it will expand and you'll be able to see more detail. And then when you're on the lock screen. You'll see it down here. And if you have more now bar stuff going on, you'll be able to scroll between the different now bars just by flicking up and down on these.
CUSTOM QUICK SETTINGS
Here's another customisation tweak that I highly recommend you do on day one. If you swipe down from the top right corner, these are your quick settings. If you swipe down again, these are all of the quick settings that are set up for you by default. If you hit the little pen and go to edit, you can actually add more quick settings, and there are some very useful ones to add. For example, if you swipe across. Secure Wi-Fi is really, really useful, and I'll show you why in a moment. Song search could be very useful if there's a song playing that you want to know what it is. And show this out if you've got the daily board here. So that feature I just showed you can be activated via the quick settings. If you add that to your quick settings. And once you set those up, you can now drag them around.
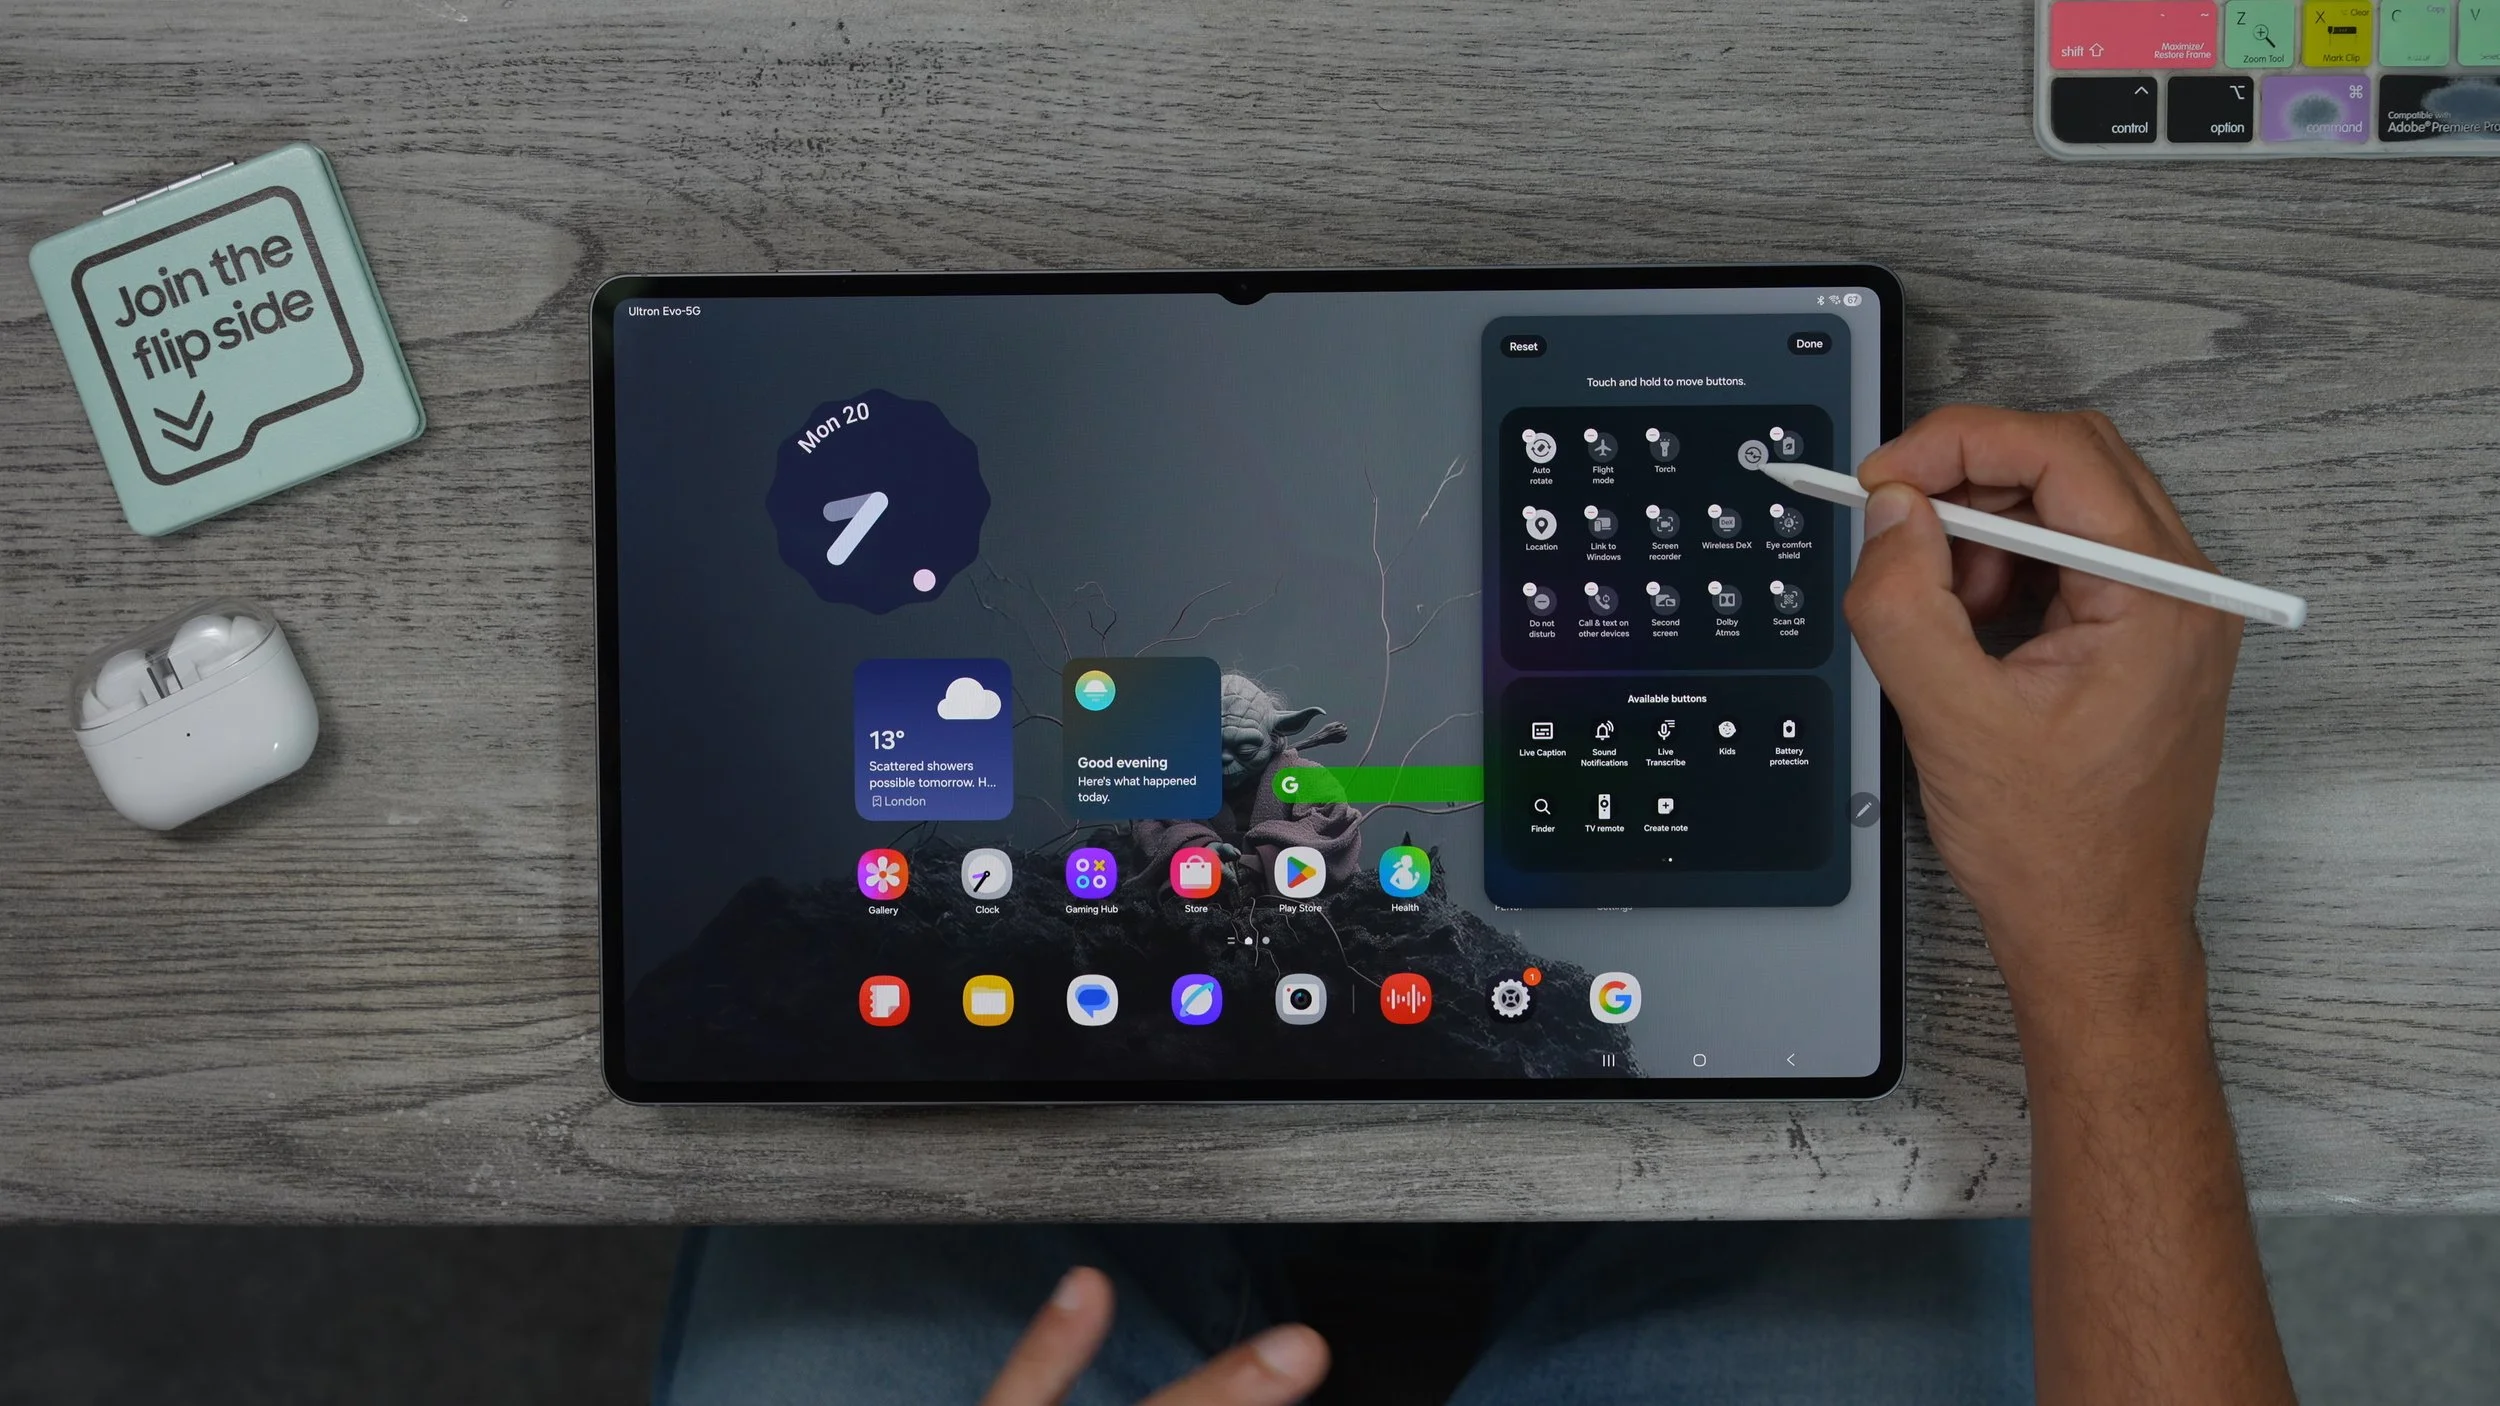
For me, the quick share is one of the most useful quick settings of all because I use Samsung phones as well. This allows me to share back and forth between my Galaxy devices very quickly. But this also works between Android devices. If you're coming over from iOS, this is exactly like AirDrop, but for Android. So I spent a bit of time customising your quick settings. You can even shuffle things around if you prefer. Some of these settings are in different places. You can play around with those if you want as well. But just make sure all your useful stuff is accessible very quickly up here. And do keep in mind the top ten icons that you've chosen appear first, and then to access the rest of them, you have to swipe again.
EDGE PANEL OPTIONS
Now let's move on to another very, very useful and maybe underutilised Samsung exclusive feature. And the reason I say underutilised is because a lot of people probably don't know how to set it up and use it properly. Let me show you how to do that. If you swipe out the edge panel, which is this little bar here, the default edge panel apps. If you go into your settings. Go to display. Here, you will actually find the option to switch edge panels off if you never want to use them. You could tap that, but I highly recommend that you use them because it allow you to create pop-up windows. And if you tap where it says edge panels, here's where you can customise how this looks.
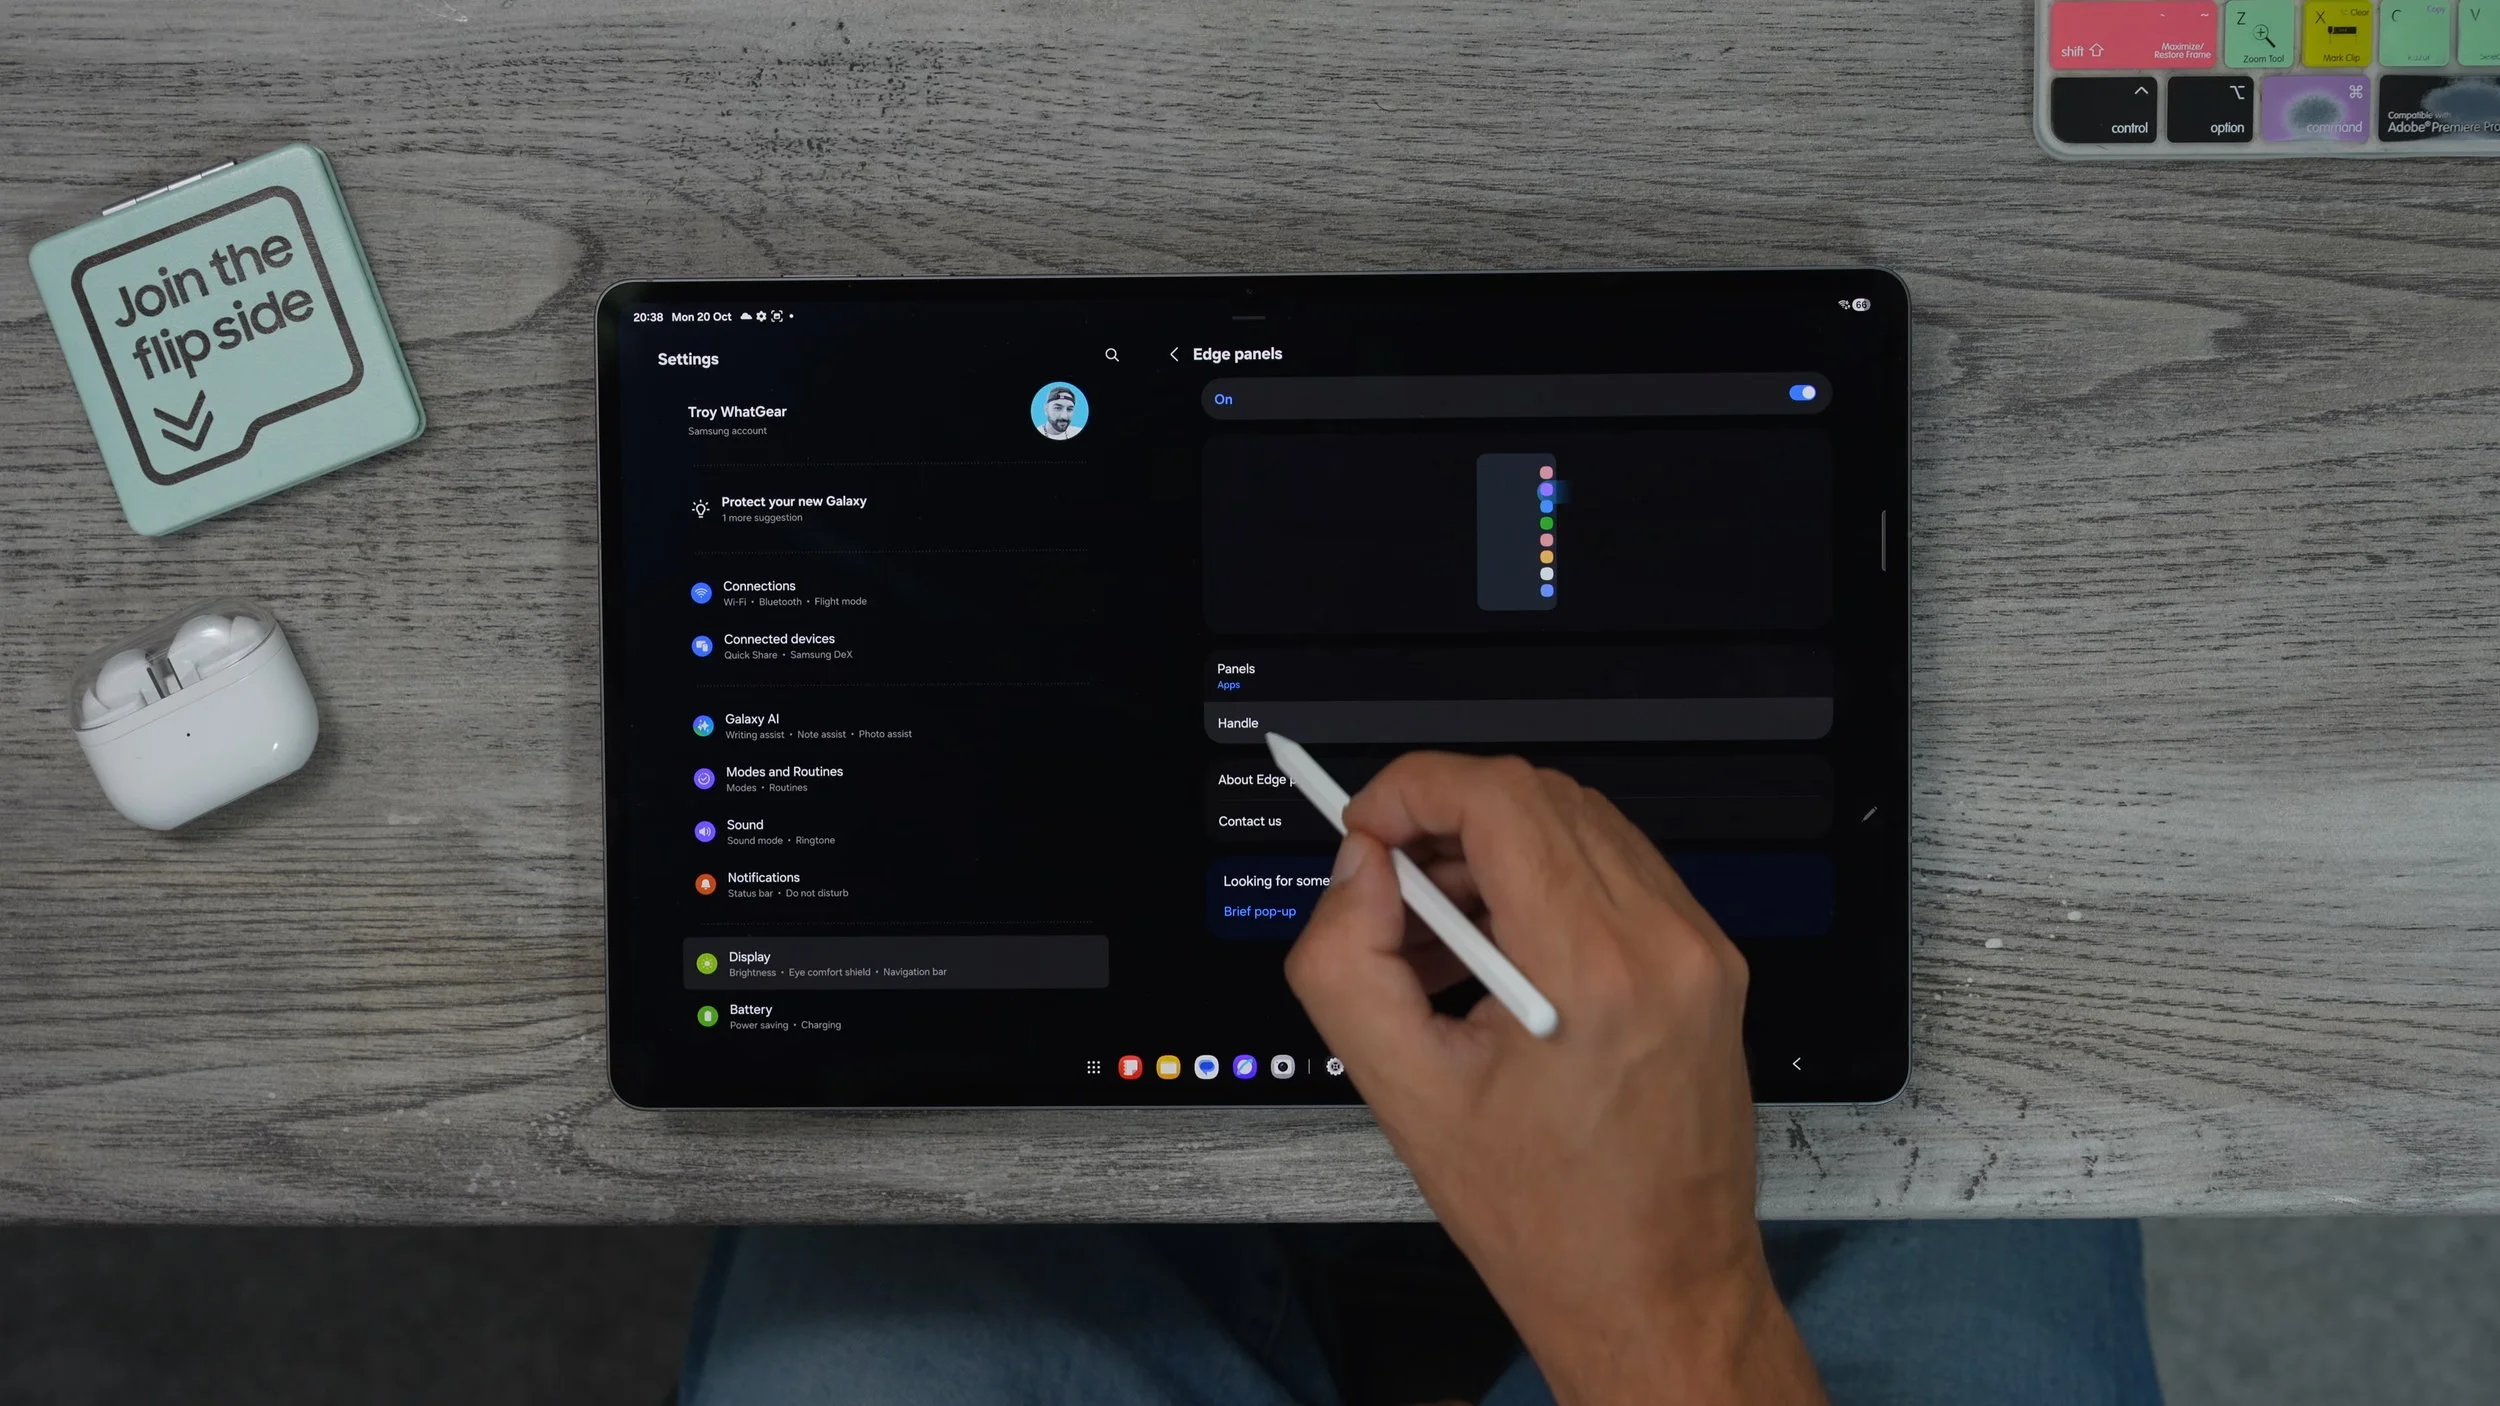
So right now it's just this little small faint line on the right-hand side. If you go to a handle here, we can change the size of the handle. I'm going to make it since this is such a big tablet; might as well make it bigger. I can also reposition it. I would keep it further up. So you're not hitting it by accident when you're trying to swipe across to another page. could also change the width of it as well. Make it a bit thicker. I'm going to keep it in the middle, and then we can change the colour of it as well. Let's make it green like the Google search bar that we set up. And adjust the transparency so it's a bit more visible. Now, if we go back one step and go to panels, we can actually add more stuff to the edge panel. If you leave it how it is, it's just going to show the apps that you've chosen, and I'm going to show you how to choose those in a minute. But some of the other tools you can add here are very useful, like the actual toolbar.
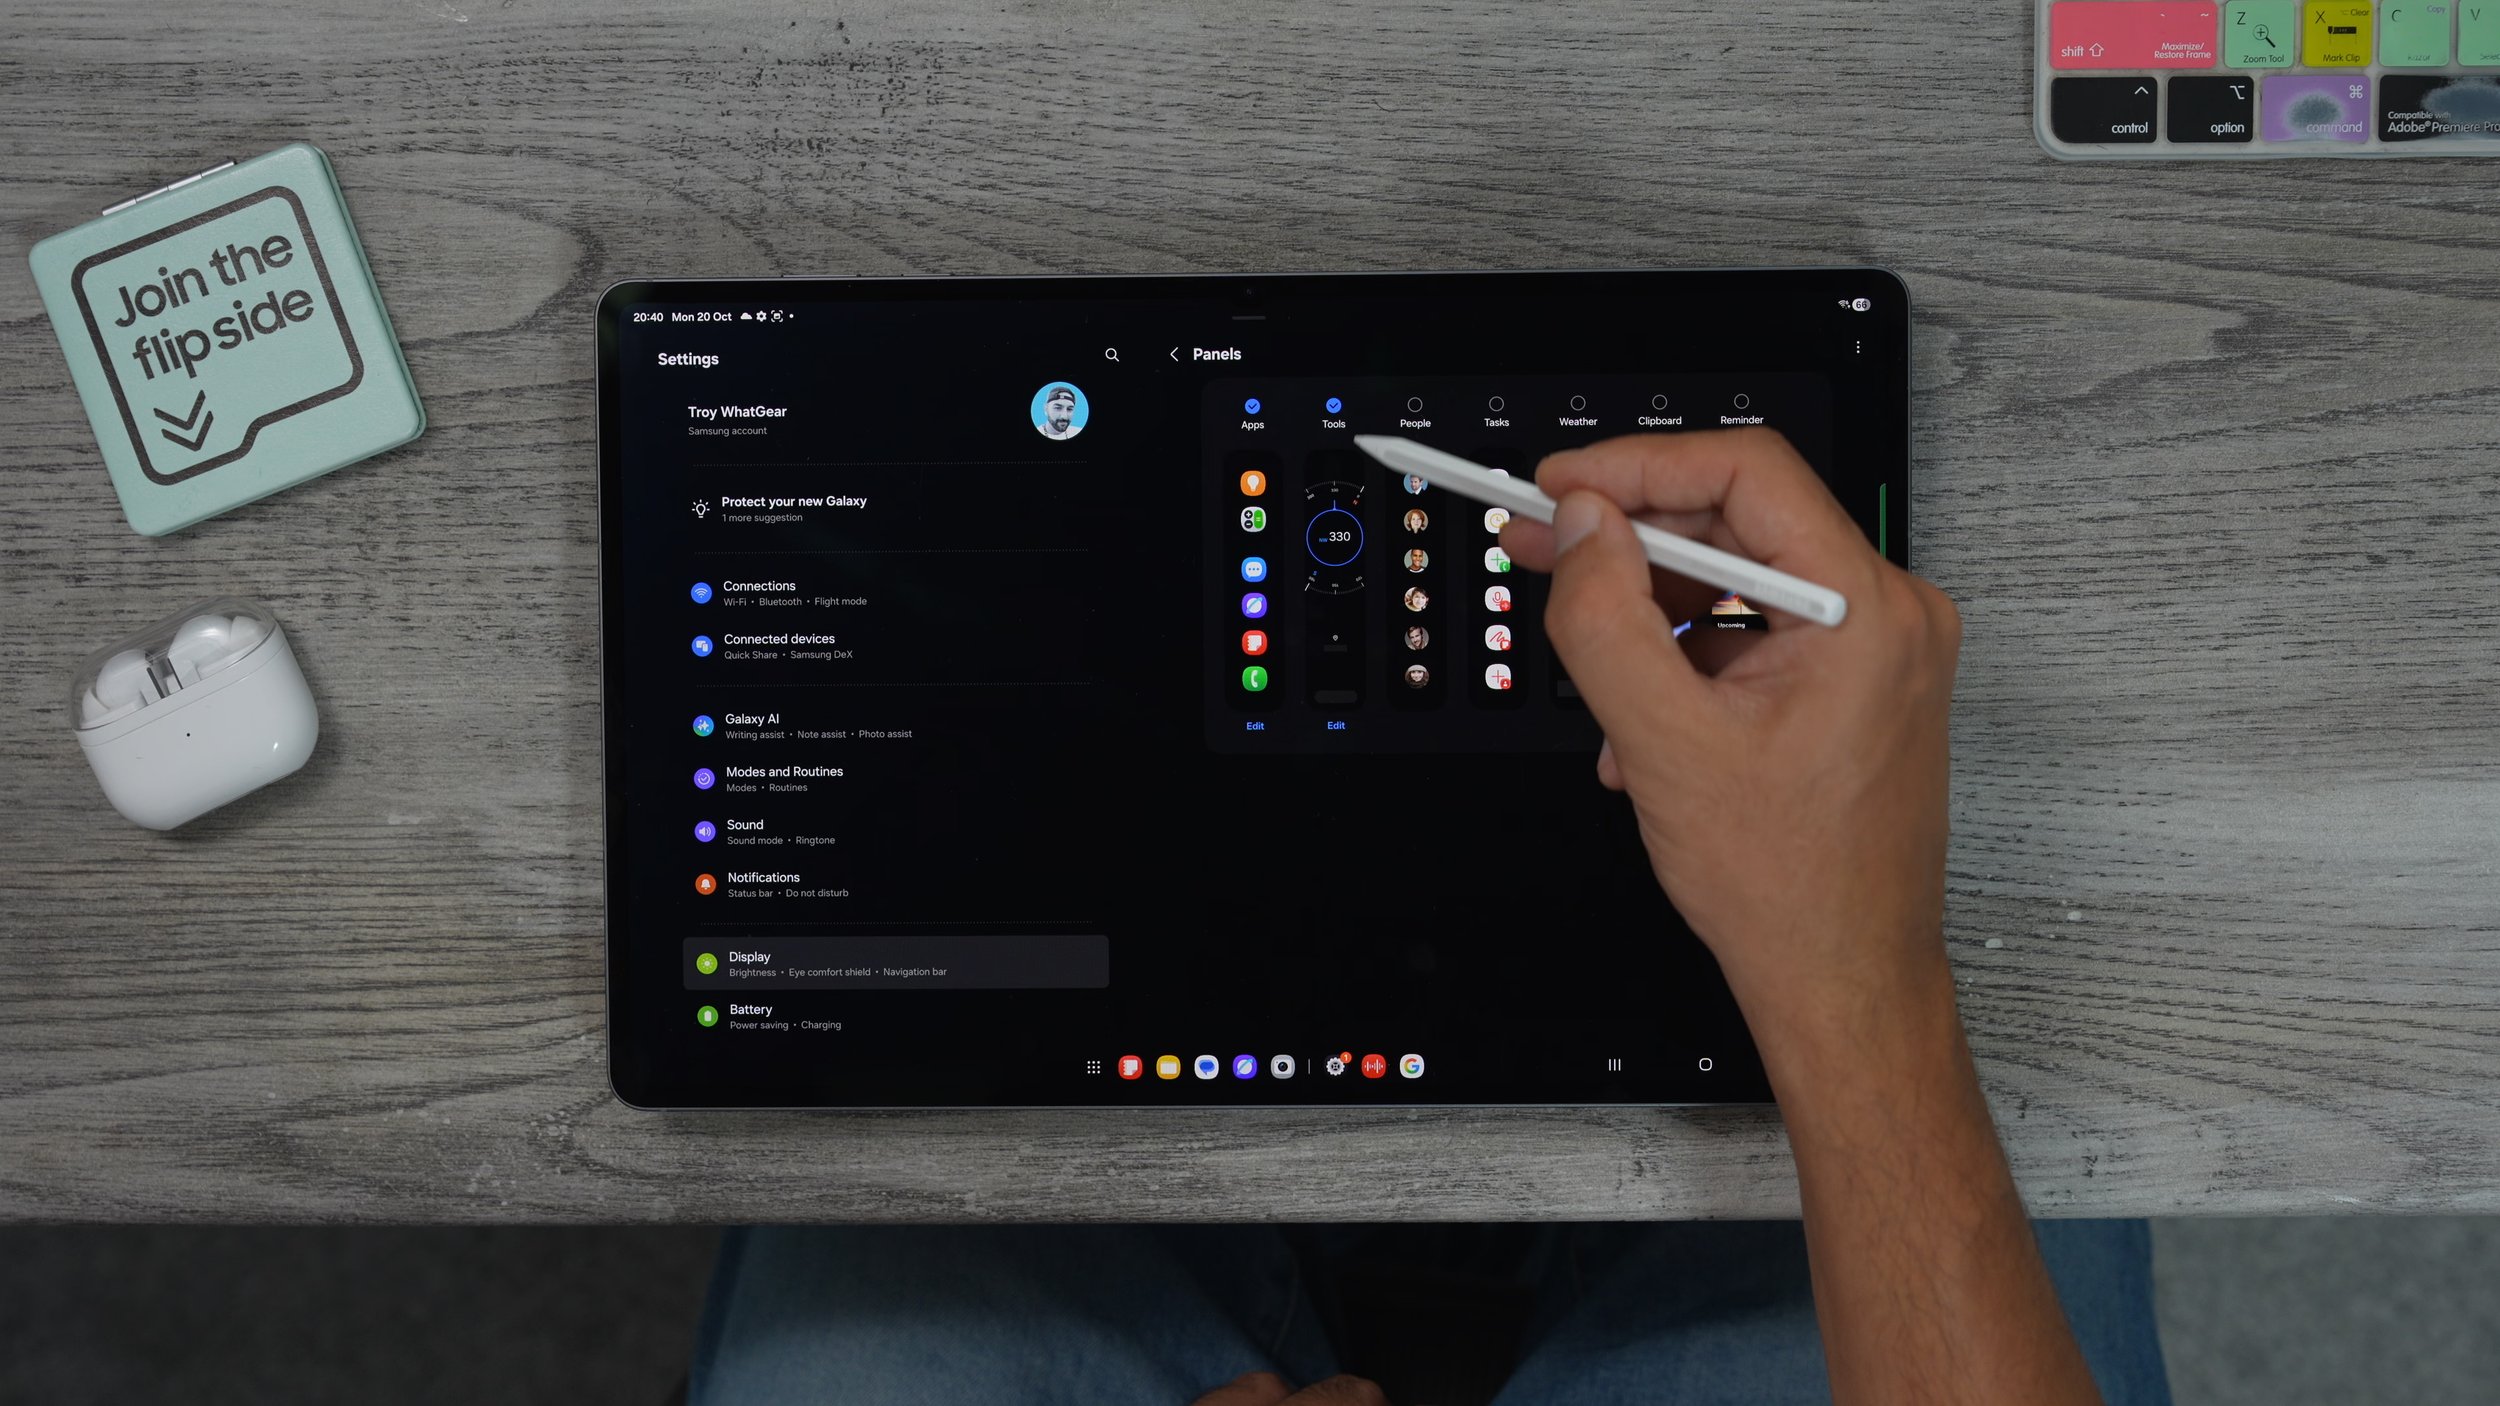
You also go to the clipboard. So if you are copying and pasting stickers like I showed you earlier in the video, you can get quick access to them here because it keeps a history of those. So I'm just going to choose these three for now. Come back to the home screen. And now I want to swap out the edge panel. That's the first one. Swipe again. That's the second one swipe again, and here we go. Here's the stuff that I copied and pasted earlier. So if I need access to these again, I can just say copy again and then paste them somewhere else. And here's how you customise the apps on the edge panel. So we go back to the app panel here. Hit the little pad at the bottom. We can do now is add more stuff to the edge panel, the kind of stuff that you don't necessarily need on your home screen all the time, but that you will want to find quickly when the time comes. For example, authenticator apps could be really, really handy. So just set this up with the most useful apps that you don't necessarily use every day.
THE CUSTOM CLOCK
Now, I know some of you might be wondering how the hell I got this clock? Well, let me show you so if you go to the play store whilst I'm showing you this, I'm going to show you another little bonus trick with the S-Pen. Go to search in the search bar up. If you type in or handwrite Google Clock. Make sure it is the official Google LLC clock.
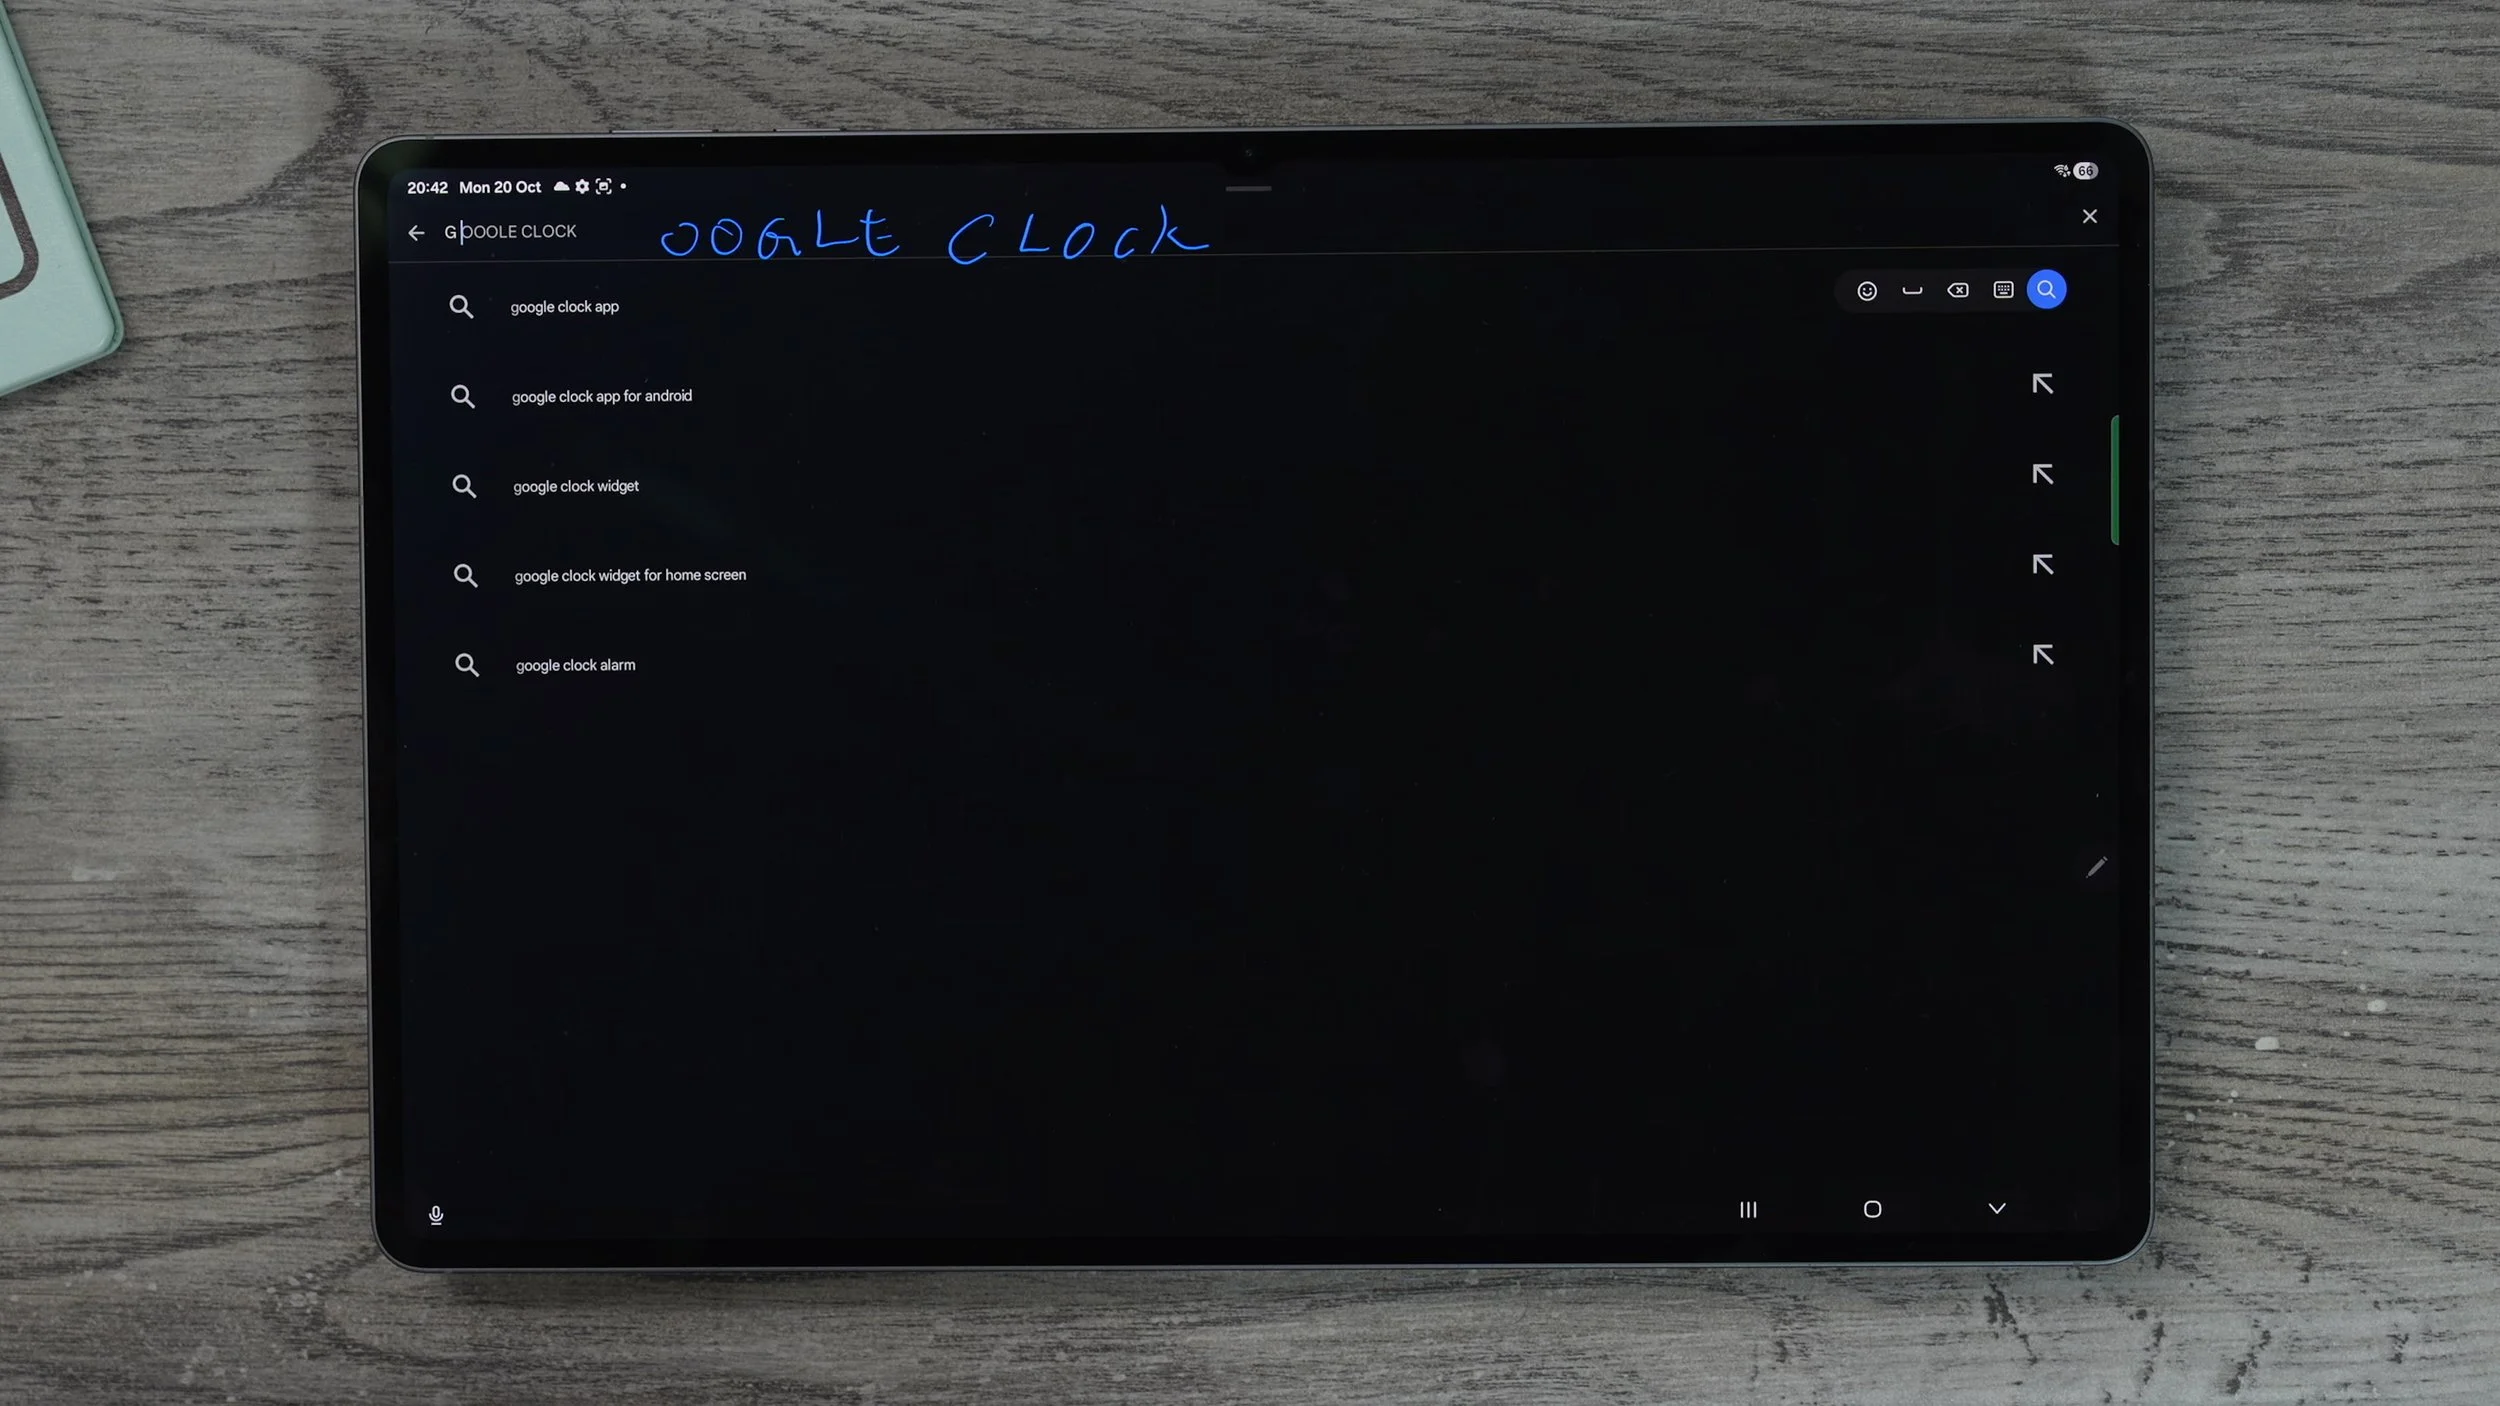
Now, when you hold your finger down on the home screen, go to widgets. You'll have two clock apps: the Samsung one. They do have some pretty good clocks, but they don't have any quite like the Google analogue clock, which is the one that I'm using. And the colours of this clock will actually match the colour palette that you set up earlier in this video.
FLOATING WINDOWS
Let me show you how to create floating windows using the edge panel. So if you swipe out the edge panel, grab one of the apps. For example, with the notes app, drag it onto the screen. You'll see if you place it on the right-hand side whole open split screen taking up half of that side, you can choose the other side, or if you drag it to the middle, this is how you get a pop-up window. Again, if we bring out the edge panel and grab another app, let's open it up and drag that on. The same thing applies. You can either snap it left or right, or drop it in the middle to create a pop-up window. And you might be wondering, why would I even need a pop-up window? Well, you might need it for a calculator calendar, or if you're referencing a website or something like that, you want to grab numbers from that website and write them down in your own notes.
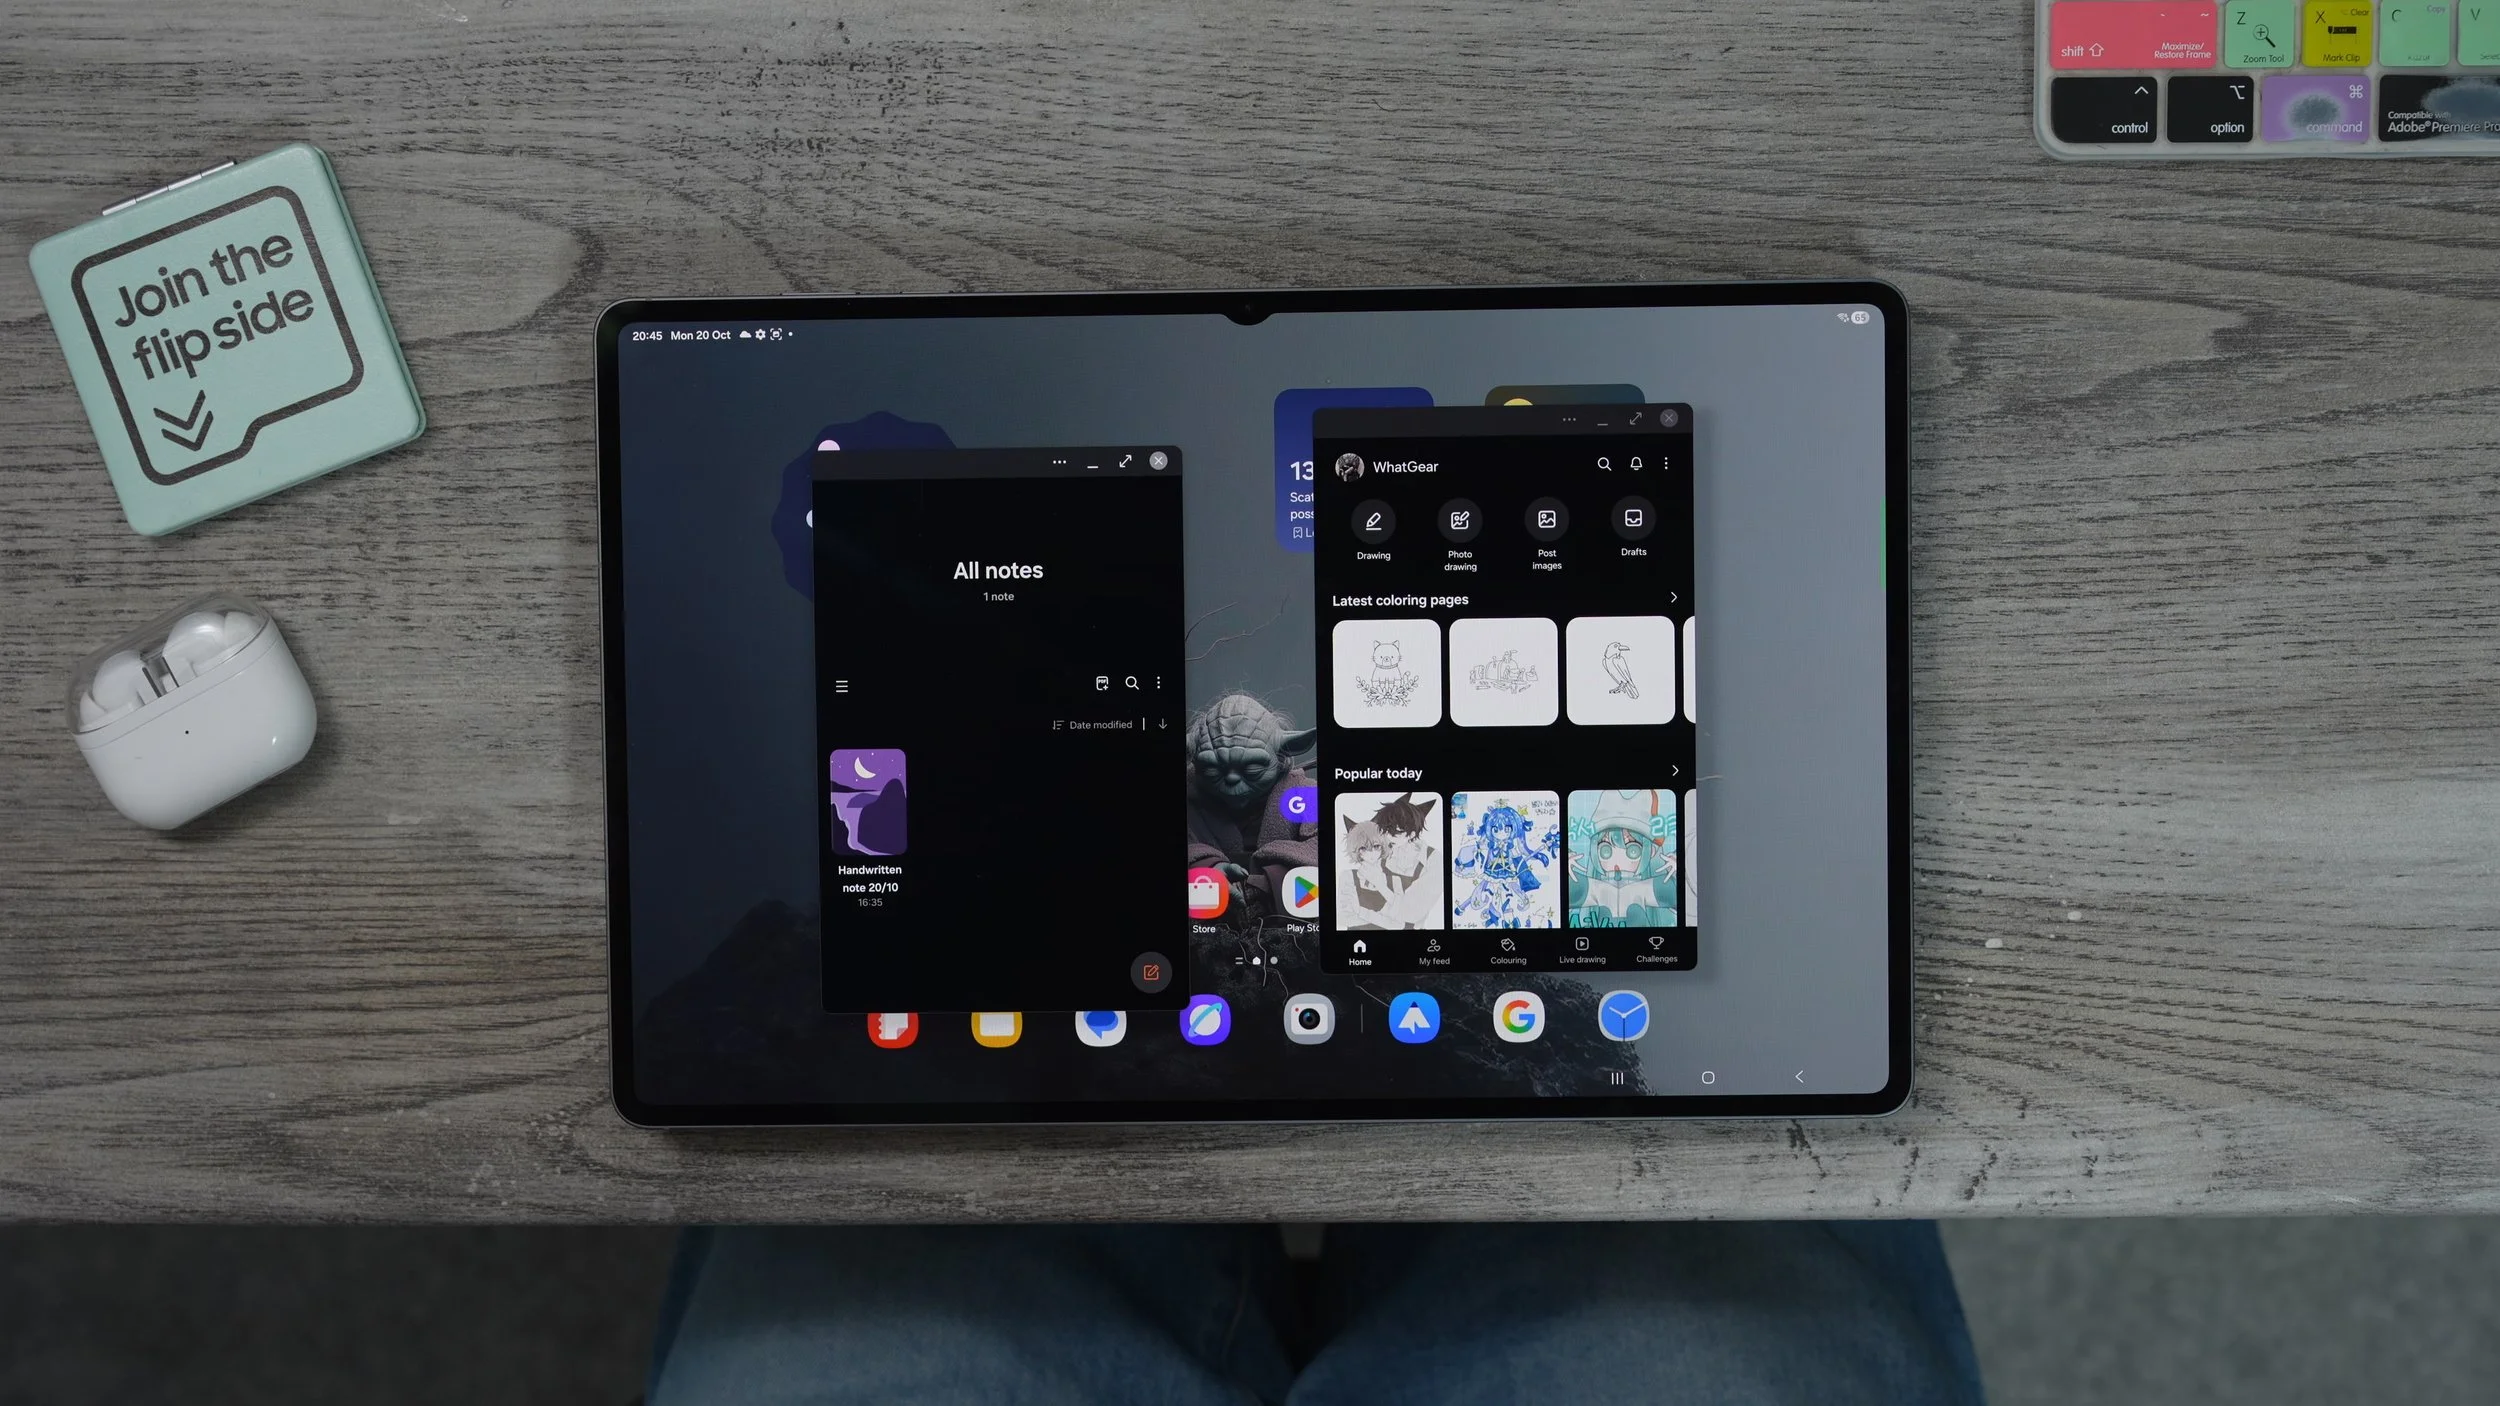
Anything like that where you need quick access to a little window of information. This is when you'd want to use a pop-up window. And the great thing about pop-up windows is that they can be minimised when they're minimised. They're just floating around like a little app icon, and they can even be pinned to the side of the screen, so you can bring them back whenever you want. And it will snap straight back to where they were when they're not in use. And if you create several pop-up windows and minimise them, they actually all stack up on top of each other. And you can grab whichever one you need very quickly just by tapping on that top icon.
HOW TO SPLIT-SCREEN
Now, let me show you how to create app pairs and trios quite similar to how we just did the pop-up apps. Grab one, drag it onto the screen, and we're going to pin it to the left on the right-hand side. We're going to open up a different app, let's say, the Play Store. Now we've got two apps in split screen. If you hit three dots in the middle, we can switch the sides of those two apps very, very easily. And you can even change the orientation so they're stacked on top as opposed to side by side. And if we want to add a third app, we can grab it from the edge panel. Just drag it onto one side or the other. Now we have an app trio set up, and the same thing applies. We can use the three dots here to shuffle them around just like that. You can also grab the dots and resize specific parts of the split screen, so you get the right ratio for each one of these apps, and you can even sort of move one out of the way and then tap on it when you need it, and just bring things back whenever you want.
One of the coolest things about this, though, is the ability to save the setup. So once you've configured split screen, the works for you. If you hit the three dots and hit the little star right here, you now have the option to save this split screen. The taskbar, which is this line of apps at the bottom of the screen, is the home screen. So it's just right there on the home screen or the preferred option, in my opinion, to the edge panel. So now we can call this app trio very quickly just by swiping out the edge panel and hitting the icon that we just created for it. And of course, you can create several split-screen setups and save them all to the edge panel. If you wanted to,
DEX DESKTOP MODE
If productivity is your main use case for the tablet, there is a brand new way that's probably even better than split-screening and setting up app trios. So if you open up your background, there's this new icon over here. This is the desktop mode. Once it's activated, you'll notice your taskbar at the bottom changes. And this is the best way to know whether you're in desktop mode or not. When in desktop mode, whenever you open an app now just by tapping it as you would, it actually automatically opens up in a window, just like a Windows PC. And if you want to maximise that, you have to drag it to the top of the screen, and it maximises it. But there'll be one difference. This line will always be here at the top, very faintly indicating that this window can be shrunk back down and placed wherever you want it to be. Let's open another app, for example, open the store, the clock. You can open several windows all on the one home screen. Just like a regular desktop PC. You can minimise things they say running in the background. For you to quickly access, just next to the little app icon in the top left corner, there's a drop-down menu. If you tap on that, you can snap things to the right.

Choose another one, snap it to the left, and this kind of works like split-screen, more in a PC style. And what makes this really, really cool is if you open up Backgrounding again, you can set up more than one desktop workspace. For example, if we just hit this little plus icon over here, set up a different workspace. Let's say this one. We want the Samsung Notes over here. We want the calculator over here. And we can do a third one if we want to. Now if you're wondering how to get back to the regular mode, the only way that I've found to do this so far is to open up Backgrounding and close all of the desktop workspaces. And you'll notice your taskbar at the bottom goes back to the full-size apps, indicating that you're back in tablet mode. I do wish there were a button that you could have on the home screen that would literally show that you're in desktop mode. Maybe that's something Samsung will add in the future. But definitely be aware of this new feature. And definitely make use of it. When you are trying to be more productive.
Ai REPLIES
When it comes to writing, there are some really cool tools. Within the software, you can actually improve them a little bit with this little hidden setting. So if you go to settings on the left side, go to Galaxy AI on the right side. If you go to the writing assist at the top. If you want to keep all of the processing on the device, you can enable this, but that will limit the results a little bit. But what I want to show you here is the suggested replies. This will be switched off by default.

If you switch it on, the keyboard will actually start to learn how you talk and how you reply to certain things. And when people message you or when you're writing, it'll actually guess what it is you might want to say next, which could help you save time. Whenever you're writing pretty much anything. When there are suggestions, you'll see a little highlighted box pop up somewhere around here with a phrase that you might use quite often.
WRITING ASSIST FEATURES
Whenever you're typing on the Samsung Galaxy Tab, as long as you're using the Galaxy Keyboard, you'll see the eye sparkles over here if you tap on that. This brings up the writing tools, and these are incredibly useful when it comes to writing anything. When it comes to creating grammar, or if you're struggling to put into words what it is that you want to say. This is where this comes in handy. So, for example, if we go to the composer. We can then choose the style in which we want to communicate this message. Let's go to social media. We can also choose whether we want it to be polite, casual, or professional. Let's go professional and hit generate. So I've given it one line of text, and it's now created an entire paragraph with emojis and everything like that, and even added hashtags to it. We can insert this immediately into the note just like that.

Now, let's say I want to correct some parts of this. I can highlight some of the text. Let's say this first sentence and then hit the AI tool again, and then go to Writing Style. And you'll see on the right side, it's actually giving me other options so we can replace it with the casual style. We could choose another section from here, highlight it, and hit the AI tool again. Go to Writing Style again and choose a different style. You can really modify and customise your text, Grammar correct it, add emojis, all that kind of stuff using AI. And I actually use the emoji feature quite a lot whenever I do social media posts. So whenever you're using a keyboard anywhere on the Galaxy Tab, just be aware that how to access the AI writing tools is right here. It looks sparkly. Stars.
GALAXY BROWSER Ai
There is another really useful and exclusive app here on the Galaxy Tab is Samsung's Internet browser. So this is definitely one of his superpowers. So I'm just going to go to the Samsung UK website. Whenever you're doing some research online, I would highly recommend you use the Galaxy Browser for this very reason. When you're on the Galaxy Browser, at the top, you'll see the sparkle right here. activate the AI. And then once you have, you can summarise entire websites with just a touch of a button. You can then copy that and paste it into your notes if you need to. You can also hit this icon here to ask for a more detailed version of the summary if you need it. And if there's a website, it's really, really interesting. What you can do is hit the AI sparkles and go to read highlights out loud. This is a particularly long article where you can actually have it playing in the background, even when the tablet locks, so you can literally listen to it like a podcast.

Also, if you tap it again, you could translate very quickly as well, instead of just hovering over to highlight individual words like I showed you earlier, you could translate entire pages. And when you are having a website read out to you, it actually appears in the now bar as well. Up here, you can bring it up very quickly. Something else that is really cool that you can do with Samsung's Galaxy browser is if you go to YouTube within the browser, you can actually play videos from YouTube in the background. Even when you navigate away from the browser, you just have to go into your settings, within the Internet settings, go to Useful Features and enable the background Play. Whatever you load up in the browser can play in the background. This means you don't necessarily have to pay for YouTube Premium
THE MOST USEFUL WIDGET
Here is one widget that I highly recommend you add to one of your Homescreens. If you hold your finger down on the home screen, go to widgets at the bottom. On the left side, scroll down to the Gemini app and here add the Gemini widget to your home screen, and you can make this bigger if you want access to all of the tools. If you want to see what the tools are. The great thing about Gemini is you can have full-on conversations just by hitting the live. So there's a live chat between you and the AI you can share what you are looking at on your screen. If you're working on something, you can literally start to screen share and then navigate to that document, whatever it is you're working on and actually ask you questions about it. You can give it access to your cameras. So if there's something that you're looking at and you want to know what it is, for. for example, these AirPods, if I wanted to know what they were, I could open the video, point at those and say, What is this? And it would tell me.
You can snap photos and send it to the A,I and even add photos from the gallery to ask questions about, and you can even upload files to it. So, something I like to do is if I get a particularly long PDF or something, I will ask it to scrub through it and pull out any key details that I absolutely need to know about. And it's a great way to summarise lengthy documents. You've also got the option just to ask Gemini a question using the microphone. And it's important to know that this is different from the Google Assistant and the Google Lens apps. And one of the things that I love about this particular widget is actually it's one of the ones that can be customised quite a few different ways. For example, you can have it all vertical like this, which I think looks pretty cool.
THE MOST USEFUL WIDGET
Here's another really useful feature. If you're coming over from an iPad or something like that. You definitely haven't seen this before. If you've got an Android device, you will be familiar with it. Just so you know what I'm talking about, let's say, for example, I am researching a new tablet and I see a photo of it, I want to know what this tablet is. Well, all I could do is hold my finger down on the home button, draw around it, and straight away it does a Google image search, brings up all the results on the right-hand side.
Also, I can hit the share button right here to send it to a friend or to email it to someone. Hey, this is a tablet. I've been looking at what you think. And you can see right here, my Galaxy Z fold has just popped up at the bottom for quick sharing, so I can send that directly to my phone if I want to.
Ai SELECT
If you want to actually extract information, there is a much more powerful AI tool exclusive to Galaxy tablets, and it lives on the edge panel. Right here is the AI select tool. So let me bring up an image, Rocky Balboa. Bring out the AI select tool. Now I can actually draw around this. And it selects the image. But it also gives me a bunch of different options, which I didn't have with Circle to search. For example, I could take this image and put it into the generative edit that I showed you earlier on like sketching the image, for example, or Portrait Studio. Just generate a cartoon version of Rocky Balboa. I'm thinking about purchasing something, and I want to grab the key information and keep it handy. I can bring the I select tool out, highlight the key information that I need, I can copy this and paste it into my notepad, or I can do around it and actually hit the pin icon to keep that information floating, just like a floating window. So now I've extracted that bit of information.
It kind of just sits there like a Post-it note. What we can actually do is tap on it, minimise it, and it floats around just like a floating window. And again, we can just leave it in the corner for quick recall. And if we want it back, we just tap on it, bring it back whenever we want. We could download it, extract the information, copy it into a notepad and just close down when it's not needed anymore. And depending on what type of information you're actually selecting with the AI select all. You'll get different options. For example, if there are addresses in there or dates or times, you might see the maps pop up, or maybe the calendar pop up as the AI kind of contextually understands what it is that is looking at. So, for example, right there, selected text, and it's got the map right there. It's also got the writing assist right there.
HOW TO CREATE A GIF
Here's another really fun way to use the AI select. Or let's say you want to create a GIF from a video online. What you can do is go to that video, bring the AI, select all out. Draw around or select the part of the screen that you want to create the GIF from, and then hit the three dots. Go to create a GIF. This brings up the record tool. And then what you can do here is actually hit record. We have now created a GIF.

LINK YOUR PHONE
All right, now let's move on to the optimisation chapter of this video. And this tip is for anyone who has a Samsung Galaxy device already. If you don't, feel free to move on to the next tip, but you might want to have a look at this if you do have a Samsung device. So, bring down your quick settings, and go into your settings. Go to Connected Devices on the left side, and these are the things that you might want to switch on the auto switch for the earbuds. So this will allow your Galaxy Buds, if you have them, to switch from your phone to your tablet and back to your phone depending on which one you're using at the time. Once you've paired it for the first time, just make sure you switch this feature on. So now if you get a phone call on your phone, you pick up, and then as soon as you go back to watching a video or working or listening to music on the tablet, you can swap automatically back to the tablet.

The other things you might want to do here are the calls and send texts on other devices. So with this activated, you can actually make phone calls from the Galaxy Tab and send text messages from the tab without having to find your phone. Just make sure both of these are switched on for this to work. And you will need to download the Samsung Messages app here on the tablet. And if you want to, you can also sync all of your contacts from your Galaxy phone to the tablet. So you have all your contacts right there, exactly as they appear now. When I get a phone call, it appears on both devices at the same time, and depending on which one I pick up is where the microphone will be.
NEARBY DEVICE FEATURES
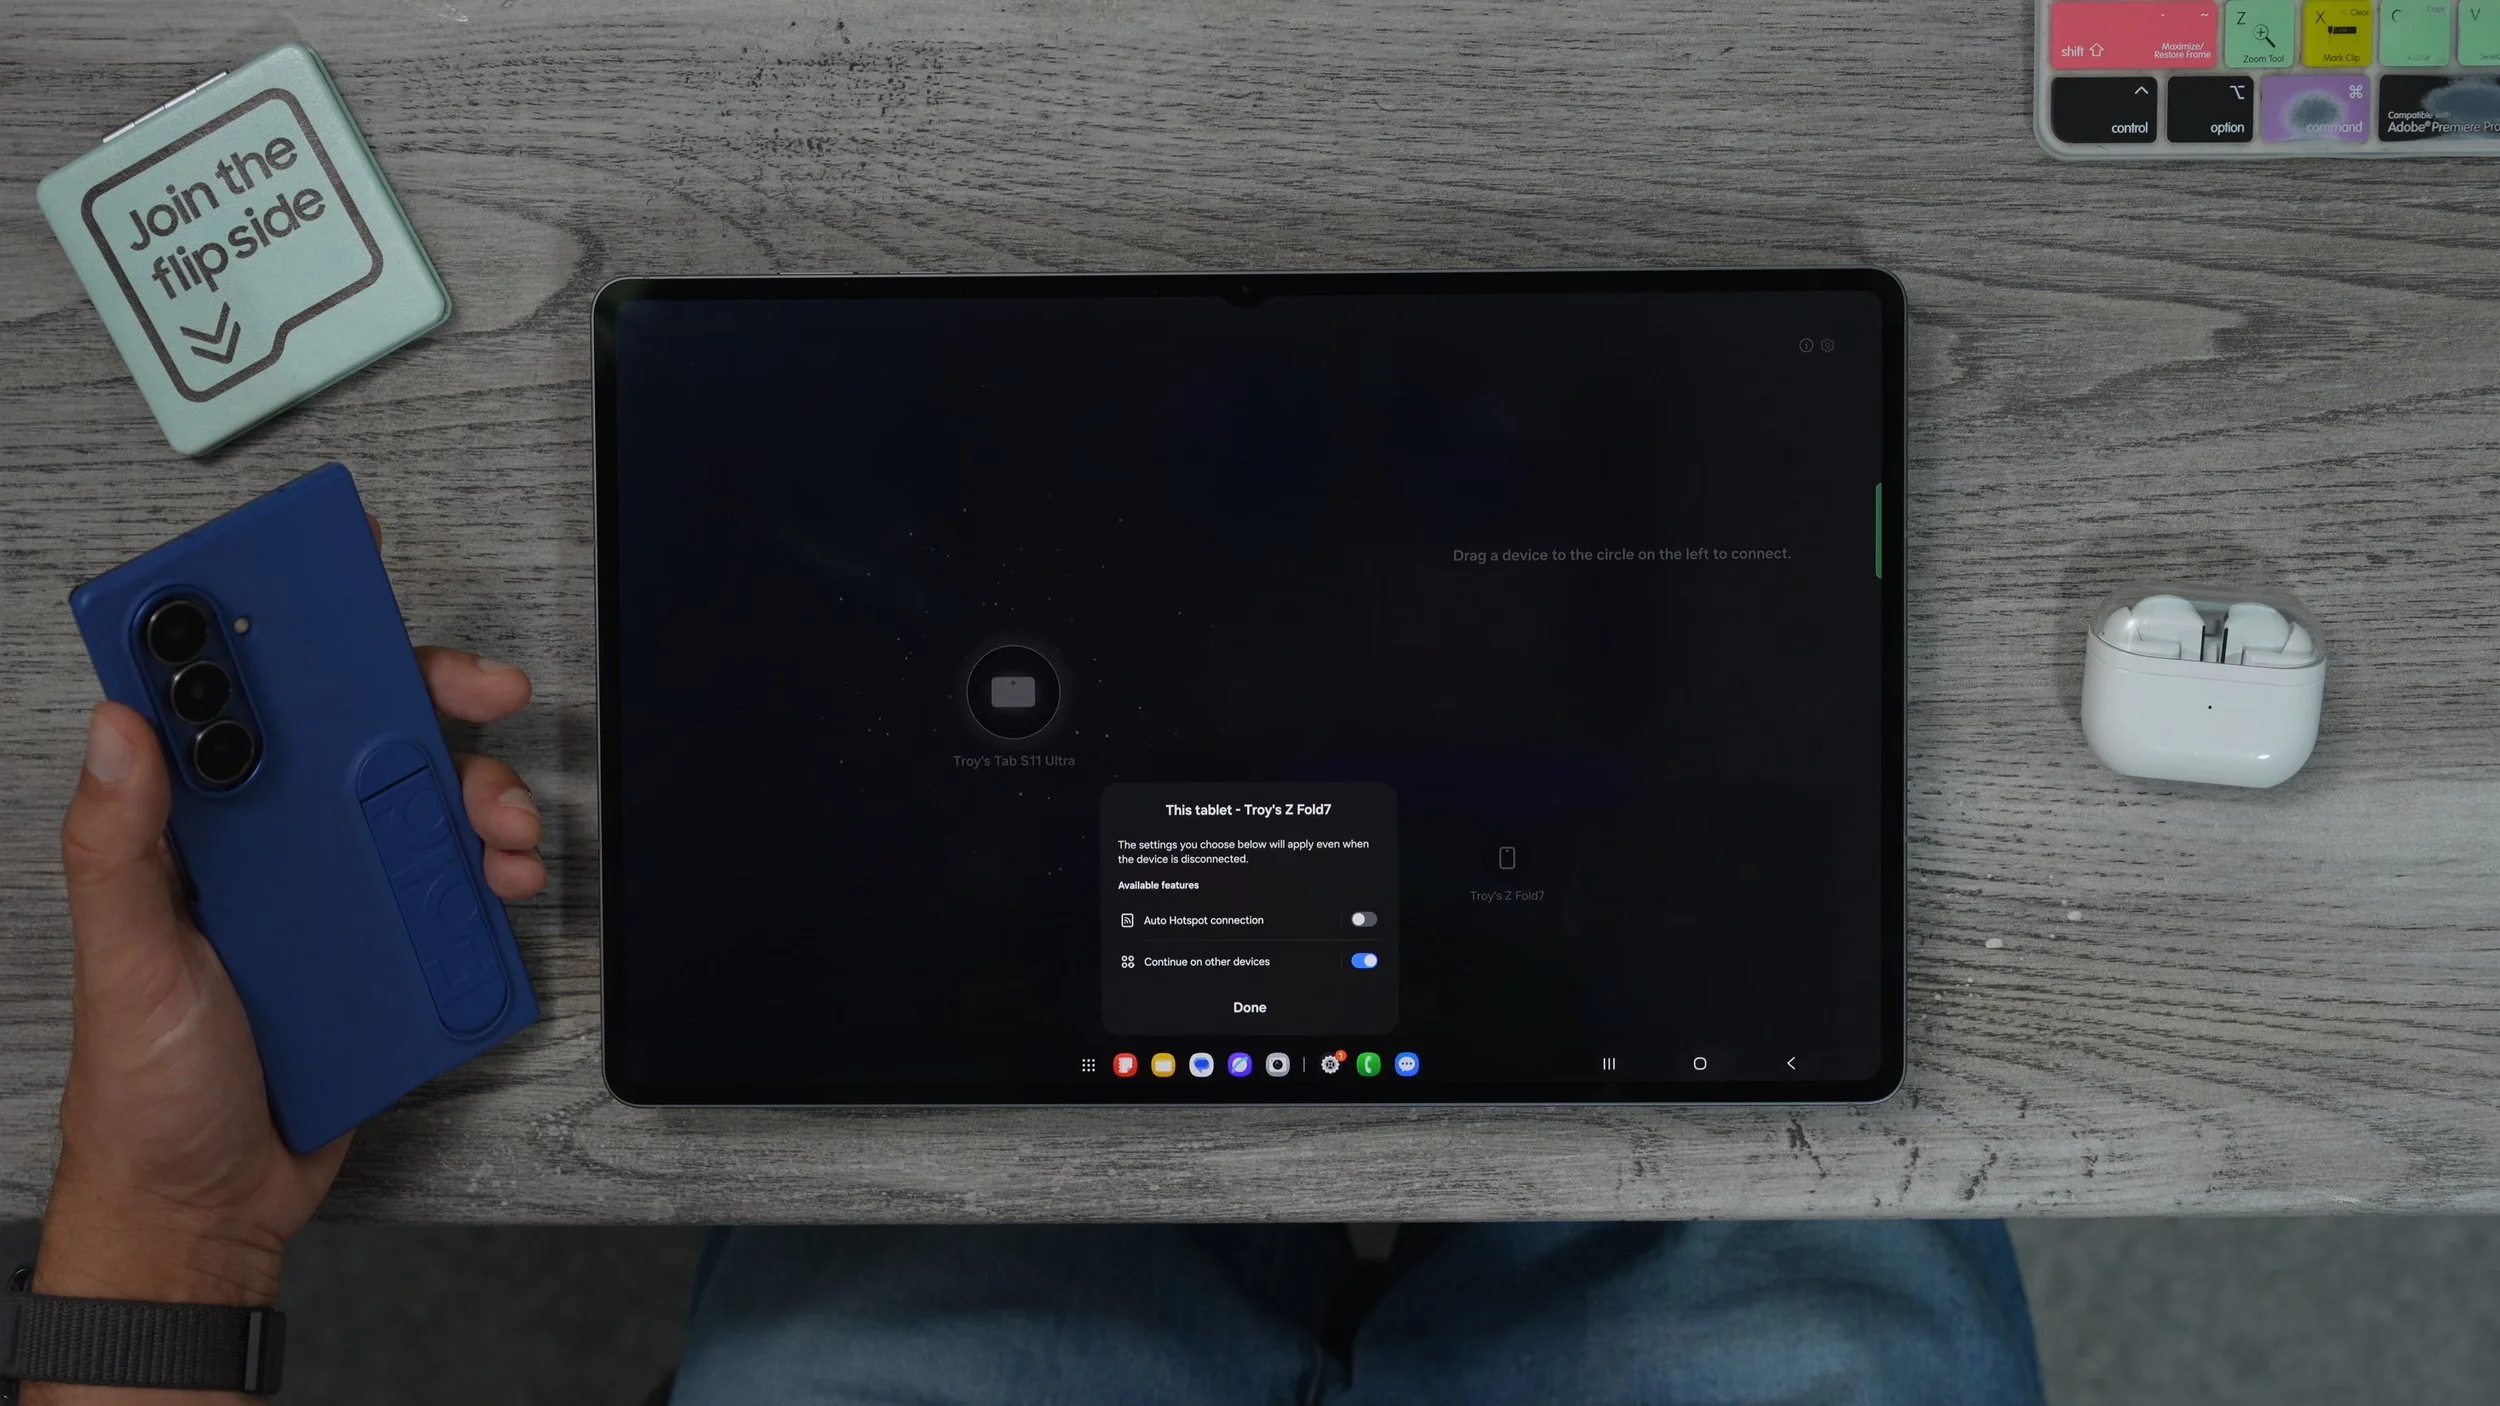
Something else you could do between the phone and the tablet, and also between the phone and the laptop or even a TV, is you bring down your quick settings, go to nearby devices here. This will show all of the devices connected to your network or close to you. If you tap on that device, you'll see the options for it. So we can actually do a quick share from here. We can share the cameras, so if I wanted to, I could use the main camera on this phone for web chat instead of the camera on the actual tablet itself, then also have multi controls available here. If you go to more features, you'll see the option to activate the hotspot connection. So this is really important if you're going to be travelling with your phone and your tablet, you can share the data from your phone to the tablet automatically. So that's something you might want to switch on if you are going to be travelling with both your devices.
Something else is really cool. What you can do is actually copy and paste between devices. So if I grab some text over here and just copy it, that's now copied to the clipboard. And remember how we added the clipboard to the edge panel, and you can see right here, really small, with a little icon that indicates that it's been copied from a phone. Now I can hit copy here and just paste it wherever I want. So I'm going to copy another bit of text over here. I'm going to go back to the notepad. Straight away, right there, ready to be pasted from the phone. Now, what's really cool about this is that it also applies to images. So if I go to my gallery on my phone and I hit three dots and copy to clipboard, and then I go to the notes app here, what I can then do is paste that image directly from my phone into the notes app. Just like that, super easy.
QUICK SHARE
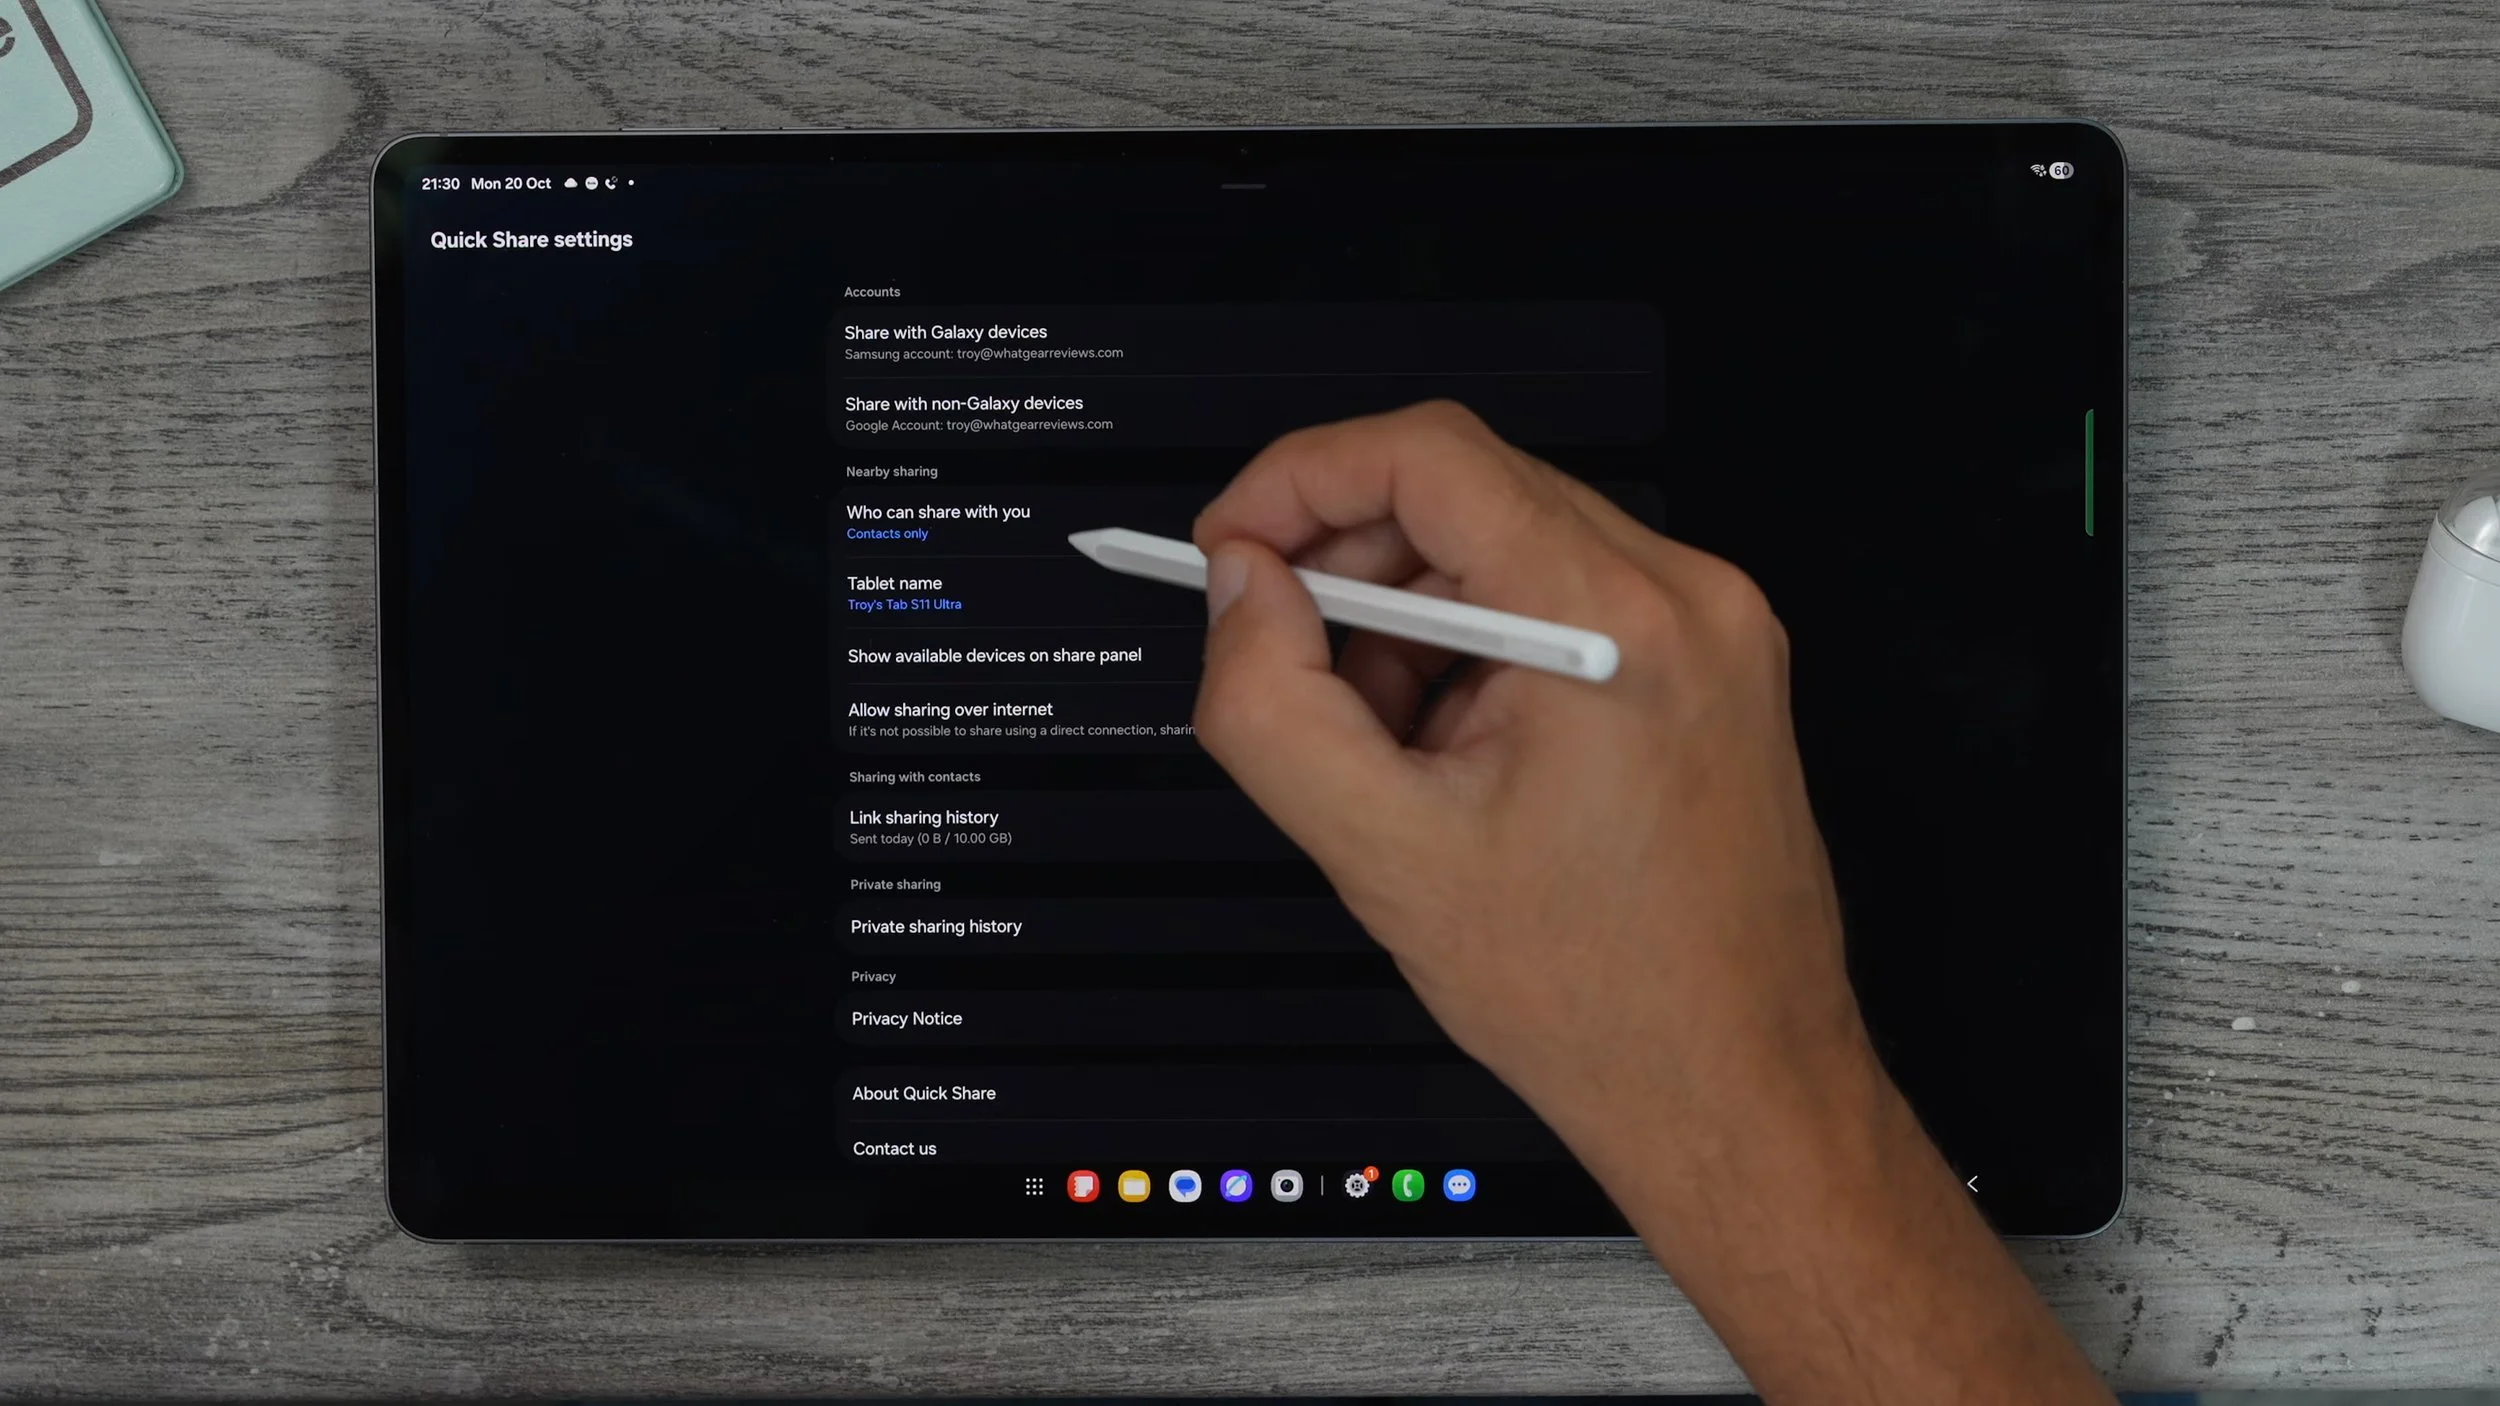
Something else that's worth checking is this. If you go into your quick settings and go to the Quick Share, which is the shortcut that I mentioned. You should add to your quick settings. Is this one here? If you hold your finger down on it. This brings up the quick share settings. You can choose who can share with you via Quick Share, and I do recommend you have this on contacts only. If, for whatever reason, someone wants to send you something and they're not in your contacts, you can change it to everyone, and it automatically only opens this up for ten minutes. You can also allow sharing over the internet. So this could be very, very handy.
AUTO OPTIMISE
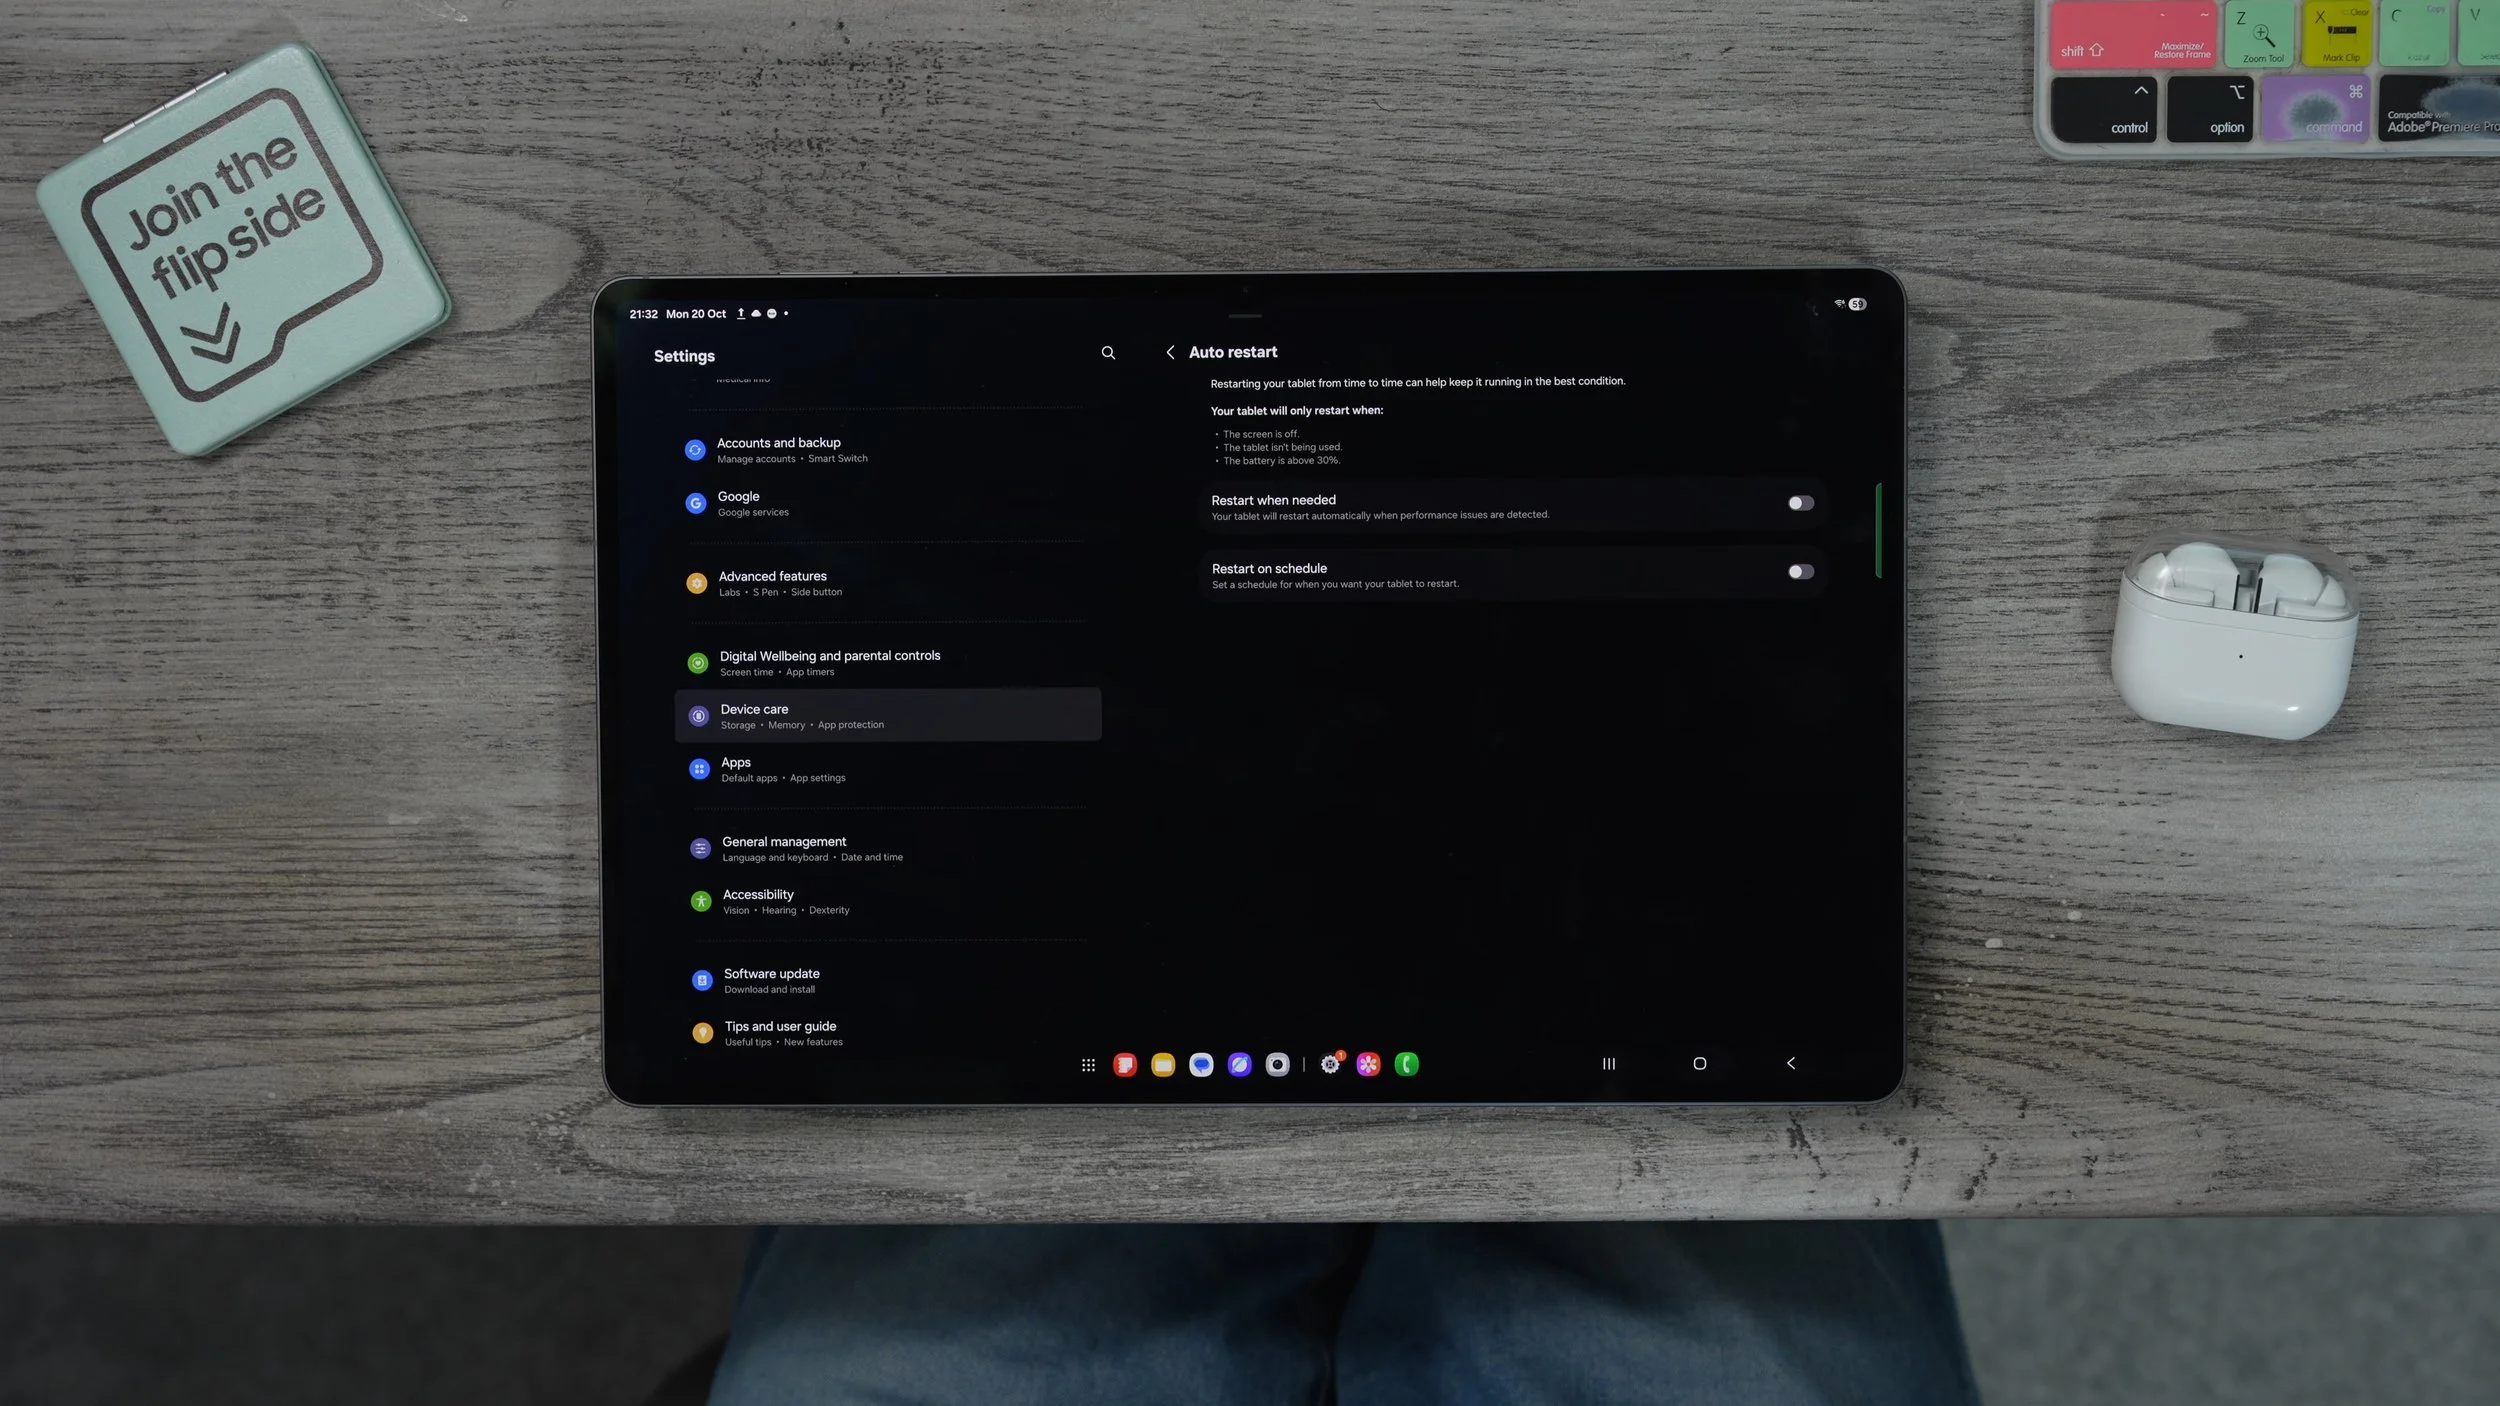
This is an important one to do if you want to keep your device running at its best. If you go into your settings. On the left side, go to your device care. On the right side, you'll see this auto-optimisation. Tap on that. And here you'll see that auto-restart is actually switched off. If you enable this tablet from time to time will refresh itself, closing everything down and starting. And this is just good for making sure things are draining the resources in the background. So set this to restart when needed. Typically, this will happen when you're not using the tablet.
MORE MEMORY
Here's another optimisation tweak again, within settings, within device care. This time, when it says memory, tap on this. At the top, it shows you how much of the memory is currently being used. If you want to clear all of that background manually, you can hit clean now, which clears all of the background.

But here's what I really want to show you. If you go to Ram Plus you can extend the amount of RAM to 12 gigs. This just gives the tablet a bit more resources for Backgrounding. This can improve loading speeds, but it does sacrifice some of the internal storage on the device. But you know what? If tablets have a lot of storage, you might as well do it because it's going to make it run even better.
OPTIMAL DISPLAY
There are a couple of display settings to be aware of. So if you go into your settings on the left side, go to display When you've got a big screen like this, if it's in light mode all of the time, all of the white areas of the screen right now are using a lot of power. If you use dark mode, it will use far less power. And if you go to dark mode settings, you can actually schedule this to kick in in the evenings. So if you do like the light mode from time to time, then I recommend you do that. The adaptive brightness you should definitely leave on. I've turned it off for this video, just so it's not constantly going up and down, messing up the camera. The motion smoothness definitely leaves this on adaptive.
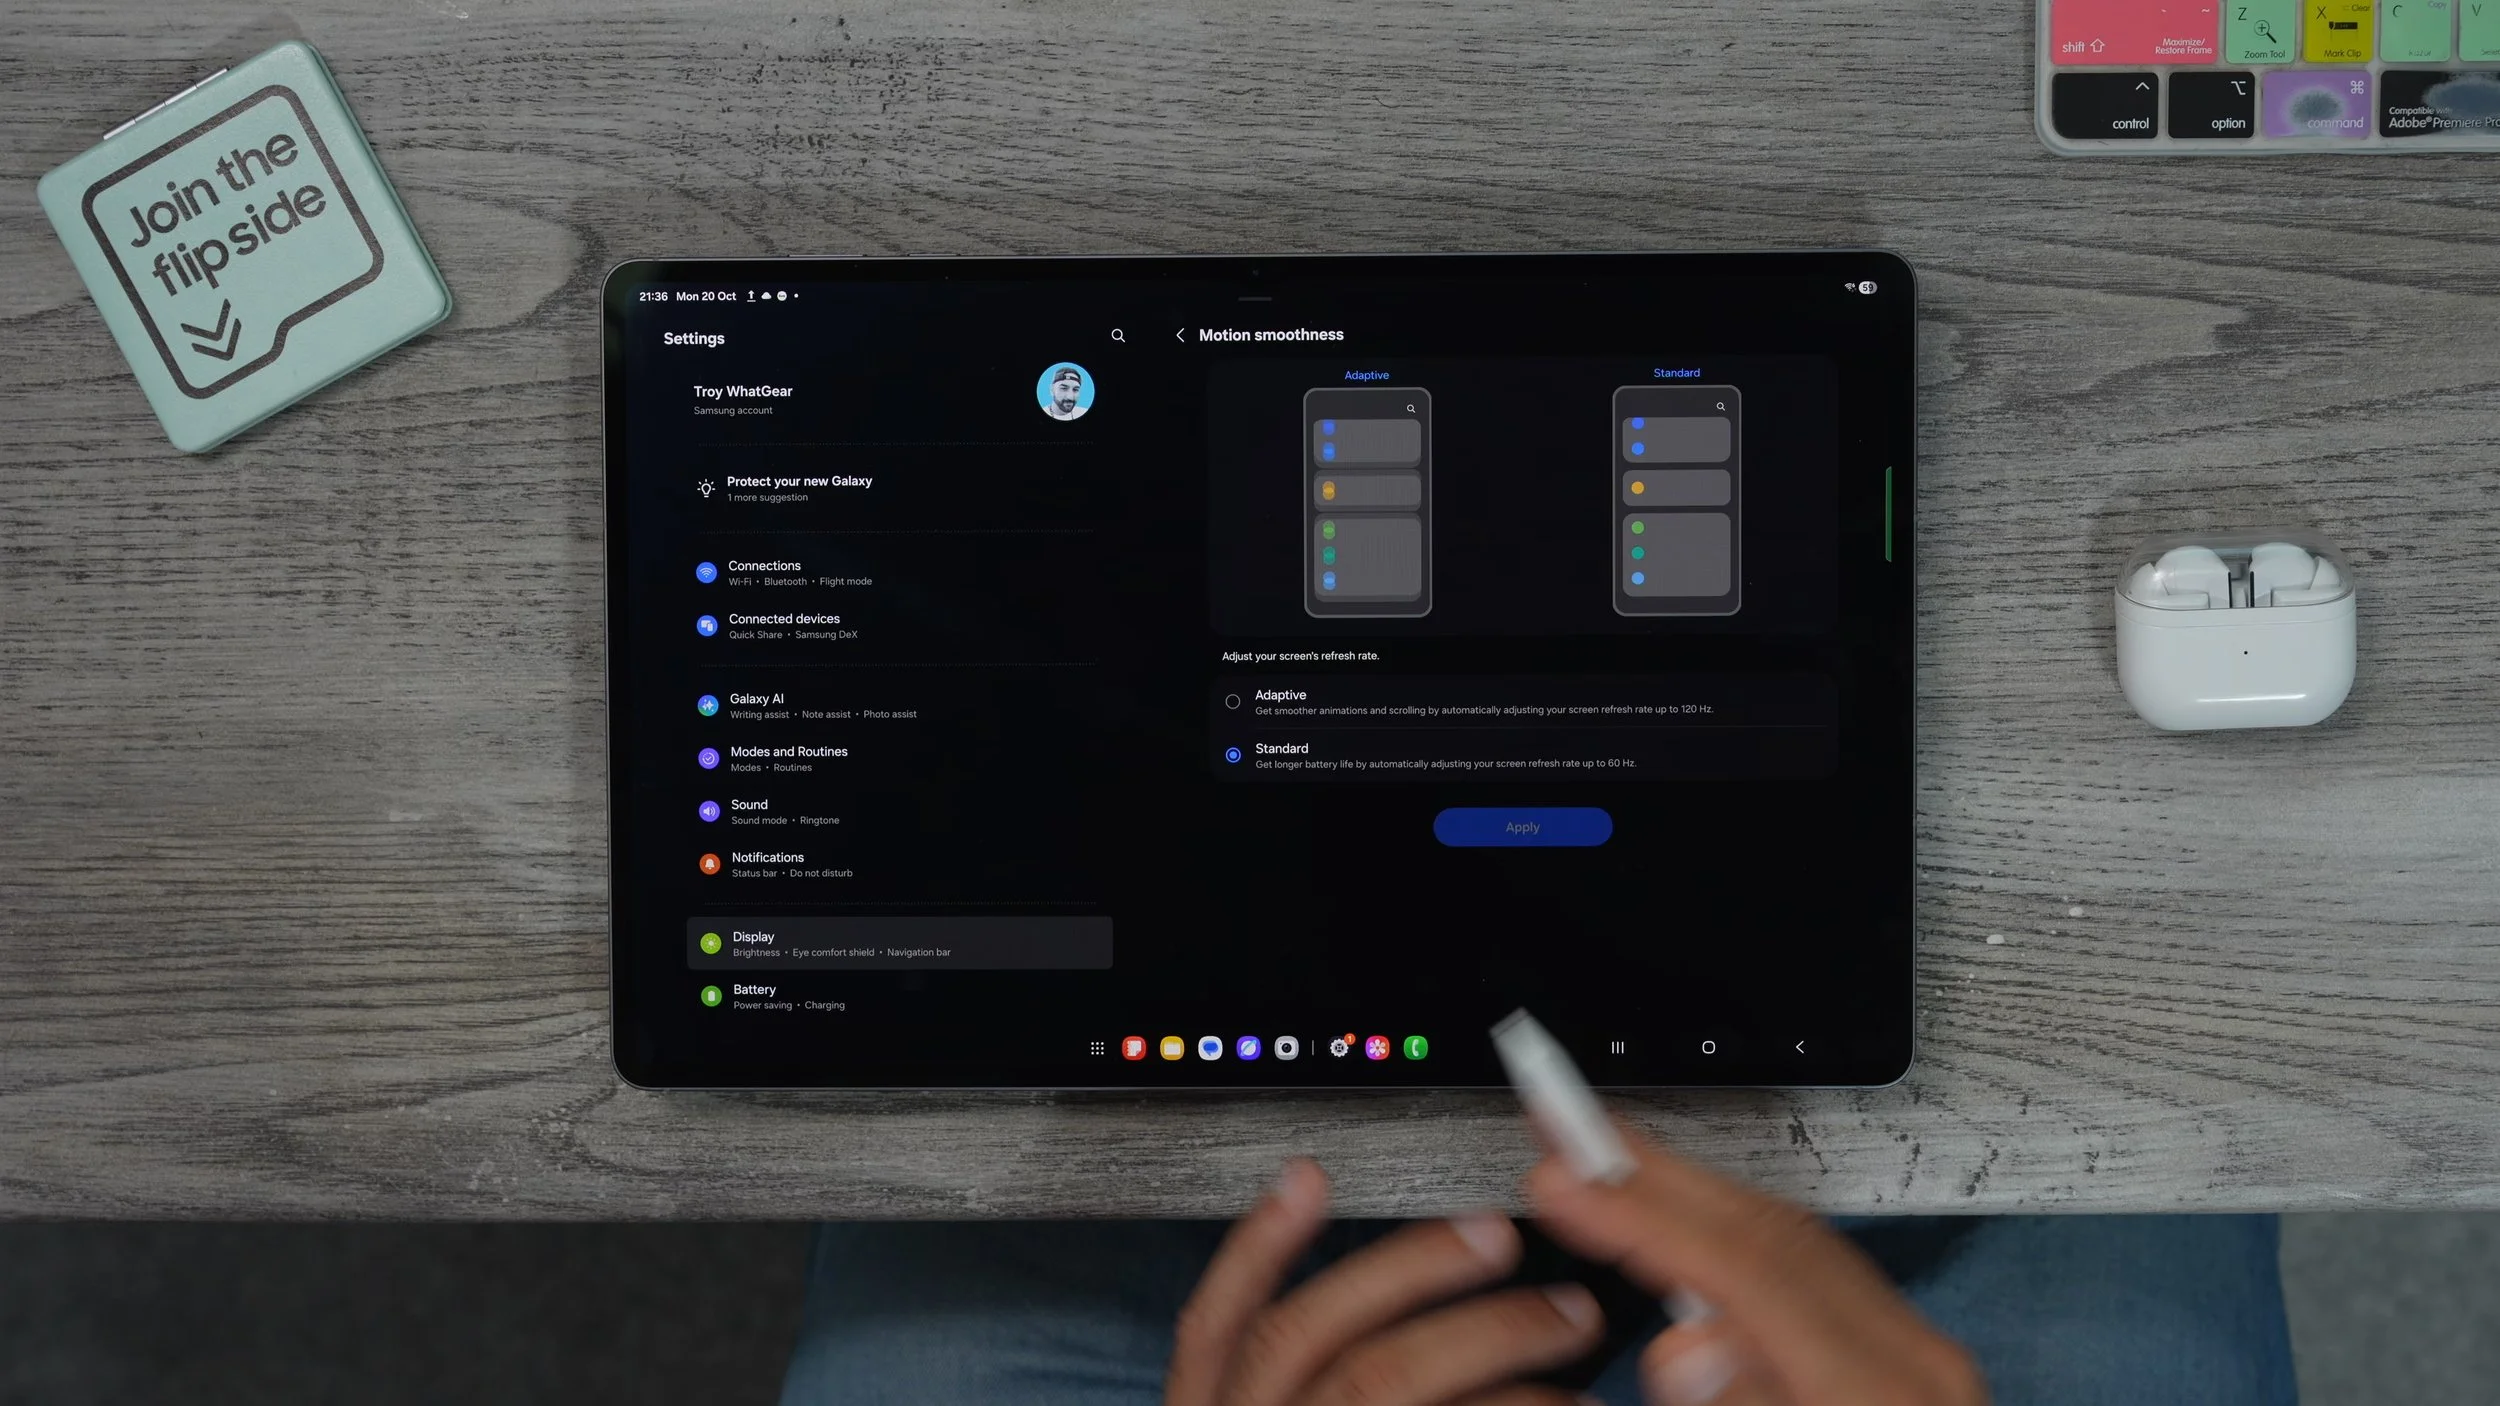
Again, I've set it to standard just for the video. The screen mode you might want to go with, natural colours, is a bit more colour accurate in natural mode. And if you want to get really advanced with it, you can dial in manually. Screen timeout, you should leave it on 30s. And if you want to, you can set the screen saver. Now to the new daily board feature. I used to always go with the Google Clock one, which is kind of like a bedside clock set up, but the daily board is actually better than that in my opinion.
WIDGET STACKS
When it comes to configuring your home screen, something is really, really cool. I think Android does this better than anyone. For example, if I hold my finger down on the weather widget and go to create stack just underneath it, now I can actually add more widgets on top of that existing one. So it's only going to take up that space on the screen. So if I want the battery widget. We now have a scrollable widget stack. There is one widget that I think you might want to add. If you hold your finger down on an empty space, within device care, the optimise widget is very, very useful. So similar to what I just showed you when it came to clearing the RAM from within the settings. If you put this on one of your home screens, you can literally just hit the optimise button at any time, and that will clear all of the background.
Something else that is really cool about the Samsung widget is that if you hold your finger down on it and go to settings, you can actually customise it quite a lot, so we can make the background more transparent. You can even change the information and how it's shown. You can change the light mode or the dark mode, and this affects it regardless of whether the tablet is in light mode or dark mode. And you'll notice this is the same size now as the Google search bar. So if I bring this over, I can actually drop it on top of the Google search bar. And there we go. We've got that hidden behind the search, so it doesn't have to be on display all the time.
APP SECURITY
Let's move on to the security features that you should set up on day one. Go into your device settings. On the left side, if you go to security and privacy. When you access this page, you'll notice it does a scan straight away. And it will highlight anything that you might need to look at. In this case is suggesting we turn on the app protection feature. To do this, we just tap App Protection and tap on it again and switch this on. This is only available in certain regions.

It kind of works like an antivirus. It will scan all of the apps installed on the device, and it will highlight anything that could be risky. It is a free bit of software over here in the UK. Definitely check if you have this. If you do, you might as well switch it on. Day one.
SAMSUNG FIND
Something else is really important to do on day one if you go into your settings. Let's go all the way to the top, where you see your Samsung account. Tap on this, and on this right-hand side, you'll see the Samsung Find app. So if you go to that, make sure this is set up and it is running.
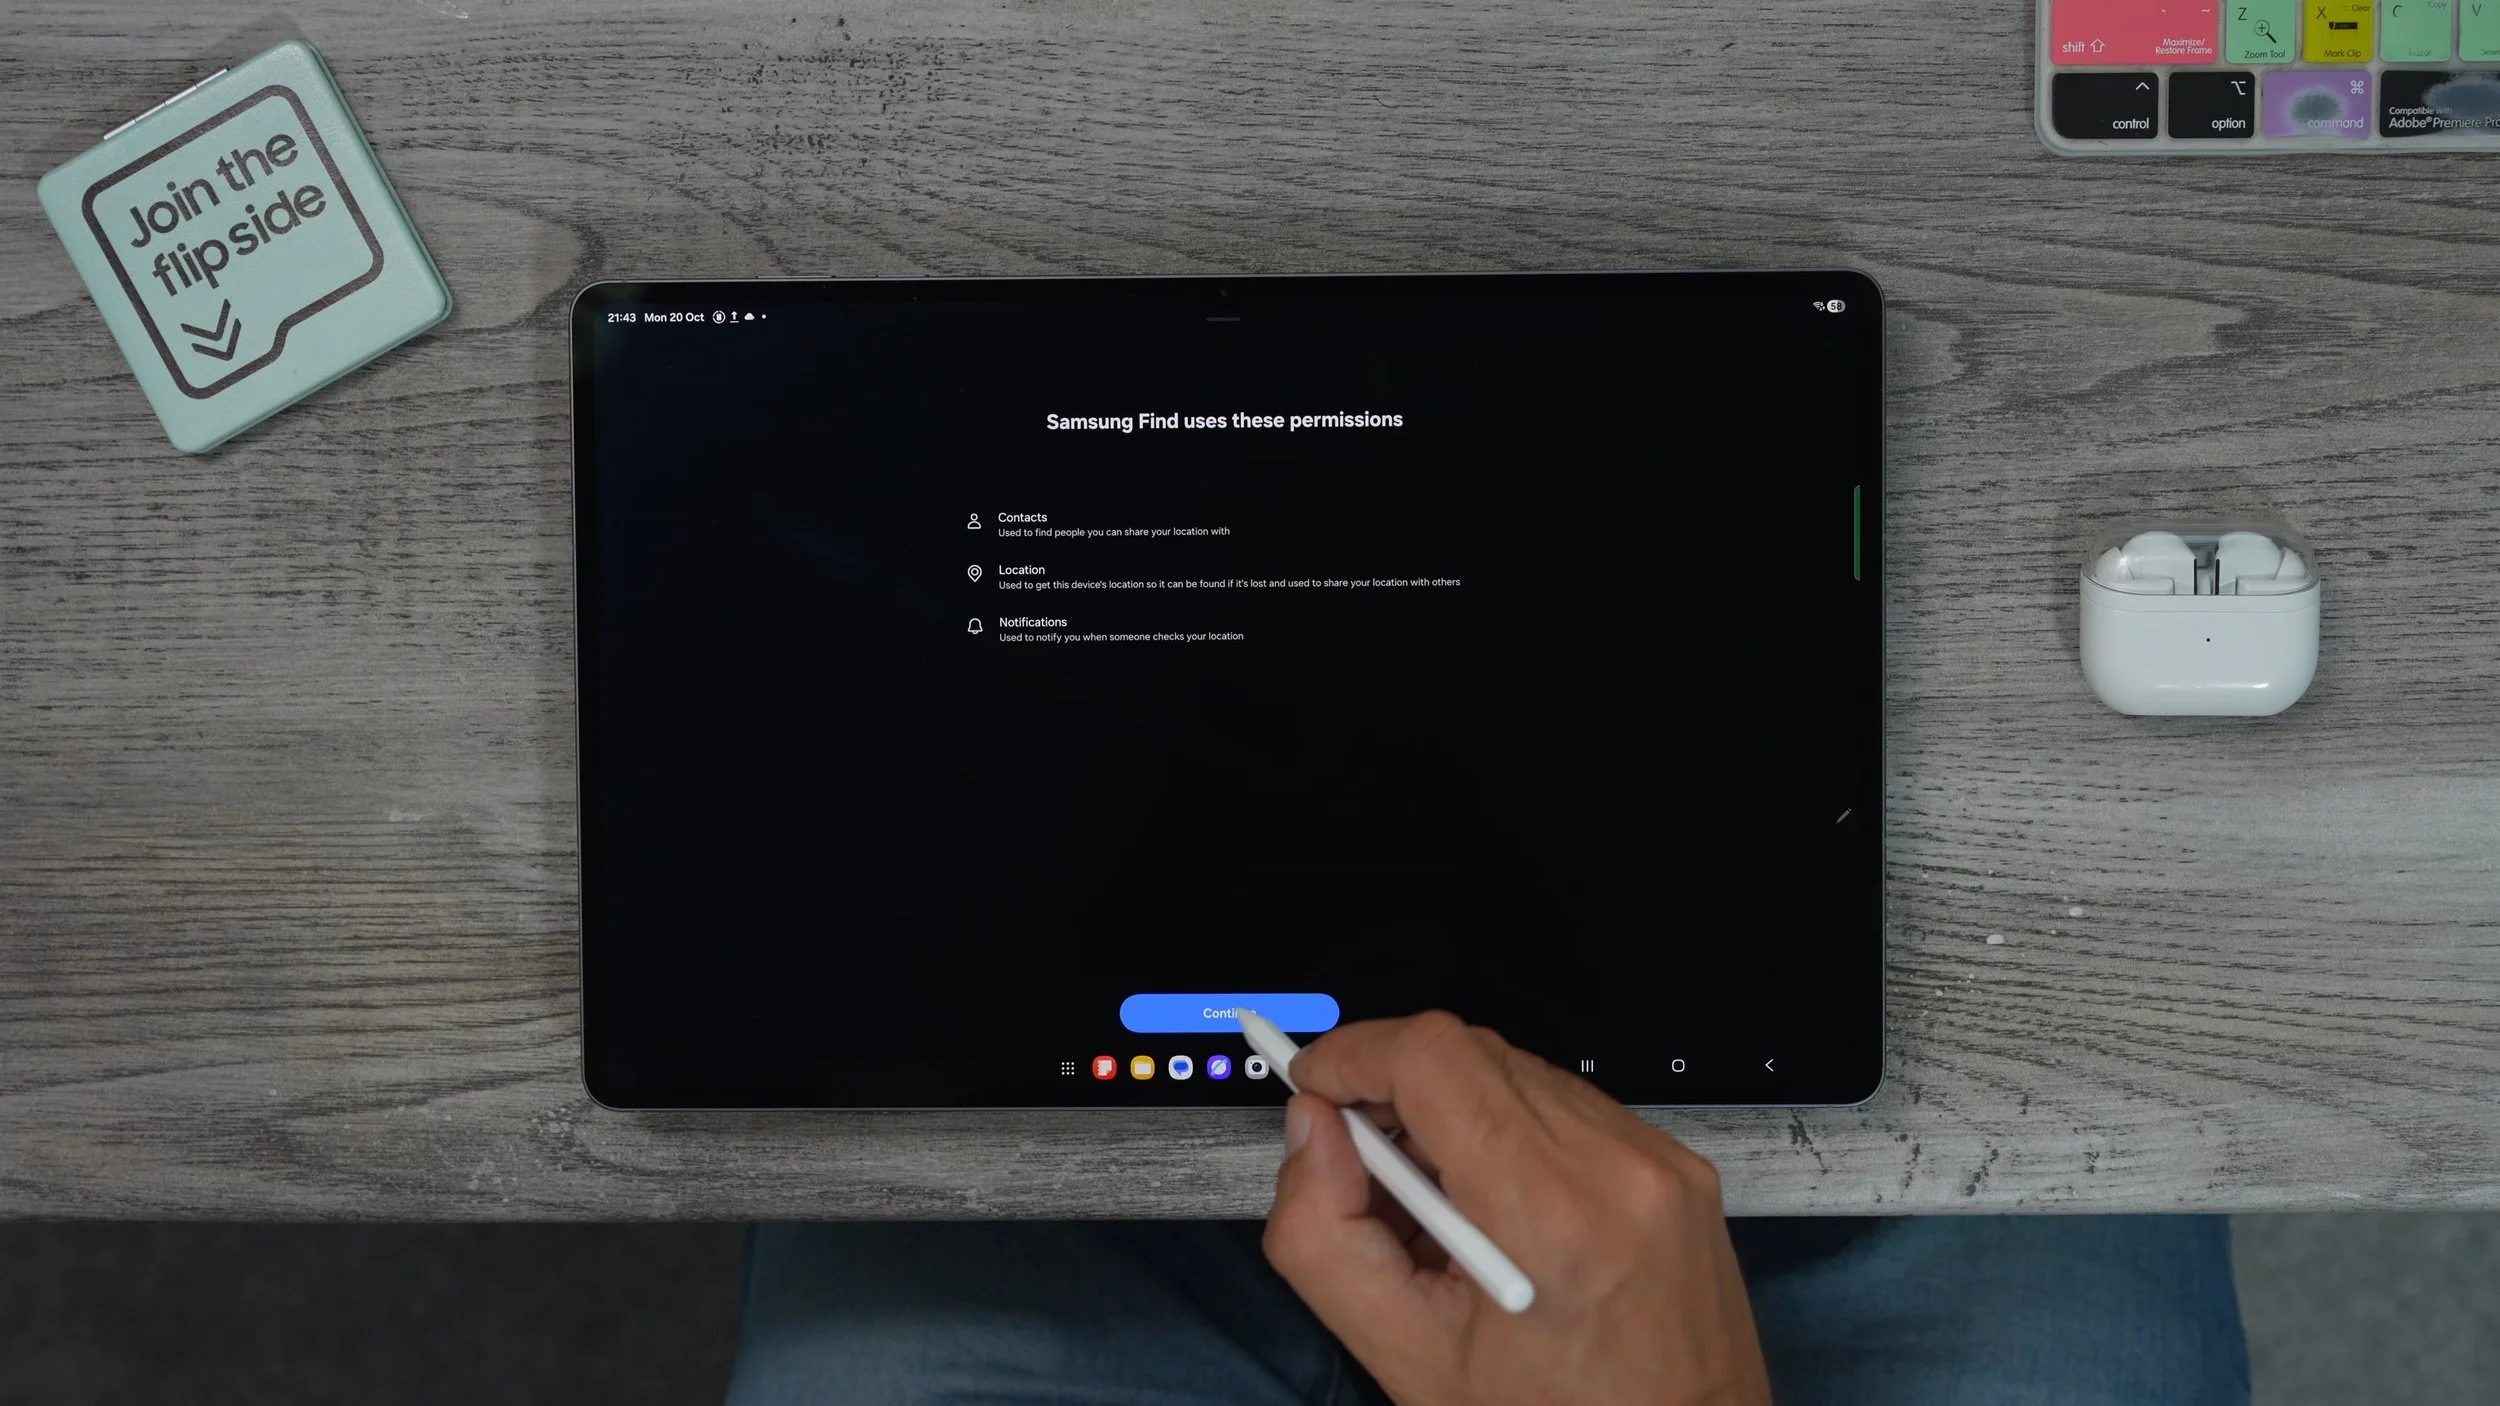
This will allow you to find your tablet should someone steal it or if you leave it somewhere, the location will actually be updated by other Android users who pass by near it. The good thing about setting this up is not only can they help you find a tablet, should you lose it, but also you can use your tablet to find your other devices, and you'll find the app within the Samsung folder right here. And it is right there.
LOCK & KEY
If you're going to be keeping sensitive information on your tablet that you don't want just anybody having access to, you might want to do this. Go into your settings, Security and privacy. More security settings. And right here you will see the secure folder. So this creates a space within the tablet to. Only you can access via a secondary password or biometric. So if you've got like bank statements or any really sensitive stuff like backup codes and things like that, you can keep them in the secure folder and create a separate pin just for that. can, of course, scan in. A specific fingerprint. So if you wanted to, you could use your pinky finger and one of your hands to do this to unlock the secure folder. Now, when it comes to this setting it depends on how you plan to use it. I would recommend closing all apps when locked. That way, it's not draining resources in the background because this separate secure folder space can have its own apps. They can run simultaneously. So this is how Secure Folder looks.
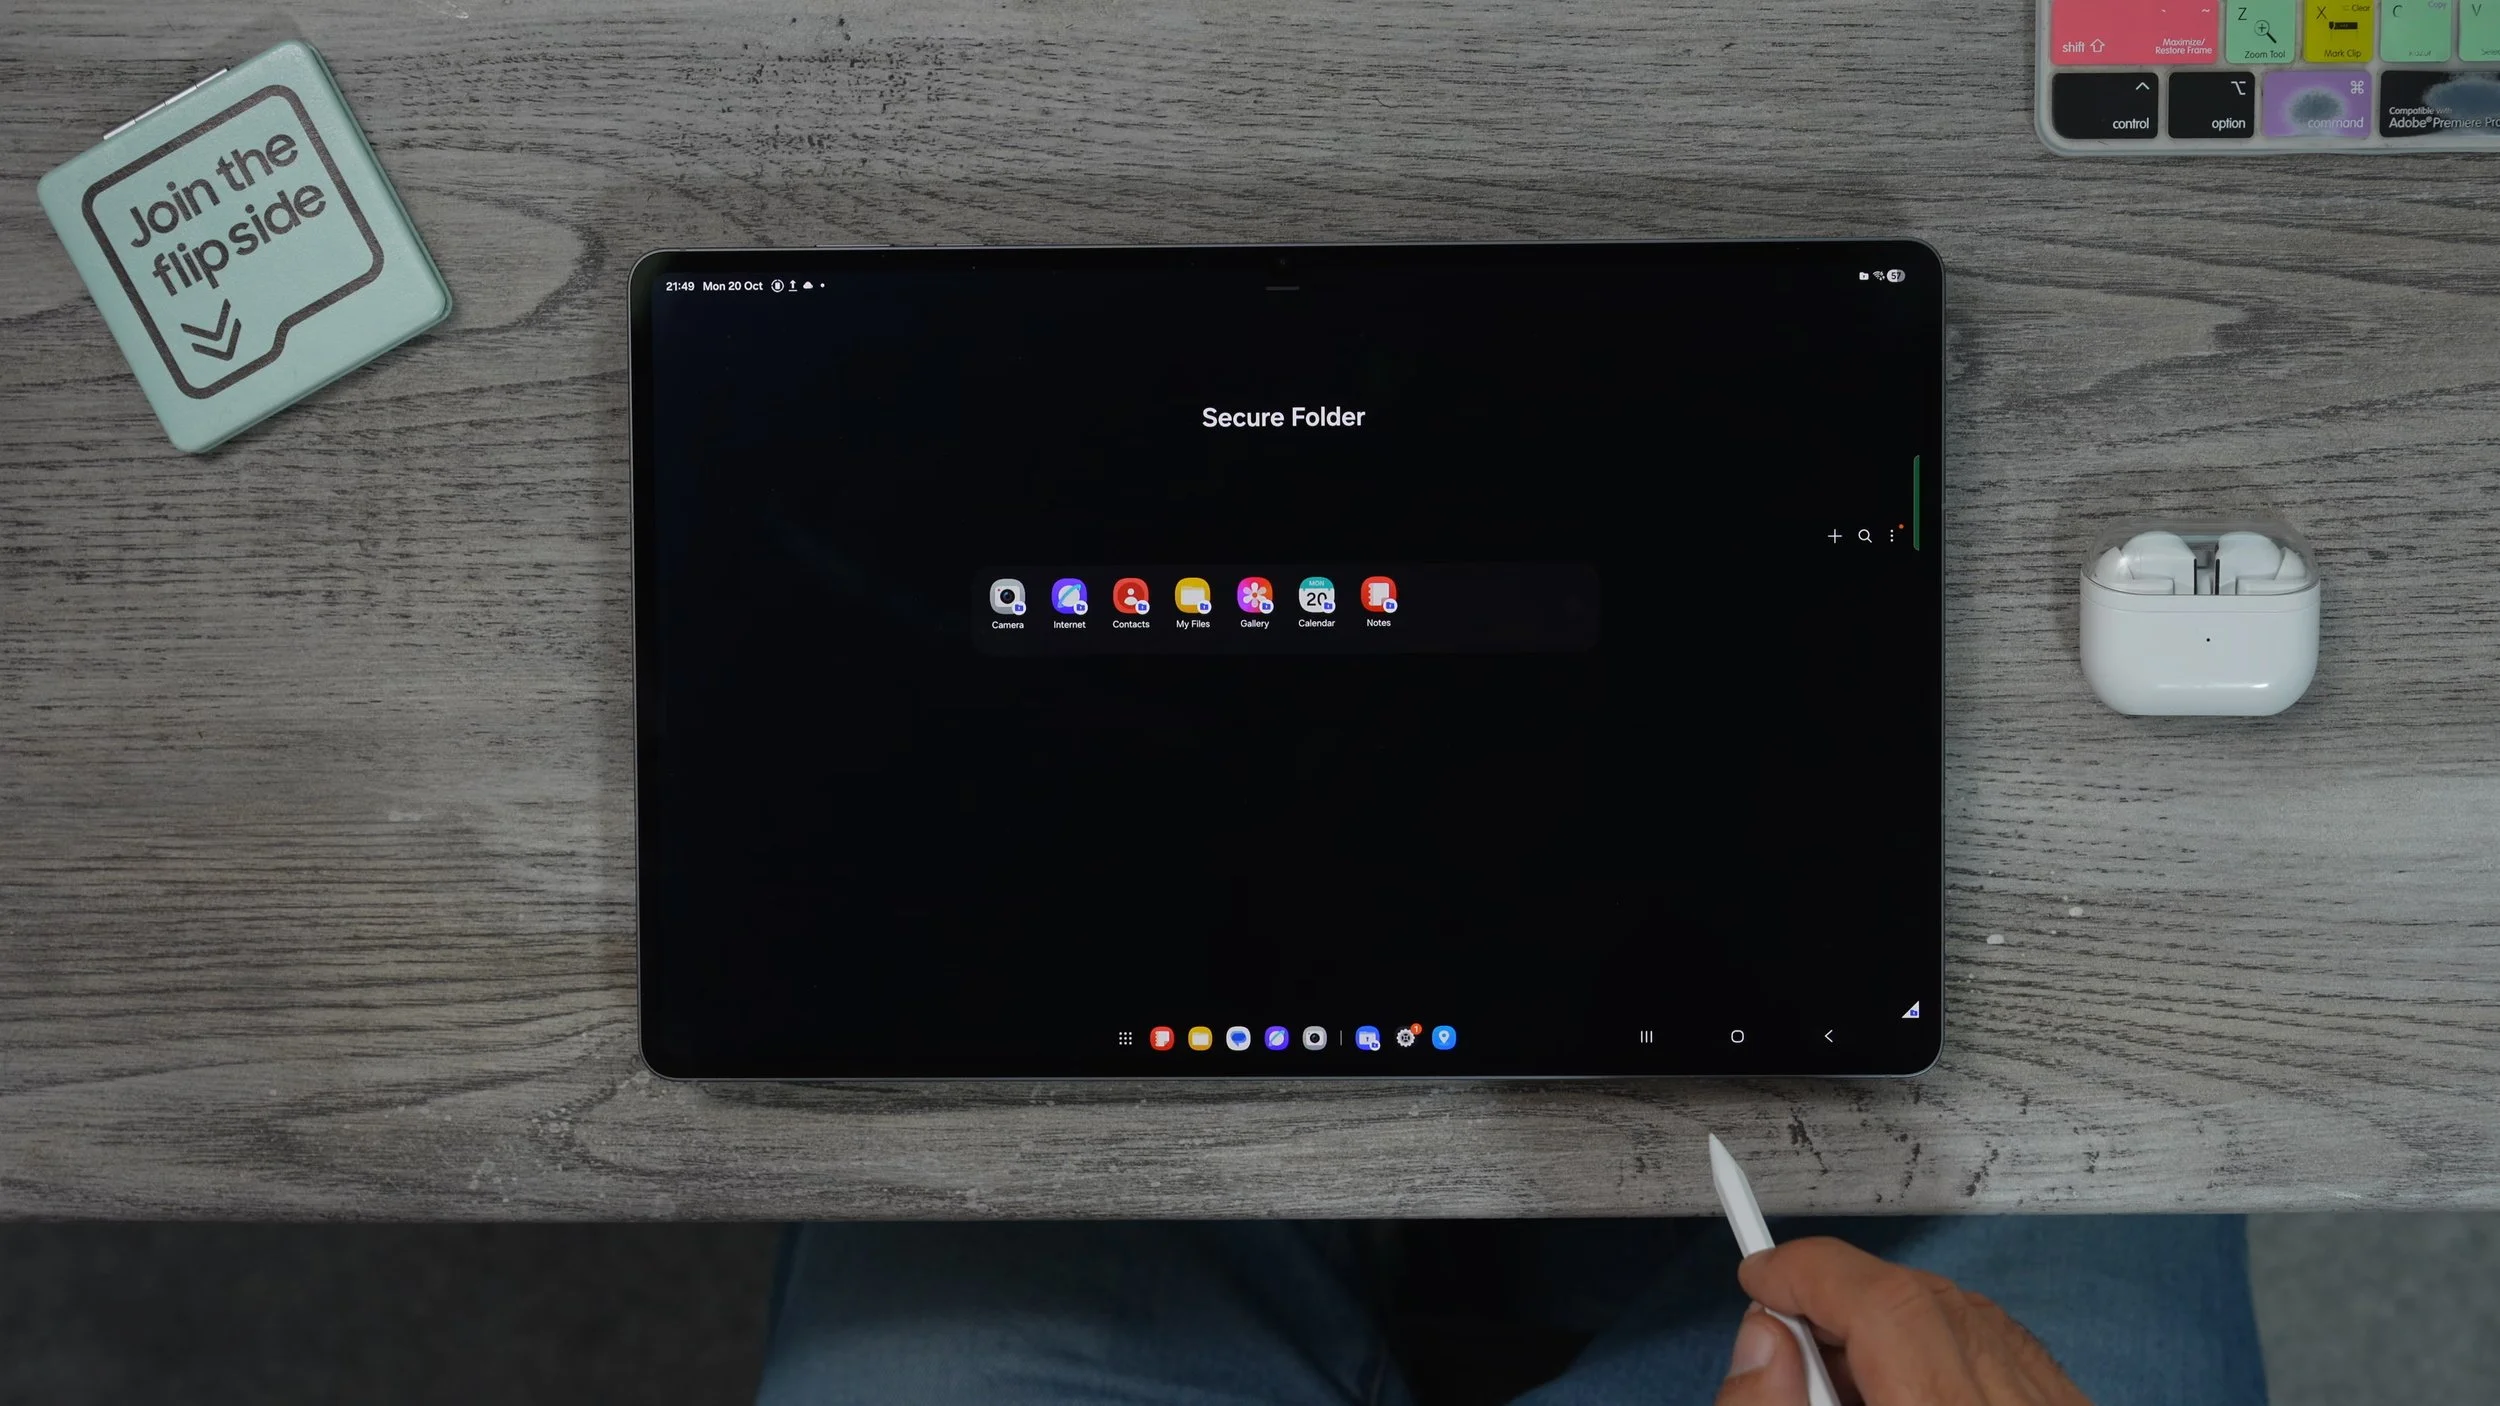
To access it. It will appear just as a regular app in your app store. Just like that. If you want to hide the secure folder, just bring down your quick settings. The secure folder will appear here as active. If we switch it off, it now hides the folder from the app drawer. It doesn't appear there anymore until you go back in. Switch on. The secure folder again from the quick settings. Put your secure folder pin in, and then it will be visible again. Really, it's more than just a folder. It's actually a separate workspace just locked down with its own apps and its own files that exist independently from the rest of the tablet.
THE FREE VPN
Here's another little security feature that you should definitely make use of because it is free. So if you bring down any quick settings. If you don't have secure Wi-Fi here already, then all you need to do is hit the pen, go to edit, and then add secure Wi-Fi. I did it earlier in the video. I'm only showing you this, in case you missed that. So secure Wi-Fi is right here. If you tap this. This essentially is Samsung's own free VPN. You get one gig for free per month, and I would highly recommend you use this whenever you are on a public hotspot. And I don't recommend you switch on the Auto Protect feature because you can burn through that one gig pretty quickly.
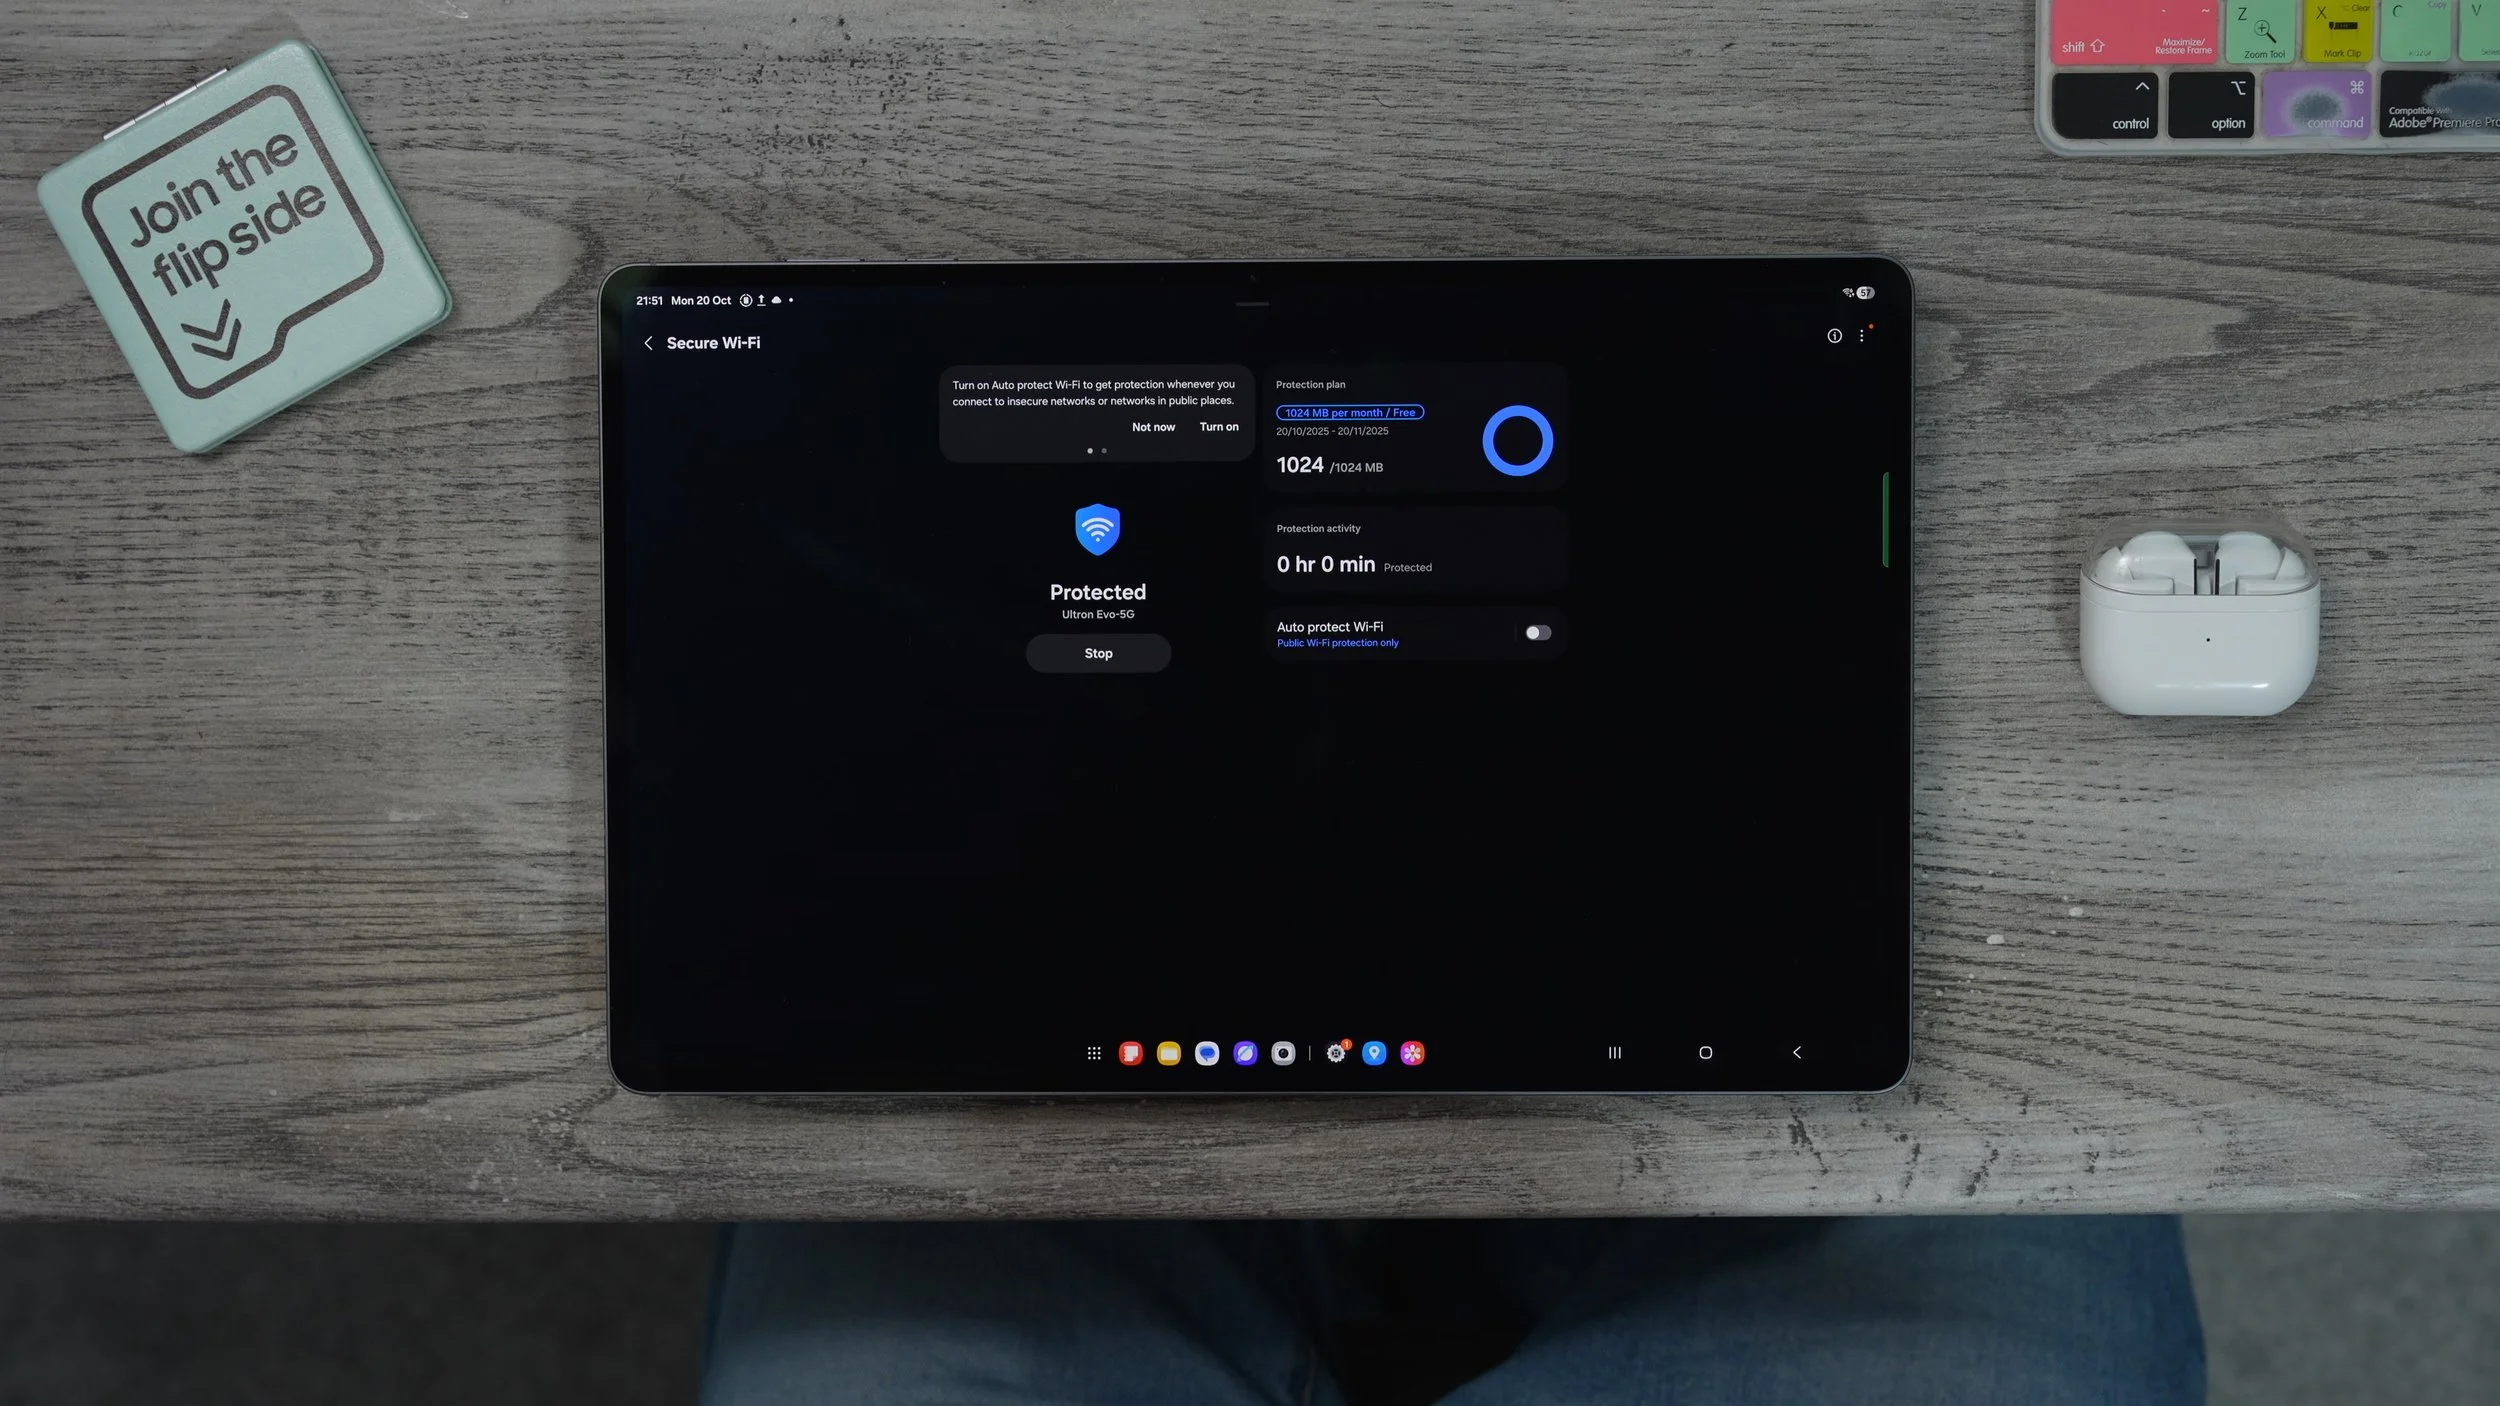
However, you might want to switch it on if you do upgrade to the unlimited plan, so this is pretty cool. If you're going to be travelling, you can actually pay for 24 hours. And in one month, unlimited. So, no data cap is just 1.79 pounds. So it's reasonable. And if you do have the unlimited one, you can set it to auto so whenever you connect to an unknown network, it will protect your IP address and all your data and stuff like that
BETTER SOUND
Let's move on to the hidden features on this tablet. This is really good for anyone who might struggle with their hearing a little bit during certain types of content. So if you go to the sound section within settings, that's the sound quality and effects. You can customise a few things here. At the top, you see Dolby Atmos. This is also available in the quick settings. That's a fantastic way to enhance movie content; it adds a kind of spatial effect to the audio. I use this every time I watch movies on the tablet and also on my phone. And if, for whatever reason, you're struggling to hear the dialogue in movie content or video content, there is a dedicated mode to boost those frequencies up in the audio.

The loudest normalisation tool is pretty cool as well. For example, if you're watching YouTube, one video is really loud, one is really quiet, and you boost up the volume for the quiet one, and then the loud video comes on and it blasts your ears. That could be uncomfortable. The normalisation feature actually balances out the audio, so you're not going to get startled by audio, and the adaptive sound is where it gets really advanced. So if you tap on this, activate it. Tap where it says Adapt Sound. You can actually customise the EQ on the tablet specifically for your age group. Or if you wanted to, you could do the personalised sound profile. This actually starts a kind of hearing test using headphones. And it will create an IQ test tailored specifically to your hearing abilities.
CUSTOM NOTIFICATIONS
Here's a fun little customisation setting for your notifications. Go into your settings, on the left side. Go to notifications on the right side. If you go to the notification pop-up style, go to Add Lighting Effect. Here you can choose a different animation from the boring regular one. I actually like the spotlight. That's my favourite. You can also customise the colour if you leave it on. Auto will actually match the colour theme of the app setting notification. Or you can actually choose your own colour. And if you go to advanced, you can change the transparency of that and even the duration of the animation as well.

You can actually get even more intricate with this and go to Lighting Effect colour by keyword. And for example, let's say you have contacts in your phone book and you want their notifications to be a specific colour. All you need to do is type in their name, exactly how it would appear if I message myself, then I can hit the colour next to that and make it whatever colour I want that to be. So when I get notifications, the animations will pop up in this green colour. You can set a custom colour for each contact in your phone book if you really wanted to,
APP PINNING
So I'm assuming at some point you might want to let someone use your tablet, maybe to do some colouring in or sketching or something like that, but you don't want them rummaging for your phone book or your photos or your messages and that kind of stuff. And that's where this trick comes into play. Go into your settings on the left side, security and privacy. On the right side, more security and privacy. And right here, you'll see the feature to allow apps to be pinned. Enable this. Now, let's say you want to give them access to pin up to do some colouring in or tracing or whatever.
What you can do now is open up your background, tap on the pen app icon and go to pin this app. This is now locked on screen, and it cannot be unlocked without your biometrics. So if I try to navigate away, nothing happens. If I want to unlock it, I need to hold back and the background button at the same time and it's going to ask me for my biometrics. Now I can navigate away from that one app that was locked on the screen. I do recommend you set this up. If you do plan to let someone else use your tablet at some point.
HIDDEN VIDEO EDITOR APP
Let me show you a hidden app within Samsung's gallery. So if you go to the gallery in the bottom left corner, you'll see go to Studio. Tap on this. The first time you run it, you'll have the option to add this to the home screen. This is essentially Samsung's own video editor tool, and it's actually pretty good. So if we go to start a new project, I'm just going to select all my wallpapers here and start a new project. What is done is to add all of those images into this video editor.
We can actually play this video. We can add music to it, we can add text to it. We can even change the types of animations in between each frame here. And this actually works better with video because when you put a video into this, you can actually choose sections of the video that will work well in an edit. This is pretty cool, and if you just set it up for the first time and added it to the home screen, now it exists in your app drawer
THE PASSWORD PROBLEM, SOLVED
Remember way back when I spoke about if you have problems with remembering passwords and things like that, well, here is the best way to access your passwords safely and securely without having to dig around within all the settings and things like that. So to do this, go to Settings. Go to the Security and Privacy tab. On the right side, go to more Security settings and here go to passwords, Passkey and Autofill. Right here, you see the preferred service. We set this up earlier. And if you tap on this. Here is where you'll find Google's password manager. Tap on this. This is where all of your passwords are held. And if you want to access any of them, you do need to use your fingerprint to get to it. But here's where it gets really interesting.
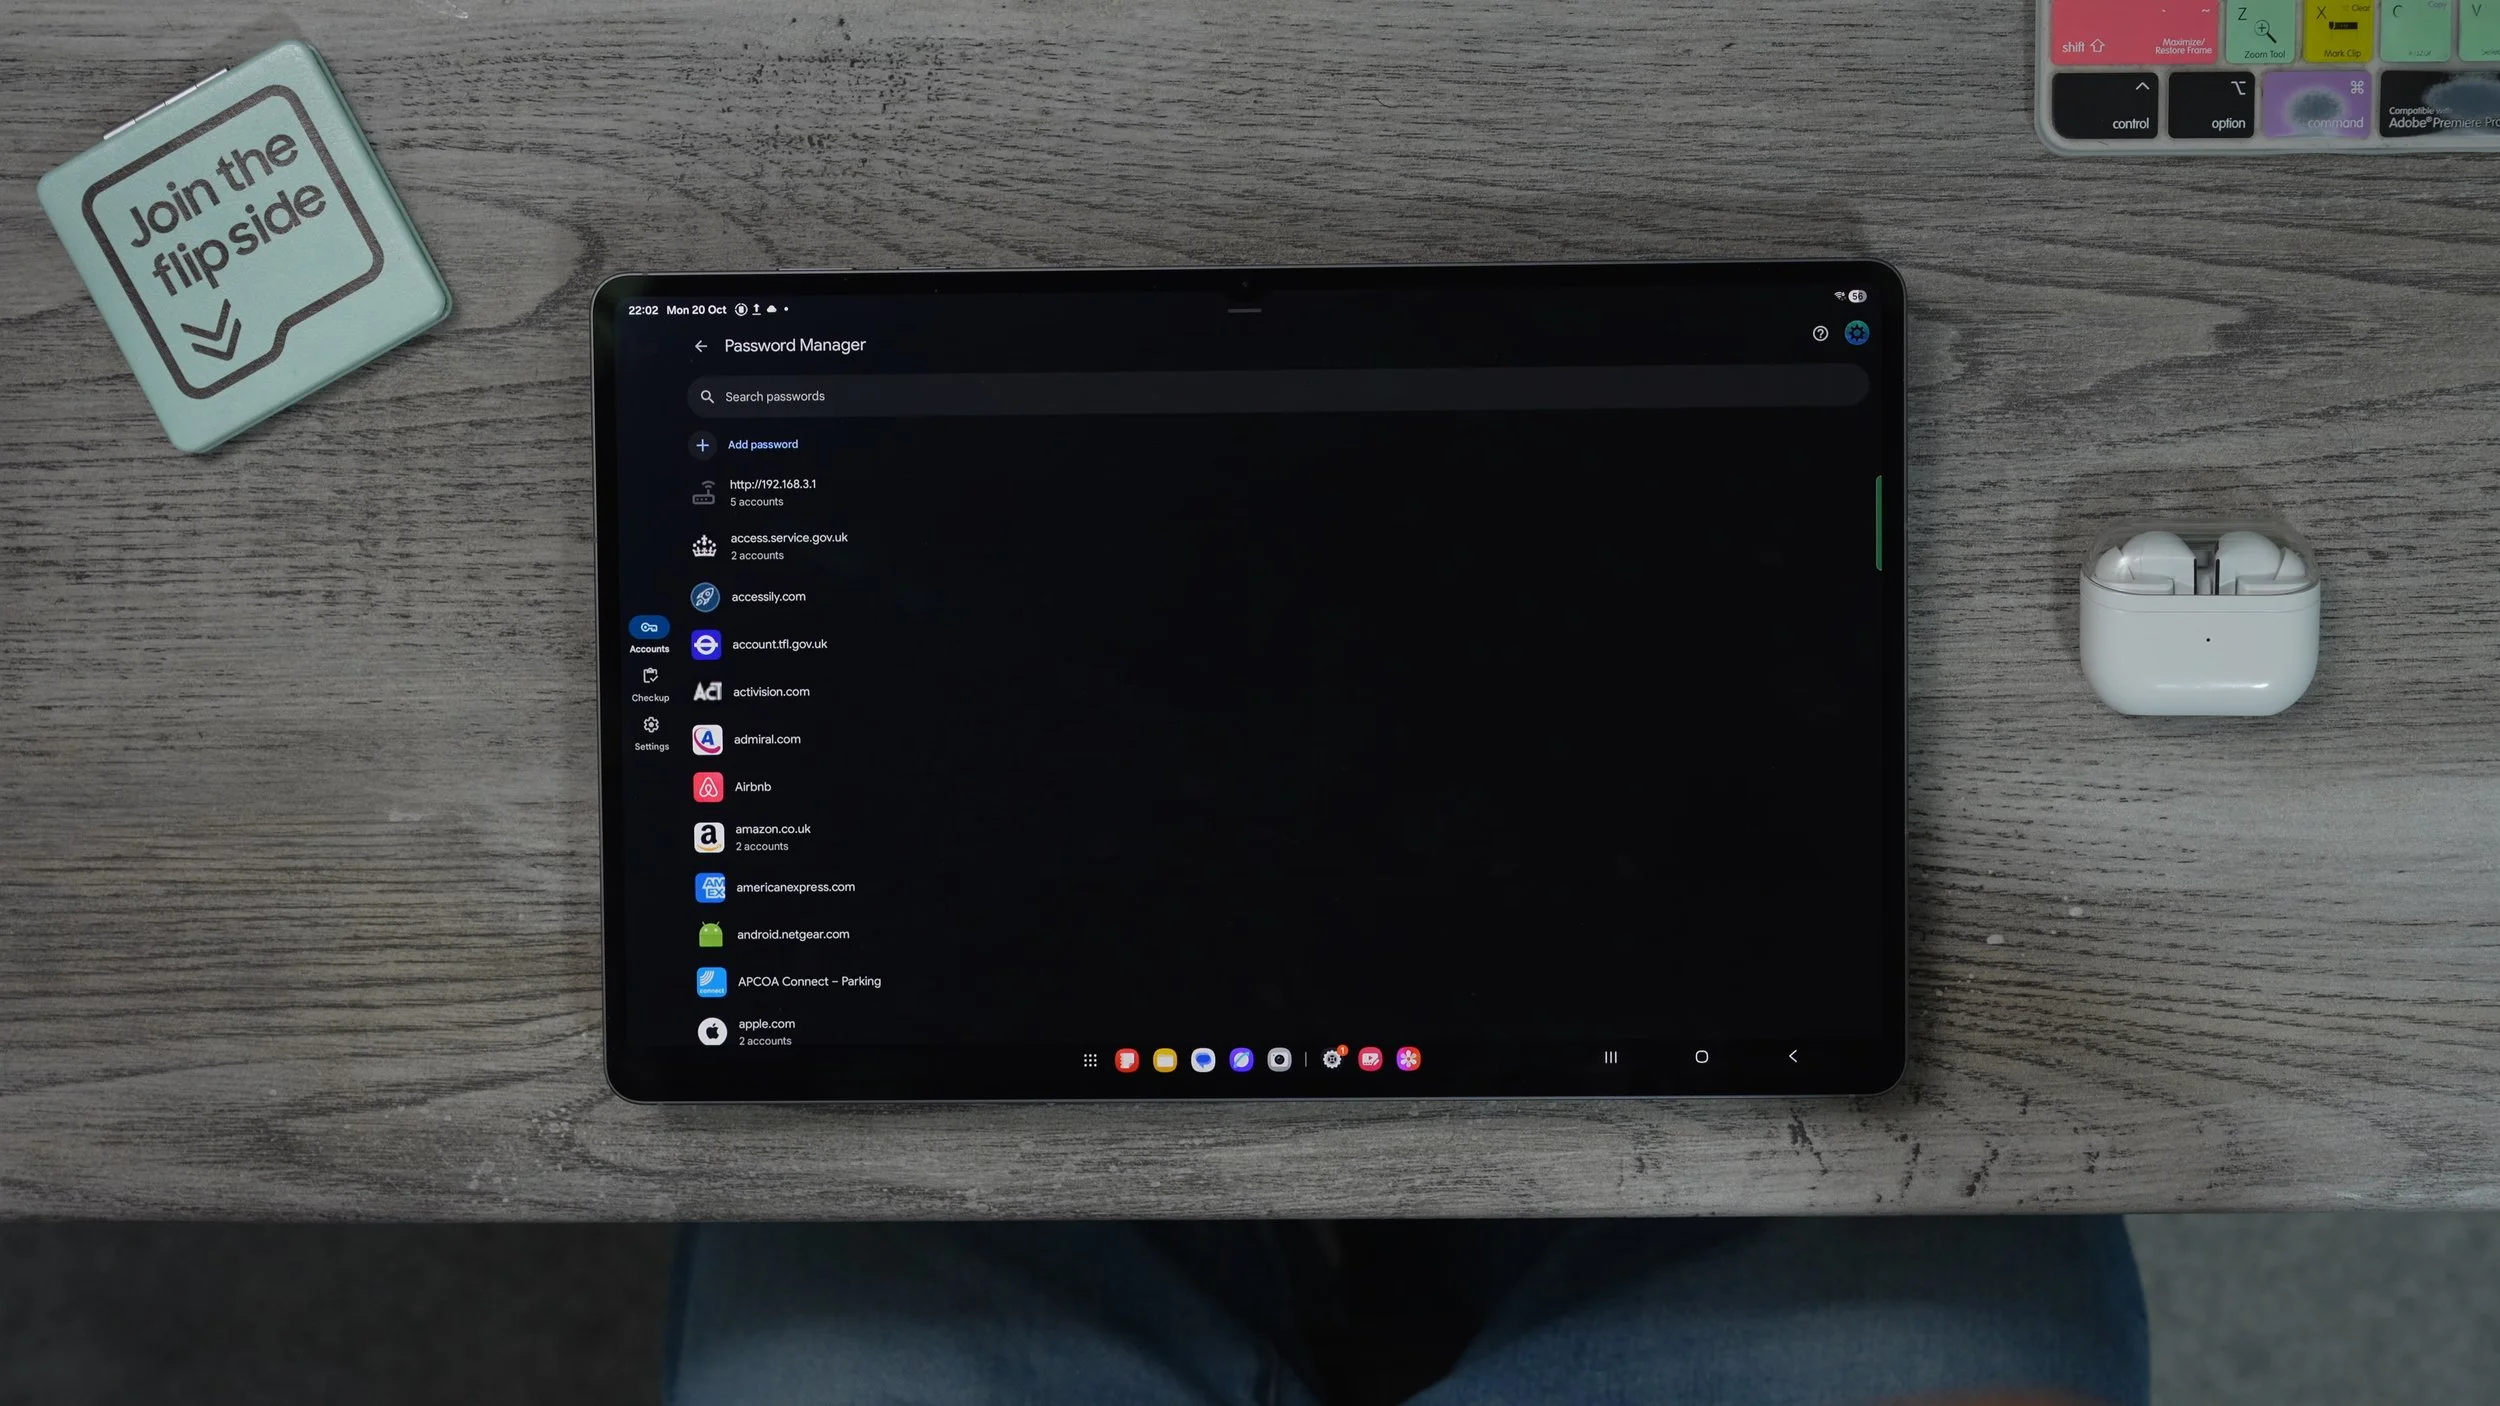
If you go to settings. Right here, you see the option to add the shortcut to your home screen for your Google password manager. Add this, and now it's been added to your home screen. So you can bring this over to the main page. And whenever you forget a password in the future and come here, search for the password that you've lost. And then put your fingerprint in, and it will show you the username and password for that specific website. And actually, there's a really useful tool here. If you go to checkup, it will scan all of your passwords and let you know if you've reused them or if there's been some kind of data breach or anything like that. So think of this as like a free password manager that already exists on pretty much every Android device. Only now you've created a way to access it very quickly.
THE EASTER EGG
This is actually just a little hidden Easter egg on the device. So, within your settings, if you scroll all the way down to about tablet on the right-hand side, if you go to software information and where it says Android 16, if you tap on this and continuously tap on it, you get the Easter egg. And if you hold your finger down on this, start to speed up, and now you've unlocked the Land Droid game. Now, the previous version of this was almost impossible to play because you're just kind of flying around randomly looking for the planets to land on.

Now they've introduced this autopilot feature, which actually guides you to the general direction of the planet, where you should be landing. The idea is to find and land on all of the planets in this kind of solar system. So what you can do is get the autopilot to take you most of the way there, and then you can kind of do your own landing yourself and then put your flag on each one of the planets. I have no idea what happens when you complete this, but now it is actually achievable, thanks to the autopilot.