
Galaxy Z Fold 7 - First Things To Do ( 16 Tips & Tricks )
So you've got yourself the Samsung Galaxy Z Fold 7. It's a powerful phone and maybe much more powerful than you might think. And most people probably don't even know how to unlock its full potential. And that is exactly why I've decided to make this beginner's guide and set up tutorial for you, because it's very easy to get all wrapped up in all the new, exciting features and forget about the basics. But with that said, by the end of this video, you feel like you're ready for the next step.

Easier Unlocks
My guess is that when you set up your phone for the first time, you were so excited that you probably only registered one fingerprint. Now, the problem with that and this phone specifically is this: when your phone is unfolded like this, you probably use your thumb or your first finger to open it. When you have it close this way, and you're using it with your left hand. You probably use your first finger. So I highly recommend you map all three. So to get to your settings, there are two ways to do it.
You can swipe down from the top right corner and go to settings here. The other way is to swipe up and go to your app drawer, which is kind of all jumbled up by default, and find the settings in here. Now, this could take a little bit of time because they're not in alphabetical order. Here's how to change that right away. Hit the three dots at the bottom here. Go to sort and go to alphabetical order. Now it should be much easier to find what you're looking for. So they both take you to the same place. And once you're here on the left-hand side, scroll down to Security and Privacy. Page opens up on the right-hand side. And then on this page, you want to go to fingerprints.
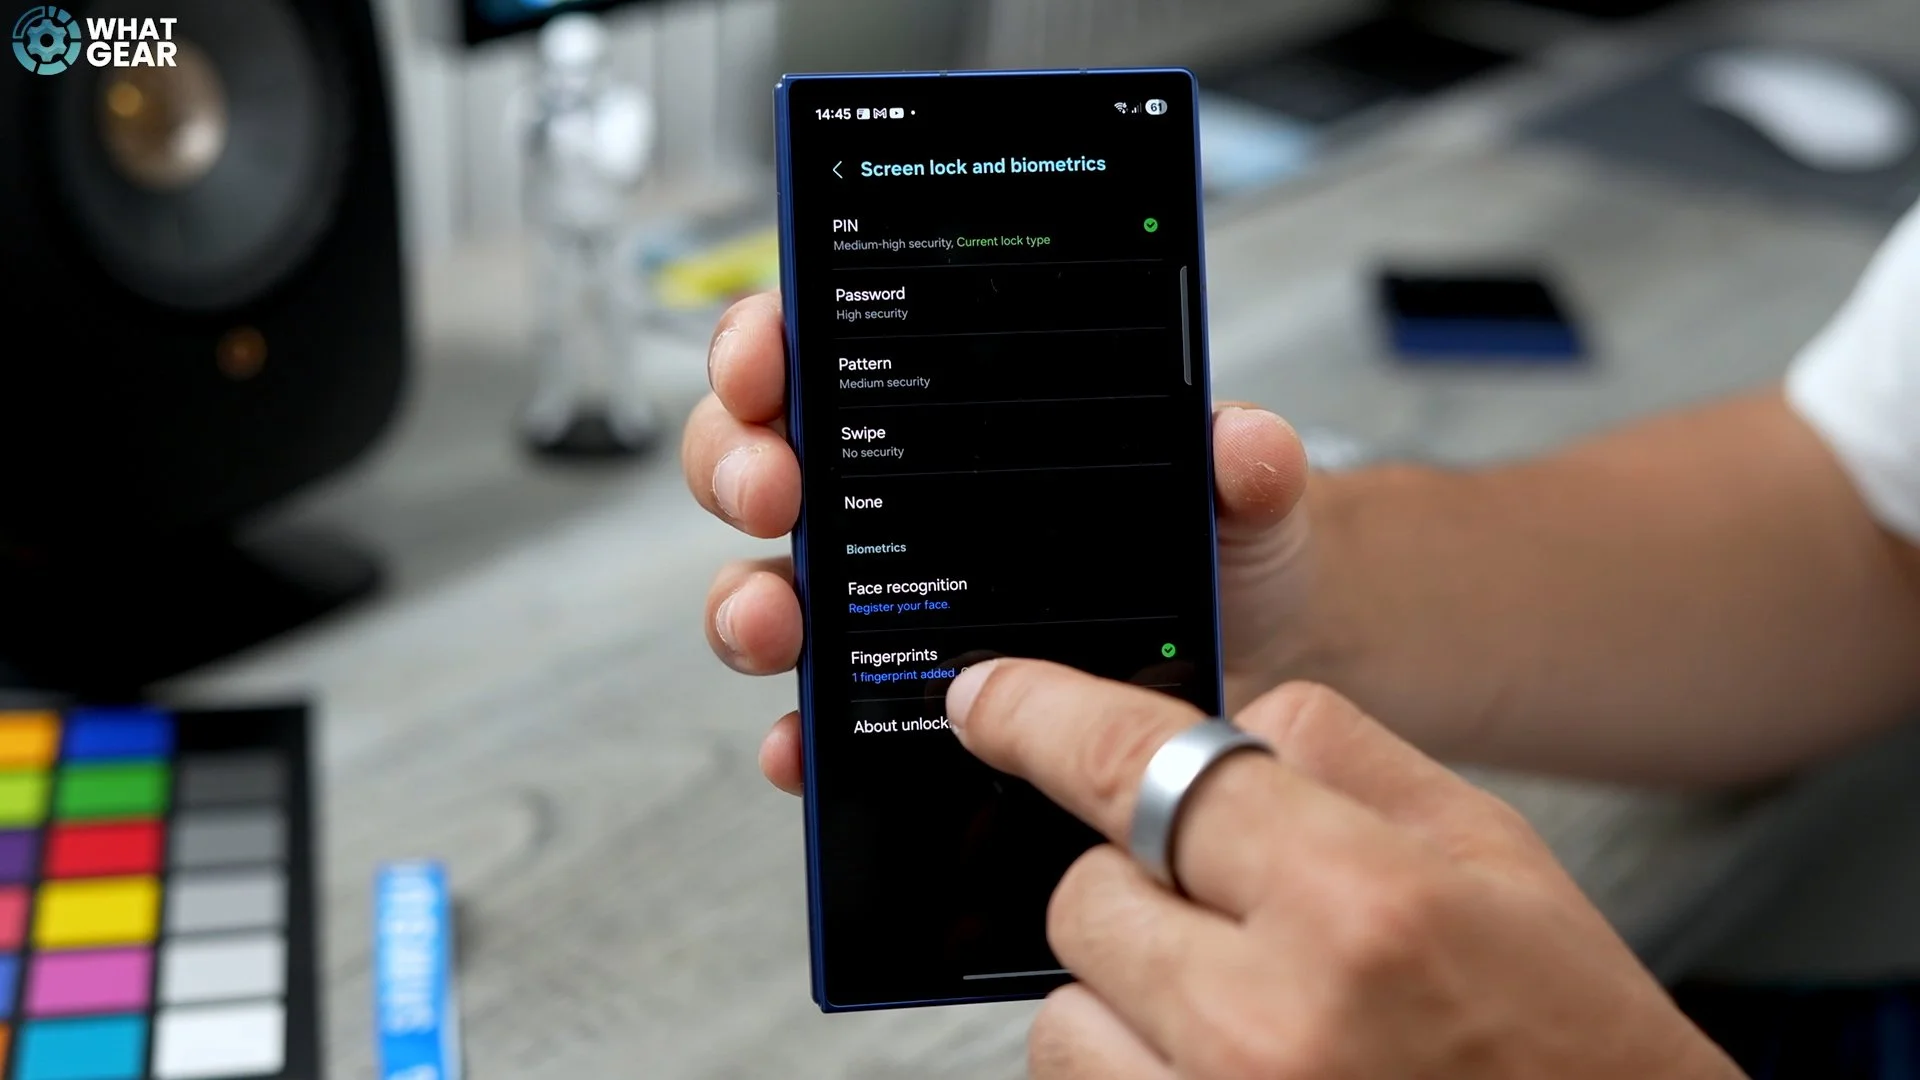
And then you'll notice I have only one fingerprint registered, which was just my thumb. So to add more, just hit the little plus here. Go to register and scan your additional fingers. And the key to getting this right is to simply just move your finger around as much as possible, because there are many edges to your finger and thumb, and you need to register them all. I do recommend you hold the phone as you would when you pick it up.

Quick Pay
This is something that I do with pretty much every single Android phone that I get. And if you are coming from an iPhone to this phone, then you're going to want to do this. Go into your settings by swiping down on the top right corner, and go to settings here. Scroll down the left-hand side, and you will find advanced features. This opens up on the right-hand side, and we're going to go to the side button. And right now, this is the default setup. So if you double-press the power key, which is the fingerprint button, it will open up the camera, which can be quite handy.

However, for me personally, I prefer to use the double tap on the power key to open the Google Wallet. So to change this, just tap where it says Double press and then you'll get all of the options. Now you actually might prefer some of these other ones here, but for me, I'm going to go to all apps, scroll down to the Google Wallet and hit wallet. Now, if you prefer the Samsung Wallet, then you could definitely set that up too. So now whenever I'm at a cash register, I want to pay quickly. Just double tap. That instantly opens up the Google Wallet with all my payment cards and loyalty cards. And that's it. You can get in and out of the shop really quickly.

Now there is one little addition to this which you should know on day one, is that Samsung really want you to use their wallet, and it will be the default provider if you want to change the NFC and contact payment provider. Here's how you do that. Go into your settings, go to connections. Go to NFC and contactless payments. And here, if you go to the default wallet app, you can change it to whatever you want it to be. You can actually even set up PayPal as a preferred app, or even something like Revolut if you prefer. And once you start adding more money-related apps, you'll probably see more options available here. So just remember where this is.
Smooth Operator
Now, Something that I noticed when I set this phone up fresh. I didn't just copy over from my previous phone, which is the Galaxy S25 Ultra, is that the button navigation is the default. And again, if you are coming from an iPhone or another phone that uses the gestures by default, well, you're probably going to want to change that. Here's how to do it. Just jump into settings, go to display, go to Navigation bar and then here you'll see swipe gestures. So now, instead of the buttons at the bottom, you just have this line here.
And the gestures work as you would expect. And if you are switching from button navigation for the first time, you're probably familiar with holding the centre button to wake up the circle to search. Well, here, if you hold the line, it does the same thing. So this is where you can circle to search. Another little trick with the navigation bar at the bottom instead of the buttons is that you can swipe through the open apps just by swiping across that line and back again. That way, you don't have to open up your background.
Make Use of the space
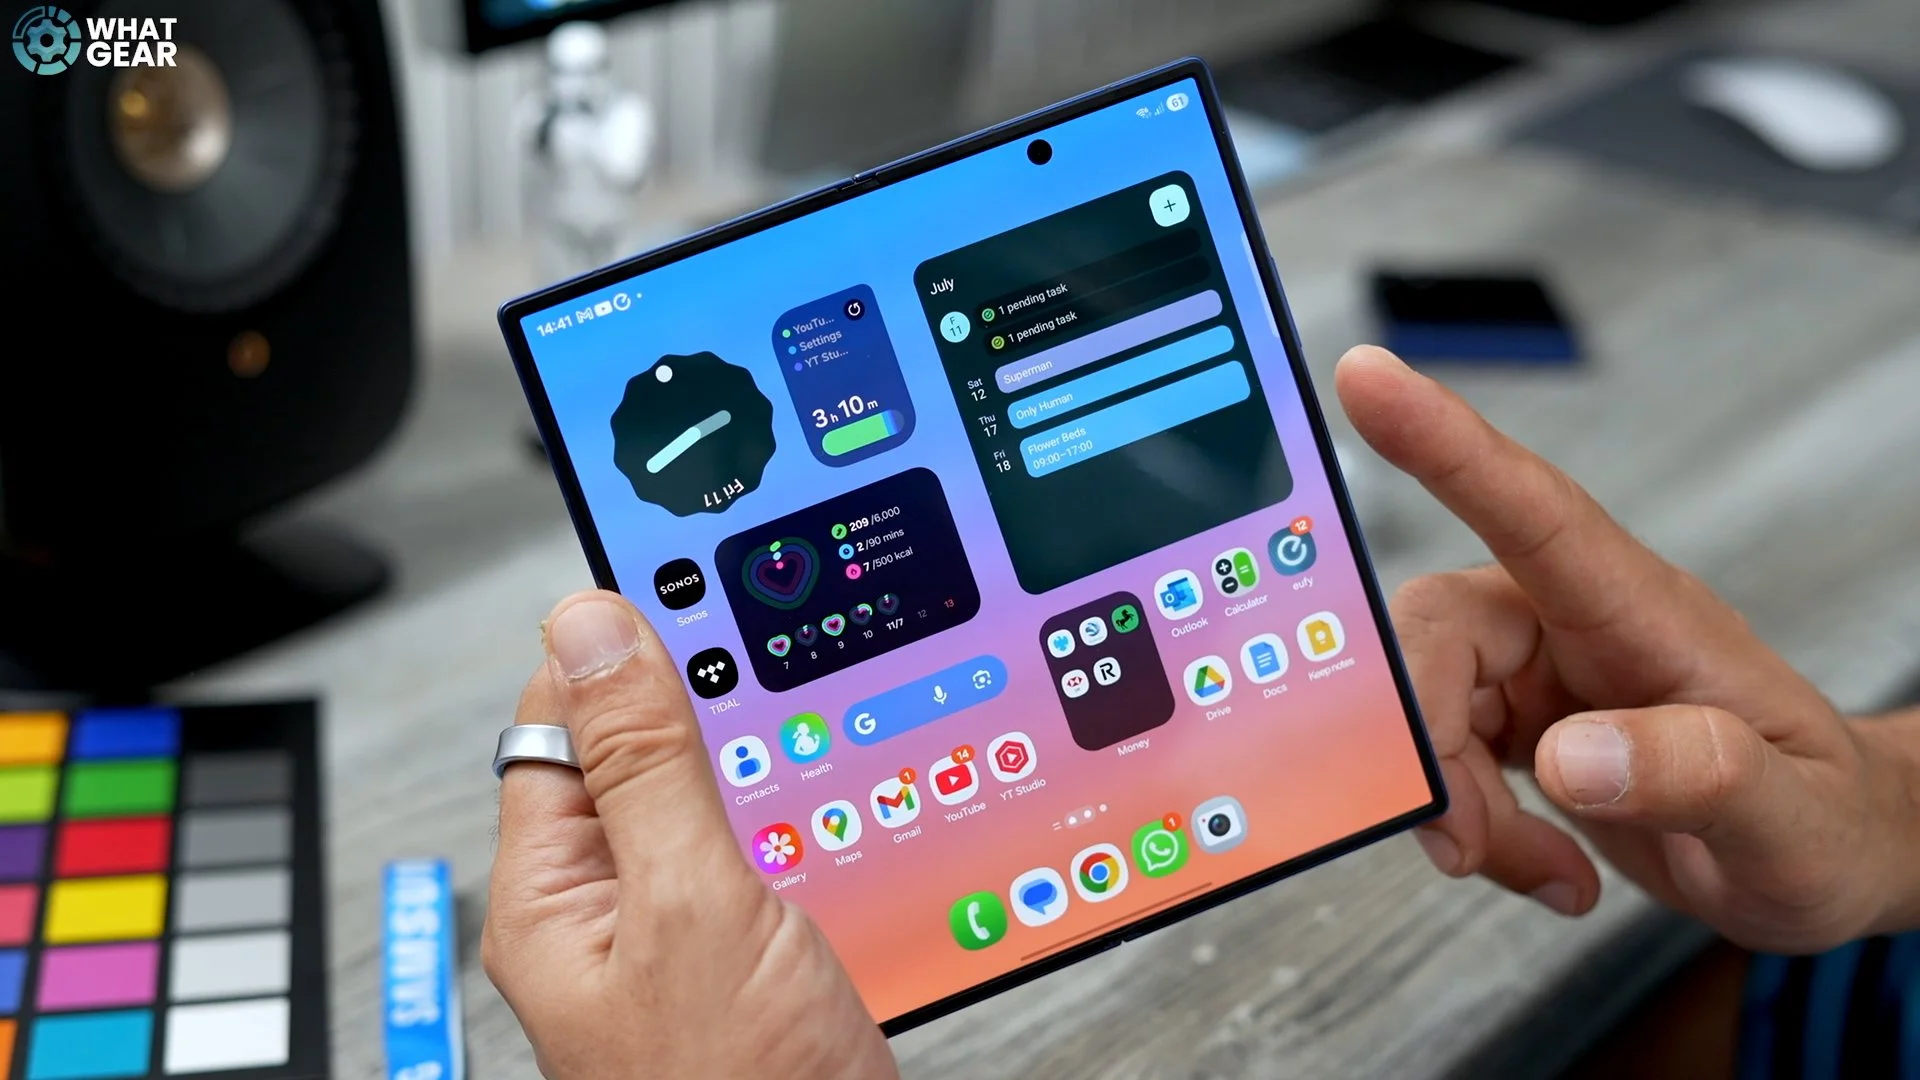
So I've set the phone up mostly how I want it, but one thing that I changed straight away on day one is the number of apps that I can have on each screen. If you hold your finger on the home screen and you go to settings here, this takes you straight to the home screen settings. There is another way to access it, but this is the easiest way in my opinion. So by default the app size was in the middle, which means there's much more gaps in between each app. I prefer to use more the space so I increase the app size.

By default, it will be set to four by six, which is good if you have particularly chunky fingers, but in my opinion, it's better to have more stuff in one place if possible. It just reduces the amount of swiping around to find things, and that is exactly why I prefer to set it to five by six. A couple of other tweaks that you might want to make whilst here on the home screen. Setting the number of columns on the app screen grid. You can change it to five if you want more, and also the folder grid. If you prefer, you can change that to less, which I think I'm going to do because my folders don't have tons of apps on them. That's how that appears.
Quicker Access
This would improve your phone's efficiency and allow you to access important tools more easily. So if you swipe down from the top right corner, that brings down your quick settings panel. If you hit the pen here, you can customise this. And the area that we want to customise the most is this one right here. So if you hit edit in the middle, have a look at these quick settings. If any of these are irrelevant to you, then get rid of them. And once you've done that, have a look at this area here at the bottom. Swipe through these. See if there's anything that would be particularly useful for you. And then you can simply grab it and drag it onto the quick settings wherever you want it to be.


My recommendations for this are the Dolby Atmos, which is very handy when you're watching movies and things like that. A couple of other ones that I do recommend are the performance profile. The song search, the secure Wi-Fi and extra dim are also very handy. And before we exit the Quick Settings panel, you can move things around a little bit. For example, if you want the brightness and the loudness near the top, you can move it nearer the top. The other thing you can do here, if you go to Panel settings and you are left-handed, swipe down from the corner to the left corner instead of the right if you need to.
Faster than you think
So if you got a new device, you probably just assumed that straight away it's going to run as efficiently as possible. But actually, there is a way to improve it even further. And most people probably will never do this. But now, you know going to be one of those people. Go into your settings on the left side. We're going to go to Device Care. If you don't have the smiley face right here, then definitely hit optimise. What I want to show you is this in this section where it says memory. If you tap here, scroll down at the bottom of this page you will see this Ram plus.
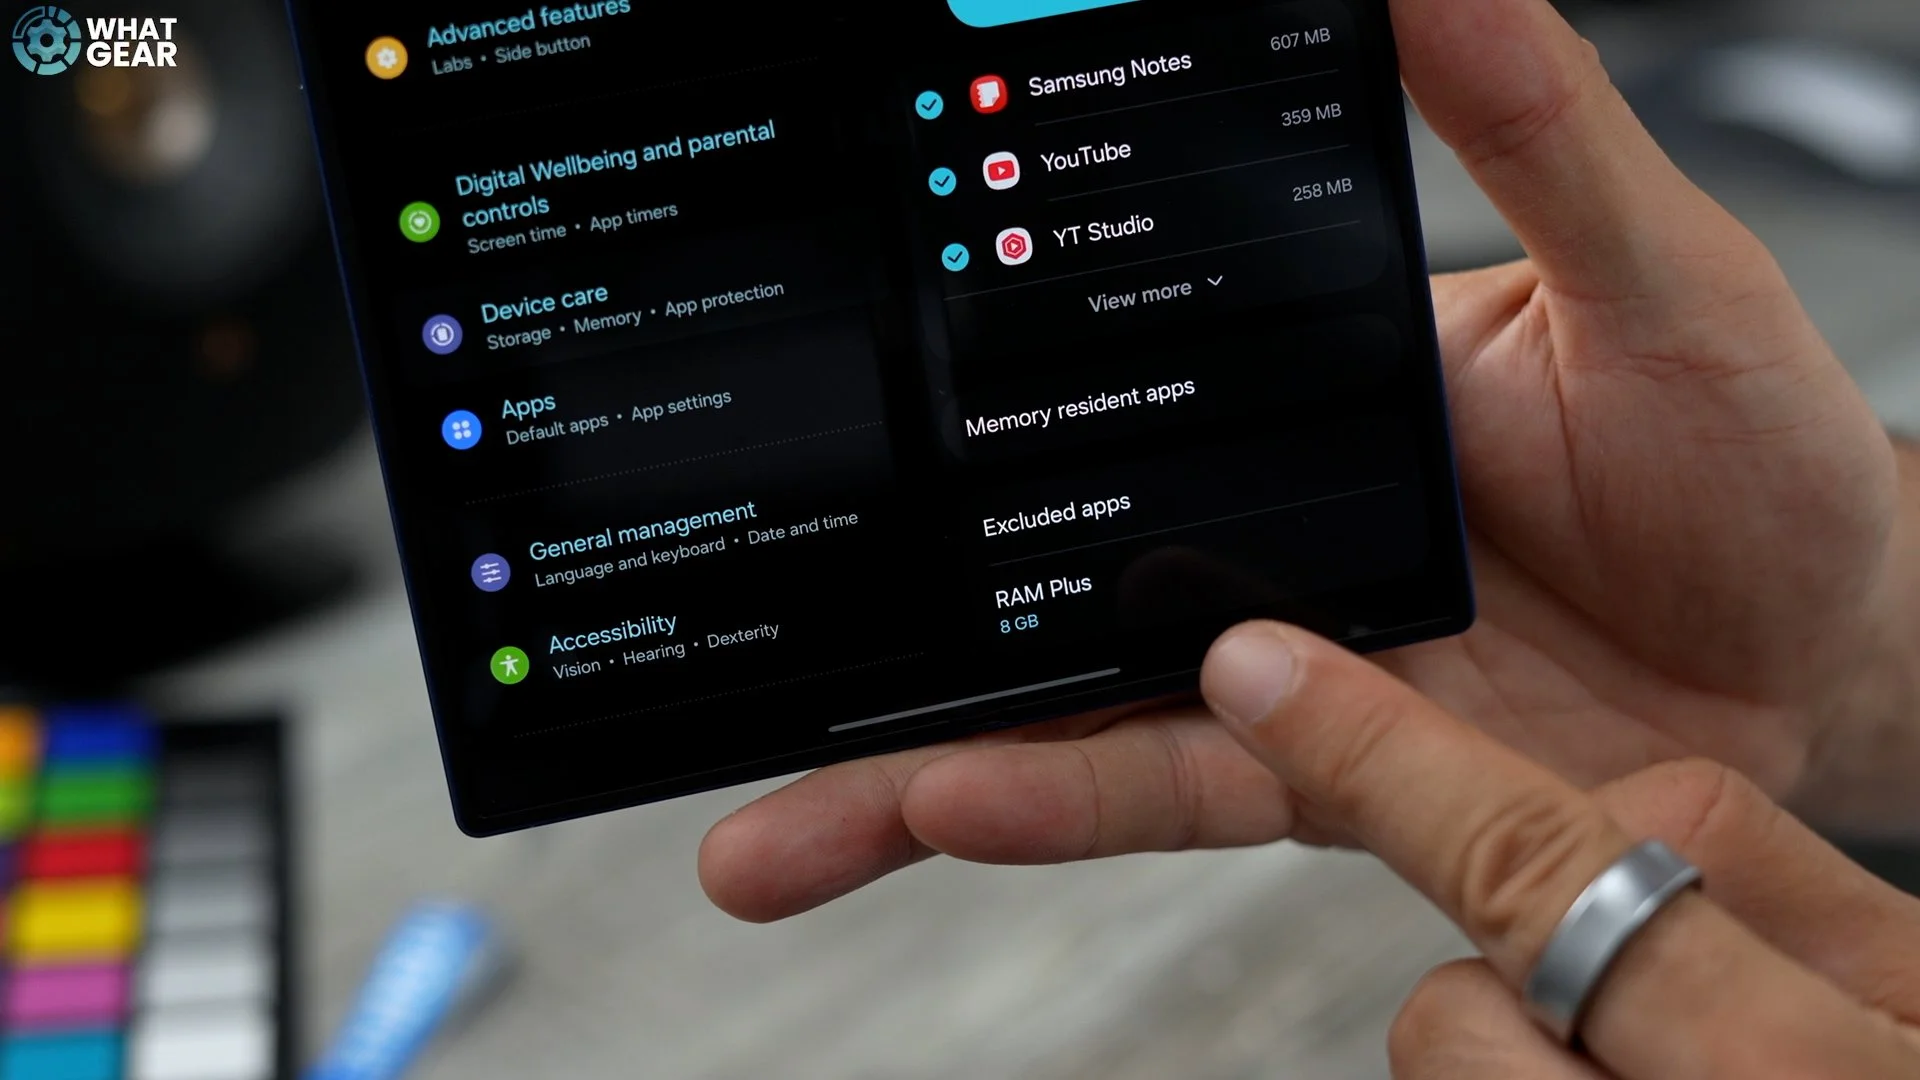
So this is set to eight gig by default. But actually if you want to, you can double the amount of Ram on your device by sacrificing some of your ROM the storage on the phone. Why not double the RAM for now, and then you can always switch it back later. This will help with multitasking, as well as gaming and other tasks. It increases the random access memory, which ultimately can make your phone run more smoothly.
The Autofill Problem
This is something that you really, really need to know and actually caught me off guard because usually when I switch to a new Samsung phone, I just do the transfer and then everything's kind of set up how it was. If you are setting up a fresh phone, then you absolutely need to know this one. Go into your settings Security and privacy. Go to more security settings and then go to passwords, Pass Keys and Autofill. Now, by default, it will be using Samsung's Pass for your passwords.

If you do use Chrome as your main browser on a computer, or if you've used another Android phone, and Google is managing all of your passwords and details and things like that, then you want to change your preferred service to that. To do that, just hit the little settings here. Choose whichever service you use the most. And now that is all set up as your default password service. You can still use Samsung Pass, and you can still use third-party ones as well. Just switch those on and off if you need them. But do this on day one. It's going to save you a lot of time.
There are six More
If you find that the autofill isn't filling out your passwords for you. What you might need to do is this. Go to the Play Store, type in Gboard, which is Google's official keyboard app. Install this, open it, and set it up for the first time. So the Samsung keyboard is very good, but if you do want to change it to another keyboard, here's how you can do it. Just go to your settings here. This will jump into the Samsung keyboard settings. If you go back one step, you'll see the option to switch the default keyboard to the Gboard.

One downside to the Gboard is that it doesn't have the Galaxy AI writing tools on it, so if you do want to get back to those writing tools, you can hit the little icon in the bottom left corner. Switch back to the Samsung keyboard, and then you will see that it sparkles. When you're in a note-taking app or Google Docs, for example, you can highlight chunks of text, and then you will see a sparkle. Alternatively, you can highlight text, and you'll see that it sparkles. And if you tap that, you will see the writing tools pop up. So you have a bunch of different writing styles and things and various other options.
Good Vibrations
Jump into your settings, go to sound and Vibration and go to Notification Vibration. One of the cool things you can do here is choose different vibration patterns. Or you can do what I've done and sync the notification vibration with the sound.
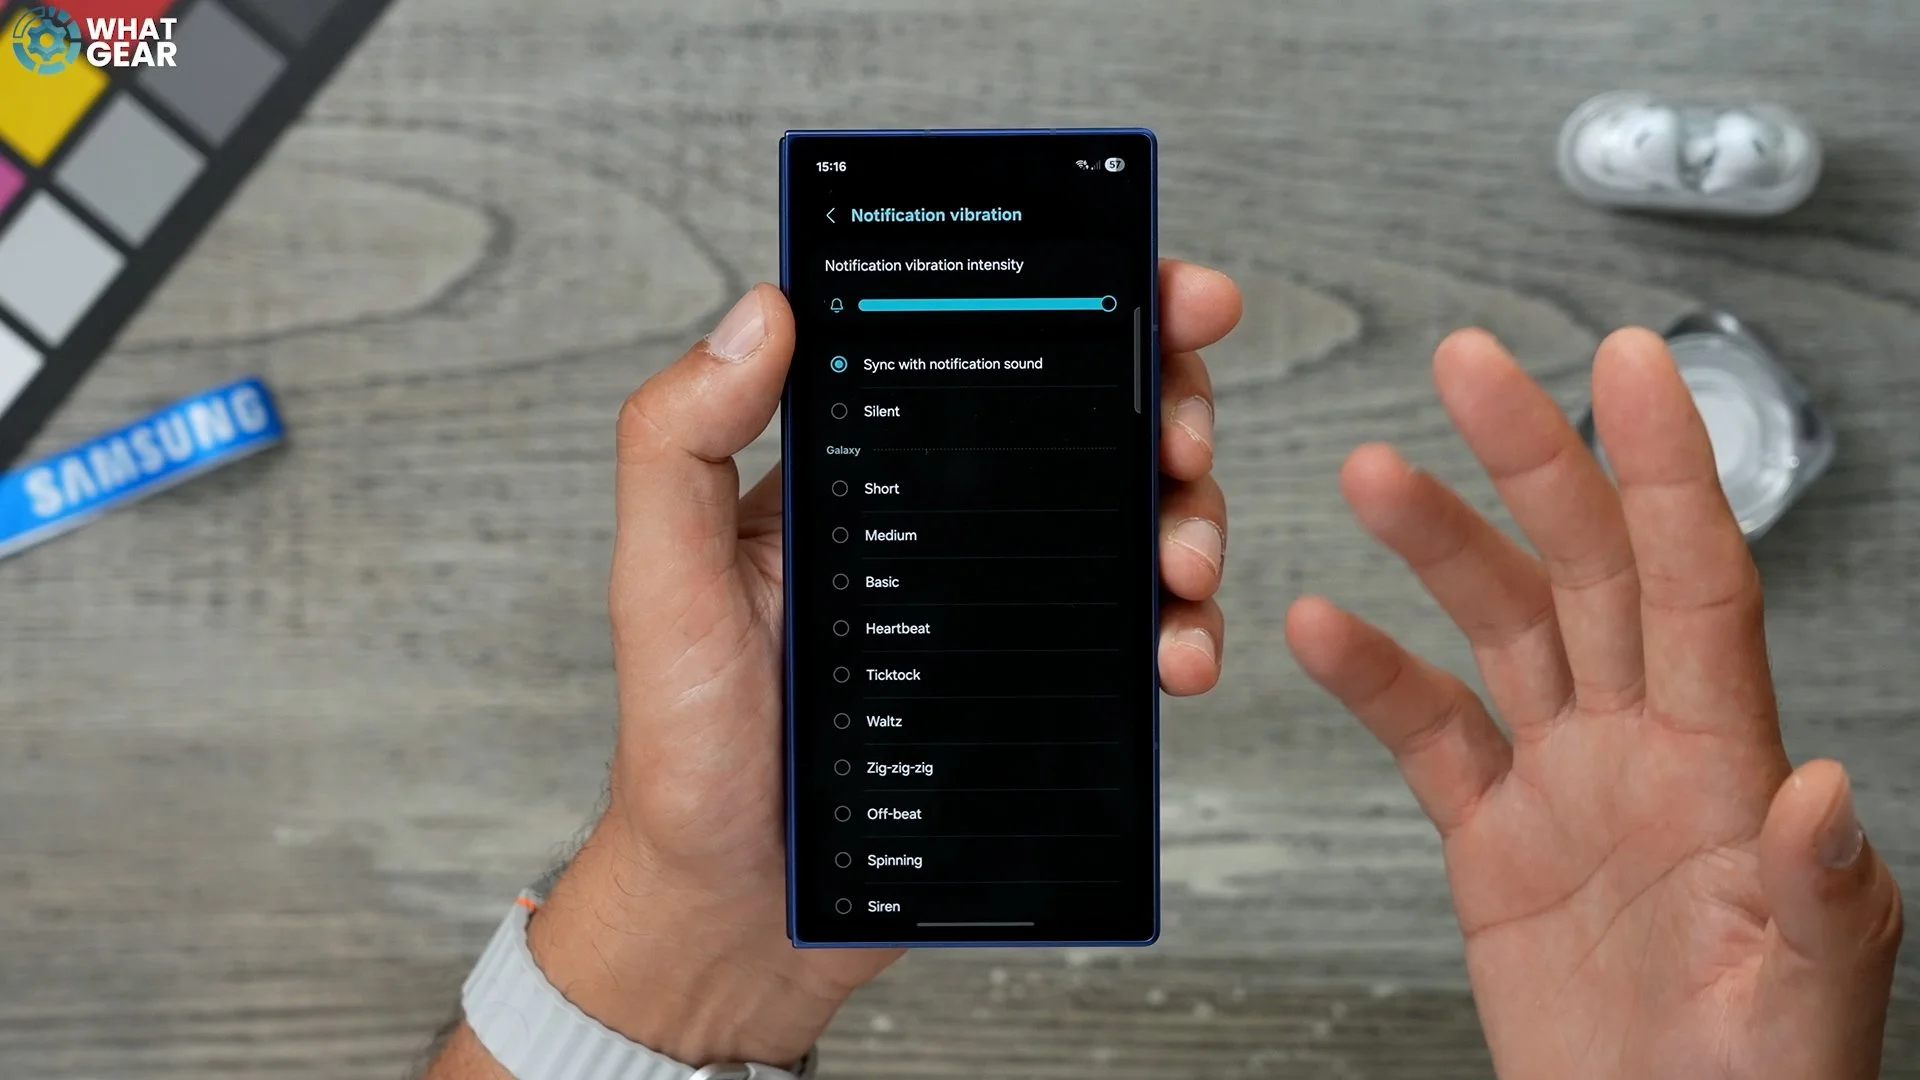
So if you are setting up different ringtones and stuff for people, the vibrations will sync up with that, which is nice, and it can let you know who's calling you without even having to take your phone out of your pocket, even if your phone is on vibrate only.
Sensitive Info
So this next one is very important for privacy reasons. Staying within the settings, if you scroll down to where you see notifications here, go to hide content when locked and go to hide when locked.
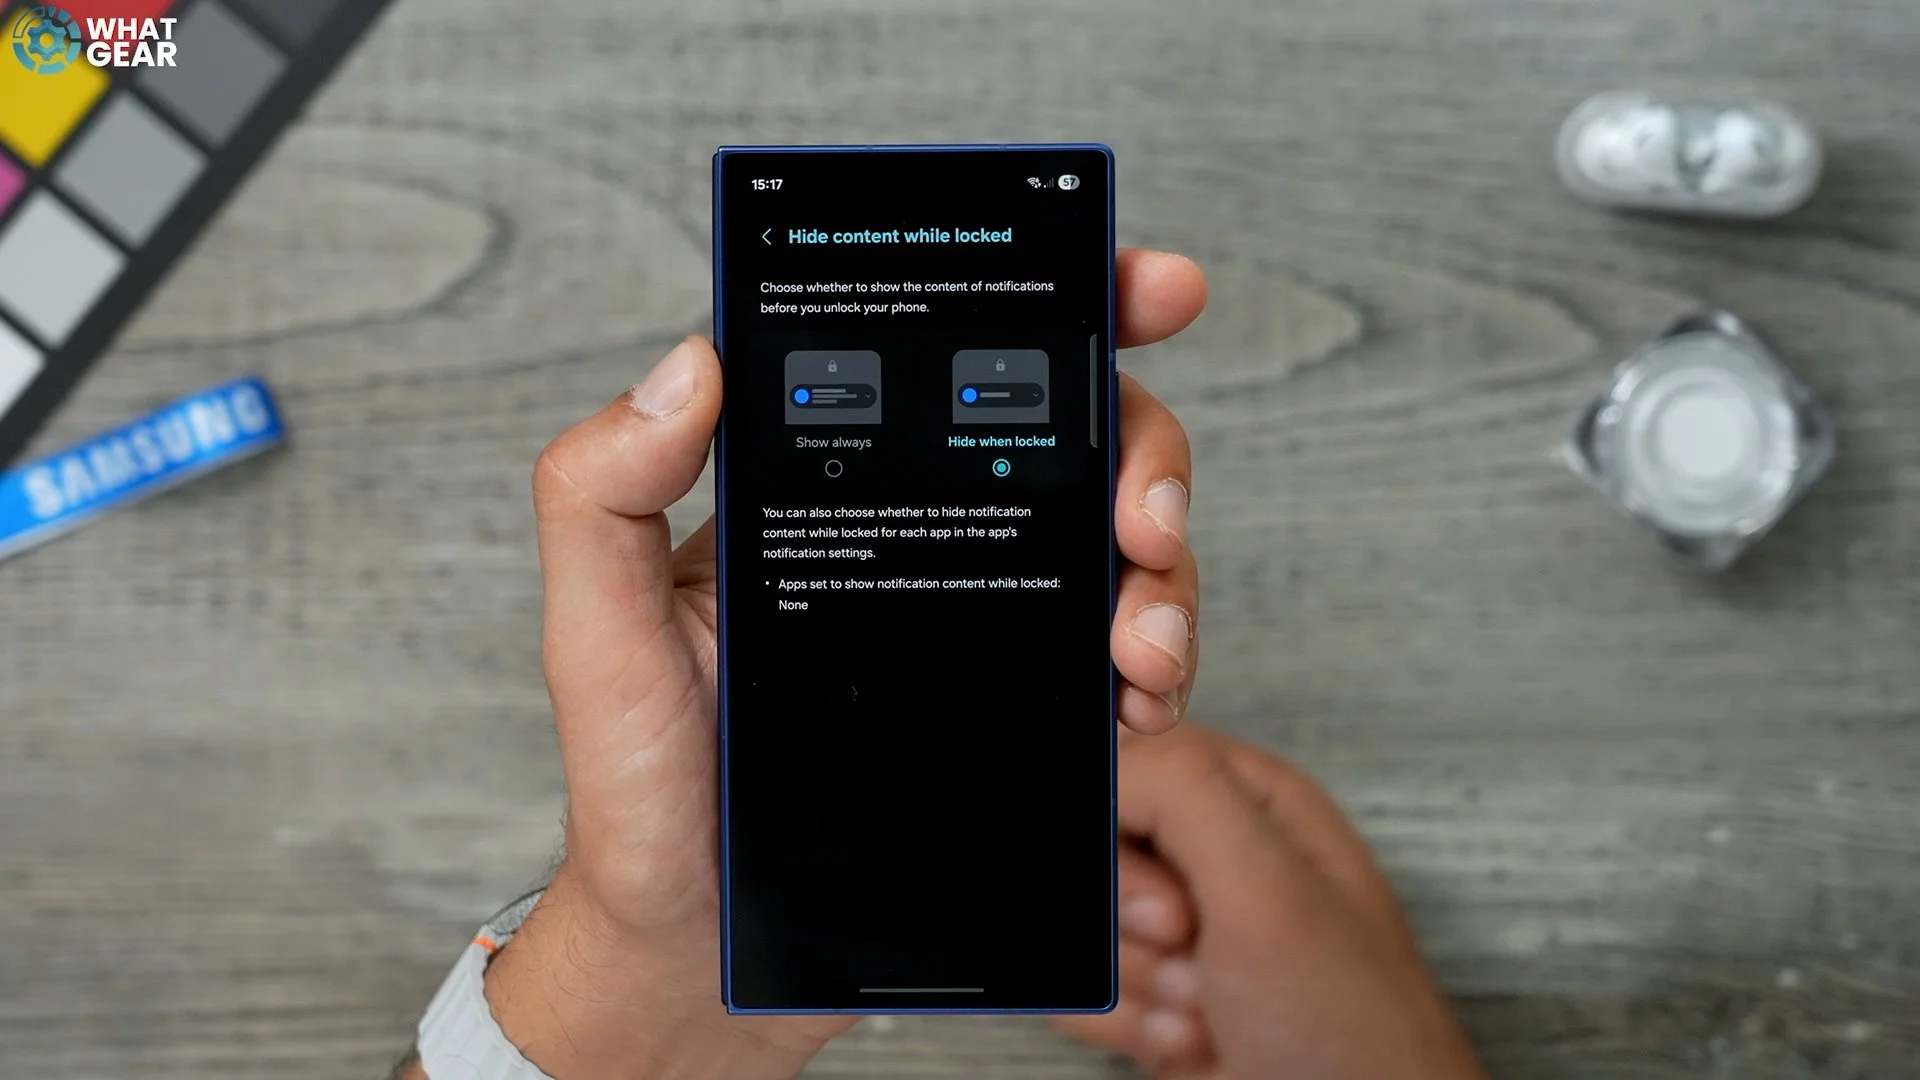
What you don't want is your messages and things like that being broadcast to people who can see the cover screen on your phone. Some people might not care about this that much, but if you do, then definitely switch this on.
App Distractions
Jump into the settings - the notification menu - App Notifications.
Now, a lot of people don't realise this, but you can customise how each app notification shows up. So, for apps that you don't want distracting you all the time, I recommend you do this. So let's say Instagram. Right now, it's going to show on the lock screen, and it's also going to show the app badge.

And it's going to show a pop-up notification. Now, in my opinion, you don't need one of those. I think if you want to be less distracted, then maybe turn off the pop-up notification and the lock screen notification and just go with the app badge. That way, you still know when you get notifications from Instagram. It's just way less distracting. So, definitely spend a bit of time going through your list of apps. Once you've installed them all, figured out which ones you don't want to distract you so much and set it up in whatever way would work best for you.
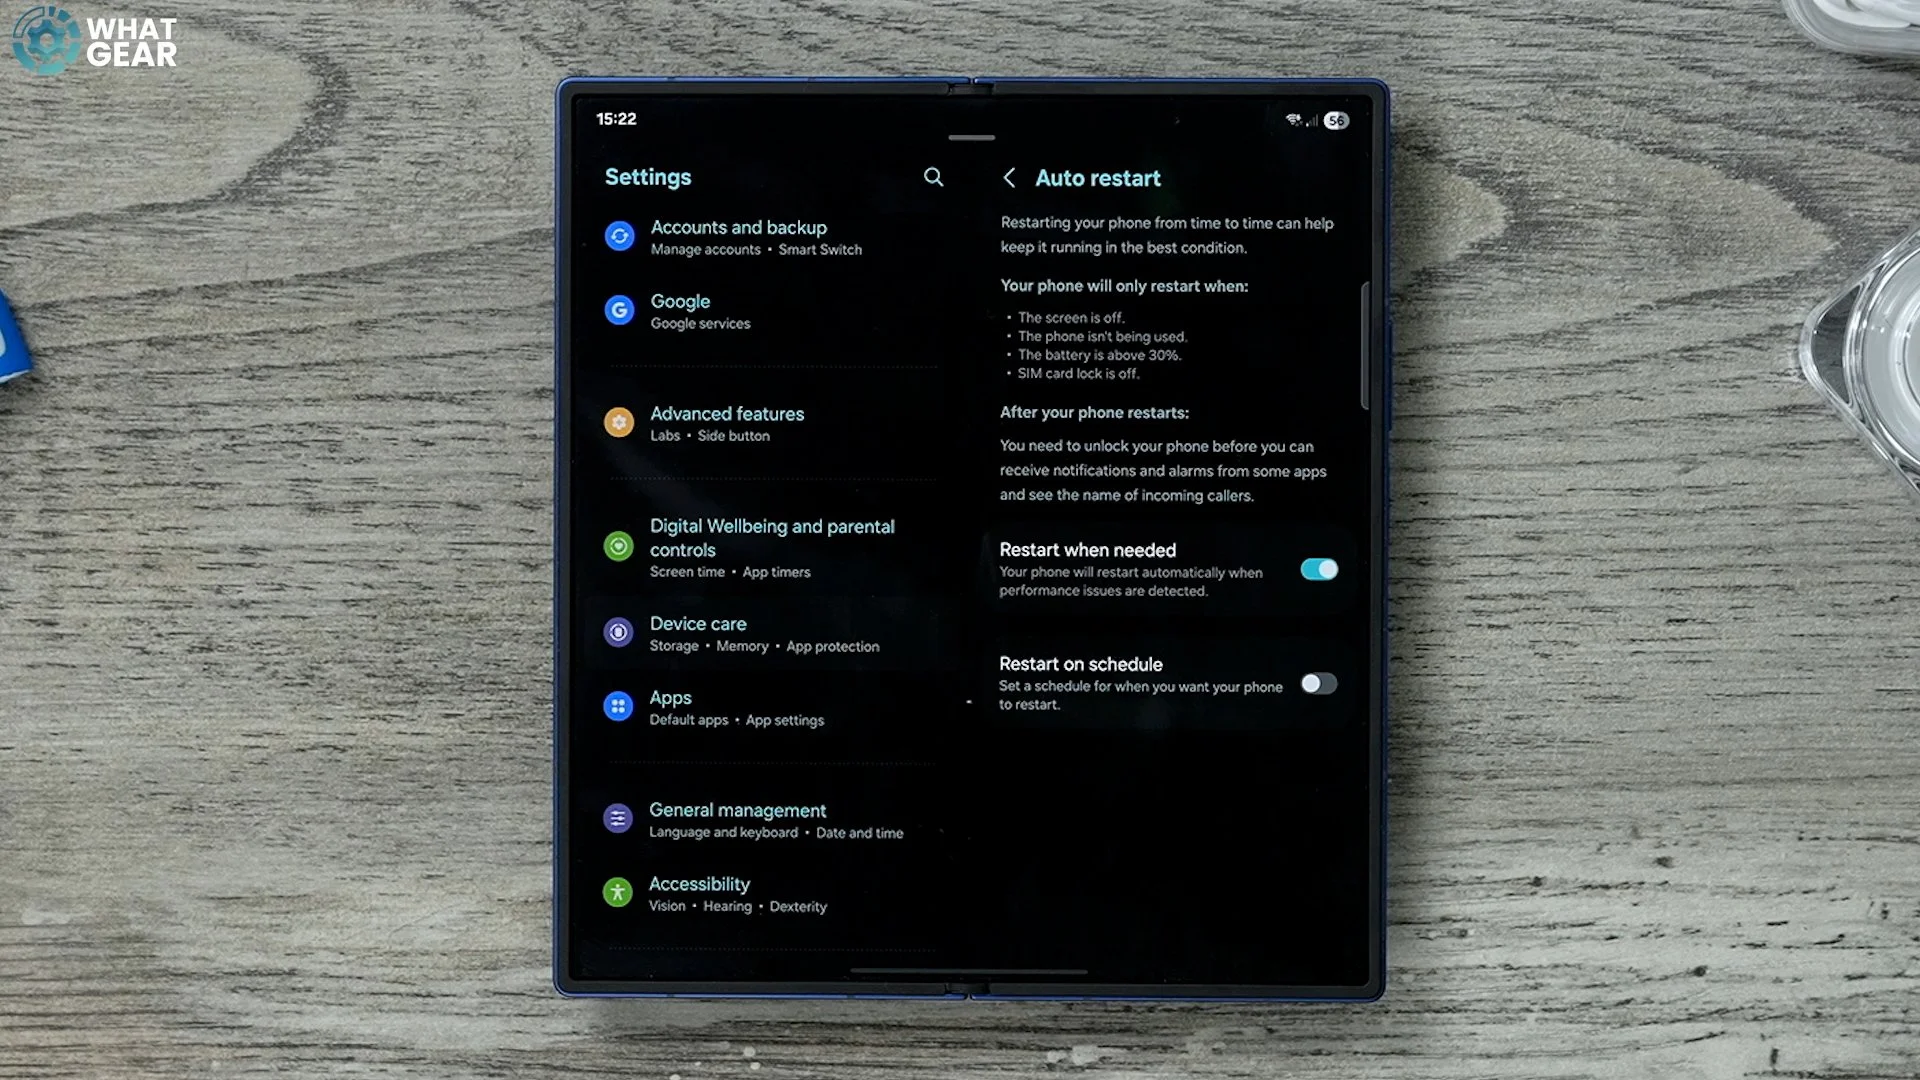
Optimal Performance
Here's a very clever way to optimise your device. Go into your settings - device care.
Here you will see auto optimisation. This is switched off by default, and I do recommend you switch it on. You can choose when this happens, but I do recommend setting it to when needed. So if your phone starts running particularly hot because there are loads of background tasks going on, or there's some reason some app is playing up and redlining the performance on your phone without realising it, the phone will know this, and it can auto-optimise by restarting and starting fresh, but only when the time is right.
Improve your Display
So some of you already know this, but Samsung Display make the best displays in the business, and they look fantastic, but you can make them look better if you do this. Go into your settings - display, set your motion smoothness to adaptive. I've set it to standard just because when I film with adaptive, it starts flickering. But here's what I wanted to show you: the adaptive colour tones. So this adjusts the colour tone of the display based on the lighting conditions around you.

And it will use the camera sensors to detect this. Not only could this be better for your eyes, it also makes your display more viewable in very bright or dark conditions. And if you really care about your eyesight, then I recommend switching on the eye comfort shield. So just tap that to switch it on. Tap where it says Eye Comfort Shield. And here you can set a custom schedule. And I also recommend switching on enhanced comfort here
Extra Dim
Remember how we set up the quick settings earlier, and I said to add the extra dim? That's a very useful feature to use at night. So let's say you want to use your phone but you don't want to illuminate the whole room because maybe your partner's sleeping or something like that, or you're in a cinema or somewhere where you shouldn't be using your phone, but you need to check very quickly.

You can activate extra dim, and that lowers the brightness of the screen below the lowest brightness. And because we set it up in the quick settings here earlier, it's very easy to access.
Live Longer
This is an expensive phone, and it has seven years of updates available to it. So if you do plan on keeping this phone for a very, very long time, then I recommend you do this. Go to your settings - Battery - Battery Protection. And on this page, the adaptive protection should be on by default. If it isn't, then switch it on. And the option here that you might want to consider is setting this to the maximum. So this limits the maximum charge of the battery. And by doing this, you're prolonging the life of the battery in the long run.
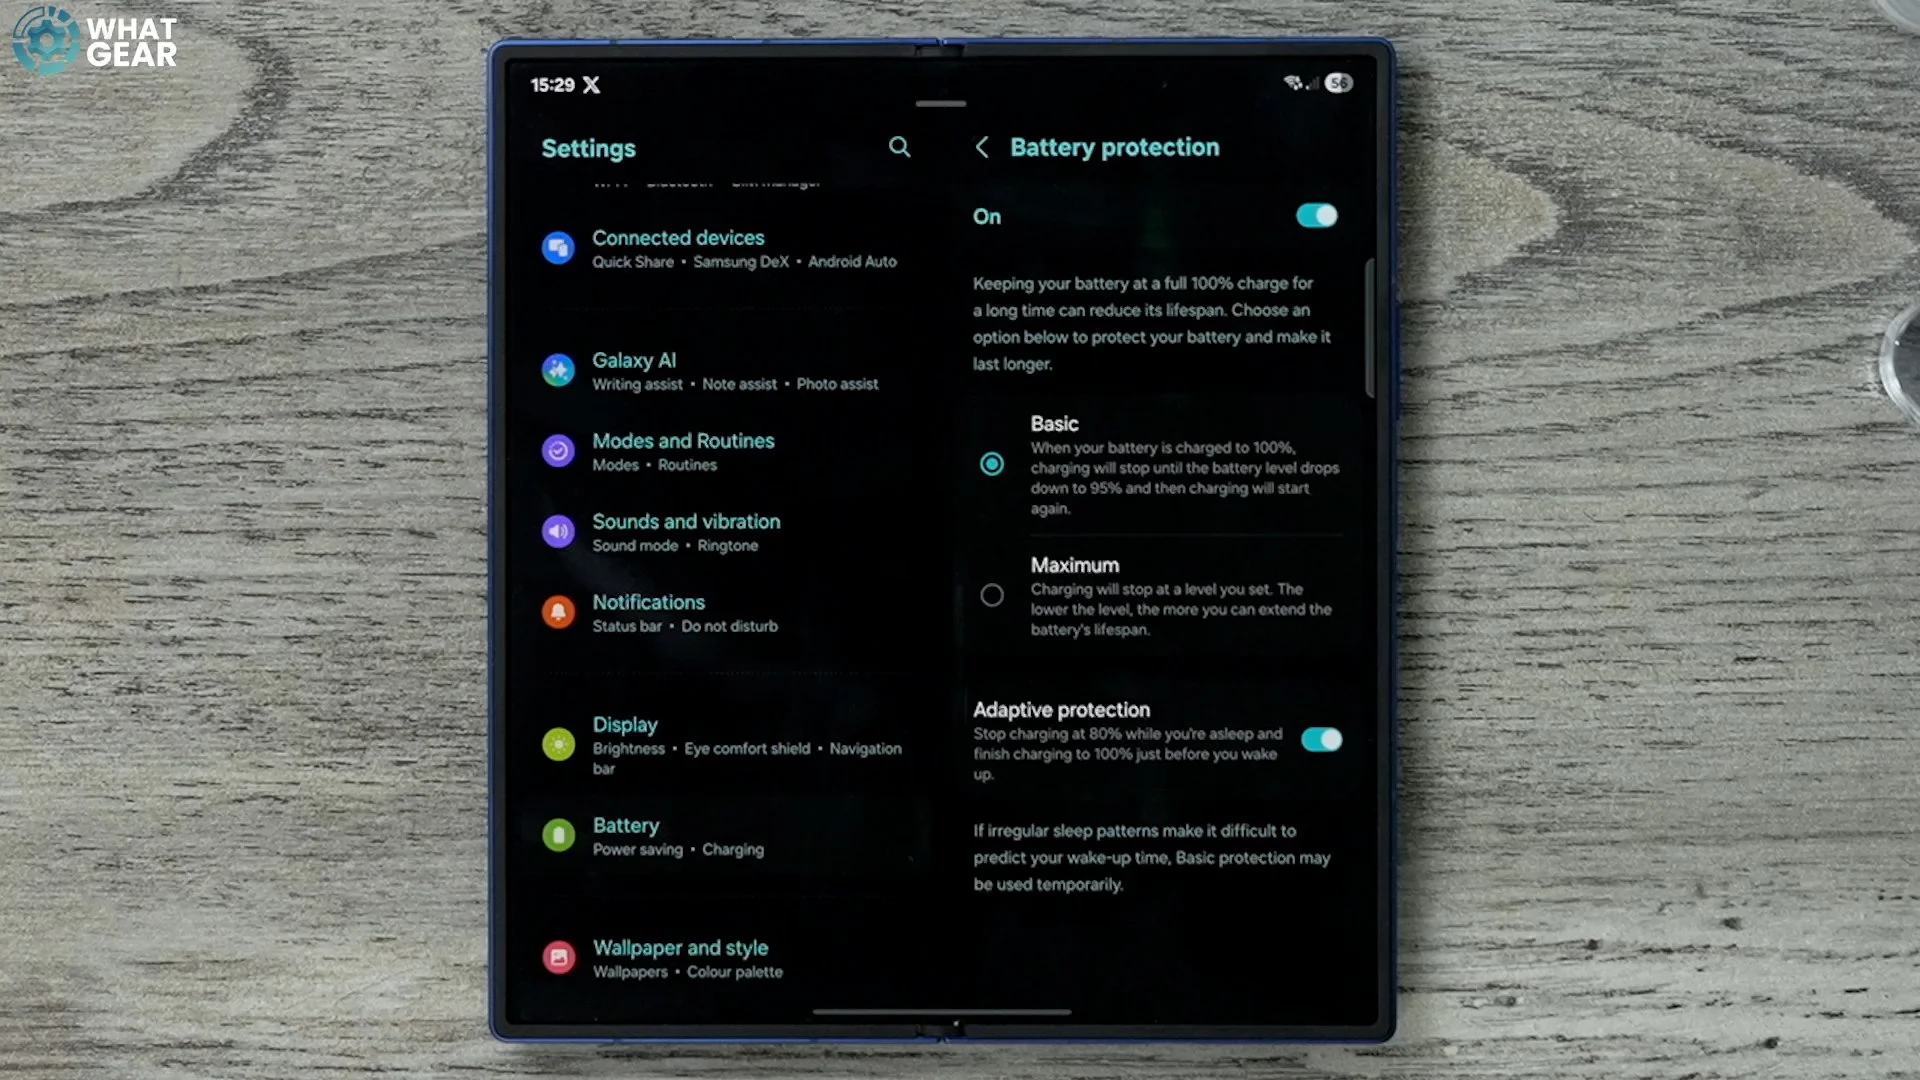
Because when you're constantly recharging at high speeds and then depleting and recharging again, the actual capacity reduces over time. By doing this, you protect the capacity of the battery. So you could set this to 90% or even lower if you wanted, or even just 95% if you wanted to play it safe. If you still want a lot of battery and just want to keep that little buffer space.
Clean Screen
Now, something that I do quite a lot with my phone when I'm trying to show people how to do things on their phones is actually to screen record, and then send that screen recording to them so they can see how I did it. Now, if you do want to screen record, there are a few ways to do it, but the easiest way is to go into the quick settings and find the screen record right here. And when you activate this, you do get a few options. You can record just the media on the device or the media and the mics. If you want to talk and have them hear what's going on on the phone, you can do that. And you can also do show taps. But there is a cool little setting here which makes these recordings a little bit cleaner.


So if we go back out of this, go into the settings, just go all the way down to advanced features, screenshots and screen recordings. Here you can hide the status and navigation bar from the recordings, which I think is nice. It's just less distractions on the screen. You can also set it to delete after sharing. So if you do a screen record and send it to someone straight away, it will delete that screen record. Assuming that you don't need it, it's entirely up to you if you want to do that. The other thing you can do is adjust the quality of the screen, record. And there are various other settings here that you might want to look at. So, definitely familiarise yourself with where the screen record is and how to use it and the options that are available to you.
Snoozing Aint losing... Sometimes
It's a noisy world. There are a lot of distractions, and you know just what notification. And next thing you know, you could be spending four hours doomscrolling through TikTok or Instagram. So here's a little trick to help you go to settings. On the left side, we're going to go to notifications. On the right side. If you go to Advanced Settings here you will see the option to show the snooze button. Now, when you get bombarded with social media notifications going off, if you swipe down from the top, you'll see the notifications.

If you span them, you can hit the little snooze button right here and choose how long you want the notifications to snooze. For now, there is another feature which I want to show you real quick while we're here. If we go back one step and go to Sort and Filter notifications, you get a new menu. So, the setting I recommend you switch on here is the minimised notifications. So your phone will learn and gradually filter out categories of notifications instead of just showing you all of them individually. So as you start to receive notifications, you will see more options available as opposed to actually seeing the thumbnail and everything.
Protect yo-self
I've saved some really important day one things to do when it comes to protecting your investment. Just think how your wallet will feel if you lose your phone. So jump into your settings. On the left side, we're going to go to security and privacy. Turn on app protection. If you have it in your region, I recommend you switch this on. It is provided by McAfee. Essentially, it's a virus scanner for apps and software being installed on the phone and at any time, you can scan the phone to see if there is malware already installed.

And this typically will only happen if you're installing stuff from third-party sources, not in the Play Store, and not the Galaxy Store. So if you have the app protection available, then definitely switch it on on day one.
Tea Leaves = Thieves
Staying within the Security and privacy menu, here we're going to go to Lost Device Protection. And you should see the Find My mobile with a green tick next to it. If it's not showing that then definitely look at that. But there is something here that you should switch on. And day one this off. By default it's there's theft protection. There are a bunch of features here that you need to look at. First of all, identity check. So if you set this up, it will require your biometrics in order to make changes to the device, which is really important. You can also set up safe places, for example, your home address, here. And this just gives you an extra layer of security. Now this is the important one, the theft detection lock. So this allows the phone to use the sensors to detect if it's been swiped out of your hand. And someone's riding off down the street with it on an electric bike.

So turn this on. And then if that does happen, it will auto-lock the device for you. Also, go to the offline device lock. Turn this on. This gives you the ability to lock the device remotely. And then you've also got remote lock here as well. Switch this on. Now, while you're on this page, the link is right here. Copy that and email it to yourself. If someone has stolen your phone, you need to get to this website quickly to lock it. And also one more step to this. And this is very important. If we go back, go to the Find my mobile section, switch on send last location. So if somehow they do manage to switch the phone off, the last location will be there. And there is one more step. I know it's a bit of a pain, but go to the website, which is
Samsung.find@samsung.com, copy this web address and email it to yourself, just like you did with the Google Device Lock feature, and make sure you give that email a memorable title so that you can find it very quickly if worst comes to worst.
Don’t be phish Food
Remember how we set up the secure WiFi here within the settings? If you tap on that and activate this for the first time, I recommend not leaving the Auto Protect on because that means it will just switch on whenever it feels like it. What it is is essentially Samsung's own VPN service. So if you are connecting to public hotspots in cafes or train stations or airports, then this is when you want to use this.

You get one gig for free per month, and if you want to upgrade it to the unlimited option, just tap here, and you can set that up to use the secure Wi-Fi whenever you need. It is very easy now, just swipe down from the quick settings. Swipe down again, go to the secure Wi-Fi here, tap it, and that turns it on.
Keep it Secret, keep it safe
Another hidden feature within the quick settings is the Secure folder. So this is very, very handy if you need to store private files and documents and maybe even like passwords and things like that. If you don't want to use a password app to access it, you can swipe down to the quick Settings secure folder should be right here or wherever you've placed it. Activate it for the first time. This will require a new password, a new PIN number. You can also use your fingerprints. So once you've got this set up, essentially, you've got an operating system within the operating system which works independently. So the apps here are not connected to the apps on the main screen. You can add more stuff just by hitting the plus.

So once you've got your secure folder activated, here's how you can quickly move files into it. For example, let's say a photo. All you need to do is hit the three dots in the top right corner on the photo, and then you'll see the option to move to Secure Folder. And there we go. That's how you move an image. So let's say you want to move a file. What you can do is I'm just going to go to downloads. For example select a file here and then see the three dots in the bottom right corner. Tap that and you'll see the option here to move to Secure Folder
Be ready, so you don’t need to get ready
Now this is very, very important. Do not skip this during the initial set-up. So if you go into your settings Safety and Emergency this entire section you should look at carefully. So first of all medical information, if you do know your specific blood type and maybe you have allergies and things like that, you definitely want to fill this out as best you can on day one. This is very, very important for emergency contacts. So add all of your friends and family who could help you.

So if you go to emergency SOS, if you click the power button five times, it will send an SOS emergency number. That it will call. You can also take this box here to send an S.O.S. to your emergency contacts. Also, who might be even quicker to get to you than the police. So maybe you might want to shout out. And the last thing to look at here is emergency sharing. Again, add your trusted contacts here. So once you set this up, if you do push the emergency five button, push on the side because something's happened, you can actually choose to send pictures and also audio recordings of what's happened when you sent that emergency S.O.S..
Track the tracker
All right, now here's another really cool tool that this phone has. So if you go to Safety and Emergency again at the bottom, you'll see this unknown tracker alert. Now what this can do is scan around you to see if there are any Apple AirTags or other tracking devices around you. And once it finds them, you can ping them so you can figure out where they are.
The reason this is important, especially if you have a nice car, sometimes people will attach AirTags to vehicles that they want to come back a steal later, or maybe someone try to track you without you knowing. This is a tool to prevent that from happening. So now that he's found these AirTags, I can pick one. And then if I want to, I can make it play sound. And the one that is pinging is probably the one in my camera bag right now. And there's a bunch of other guidance here. If you do think you are being tracked with one of these tracking devices.