
OnePlus 15R - 15 Settings You Need To Switch On! ( Beast Mode )
If you have a OnePlus 15 or 15R, I’m about to reveal 15 settings that are switched off on day one that will instantly level up your device’s performance and capabilities once you turn them on. If you haven’t changed these settings yet, you might be like… what?! when you see what they are — but don’t worry. Follow along, because you’re about to unlock your OnePlus 15’s beast mode. And if you stick around, I’ve got some good news for you OxygenOS fans.
PIXEL UPGRADE
Let’s kick this off by upgrading the part of the phone that you look at every day: the display. I’ve added Settings right here on the home screen, because we are going to be using this a lot throughout this guide. If you're completely new to OxygenOS, there are a couple of ways you can access Settings. You can either find the Settings app in the app tray or you can swipe down from the top right corner and tap the Settings icon.
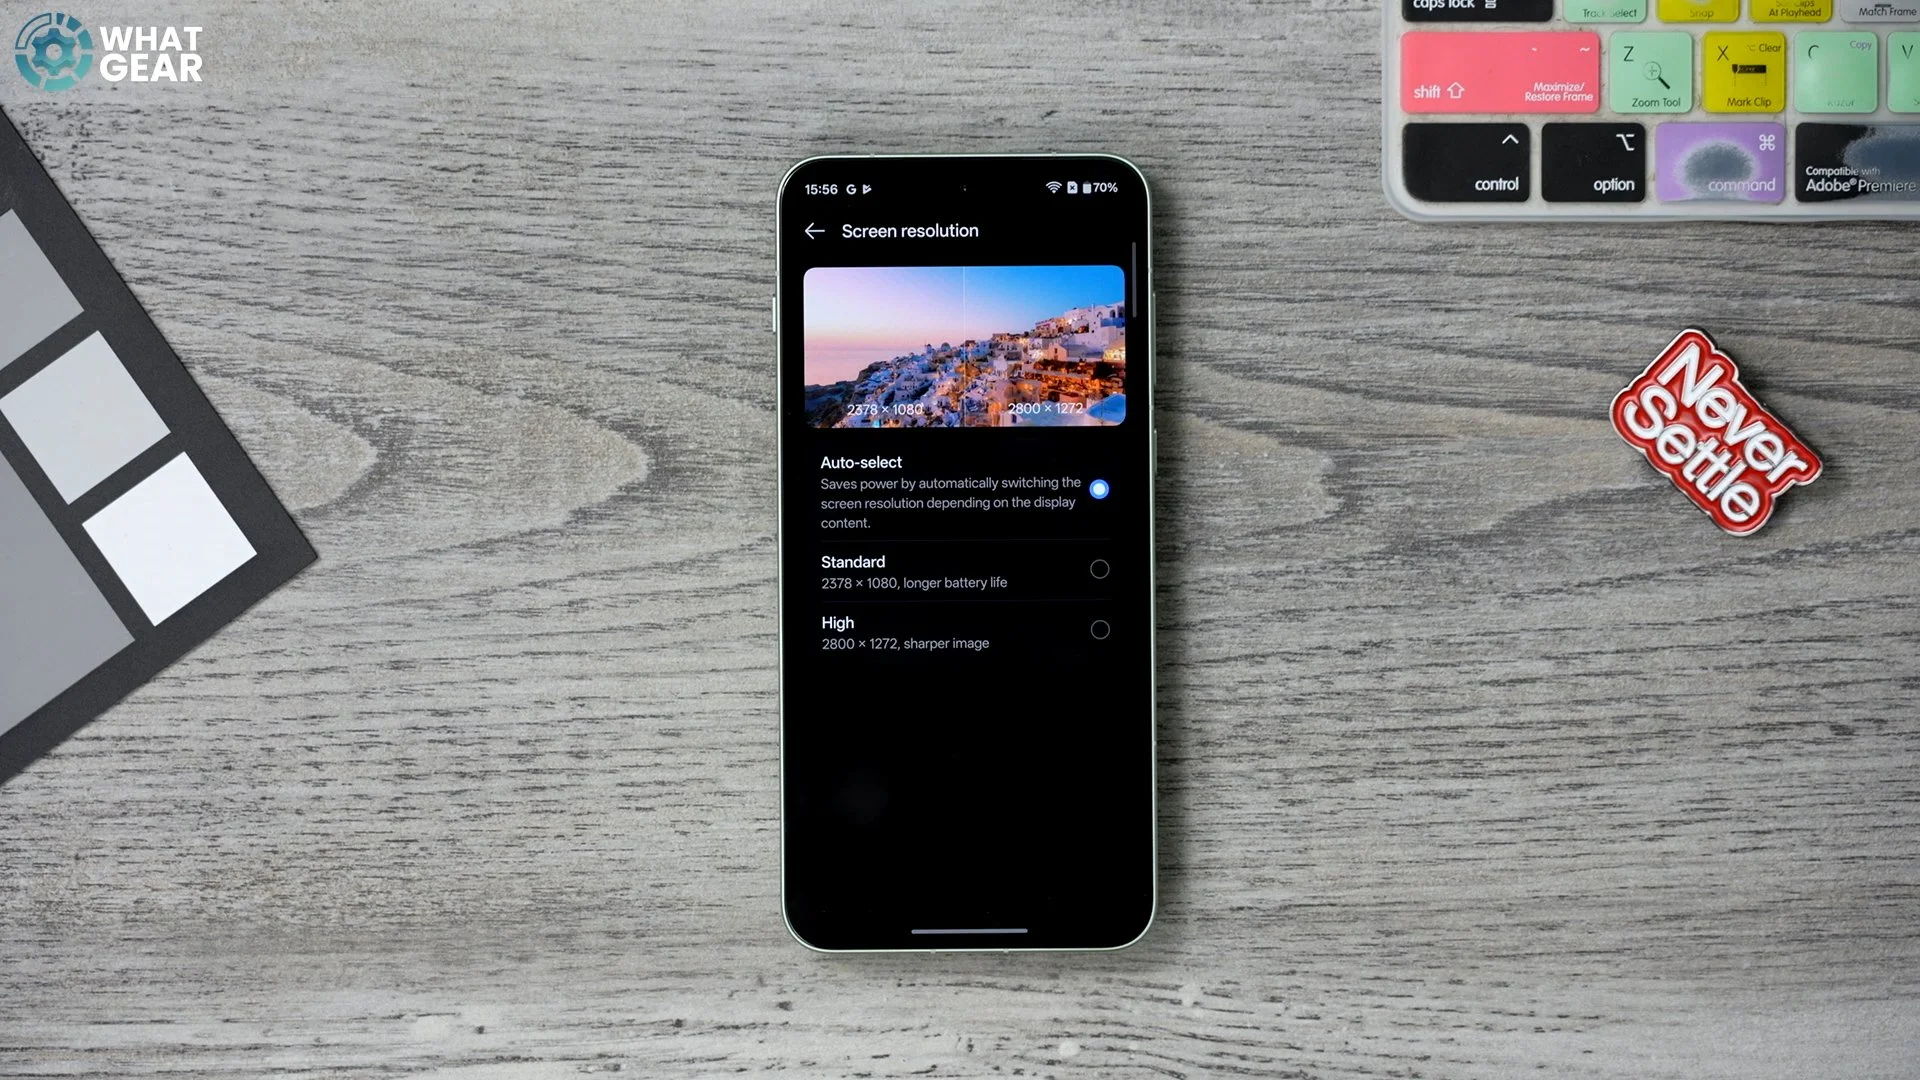
Once in Settings, scroll down to Display & Brightness. People might not realise this, but the display is not actually optimised out of the box to deliver the best possible picture performance — so that’s what we’re going to change. Scroll down to Screen resolution. Right now, it is set to Auto select, which is fine for power efficiency. But if you want optimal display performance, set this to High. This way, you get the maximum pixel count. And this phone has a huge battery, so battery life isn’t really a concern with a phone like this. Later on, if you need even more juice, you can scale this back. But for day one, I recommend you change this.
SPEED UPGRADE
Now let’s improve it even more. Go back into Settings → Display & Brightness, and this time scroll down to Screen refresh rate. This phone has one of the best and fastest displays you can get in this price bracket, but it won’t run at its fastest speeds 100% of the time — which, again, can be good for battery life. But if you want absolute peak performance, set it to High. With this enabled, whenever your phone detects a game or app that supports 165Hz, it will use that maximum speed.
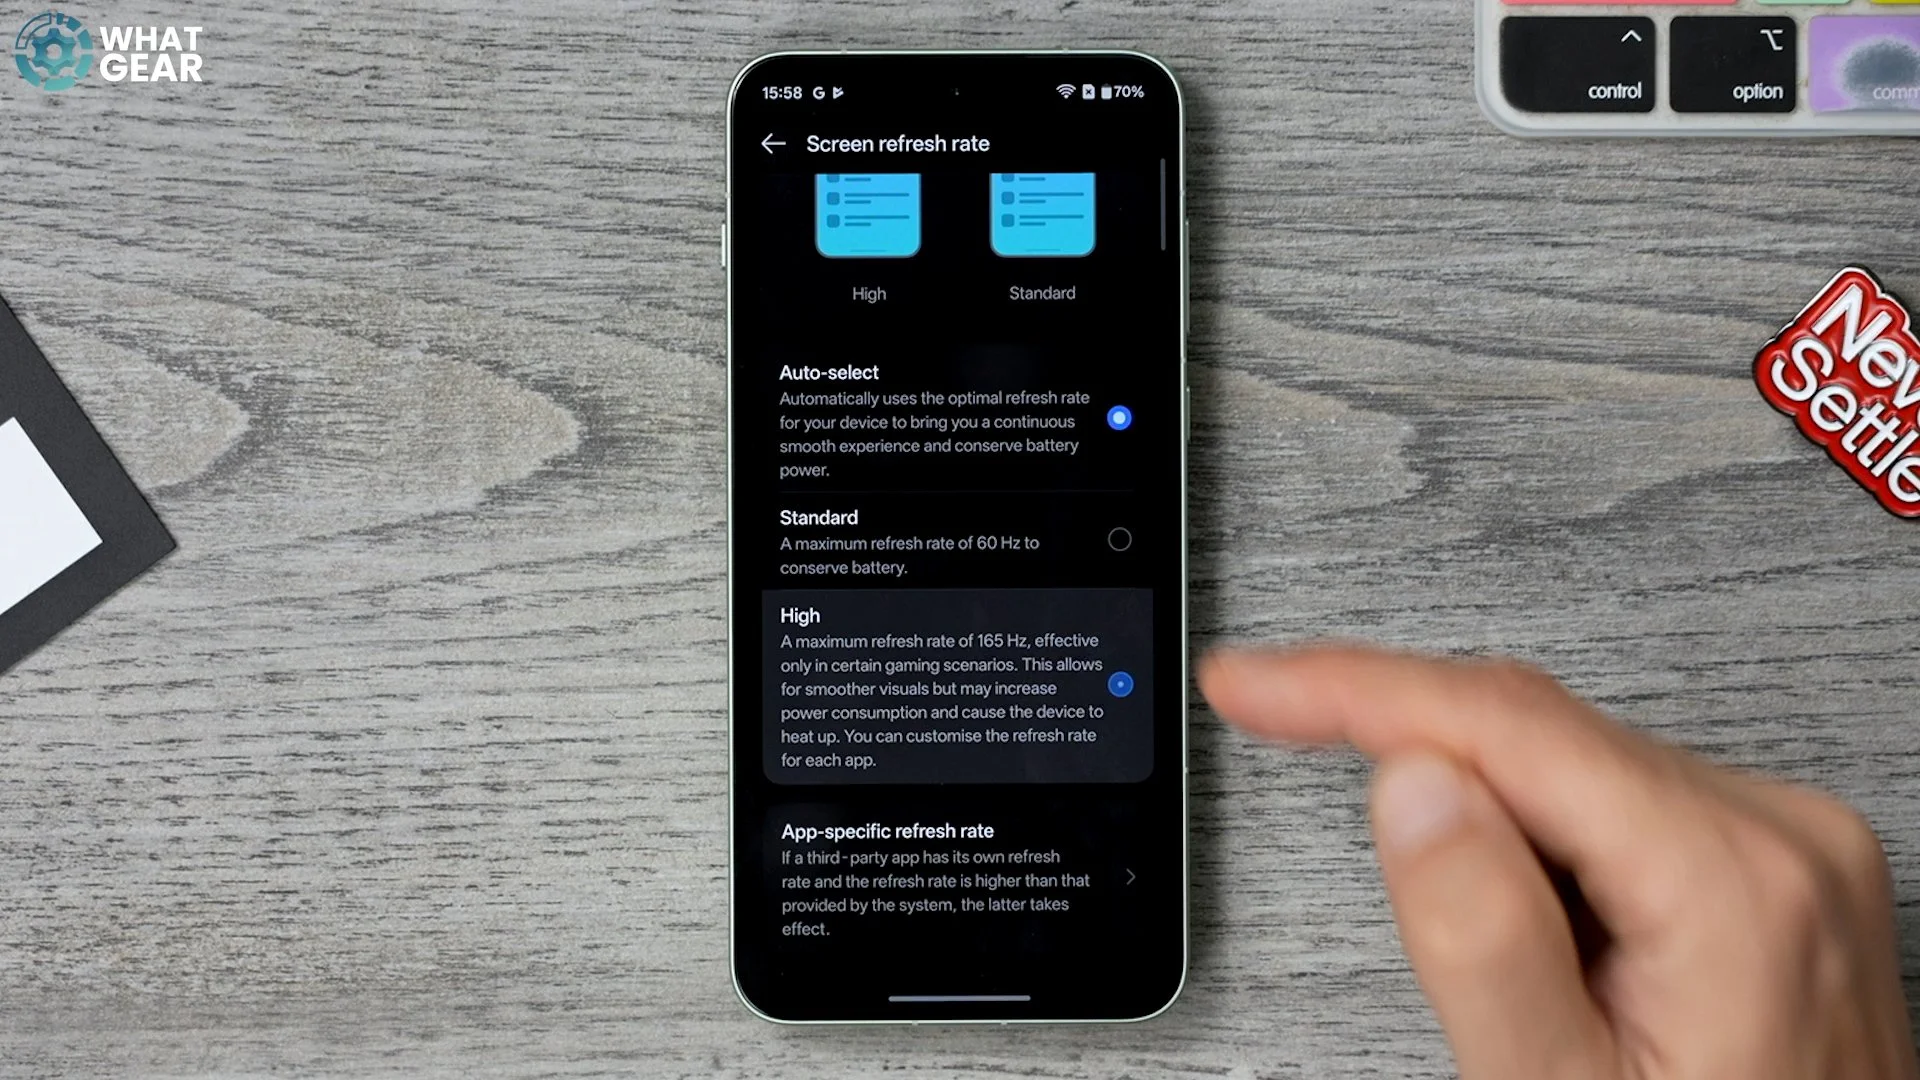
And if you want to go real pro with this, go to App-specific refresh rates. Here you can choose which apps have access to 120Hz (the default when set to High). For less demanding apps where you don’t care about refresh rate, you can scale it down to 90Hz or 60Hz. That way, even though your phone is set to the highest refresh rate, you can still optimise battery use per app.
COLOUR UPGRADE
This next setting upgrades your display so it works more dynamically based on your surroundings. Go back to Settings → Display & Brightness. On this page, I recommend leaving Auto Brightness on. I’ve got it off for this video, but the setting that is switched off by default — and that you should switch on — is Adaptive tone.
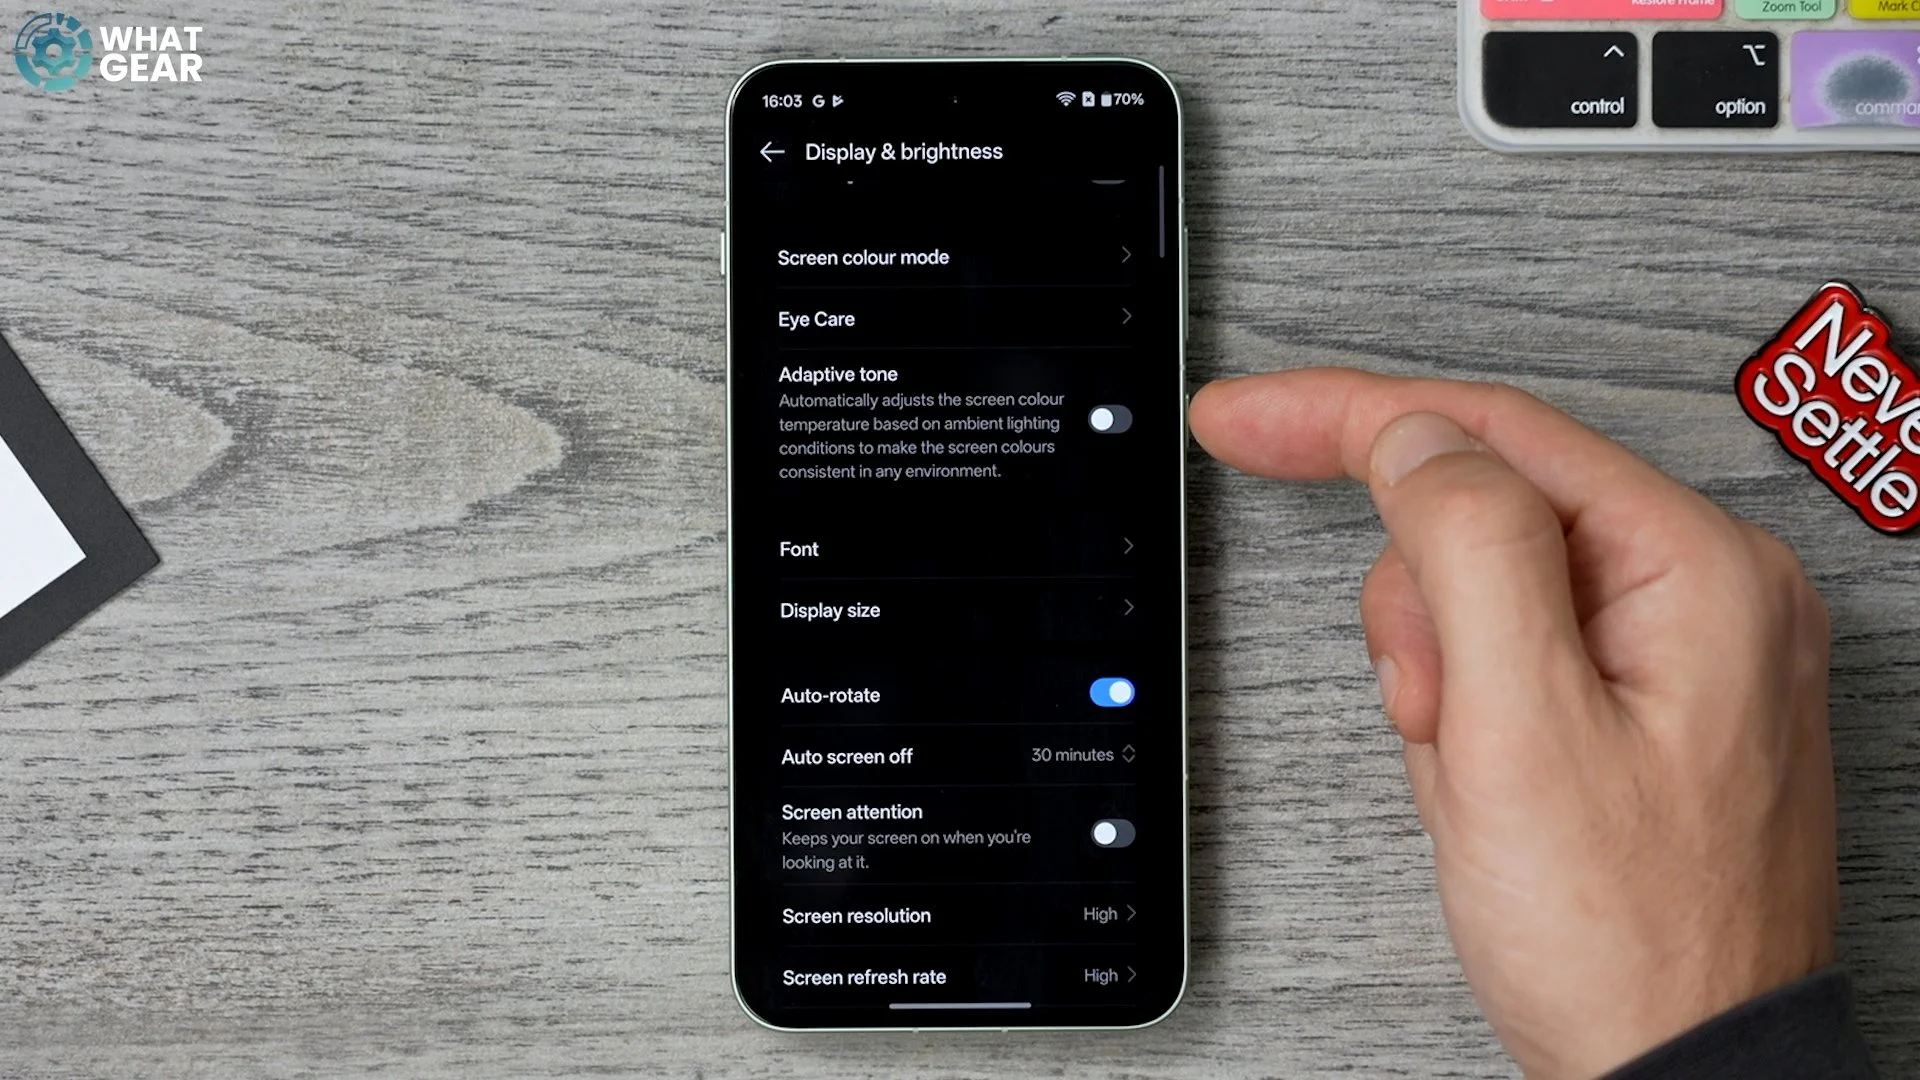
This allows the phone to adjust the colors of the display based on the lighting in your environment. It can make the phone gentler on your eyes and sometimes more consistently accurate when it comes to colors.
EYES ON
Sometimes when you use your phone and don’t touch the screen for a while, it locks — even if you’re still reading something. Isn’t that annoying? Go back into Display & Brightness, then scroll down to Screen Attention. This is switched off by default. Switch it on.
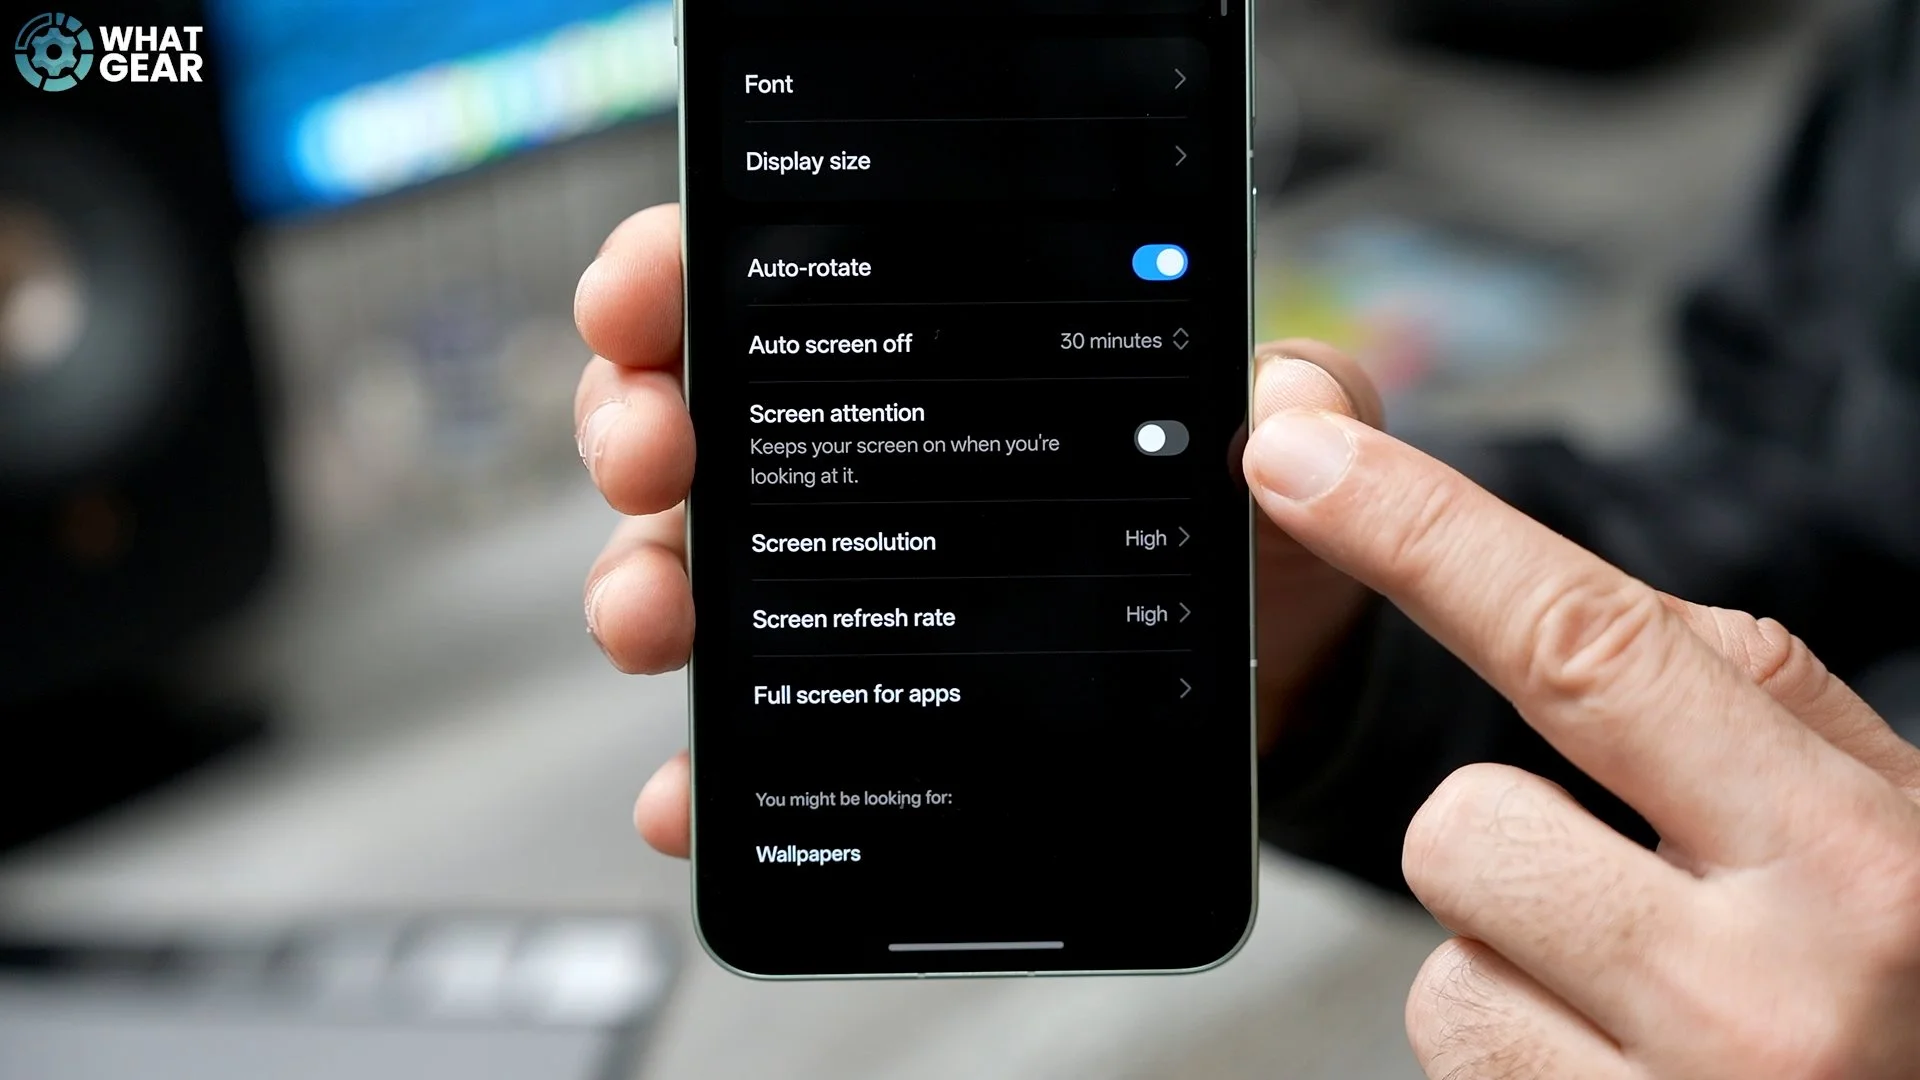
With this enabled, your phone can use the front camera to detect when you're looking at the screen. Even if your screen timeout is very short, it will keep the display on while you're viewing it. That’s a nice day-one setting to enable.
QUICKER CAMERA ACCESS
You might already notice this, but the OnePlus 15R uses the same primary camera sensor as the flagship model. But did you know that some settings out of the box hold back max usability? I don’t know why either — but I do know how to unlock it. Go into Settings, scroll down to Accessibility & convenience, then scroll down to Power button.
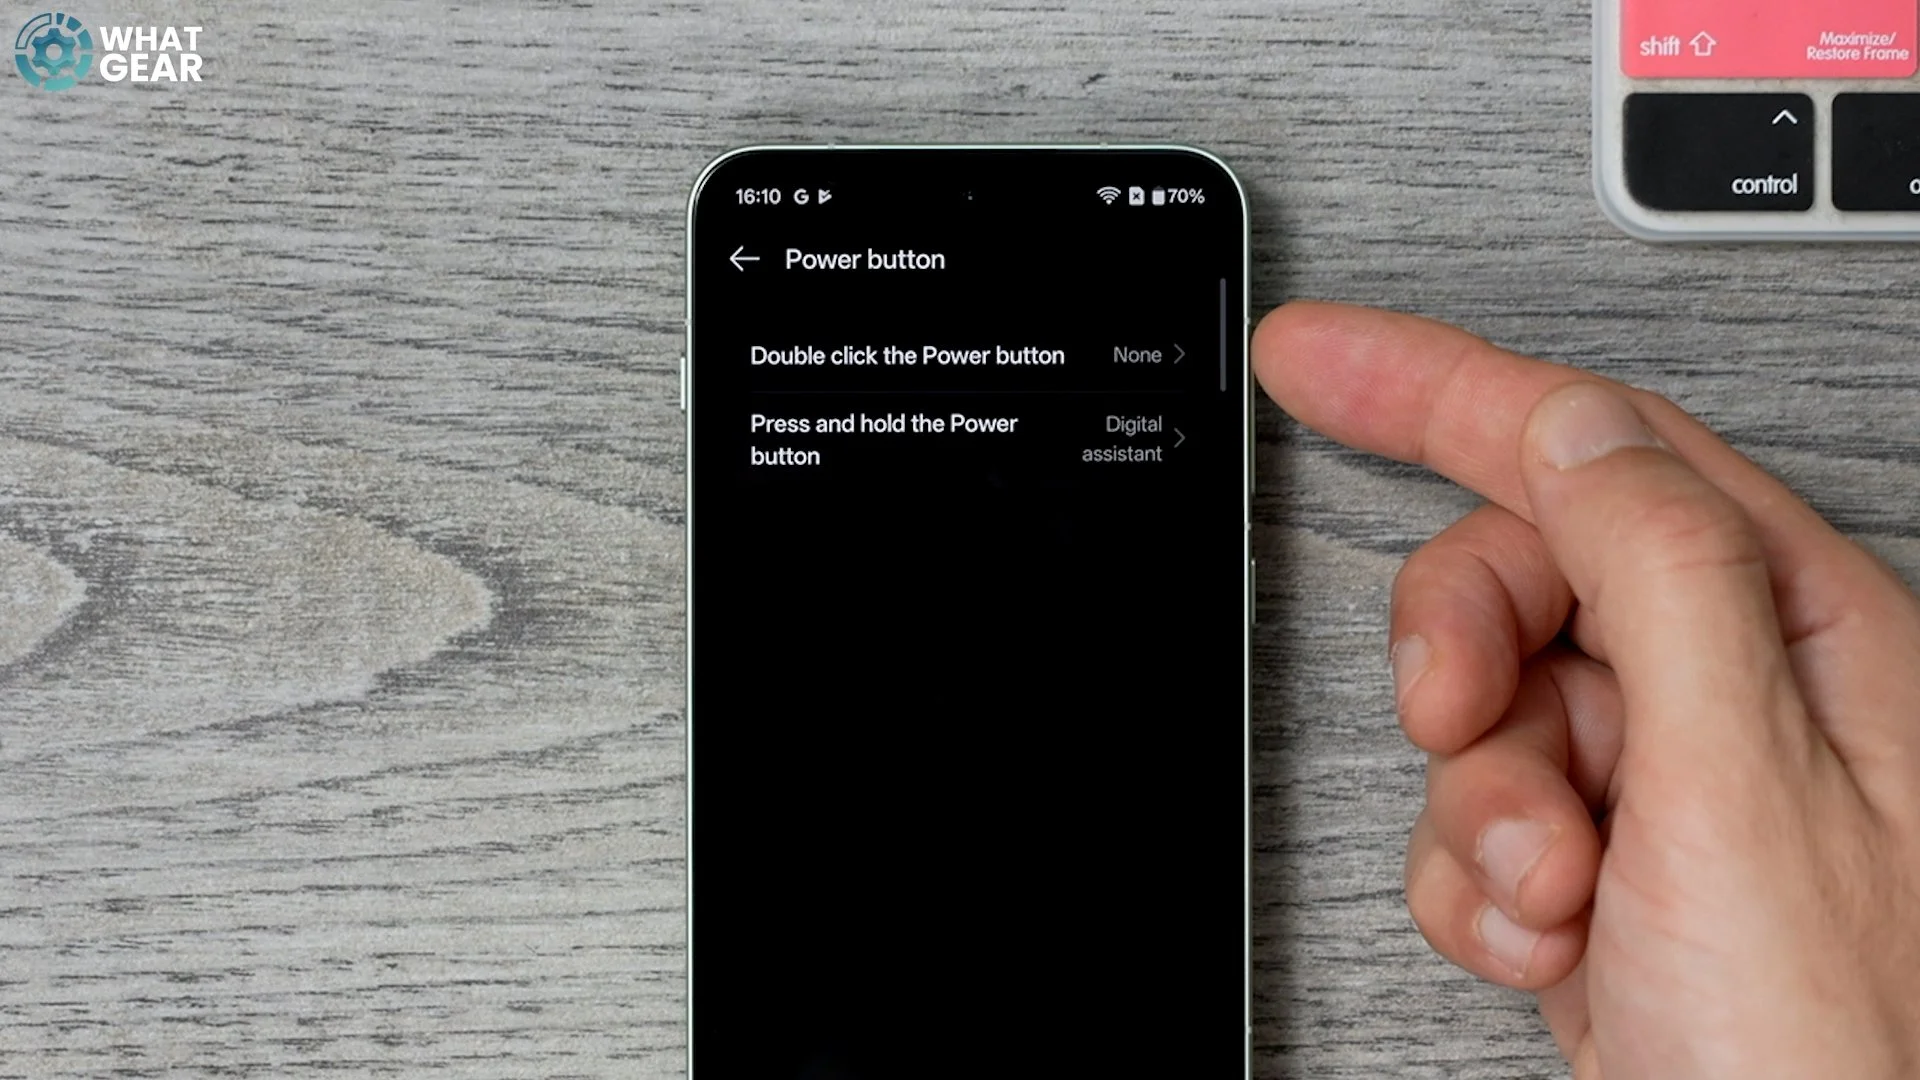
On this page, you’ll notice that double-clicking the power button is not mapped — it says None. Tap it, and map it to the only option available: Camera. This is super handy when your phone is locked or unlocked — double-tap, and you jump straight into the camera. And I know some of you are thinking, “Why not just use the Plus Key on the other side?” Well, I’ll show you a better use case for that later.
PHOTO QUALITY UPGRADE
Now let’s improve camera performance overall. Open the Camera app, tap the three lines in the top right corner, and go to Settings. These are camera-specific settings and aren’t available in the regular Settings menu. Go to Formats. If you haven’t changed this yet, you might be kicking yourself, because by default Photo quality is set to Standard, not high resolution.
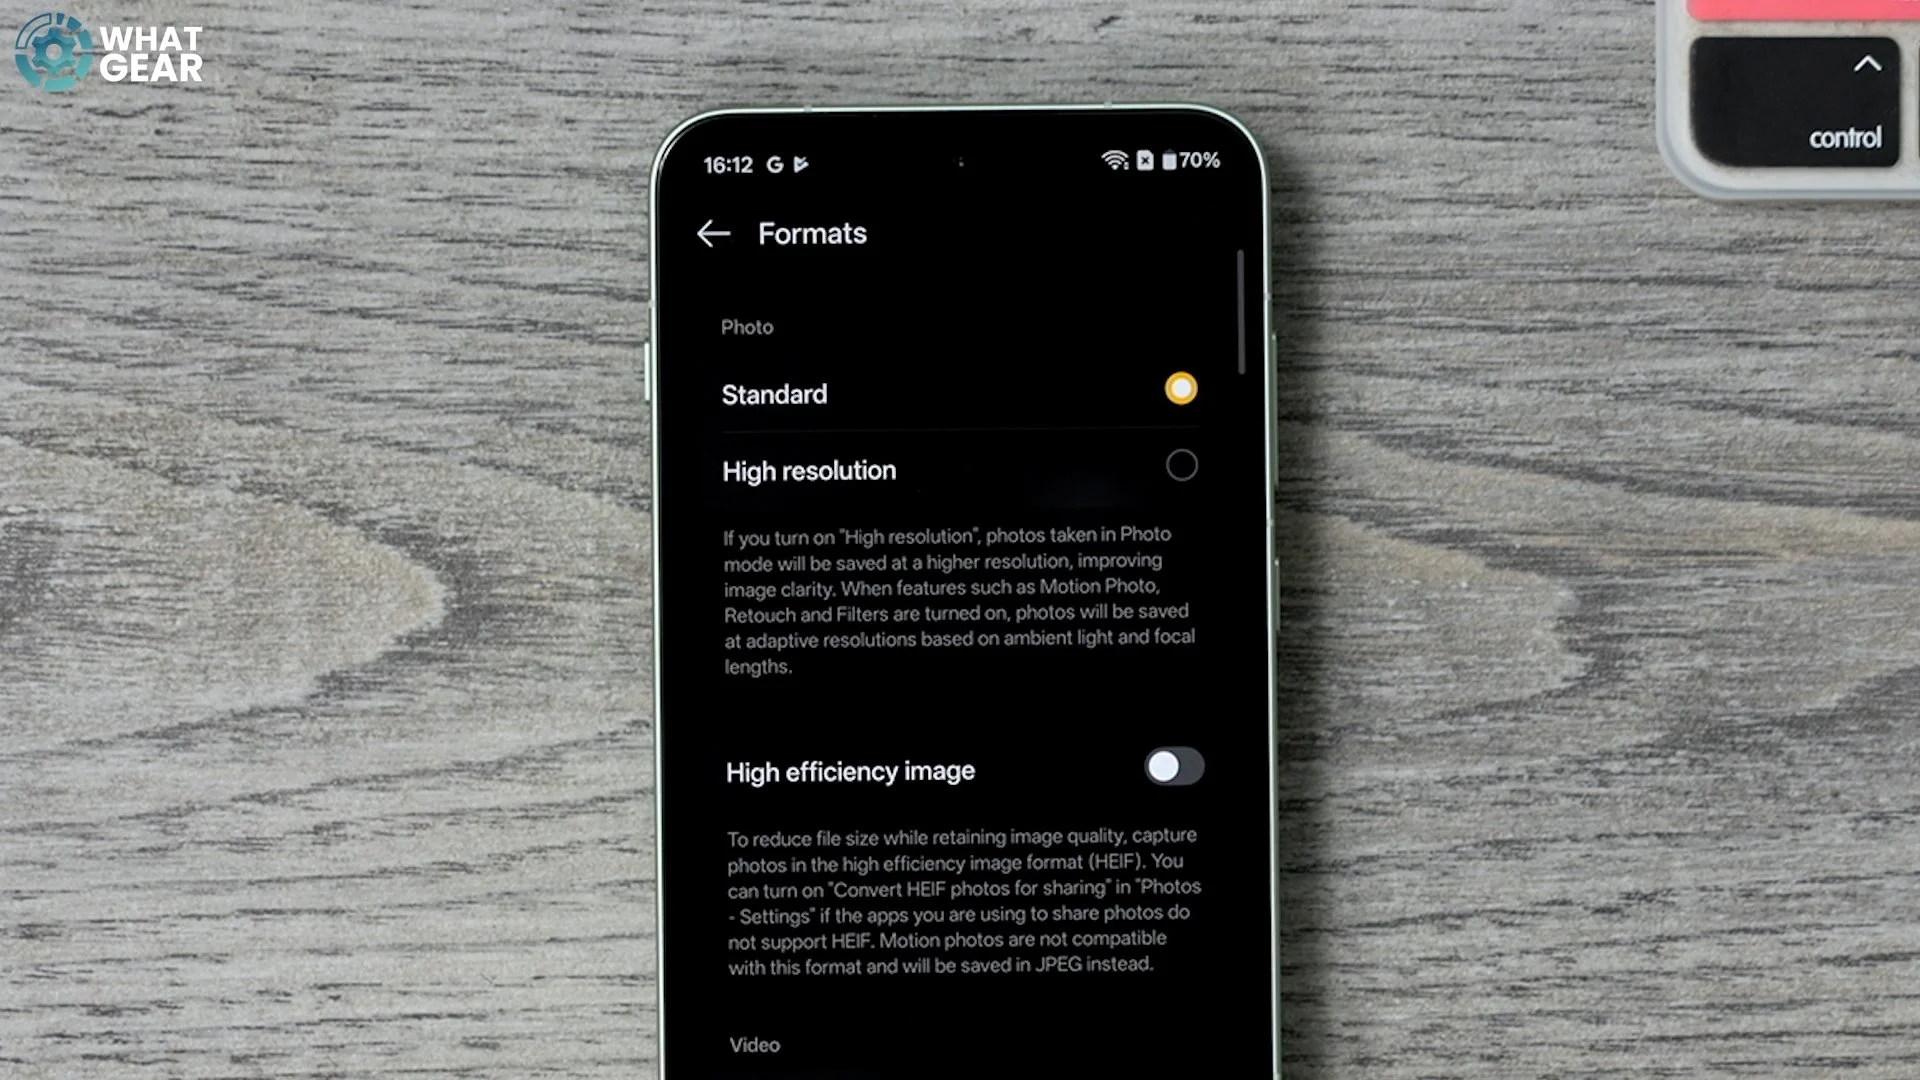
Switch it to High resolution. Yes, this can increase file sizes, but it’s worth it. The phone won’t always use the highest resolution — it may default back to adaptive resolution depending on lighting — but with this on, most of the time you’ll get the best image quality when taking photos.
VIDEO QUALITY UPGRADE
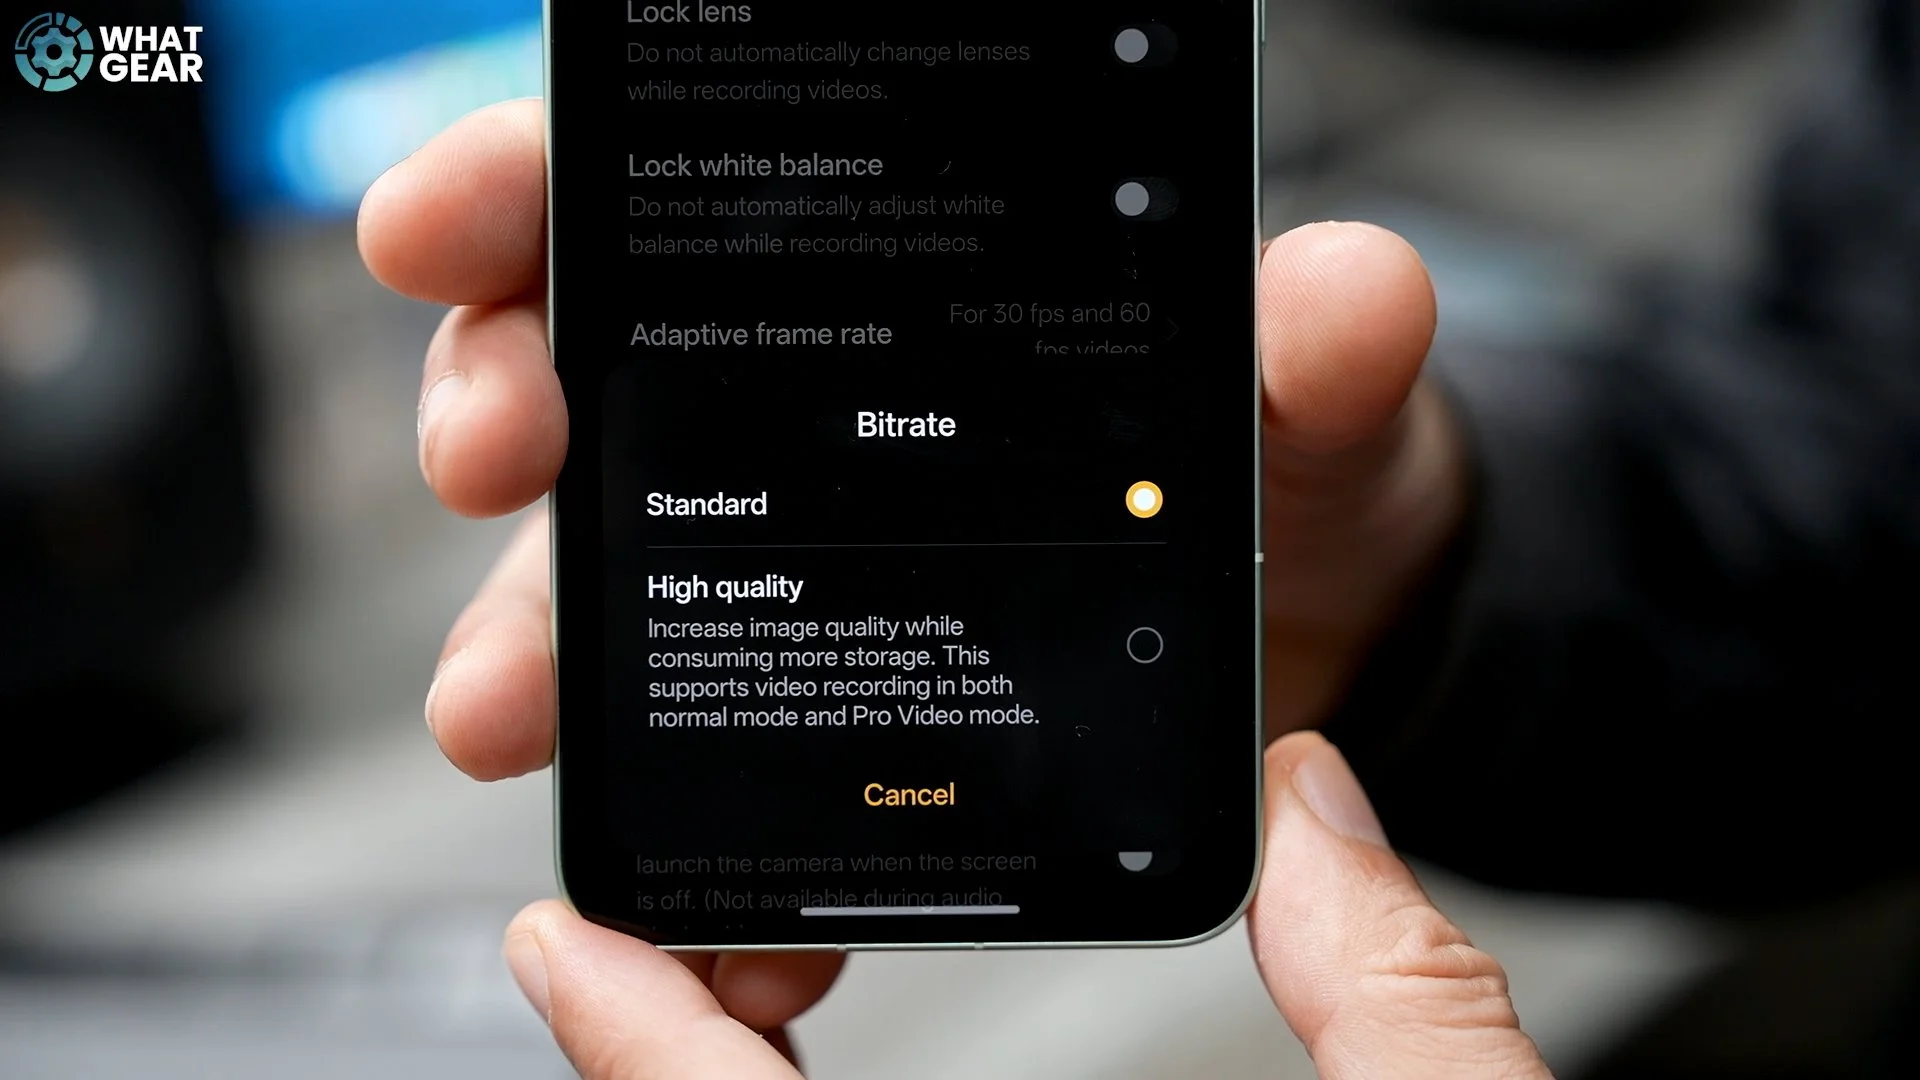
Stay in the camera settings, but go back one step to the main page. Scroll down until you see Bitrate. Again, it’s set to Standard by default. Tap it and set it to High quality. This improves video quality not only in Pro Video but also in normal video recording. The only downside is larger file sizes — but that’s a good trade-off for better recordings. Now we’ve improved photo and video using the rear cameras.
SELFIE FEATURE UPGRADE
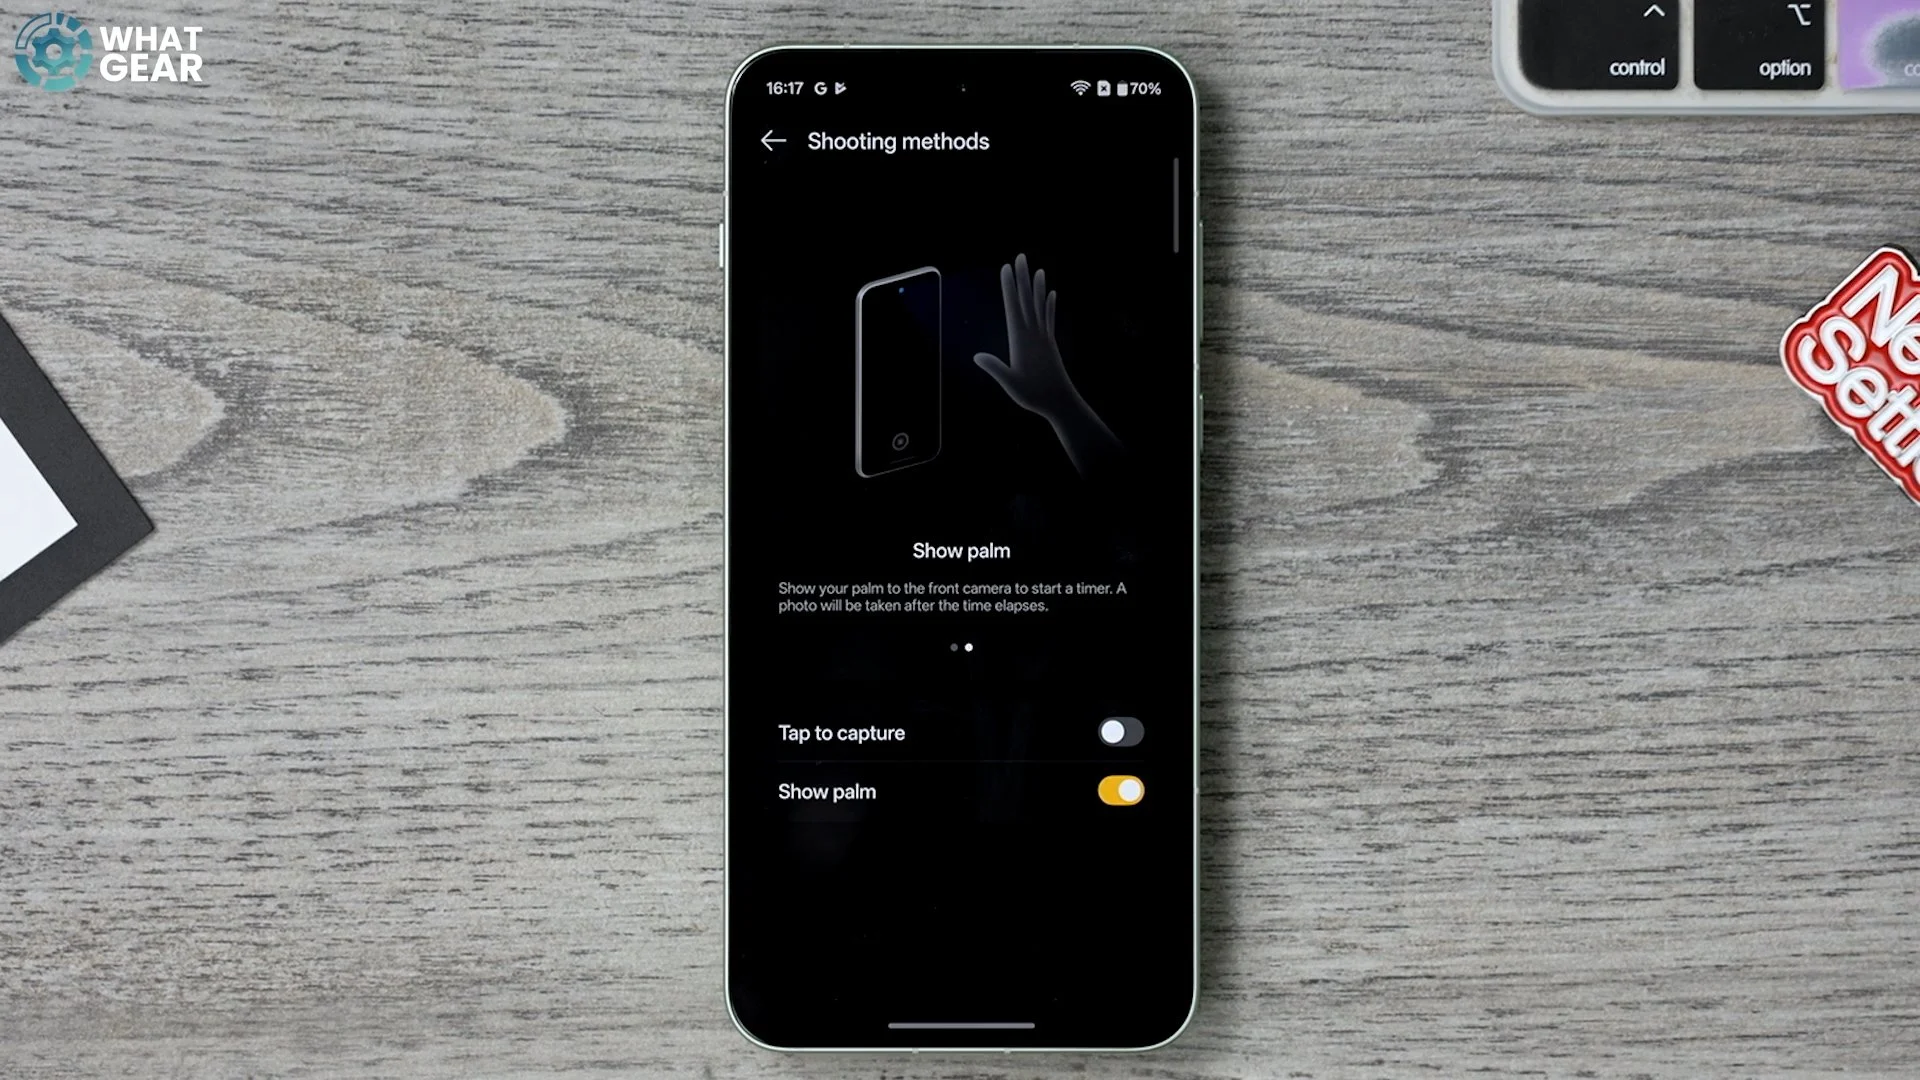
Let’s improve selfie usability. Go back into the Camera settings, then find Shooting methods. You’ll notice the Show palm is switched off. Enable it. This is fantastic for selfies: instead of reaching for the shutter button, you can simply show your palm to the camera, and it starts a countdown to take the selfie. Super, super handy. See what I did there?
BETTER BATTERY HEALTH
Your OnePlus has a cutting-edge silicon nano-stack battery with charging speeds that are basically double an iPhone (at the time of this video). But it won’t reach its full potential unless you change a couple of settings — and I know some of you worry about battery lifespan when maxing out charging. These next two tips help you get the best balance between charging speed and battery health.
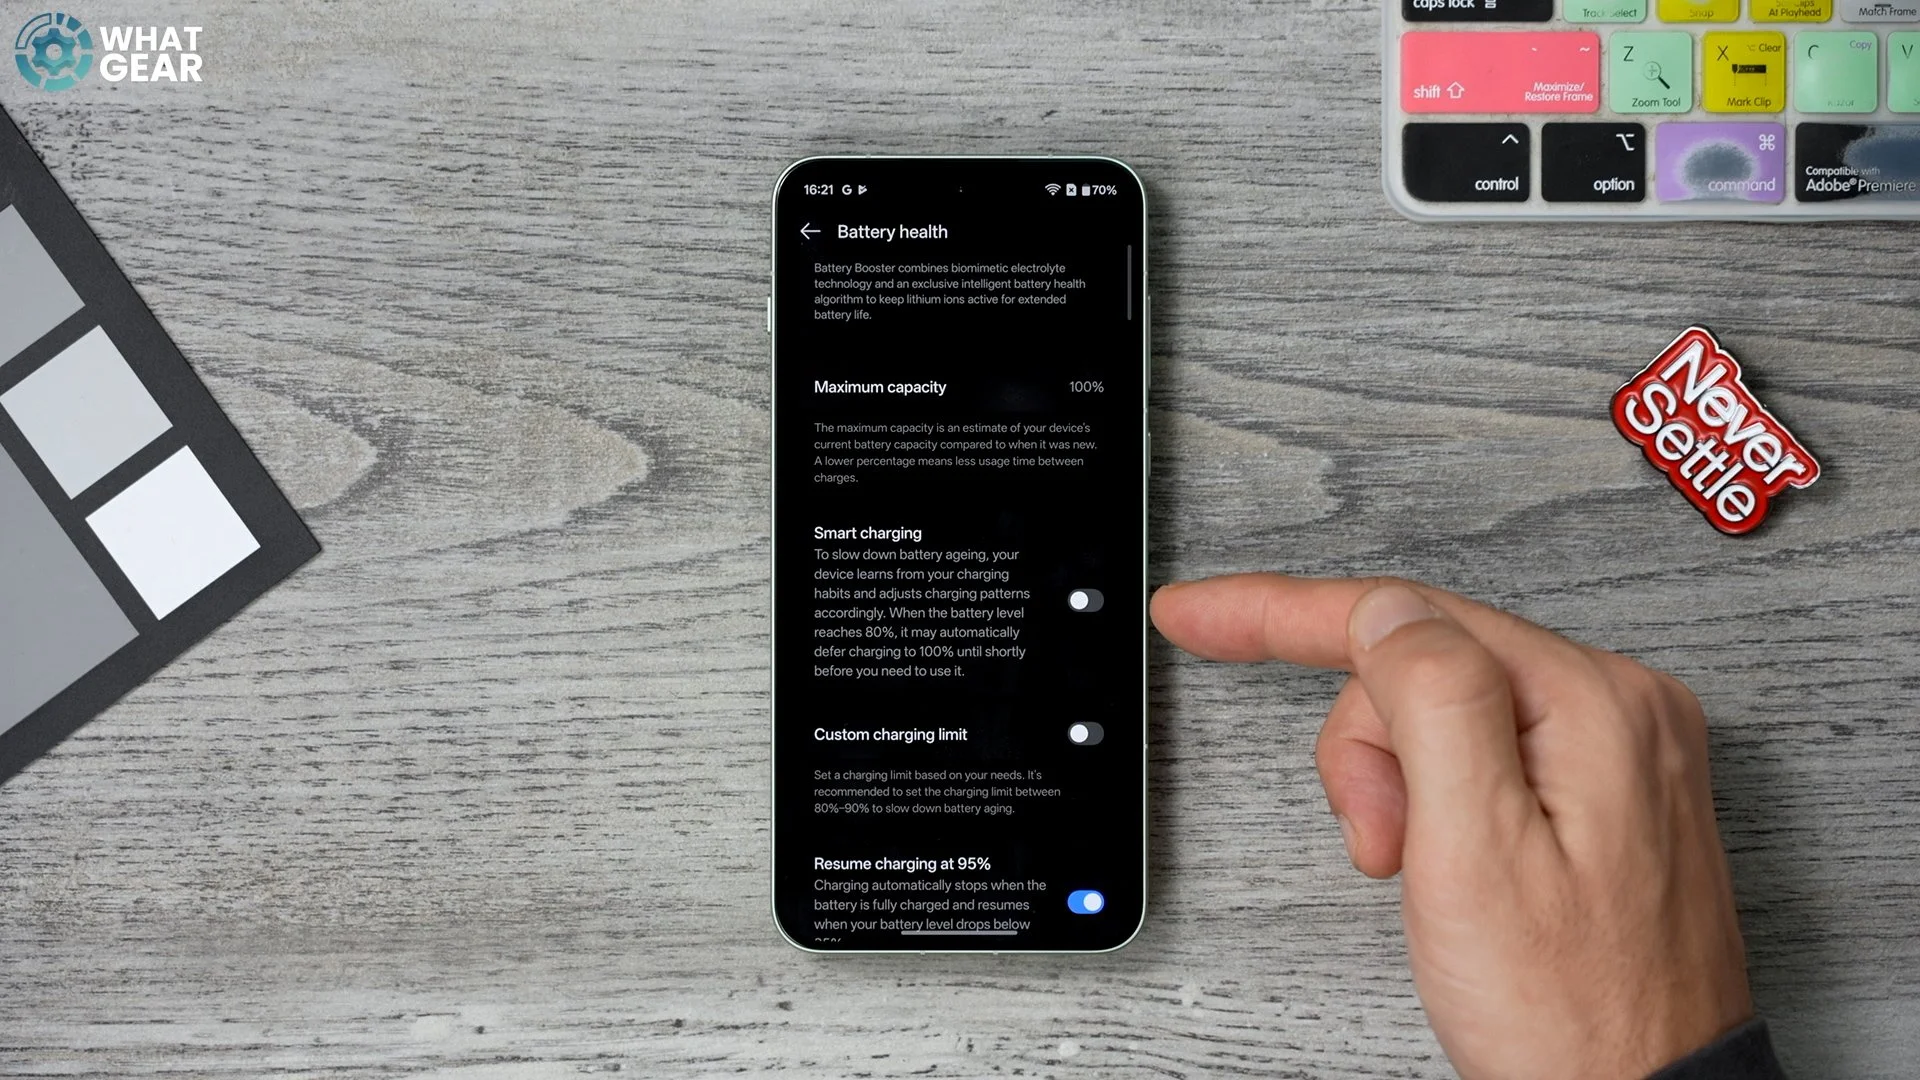
Go into Settings → Battery. Scroll down and enable Smart charging (it’s off by default). With this on, your phone learns your charging habits. If you charge overnight, it charges to 80%, then times the final 20%, so it finishes right before you wake up. Switch it on day one, and you’ll be glad you did later.
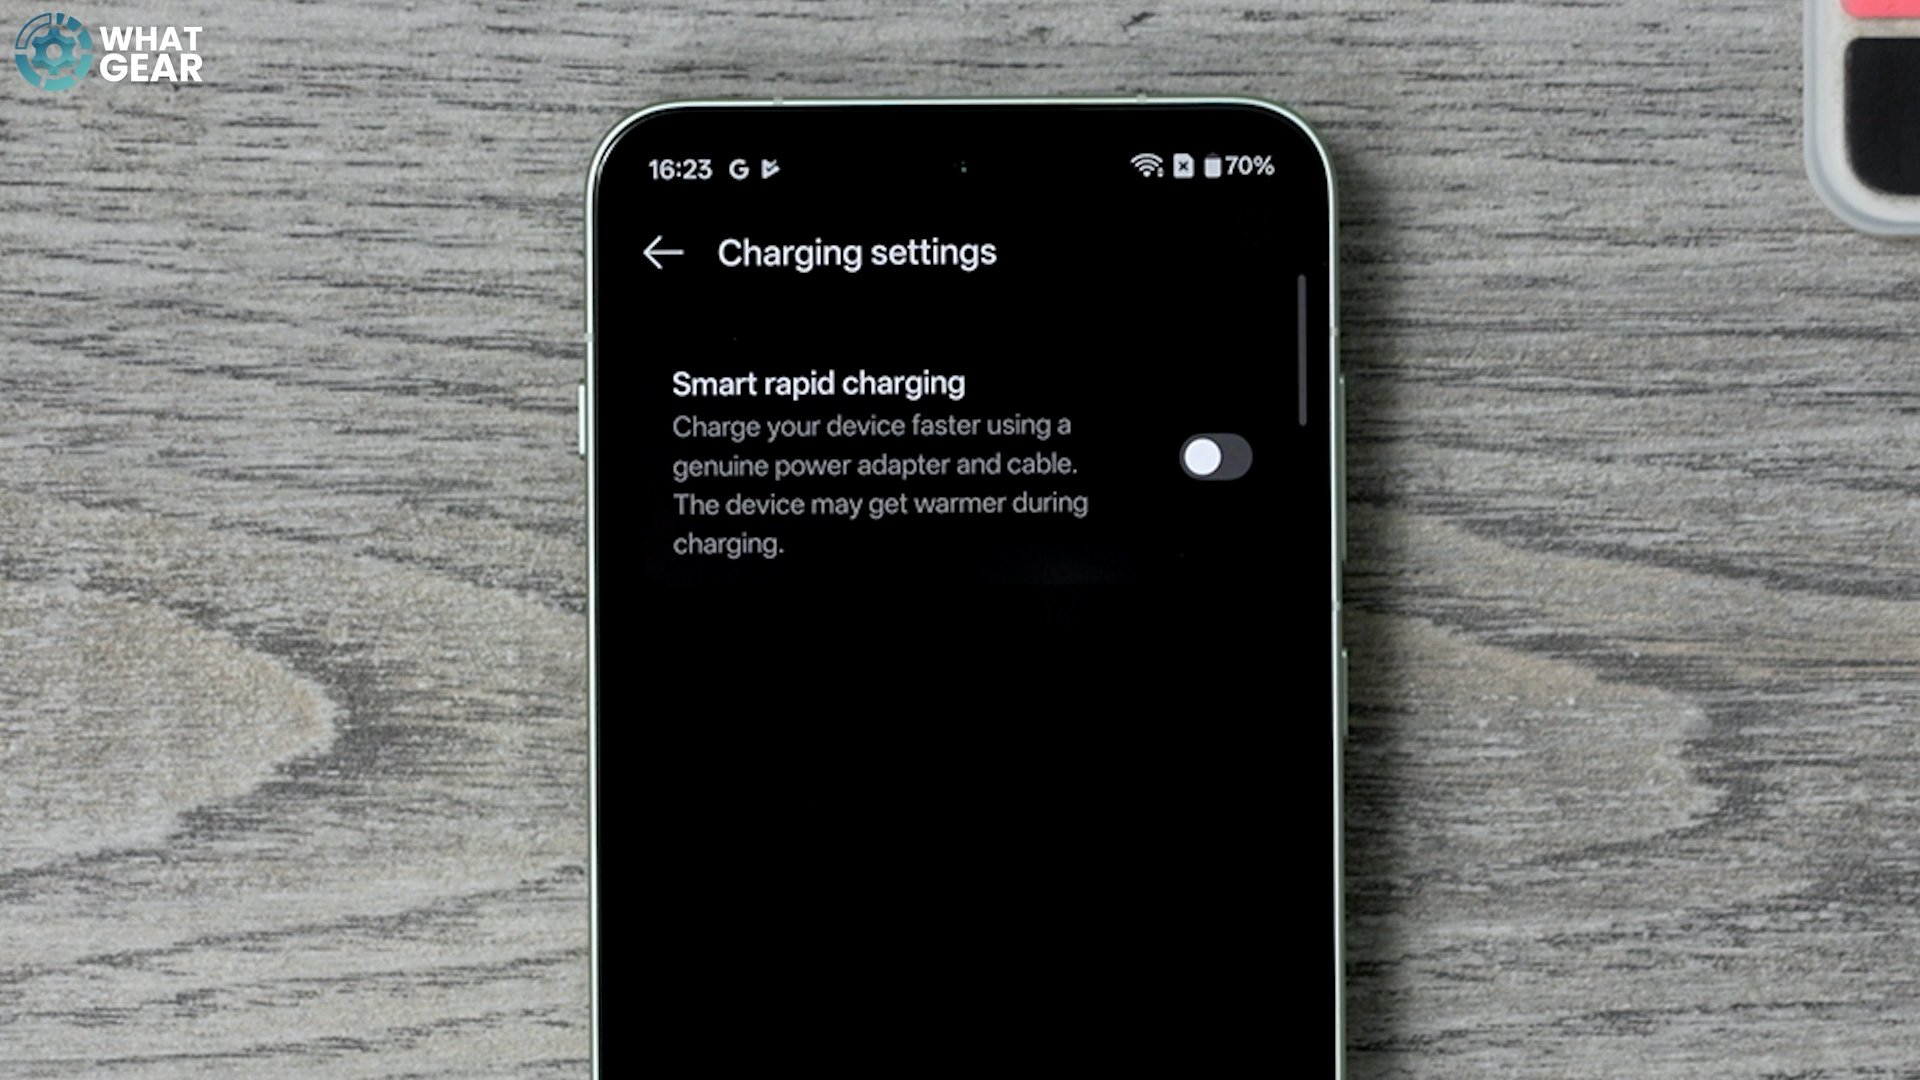
SAVE TIME CHARGING
Still in Battery, scroll down to Charging settings. Enable Smart Rapid Charging (also off by default). With this active — and using the right power brick — you’ll get the fastest charging speeds, and it does it intelligently so it’s not constantly redlining the battery. It warns that the phone may get warm. If you don’t care about that, switch it on.
SECURITY UPGRADE
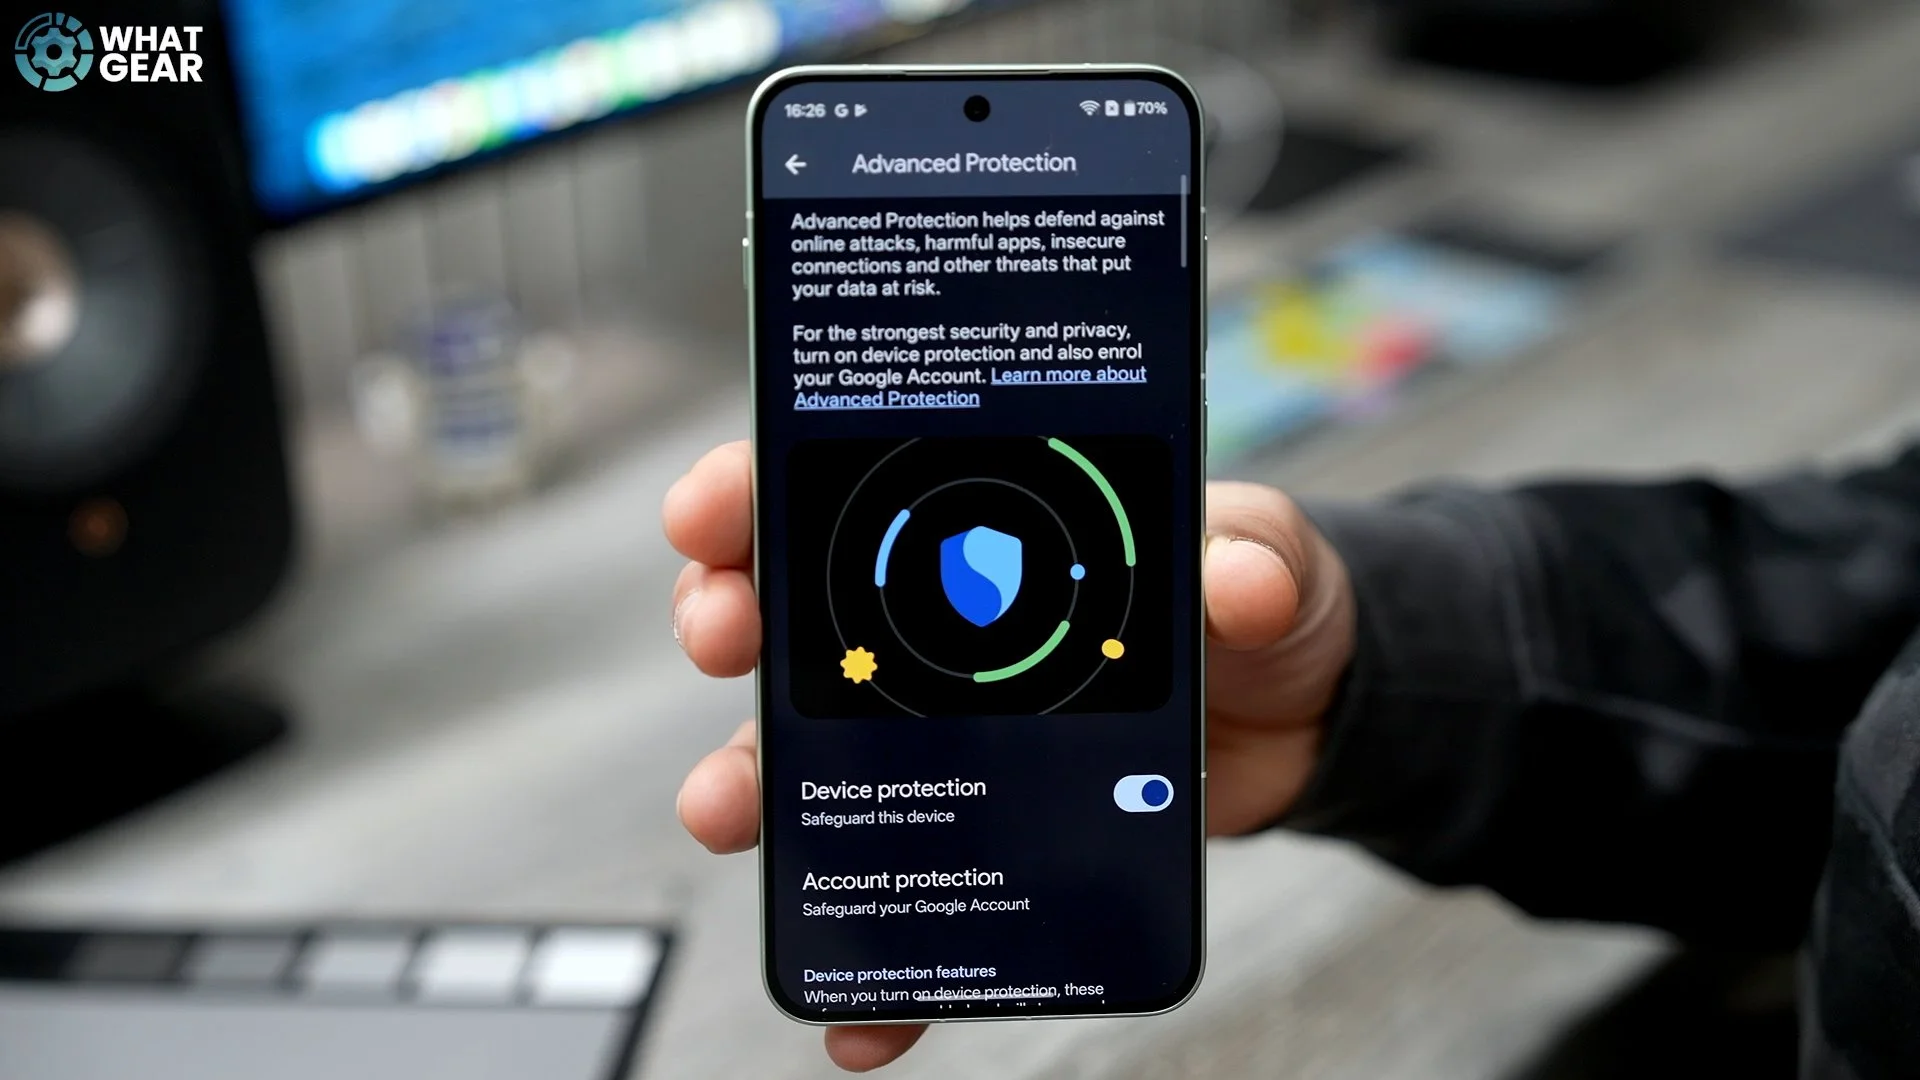
Did you know your OnePlus has hidden security settings to help protect you from getting hacked? No one wants that, right? Go to Settings → Security & Privacy. Don’t get a false sense of security just because it says everything looks good at the top — because Advanced Protection might not actually be on. Tap See details, scroll down, and enable Device protection. It might seem like a simple setting, but once enabled, it activates multiple protections to keep your device safer.
MORE PRIVACY
Here’s a feature that keeps your phone more private and shielded from prying eyes. Go to Settings → Notifications & Quick Settings, then scroll down to More settings. At the bottom, you’ll find Smart notification hiding, which is switched off. Enable it.
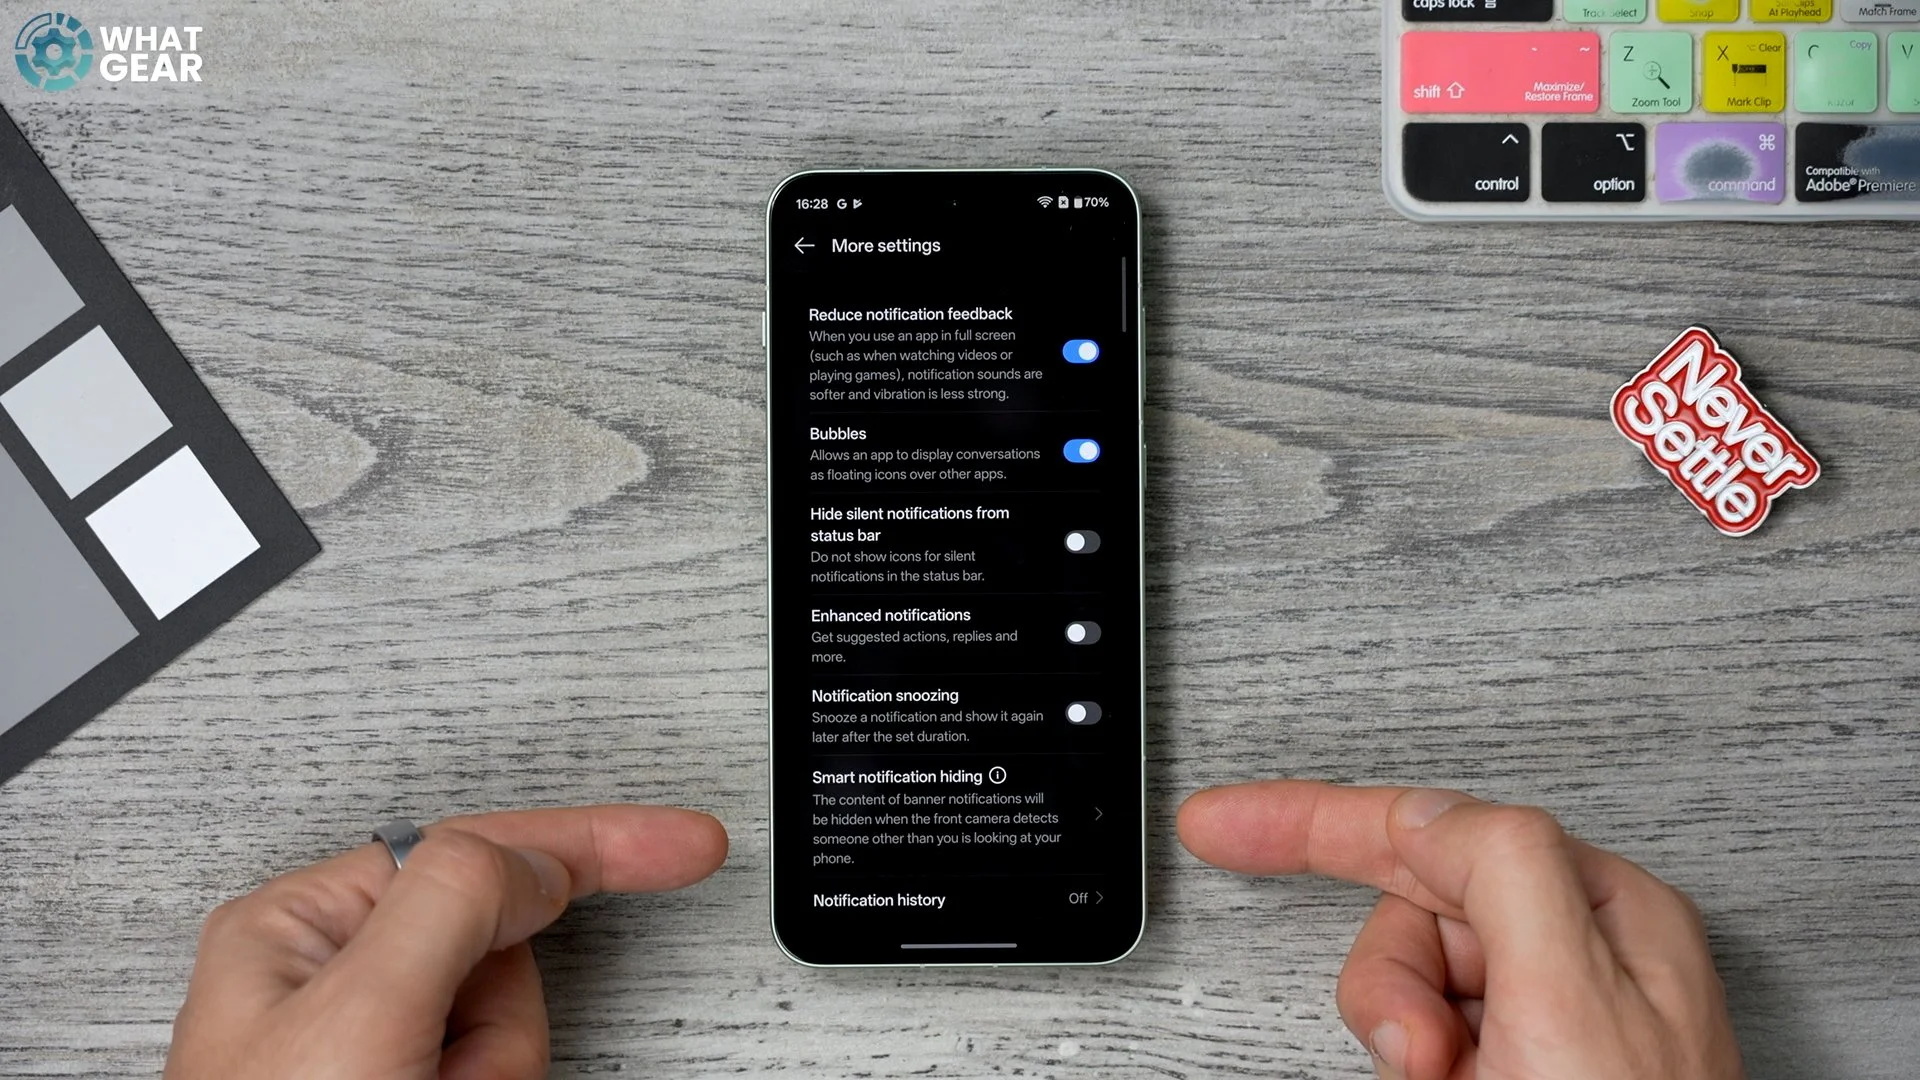
For this to work, you need face unlock enrolled. If you’re wondering why I didn’t set face unlock up straight away: I prefer fingerprint unlock, since 2D face unlock isn’t as secure. But face unlock is useful here because this feature blocks notifications from showing when someone else is looking at your screen, not you.
PHONE IMPROVEMENTS
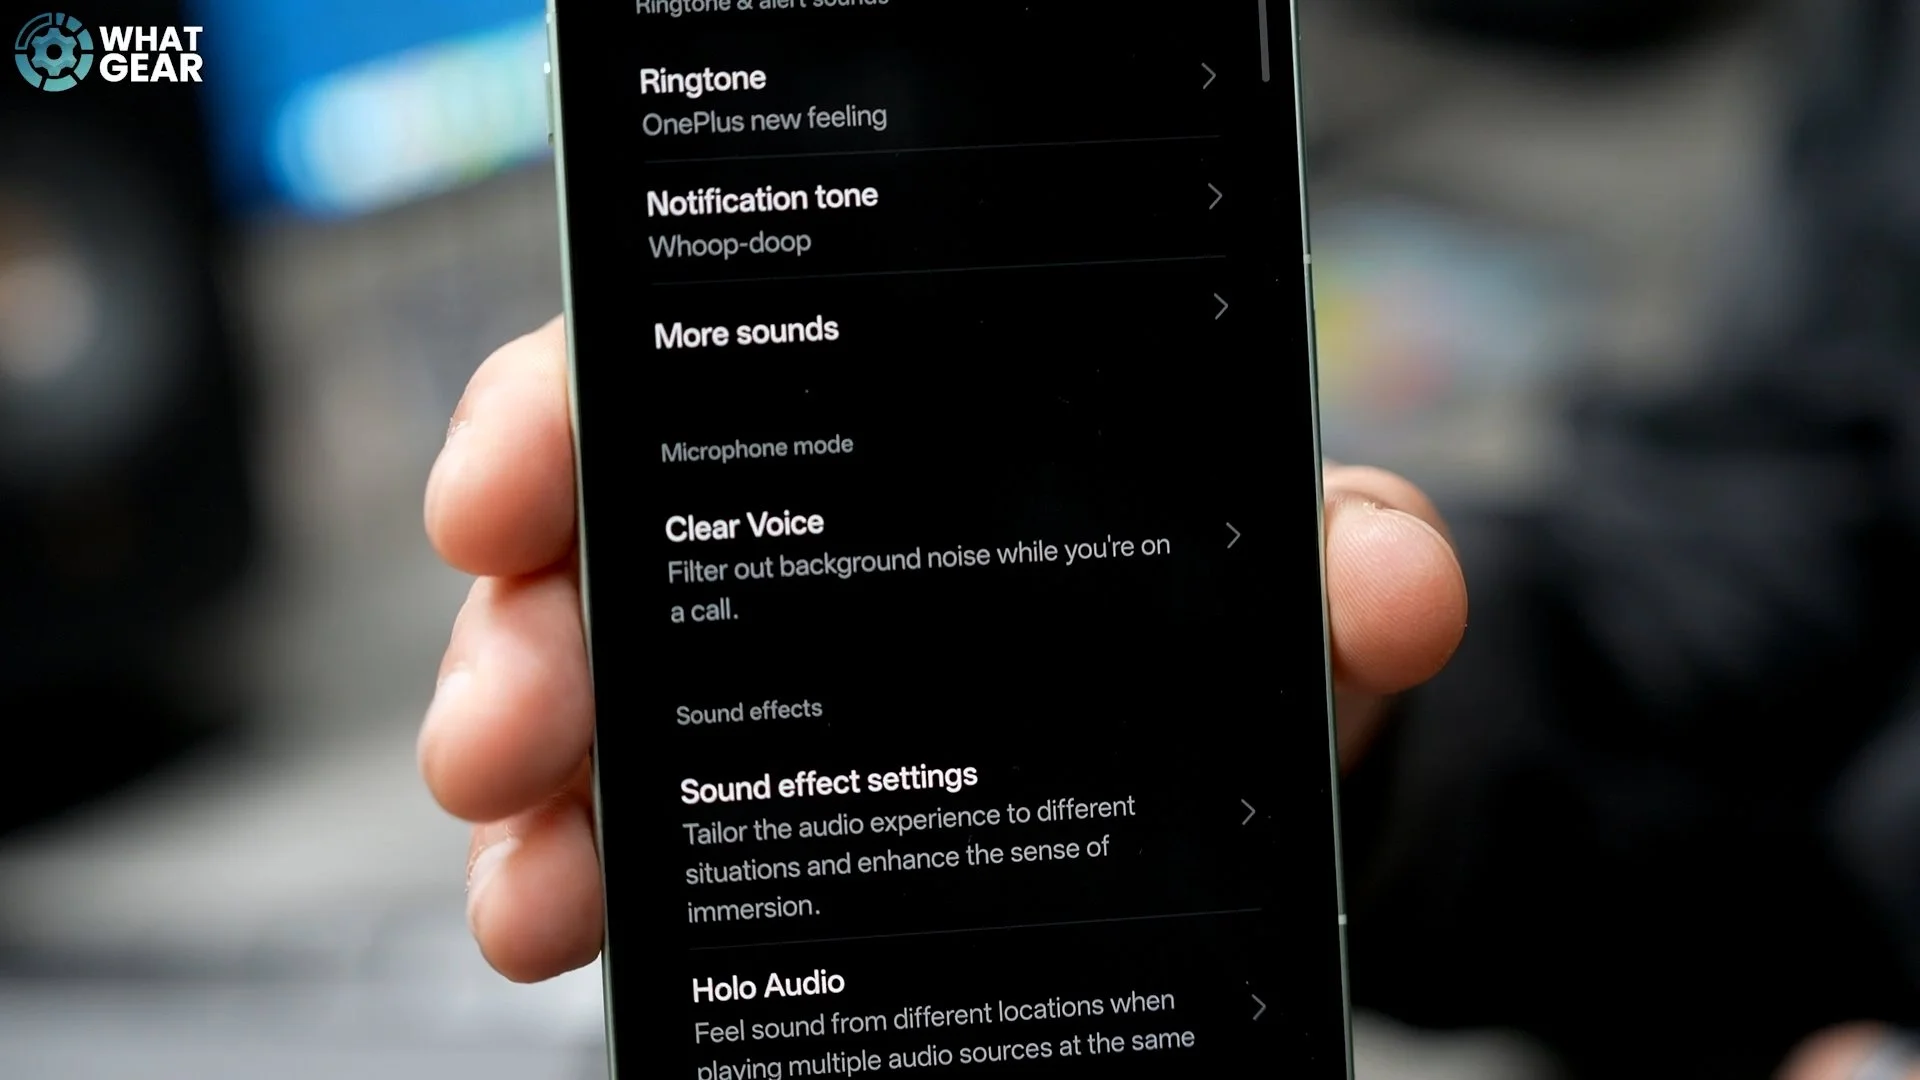
The next few settings improve daily usability. Let’s start with better phone calls. Go to Settings → Sound & Vibration. Scroll down and find Clear Voice. Enable it. This uses AI to cancel background noise during calls. If you ever take calls in busy places with road noise and people talking, this is perfect.
THE + KEY
Now let’s talk about one of the unique OnePlus features: the Plus Key. Go into Settings, scroll down, and open the dedicated Plus Key settings. If you didn’t like mapping the double power button press to the camera, you can map the Plus Key to open the camera instead — and you can even choose which camera mode it opens. But personally, I really like the Mind Space feature. If you’re not familiar with it, it’s like a screenshot on steroids. When you’re researching something across websites, press the Mind Space button, and the screen highlights like this. You’ll see a little dynamic island-style element appear for Mind Space. When you open Mind Space, it creates an AI summary of what you captured, plus a shortcut back to the exact place you grabbed it from.
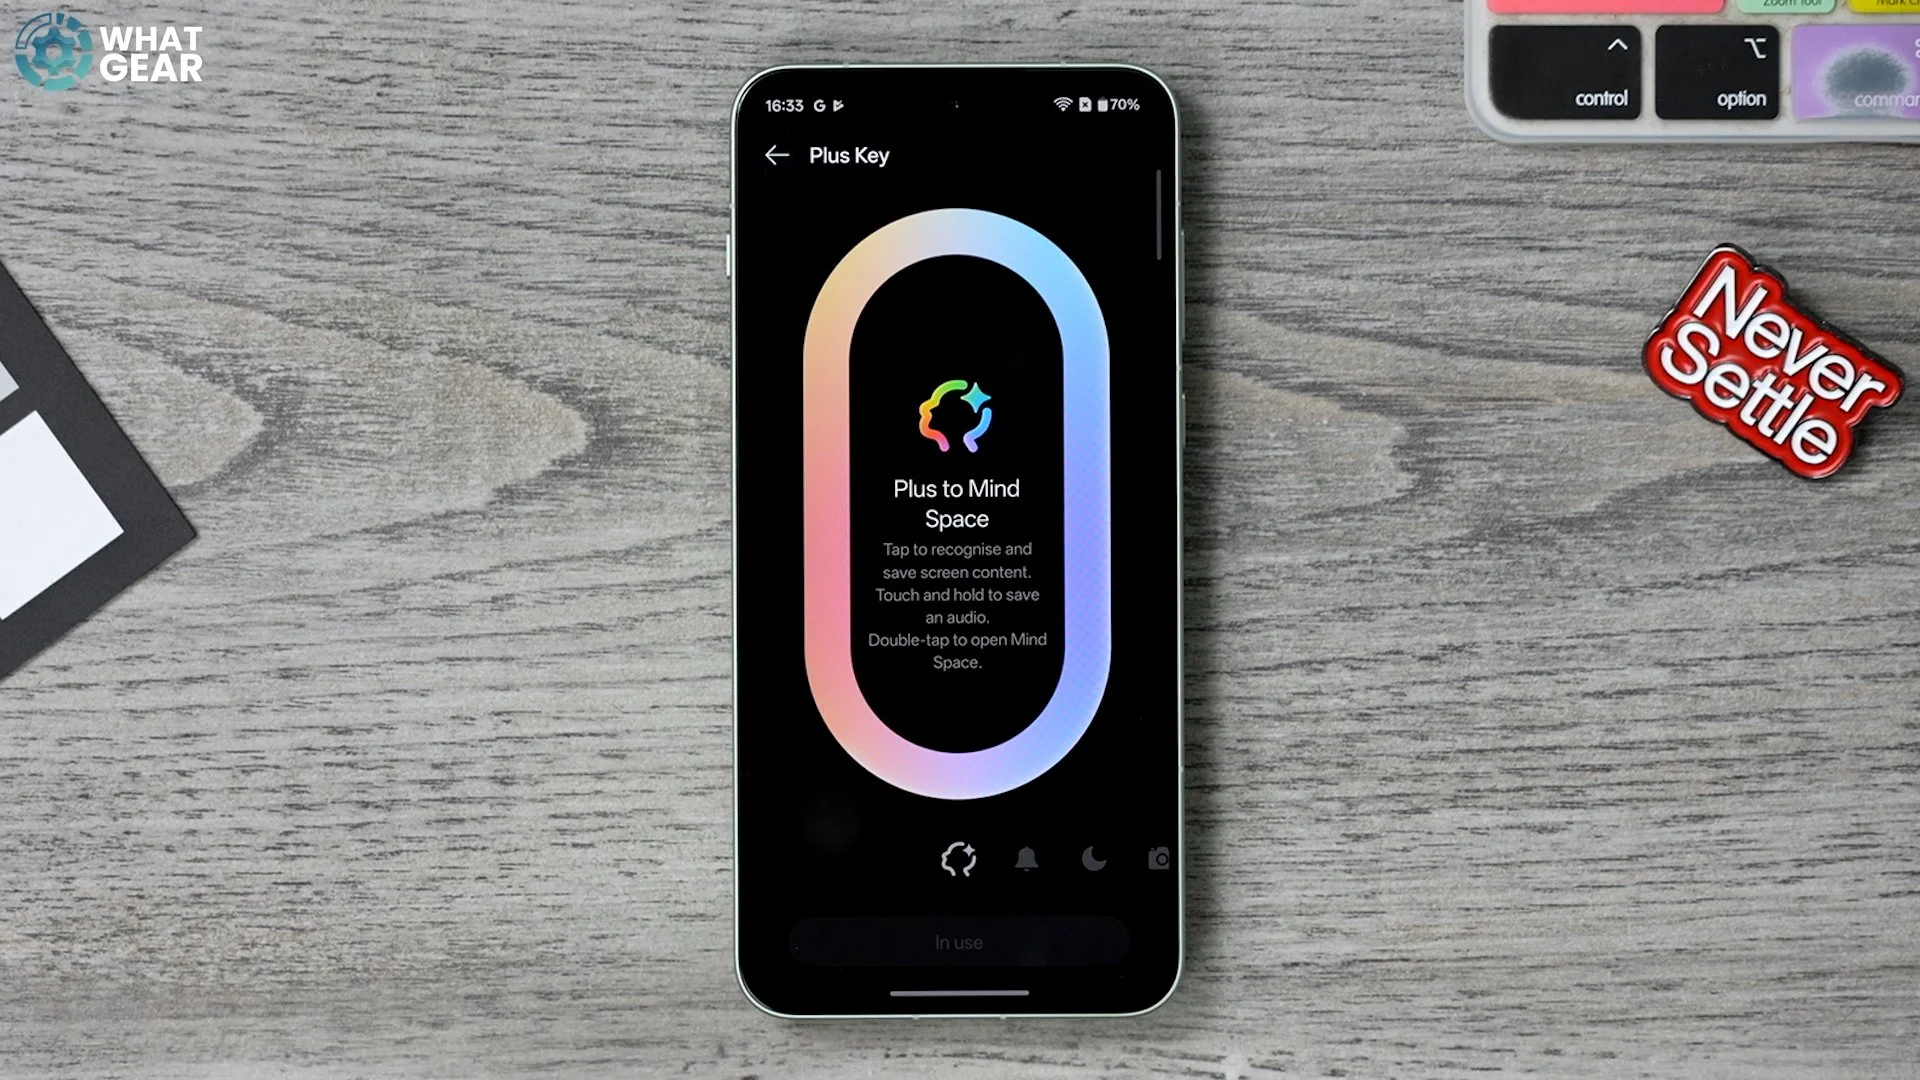
Another reason I like keeping it as Mind Space: when you hold the button, it activates a voice recorder. As the screen captures, it creates an AI summary of what you said, plus context like when you recorded it. In my opinion, this is an incredible research tool baked right into the phone. And if you’ve collected lots of research in Mind Space, you can even tap Ask questions, and the onboard AI helps clarify, organize, and streamline what you’ve saved.
FIND THINGS QUICKER
Here’s another AI feature that’s switched off on day one and should be turned on. Go to Settings, scroll down to the dedicated AI menu, and at the top, you’ll see AI search. Tap it, and you’ll notice it’s switched off. Switch it on. Underneath, you can choose what it has access to — and Settings access is super handy.
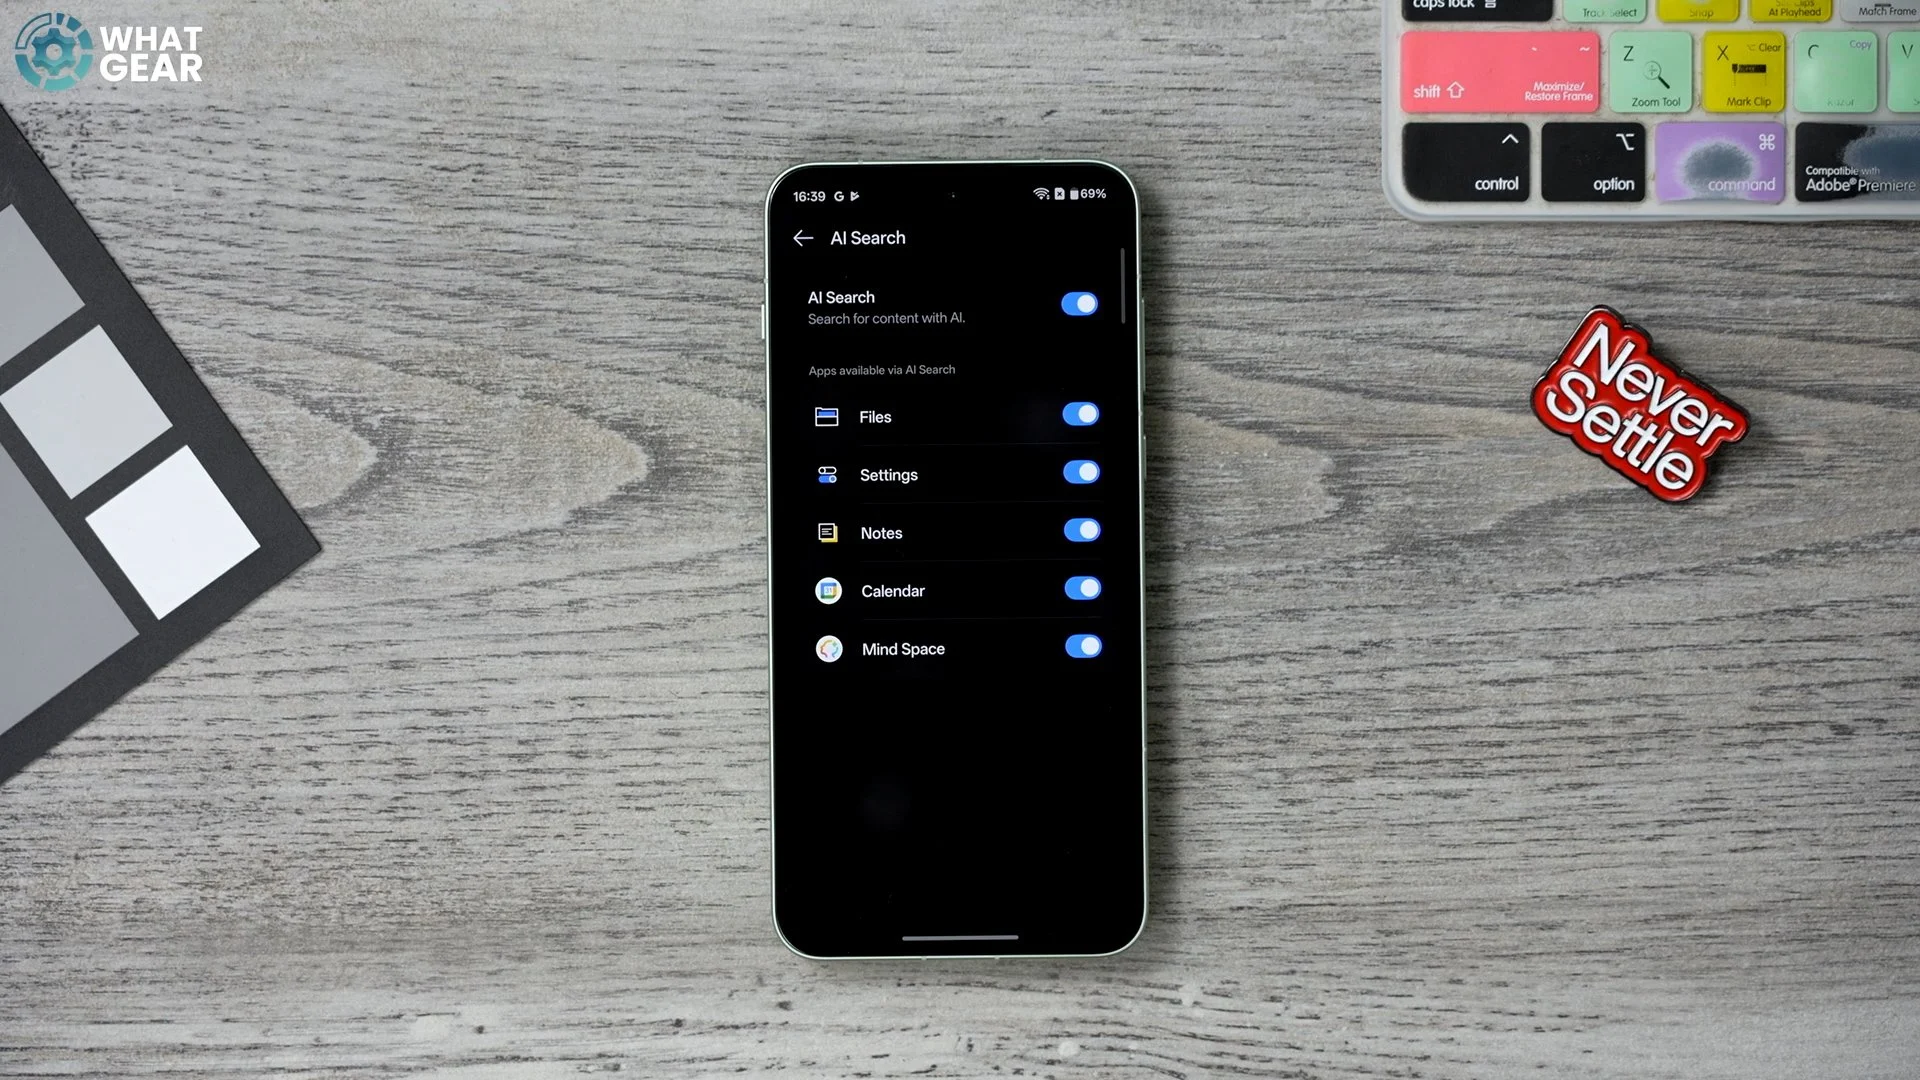
With this active, when you tap the search bar above the dock, it can search the entire device: files, Mind Space, and more. It’s especially useful for quickly changing settings. For example, if you want Light mode but can’t be bothered finding it, just search for it — and it takes you directly to the right settings page.
FOR SPORTS FANS
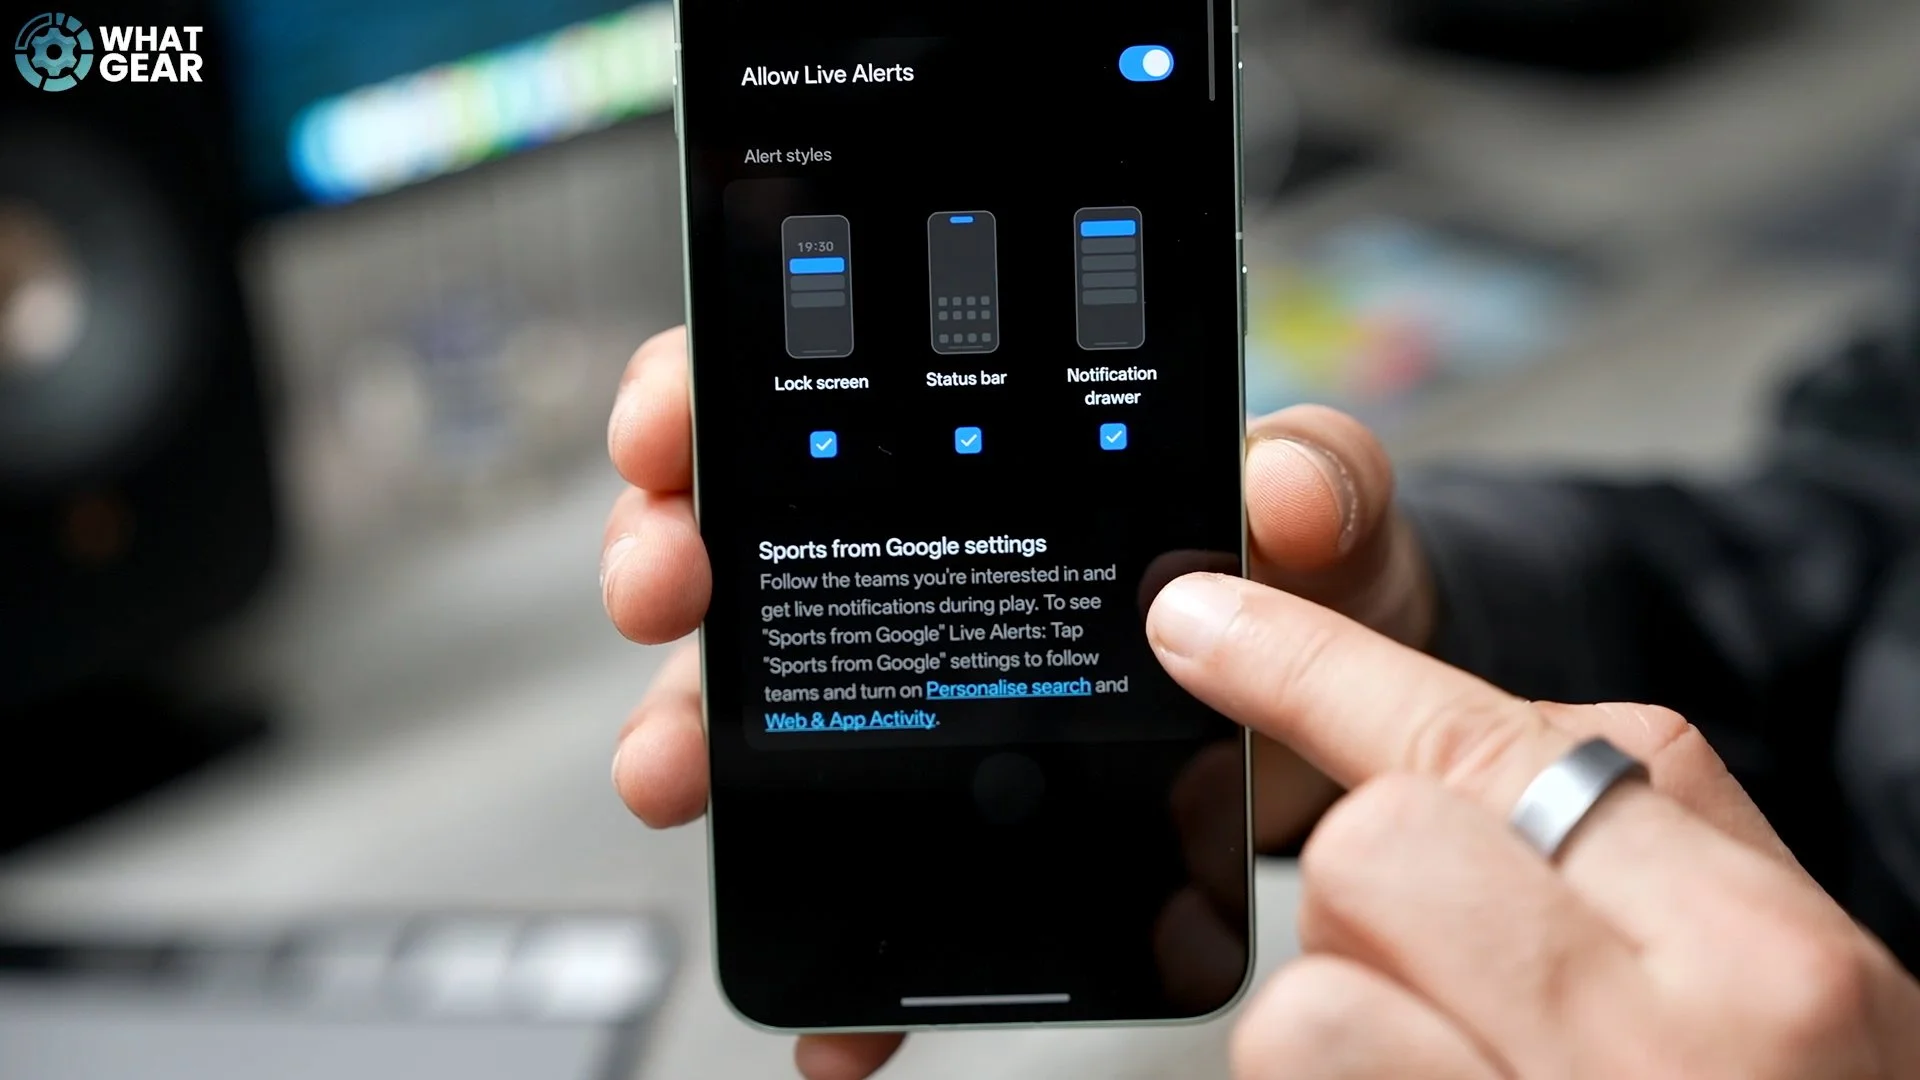
This one is for sports fans. Go to Settings → Accessibility & convenience → Live Alerts. Find Sports from Google. Tap it — but here’s the trick: tap the small arrow on the right, not the text. That takes you to Google Sports, where you can follow your favourite teams. Once you follow them, you’ll get live alerts in the dynamic island area at the top when games are happening.
ENHANCE YOUR PHONE
This next setting is one of the most hidden, and it’s off by default. Most people never find it. Go to Settings → System & update. You can check updates here, but what you want is the recommended services. Scroll down, and you’ll likely see Enhanced intelligence services switched off. Turn it on.
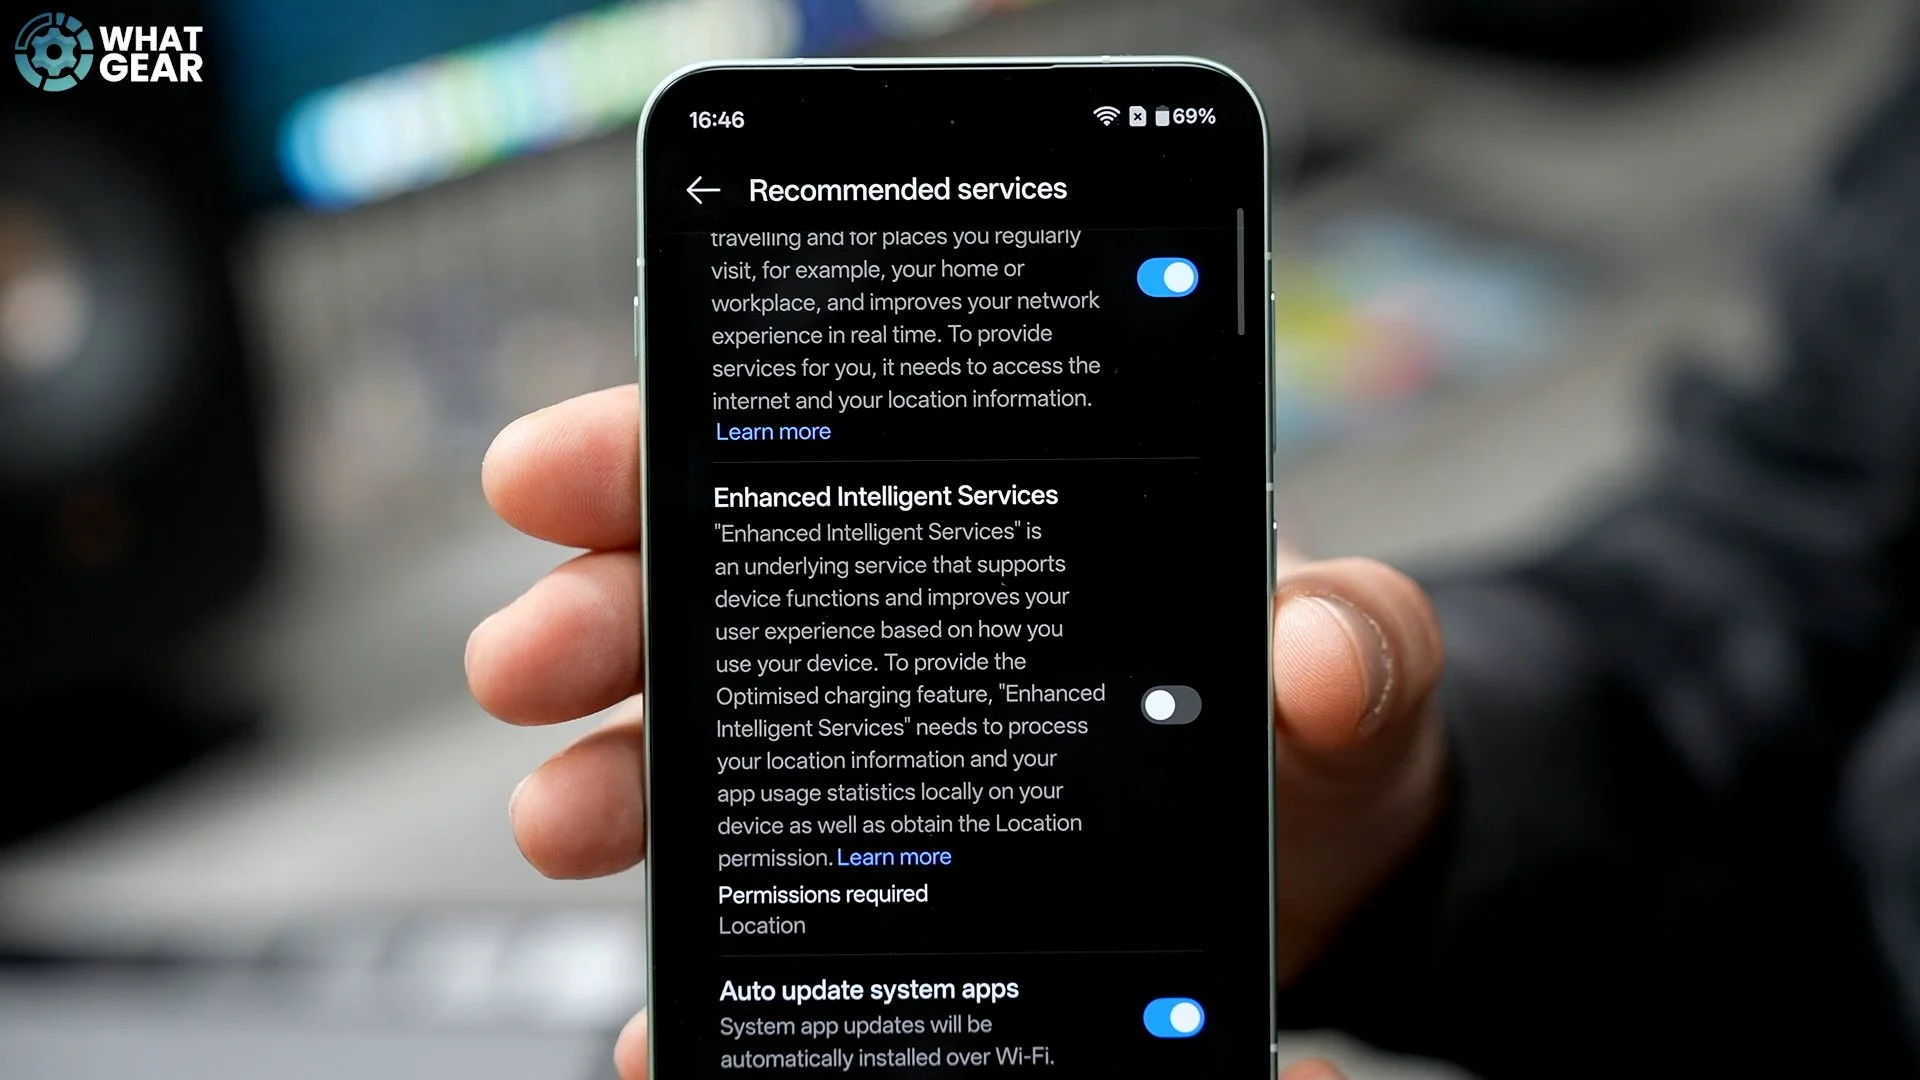
Even though we enabled smart charging and battery protection, this goes a level deeper. Your device learns how you use it over time — even based on location — and tailors performance to your usage. Most people probably didn’t even know this existed, but now you do.